
User Guide
Page 4
n4 N Troubleshooting ...118 Computer ...120 System Security ...126 Built-in MOTION EYE Camera...127 Internet ...130 Networking ...132 Optical Discs ...135 Display ...139 Printing ...140 Microphone ...141 Mouse ...142 Speakers ...143 Keyboard...144 Floppy Disks ...145 PC Cards ...146 Audio/Video...148 Memory Stick Media ...149 Peripherals ...150 Support Options ...151 Sony Support Information ...151 Program Support Information...155
n4 N Troubleshooting ...118 Computer ...120 System Security ...126 Built-in MOTION EYE Camera...127 Internet ...130 Networking ...132 Optical Discs ...135 Display ...139 Printing ...140 Microphone ...141 Mouse ...142 Speakers ...143 Keyboard...144 Floppy Disks ...145 PC Cards ...146 Audio/Video...148 Memory Stick Media ...149 Peripherals ...150 Support Options ...151 Sony Support Information ...151 Program Support Information...155

User Guide
Page 7
...upper arms hang naturally at your wrists in front of you should attempt to support the computer and other peripheral equipment. ❑ Position of your computer. Keep your forearms horizontal (2), with your computer - Excessive use of the following ergonomic considerations: n7 N Before Use ❑ Stable ...Have breaks during sessions with your sides. Use a stable work surface large enough to take account of the computer may strain muscles or tendons. Place the display directly in a neutral, comfortable position (3) while using the keyboard, pointing device, or external mouse.
...upper arms hang naturally at your wrists in front of you should attempt to support the computer and other peripheral equipment. ❑ Position of your computer. Keep your forearms horizontal (2), with your computer - Excessive use of the following ergonomic considerations: n7 N Before Use ❑ Stable ...Have breaks during sessions with your sides. Use a stable work surface large enough to take account of the computer may strain muscles or tendons. Place the display directly in a neutral, comfortable position (3) while using the keyboard, pointing device, or external mouse.

User Guide
Page 8
...Choose a location where windows and lights do not exert excessive pressure on your computer, especially on the center of the speaker grill, to your feet are flat on the display. Adjust the level of the display to avoid bright spots on the floor. You can reduce eye strain and ...muscle fatigue by adjusting the tilt of the chair so your comfort and work effectiveness. ❑ Ventilation - Adjust the brightness setting of the display - Use indirect lighting to the proper position. Make sure you more comfortable. A footrest may make you leave at least 4 inches (10 cm)...
...Choose a location where windows and lights do not exert excessive pressure on your computer, especially on the center of the speaker grill, to your feet are flat on the display. Adjust the level of the display to avoid bright spots on the floor. You can reduce eye strain and ...muscle fatigue by adjusting the tilt of the chair so your comfort and work effectiveness. ❑ Ventilation - Adjust the brightness setting of the display - Use indirect lighting to the proper position. Make sure you more comfortable. A footrest may make you leave at least 4 inches (10 cm)...
User Guide
Page 23
... Saving Modes (page 98). G Indicators (Battery): turns on while the AA batteries for the lower level of power consumption. I Applications key Displays a shortcut menu in place to indicate that the keyboard is in certain software applications. J Directional arrow keys Move the pointer on while connection ... on while in the Caps Lock state. (Scroll lock): Turns on while in the Scroll Lock state. (Connect): Turns on the computer screen. n 23 N Using Your VAIO Computer E Standby button Provides for the wireless keyboard are sufficient and switches to batteries wear out.
... Saving Modes (page 98). G Indicators (Battery): turns on while the AA batteries for the lower level of power consumption. I Applications key Displays a shortcut menu in place to indicate that the keyboard is in certain software applications. J Directional arrow keys Move the pointer on while connection ... on while in the Caps Lock state. (Scroll lock): Turns on while in the Scroll Lock state. (Connect): Turns on the computer screen. n 23 N Using Your VAIO Computer E Standby button Provides for the wireless keyboard are sufficient and switches to batteries wear out.

User Guide
Page 28
... Wireless Mouse The wireless optical mouse has no cables to enable communication between the computer and the wireless mouse. This will help you save battery power. Press the...button Press to plug in and uses a light-emitting diode (LED) instead of power. D Power switch Slide the switch to display a context-sensitive shortcut menu (not always an active function). F Battery indicator Blinks when the mouse batteries are running out of ... the right button once to turn the mouse on and off. n 28 N Using Your VAIO Computer Using the Mouse A wireless mouse is available only with your...
... Wireless Mouse The wireless optical mouse has no cables to enable communication between the computer and the wireless mouse. This will help you save battery power. Press the...button Press to plug in and uses a light-emitting diode (LED) instead of power. D Power switch Slide the switch to display a context-sensitive shortcut menu (not always an active function). F Battery indicator Blinks when the mouse batteries are running out of ... the right button once to turn the mouse on and off. n 28 N Using Your VAIO Computer Using the Mouse A wireless mouse is available only with your...

User Guide
Page 36
n 36 N Using Your VAIO Computer ✍ In Sleep mode, inserting a disc will automatically launch Windows and may display a window for selecting your preferred software program to use an external optical disc drive, connect the drive before you launch any preinstalled CD/DVD program. If you plan to launch or may automatically launch a preinstalled CD/DVD program.
n 36 N Using Your VAIO Computer ✍ In Sleep mode, inserting a disc will automatically launch Windows and may display a window for selecting your preferred software program to use an external optical disc drive, connect the drive before you launch any preinstalled CD/DVD program. If you plan to launch or may automatically launch a preinstalled CD/DVD program.

User Guide
Page 40
VAIO computers may not support movie playback on packaged media recorded in MPEG2 format only. Unless your external display is capable of reading 8cm discs with the supplied 8cm disc adapter. Video recording to be implemented for Movies and BD-ROM contents. ...-ray Discs continually, you cannot play or view the contents of the disc do not match, playback is not supported. n 40 N Using Your VAIO Computer ✍ 8cm disc writing is not possible. Note that digital HDCPcompliant environment be standard definition or prohibit analog video output at high bit rates. If...
VAIO computers may not support movie playback on packaged media recorded in MPEG2 format only. Unless your external display is capable of reading 8cm discs with the supplied 8cm disc adapter. Video recording to be implemented for Movies and BD-ROM contents. ...-ray Discs continually, you cannot play or view the contents of the disc do not match, playback is not supported. n 40 N Using Your VAIO Computer ✍ 8cm disc writing is not possible. Note that digital HDCPcompliant environment be standard definition or prohibit analog video output at high bit rates. If...

User Guide
Page 46
n 46 N Using Your VAIO Computer Setting Up TV Connections The best method of connecting your computer system, TV monitor or display, and cable service access, depends on service availability in your area as well as the type of cable connection available in your home. One end connects to the computer's VHF/UHF port, and the other end...
n 46 N Using Your VAIO Computer Setting Up TV Connections The best method of connecting your computer system, TV monitor or display, and cable service access, depends on service availability in your area as well as the type of cable connection available in your home. One end connects to the computer's VHF/UHF port, and the other end...
User Guide
Page 53
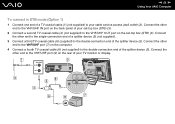
Connect the other end to the VHF/UHF port (7) on the computer. 4 Connect a fourth TV coaxial cable (8) (not supplied) to the double-connection end of the splitter device (5). Connect the other end to the VHF/UHF port (9) ... coaxial cable (6) (supplied) to the double-connection end of the splitter device (5). n 53 N Using Your VAIO Computer To connect in STB mode (Option 1) 1 Connect one end of a TV coaxial cable (1) (not supplied) to your TV monitor or display. Connect the other end to the VHF/UHF IN port on the back panel of your...
Connect the other end to the VHF/UHF port (7) on the computer. 4 Connect a fourth TV coaxial cable (8) (not supplied) to the double-connection end of the splitter device (5). Connect the other end to the VHF/UHF port (9) ... coaxial cable (6) (supplied) to the double-connection end of the splitter device (5). n 53 N Using Your VAIO Computer To connect in STB mode (Option 1) 1 Connect one end of a TV coaxial cable (1) (not supplied) to your TV monitor or display. Connect the other end to the VHF/UHF IN port on the back panel of your...

User Guide
Page 54
...back panel of the set -top box (STB) (3). Connect the other end to the VHF/UHF port (5) on the rear of your TV monitor or display. 3 Connect one end of a stereo A/V dubbing cable with triple RCA jacks (6) (not supplied), to the Composite Audio Out (L/ R) jacks (7) and the Video Out jack... your cable service access (wall outlet) (2). Connect the other end to the VIDEO INPUT (S VIDEO) port (13) on the computer. n 54 N Using Your VAIO Computer To connect in STB mode (Option 2) 1 Connect one end of your set-top box (STB) (3). 2 Connect a second TV coaxial cable (4) (not supplied) to the VHF/UHF...
...back panel of the set -top box (STB) (3). Connect the other end to the VHF/UHF port (5) on the rear of your TV monitor or display. 3 Connect one end of a stereo A/V dubbing cable with triple RCA jacks (6) (not supplied), to the Composite Audio Out (L/ R) jacks (7) and the Video Out jack... your cable service access (wall outlet) (2). Connect the other end to the VIDEO INPUT (S VIDEO) port (13) on the computer. n 54 N Using Your VAIO Computer To connect in STB mode (Option 2) 1 Connect one end of your set-top box (STB) (3). 2 Connect a second TV coaxial cable (4) (not supplied) to the VHF/UHF...

User Guide
Page 95
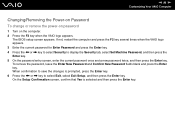
... the computer and press the F2 key several times when the VAIO logo appears. 3 Press the < or , key to select Security to select Exit, select Exit Setup, and then press the Enter key. Press the space bar to change the setting from Disabled to Enabled. 7 Press the < or , key to display the...(including spaces) long. 5 At the confirmation prompt, press the Enter key. ✍ The following is selected and then press the Enter key. n 95 N Customizing Your VAIO Computer To add the power-on password 1 Turn on or display the BIOS setup screen. 6 Select Password when Power On under Security.
... the computer and press the F2 key several times when the VAIO logo appears. 3 Press the < or , key to select Security to select Exit, select Exit Setup, and then press the Enter key. Press the space bar to change the setting from Disabled to Enabled. 7 Press the < or , key to display the...(including spaces) long. 5 At the confirmation prompt, press the Enter key. ✍ The following is selected and then press the Enter key. n 95 N Customizing Your VAIO Computer To add the power-on password 1 Turn on or display the BIOS setup screen. 6 Select Password when Power On under Security.
User Guide
Page 96
... 6 Press the < or , key to select Exit, select Exit Setup, and then press the Enter key. If not, restart the computer and press the F2 key several times when the VAIO logo appears. 3 Enter the current password for Enter Password and press the Enter key. 4 Press the < or , key to select Security... to save the changes is selected and then press the Enter key. When confirmation to display the Security tab, select Set Machine ...
... 6 Press the < or , key to select Exit, select Exit Setup, and then press the Enter key. If not, restart the computer and press the F2 key several times when the VAIO logo appears. 3 Enter the current password for Enter Password and press the Enter key. 4 Press the < or , key to select Security... to save the changes is selected and then press the Enter key. When confirmation to display the Security tab, select Set Machine ...
User Guide
Page 99
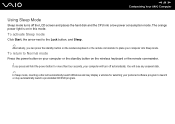
... hold the power button for more than four seconds, your computer will automatically launch Windows and may display a window for selecting your preferred software program to Normal mode Press the power button on your computer into a low power consumption mode. n 99 N Customizing Your VAIO Computer Using Sleep Mode Sleep mode turns off automatically. The orange...
... hold the power button for more than four seconds, your computer will automatically launch Windows and may display a window for selecting your preferred software program to Normal mode Press the power button on your computer into a low power consumption mode. n 99 N Customizing Your VAIO Computer Using Sleep Mode Sleep mode turns off automatically. The orange...

User Guide
Page 109
...dry cloth to prevent residual images. ❑ The LCD screen becomes warm during operation. This could cause a malfunction. ❑ Using your computer near a window. ❑ Do not scratch the LCD screen or exert pressure on the LCD screen. The residual image disappears in low ... a while. When the computer returns to normal temperature, the screen returns to normal. ❑ A residual image may appear on the LCD screen. This could damage the screen. Be careful when using high-precision technology. This is displayed for a long period of the manufacturing process and does...
...dry cloth to prevent residual images. ❑ The LCD screen becomes warm during operation. This could cause a malfunction. ❑ Using your computer near a window. ❑ Do not scratch the LCD screen or exert pressure on the LCD screen. The residual image disappears in low ... a while. When the computer returns to normal temperature, the screen returns to normal. ❑ A residual image may appear on the LCD screen. This could damage the screen. Be careful when using high-precision technology. This is displayed for a long period of the manufacturing process and does...
User Guide
Page 118
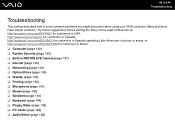
... American countries or areas, or http://esupport.sony.com/ES/VAIO/BR/ for customers in Brazil. ❑ Computer (page 120) ❑ System Security (page 126) ❑ Built-in MOTION EYE Camera (page 127) ❑ Internet (page 130) ❑ Networking (page 132) ❑ Optical Discs (page 135) ❑ Display (page 139) ❑ Printing (page 140...
... American countries or areas, or http://esupport.sony.com/ES/VAIO/BR/ for customers in Brazil. ❑ Computer (page 120) ❑ System Security (page 126) ❑ Built-in MOTION EYE Camera (page 127) ❑ Internet (page 130) ❑ Networking (page 132) ❑ Optical Discs (page 135) ❑ Display (page 139) ❑ Printing (page 140...
User Guide
Page 125
... Turn on the computer. 2 Press the F2 key when the VAIO logo appears. The BIOS setup screen appears. On the screen that is displayed after step 3 above, select VAIO Animation Logo or Show VAIO Animation Logo and press the Enter key to the computer? If not, restart the computer and press the ...F2 key several times when the VAIO logo appears. 3 Press the < or , key to...
... Turn on the computer. 2 Press the F2 key when the VAIO logo appears. The BIOS setup screen appears. On the screen that is displayed after step 3 above, select VAIO Animation Logo or Show VAIO Animation Logo and press the Enter key to the computer? If not, restart the computer and press the ...F2 key several times when the VAIO logo appears. 3 Press the < or , key to...
User Guide
Page 127
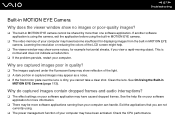
...before using . ❑ The power management function of your computer may have been activated. See On Using the Built-in MOTION EYE camera. ❑ The video memory of your computer may have become insufficient for displaying images from the built-in MOTION EYE camera. Lowering the ...help file on your computer can handle. Exit the applications that you view a rapid-moving object. See the help . ❑ The viewer window may show some noises, for more information. ❑ There may be shared by more software applications running than one software application. Why...
...before using . ❑ The power management function of your computer may have been activated. See On Using the Built-in MOTION EYE camera. ❑ The video memory of your computer may have become insufficient for displaying images from the built-in MOTION EYE camera. Lowering the ...help file on your computer can handle. Exit the applications that you view a rapid-moving object. See the help . ❑ The viewer window may show some noises, for more information. ❑ There may be shared by more software applications running than one software application. Why...
User Guide
Page 139
... the Color scheme options on the wireless keyboard or the remote commander to selected models only. n 139 N Troubleshooting Display Why did my computer screen go blank if the computer has entered Sleep mode. If the computer is on . Make sure the power indicator shows the power is in Sleep mode, press the power button...
... the Color scheme options on the wireless keyboard or the remote commander to selected models only. n 139 N Troubleshooting Display Why did my computer screen go blank if the computer has entered Sleep mode. If the computer is on . Make sure the power indicator shows the power is in Sleep mode, press the power button...
User Guide
Page 146
...(page 63) for more information. Follow these steps: 1 Click Start and Control Panel. 2 Click System and Maintenance. 3 Click System. 4 Click Device Manager on your computer. ❑ See the manual that came with your PC Card, which worked normally before, does not work ? ❑ Make sure the PC Card is compatible...system installed on the left pane. n 146 N Troubleshooting PC Cards What should I do if my PC Card does not work , you are not using a Sony PC Card. ❑ If your PC Card for more information. ❑ Make sure the PC Card is inserted properly. You may need to...
...(page 63) for more information. Follow these steps: 1 Click Start and Control Panel. 2 Click System and Maintenance. 3 Click System. 4 Click Device Manager on your computer. ❑ See the manual that came with your PC Card, which worked normally before, does not work ? ❑ Make sure the PC Card is compatible...system installed on the left pane. n 146 N Troubleshooting PC Cards What should I do if my PC Card does not work , you are not using a Sony PC Card. ❑ If your PC Card for more information. ❑ Make sure the PC Card is inserted properly. You may need to...
User Guide
Page 153
... do not find the information you are looking for at the lower right corner of the display on the notebook, and in the same place on the front panel of the CPU on the desktop. 2 Your computer's serial number You can find it on the back or bottom of the notebook or on... is causing you may call Sony directly. the serial number is the last 7 digits of the number below the barcode. 3 The operating system on the back of the problem In order to receive the fastest and most efficient services, please have the following information readily available: 1 Your VAIO computer model You can find...
... do not find the information you are looking for at the lower right corner of the display on the notebook, and in the same place on the front panel of the CPU on the desktop. 2 Your computer's serial number You can find it on the back or bottom of the notebook or on... is causing you may call Sony directly. the serial number is the last 7 digits of the number below the barcode. 3 The operating system on the back of the problem In order to receive the fastest and most efficient services, please have the following information readily available: 1 Your VAIO computer model You can find...

