User Guide
Page 2
... 16 Setting Up Your Computer 17 Shutting Down Your Computer Safely 20 Using the Power Saving Mode 21 Updating Your Computer 23 Using Your VAIO Computer 24 Using the Keyboard 25 Using the Built-in Camera 27 Using the Optical Disc Drive 28 Using "Memory Stick 35 Using Other... 61 Setting the Password 62 Using the VAIO Control Center 67 Upgrading Your VAIO Computer 68 Adding and Removing Memory 69 Precautions 75 Safety Information 76 Care and Maintenance Information 77 Handling Your Computer 78 Handling the LCD Screen 80 Using the Power Source 81 Handling the Built-in Camera 82...
... 16 Setting Up Your Computer 17 Shutting Down Your Computer Safely 20 Using the Power Saving Mode 21 Updating Your Computer 23 Using Your VAIO Computer 24 Using the Keyboard 25 Using the Built-in Camera 27 Using the Optical Disc Drive 28 Using "Memory Stick 35 Using Other... 61 Setting the Password 62 Using the VAIO Control Center 67 Upgrading Your VAIO Computer 68 Adding and Removing Memory 69 Precautions 75 Safety Information 76 Care and Maintenance Information 77 Handling Your Computer 78 Handling the LCD Screen 80 Using the Power Source 81 Handling the Built-in Camera 82...
User Guide
Page 4
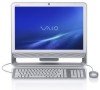
...10065; For customers in USA http://esupport.sony.com/EN/VAIO/ ❑ For customers in Canada http://sony.ca/support/ ❑ For customers in Spanish-speaking Latin American countries or areas http://esupport.sony.com/ES/VAIO/LA ❑ For customers in this Sony VAIO® computer, and welcome to provide a..., and supplied items may look slightly different from those of your computer. External views illustrated in Brazil http://esupport.sony.com/BR/ Before Use > n4 N Before Use Congratulations on your purchase of this manual may not be available on -screen User Guide.
...10065; For customers in USA http://esupport.sony.com/EN/VAIO/ ❑ For customers in Canada http://sony.ca/support/ ❑ For customers in Spanish-speaking Latin American countries or areas http://esupport.sony.com/ES/VAIO/LA ❑ For customers in this Sony VAIO® computer, and welcome to provide a..., and supplied items may look slightly different from those of your computer. External views illustrated in Brazil http://esupport.sony.com/BR/ Before Use > n4 N Before Use Congratulations on your purchase of this manual may not be available on -screen User Guide.
User Guide
Page 5
...your VAIO computer with Internet and wireless setup, security setup, personalizing your VAIO computer. 1. Use my VAIO Access interactive help with VAIO Care, system restore, backup and recovery, and contact Sony support. Software Information Troubleshoot my VAIO Maintain and troubleshoot your VAIO computer...10065; Safety Information - On-screen Documentation ❑ Help and Support - Get started with my VAIO Get help in storage device to the original factory settings - VAIO Recovery Center User Guide - Information about your VAIO computer, and creating recovery discs...
...your VAIO computer with Internet and wireless setup, security setup, personalizing your VAIO computer. 1. Use my VAIO Access interactive help with VAIO Care, system restore, backup and recovery, and contact Sony support. Software Information Troubleshoot my VAIO Maintain and troubleshoot your VAIO computer...10065; Safety Information - On-screen Documentation ❑ Help and Support - Get started with my VAIO Get help in storage device to the original factory settings - VAIO Recovery Center User Guide - Information about your VAIO computer, and creating recovery discs...
User Guide
Page 6
..., GPS, and wireless WAN functions. Features and options may be included with the preinstalled software programs on your computer. Before Use > Finding More about Your VAIO Computer n6 N ❑ Program help menu on -screen guide: 1 Click Start, All Programs, and SmartWi Connection Utility. 2 Click SmartWi Connection Utility Help.
..., GPS, and wireless WAN functions. Features and options may be included with the preinstalled software programs on your computer. Before Use > Finding More about Your VAIO Computer n6 N ❑ Program help menu on -screen guide: 1 Click Start, All Programs, and SmartWi Connection Utility. 2 Click SmartWi Connection Utility Help.
User Guide
Page 12
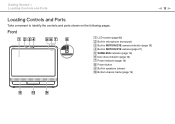
Getting Started > Locating Controls and Ports n 12 N Locating Controls and Ports Take a moment to identify the controls and ports shown on the following pages. Front A LCD screen (page 80) B Built-in microphone (monaural) C Built-in MOTION EYE camera indicator (page 16) D Built-in MOTION EYE camera (page 27) E WIRELESS indicator (page 16) F Disc drive indicator (page 16) G Power indicator (page 16) H Power button I Built-in speakers (stereo) J Bottom chassis frame (page 76)
Getting Started > Locating Controls and Ports n 12 N Locating Controls and Ports Take a moment to identify the controls and ports shown on the following pages. Front A LCD screen (page 80) B Built-in microphone (monaural) C Built-in MOTION EYE camera indicator (page 16) D Built-in MOTION EYE camera (page 27) E WIRELESS indicator (page 16) F Disc drive indicator (page 16) G Power indicator (page 16) H Power button I Built-in speakers (stereo) J Bottom chassis frame (page 76)

User Guide
Page 21
... the Power Saving Mode In addition to use . Mode Normal mode Sleep mode Description This is the normal state of time. Turn off the LCD screen and places the built-in use it for a long period of your computer is in this mode. The green power indicator light is lit while...
... the Power Saving Mode In addition to use . Mode Normal mode Sleep mode Description This is the normal state of time. Turn off the LCD screen and places the built-in use it for a long period of your computer is in this mode. The green power indicator light is lit while...
User Guide
Page 23
Getting Started > Updating Your Computer n 23 N Updating Your Computer Be sure to install the latest updates on your computer with the following software applications so that the computer can run more efficiently. ❑ Windows Update Click Start, All Programs, and Windows Update and then follow the on-screen instructions. ❑ VAIO Update 4 Click Start, All Programs, VAIO Update 4, and Go to download the updates. Your computer must be connected to the Internet to VAIO Web Support and then follow the on-screen instructions. !
Getting Started > Updating Your Computer n 23 N Updating Your Computer Be sure to install the latest updates on your computer with the following software applications so that the computer can run more efficiently. ❑ Windows Update Click Start, All Programs, and Windows Update and then follow the on-screen instructions. ❑ VAIO Update 4 Click Start, All Programs, VAIO Update 4, and Go to download the updates. Your computer must be connected to the Internet to VAIO Web Support and then follow the on-screen instructions. !
User Guide
Page 25
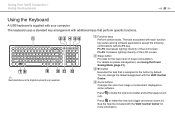
...that is the English keyboard as an example. Fn+F5: Decreases lighting intensity of the LCD screen. For details on some software. You can change the default assignment with the VAIO Control Center for the lower level of an image or a document displayed on power management, ...Using the Power Saving Mode (page 21). D Zoom buttons Changes the size of power consumption. See the help file included with the VAIO Control Center. B Sleep button Provides for more information. The task associated with each function key varies among software applications except the following ...
...that is the English keyboard as an example. Fn+F5: Decreases lighting intensity of the LCD screen. For details on some software. You can change the default assignment with the VAIO Control Center for the lower level of an image or a document displayed on power management, ...Using the Power Saving Mode (page 21). D Zoom buttons Changes the size of power consumption. See the help file included with the VAIO Control Center. B Sleep button Provides for more information. The task associated with each function key varies among software applications except the following ...
User Guide
Page 26
... Ejects the optical disc drive tray when used in conjunction with the Fn key. J Directional arrow keys Move the pointer on and off. Using Your VAIO Computer > Using the Keyboard n 26 N E Muting button Turns the volume on the computer screen. F Volume control buttons Increase (+) or decrease (-) the volume.
... Ejects the optical disc drive tray when used in conjunction with the Fn key. J Directional arrow keys Move the pointer on and off. Using Your VAIO Computer > Using the Keyboard n 26 N E Muting button Turns the volume on the computer screen. F Volume control buttons Increase (+) or decrease (-) the volume.

User Guide
Page 39
n 39 N Using Your VAIO Computer > Using "Memory Stick" 6 Click Start. 7 Follow the on the media type. It may take time to format "Memory Stick" depending on -screen instructions. !
n 39 N Using Your VAIO Computer > Using "Memory Stick" 6 Click Start. 7 Follow the on the media type. It may take time to format "Memory Stick" depending on -screen instructions. !
User Guide
Page 47
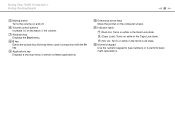
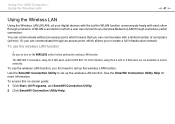
... you can communicate through a network. See the SmartWi Connection Utility Help for more information. To access this on ad-hoc networks. Using Your VAIO Computer > Using the Wireless LAN n 47 N Using the Wireless LAN Using the Wireless LAN (WLAN), all your digital devices with the built....11a standard, using the 5 GHz band, and the IEEE 802.11n draft standard, using the 2.4 GHz or 5 GHz band, are not available on -screen guide: 1 Click Start, All Programs, and SmartWi Connection Utility. 2 Click SmartWi Connection Utility Help. A WLAN is a network in WLAN function communicate freely ...
... you can communicate through a network. See the SmartWi Connection Utility Help for more information. To access this on ad-hoc networks. Using Your VAIO Computer > Using the Wireless LAN n 47 N Using the Wireless LAN Using the Wireless LAN (WLAN), all your digital devices with the built....11a standard, using the 5 GHz band, and the IEEE 802.11n draft standard, using the 2.4 GHz or 5 GHz band, are not available on -screen guide: 1 Click Start, All Programs, and SmartWi Connection Utility. 2 Click SmartWi Connection Utility Help. A WLAN is a network in WLAN function communicate freely ...
User Guide
Page 50
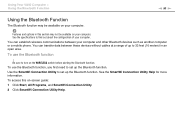
... Bluetooth function. To use the Bluetooth function ! Be sure to 33 feet (10 meters) in this on-screen guide: 1 Click Start, All Programs, and SmartWi Connection Utility. 2 Click SmartWi Connection Utility Help. Using Your VAIO Computer > Using the Bluetooth Function n 50 N Using the Bluetooth Function The Bluetooth function may not be available...
... Bluetooth function. To use the Bluetooth function ! Be sure to 33 feet (10 meters) in this on-screen guide: 1 Click Start, All Programs, and SmartWi Connection Utility. 2 Click SmartWi Connection Utility Help. Using Your VAIO Computer > Using the Bluetooth Function n 50 N Using the Bluetooth Function The Bluetooth function may not be available...

User Guide
Page 62
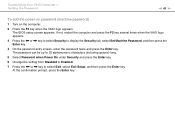
...user password. The machine password is provided for changing some of the power-on password and need to be sent in the BIOS setup screen, as well as starting the computer. Write down your computer from unauthorized access. To set the user password, you to protect your ...access. Adding the Power-on Password The power-on password allows you must first set the password. Customizing Your VAIO Computer > Setting the Password n 62 N Setting the Password Use one of the BIOS functions to set the machine password. ! Once you have set the power-on the computer to...
...user password. The machine password is provided for changing some of the power-on password and need to be sent in the BIOS setup screen, as well as starting the computer. Write down your computer from unauthorized access. To set the user password, you to protect your ...access. Adding the Power-on Password The power-on password allows you must first set the password. Customizing Your VAIO Computer > Setting the Password n 62 N Setting the Password Use one of the BIOS functions to set the machine password. ! Once you have set the power-on the computer to...
User Guide
Page 63
...Security tab, select Set Machine Password, and then press the Enter key. 4 On the password entry screen, enter the password twice and press the Enter key. If not, restart the computer and press the F2 key... several times when the VAIO logo appears. 3 Press the < or , key to select Security to select Exit, select Exit ..., and then press the Enter key. At the confirmation prompt, press the Enter key. Customizing Your VAIO Computer > Setting the Password n 63 N To add the power-on password (machine password) 1 Turn on the computer...
...Security tab, select Set Machine Password, and then press the Enter key. 4 On the password entry screen, enter the password twice and press the Enter key. If not, restart the computer and press the F2 key... several times when the VAIO logo appears. 3 Press the < or , key to select Security to select Exit, select Exit ..., and then press the Enter key. At the confirmation prompt, press the Enter key. Customizing Your VAIO Computer > Setting the Password n 63 N To add the power-on password (machine password) 1 Turn on the computer...
User Guide
Page 64
... spaces) long. 6 Press the < or , key to display the Security tab, select Set User Password, and then press the Enter key. 5 On the password entry screen, enter the password twice and press the Enter key. If not, restart the computer and press the F2 key several times when the... VAIO logo appears. 3 Enter the machine password and press the Enter key. 4 Press the < or , key to select Security to select Exit, select Exit Setup, and ...
... spaces) long. 6 Press the < or , key to display the Security tab, select Set User Password, and then press the Enter key. 5 On the password entry screen, enter the password twice and press the Enter key. If not, restart the computer and press the F2 key several times when the... VAIO logo appears. 3 Enter the machine password and press the Enter key. 4 Press the < or , key to select Security to select Exit, select Exit Setup, and ...

User Guide
Page 65
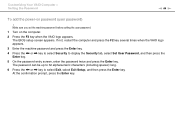
... Press the < or , key to display the Security tab, select Set Machine Password, and then press the Enter key. 5 On the password entry screen, enter the current password once and a new password twice, and then press the Enter key. At the confirmation prompt, press the Enter key. Customizing ...Your VAIO Computer > Setting the Password n 65 N Changing/Removing the Power-on Password To change or remove the power-on password (machine password) 1 Turn on...
... Press the < or , key to display the Security tab, select Set Machine Password, and then press the Enter key. 5 On the password entry screen, enter the current password once and a new password twice, and then press the Enter key. At the confirmation prompt, press the Enter key. Customizing ...Your VAIO Computer > Setting the Password n 65 N Changing/Removing the Power-on Password To change or remove the power-on password (machine password) 1 Turn on...
User Guide
Page 66
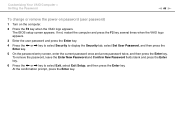
... Press the < or , key to display the Security tab, select Set User Password, and then press the Enter key. 5 On the password entry screen, enter the current password once and a new password twice, and then press the Enter key. At the confirmation prompt, press the Enter key. Customizing ...Your VAIO Computer > Setting the Password n 66 N To change or remove the power-on password (user password) 1 Turn on the computer. 2 Press the F2 key when the VAIO logo appears. The BIOS setup screen appears.
... Press the < or , key to display the Security tab, select Set User Password, and then press the Enter key. 5 On the password entry screen, enter the current password once and a new password twice, and then press the Enter key. At the confirmation prompt, press the Enter key. Customizing ...Your VAIO Computer > Setting the Password n 66 N To change or remove the power-on password (user password) 1 Turn on the computer. 2 Press the F2 key when the VAIO logo appears. The BIOS setup screen appears.
User Guide
Page 71
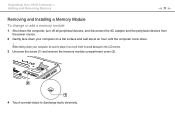
When facing down . ! Upgrading Your VAIO Computer > Adding and Removing Memory n 71 N Removing and Installing a Memory Module To change or add a memory module 1 Shut down the computer, turn off all peripheral ... wait about an hour until the computer cools down your computer, be sure to place it on a soft cloth to avoid damage to the LCD screen. 3 Unscrew the screw (1) and remove the memory module compartment cover (2). 4 Touch a metal object to discharge static electricity.
When facing down . ! Upgrading Your VAIO Computer > Adding and Removing Memory n 71 N Removing and Installing a Memory Module To change or add a memory module 1 Shut down the computer, turn off all peripheral ... wait about an hour until the computer cools down your computer, be sure to place it on a soft cloth to avoid damage to the LCD screen. 3 Unscrew the screw (1) and remove the memory module compartment cover (2). 4 Touch a metal object to discharge static electricity.
User Guide
Page 75
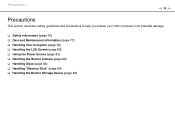
Precautions > n 75 N Precautions This section describes safety guidelines and precautions to help you protect your VAIO computer from potential damage. ❑ Safety Information (page 76) ❑ Care and Maintenance Information (page 77) ❑ Handling Your Computer (page 78) ❑ Handling the LCD Screen (page 80) ❑ Using the Power Source (page 81) ❑ Handling the Built-in Camera (page 82) ❑ Handling Discs (page 83) ❑ Handling "Memory Stick" (page 84) ❑ Handling the Built-in Storage Device (page 85)
Precautions > n 75 N Precautions This section describes safety guidelines and precautions to help you protect your VAIO computer from potential damage. ❑ Safety Information (page 76) ❑ Care and Maintenance Information (page 77) ❑ Handling Your Computer (page 78) ❑ Handling the LCD Screen (page 80) ❑ Using the Power Source (page 81) ❑ Handling the Built-in Camera (page 82) ❑ Handling Discs (page 83) ❑ Handling "Memory Stick" (page 84) ❑ Handling the Built-in Storage Device (page 85)
User Guide
Page 77
..., as it is sensitive to pressure. Do not use any remaining moisture with a dry soft cloth. LCD Screen Use a soft, dry cloth to wipe the surface of the LCD screen. Rubbing the surface could damage the screen. Do not rub the cover, as these may cause damage to the disc. ❑ For normal...
..., as it is sensitive to pressure. Do not use any remaining moisture with a dry soft cloth. LCD Screen Use a soft, dry cloth to wipe the surface of the LCD screen. Rubbing the surface could damage the screen. Do not rub the cover, as these may cause damage to the disc. ❑ For normal...


