User Guide
Page 2
...Setting Up Your Computer 17 Shutting Down Your Computer Safely 20 Using the Power Saving Mode 21 Updating Your Computer 23 Using Your VAIO Computer 24 Using the Keyboard 25 Using the Built-in Camera 27 Using the Optical Disc Drive 28 Using "Memory Stick 35 ... Speakers or Headphones ..........56 Connecting a USB Device 57 Connecting an i.LINK Device 59 Customizing Your VAIO Computer 61 Setting the Password 62 Using the VAIO Control Center 67 Upgrading Your VAIO Computer 68 Adding and Removing Memory 69 Precautions 75 Safety Information 76 Care and Maintenance Information 77...
...Setting Up Your Computer 17 Shutting Down Your Computer Safely 20 Using the Power Saving Mode 21 Updating Your Computer 23 Using Your VAIO Computer 24 Using the Keyboard 25 Using the Built-in Camera 27 Using the Optical Disc Drive 28 Using "Memory Stick 35 ... Speakers or Headphones ..........56 Connecting a USB Device 57 Connecting an i.LINK Device 59 Customizing Your VAIO Computer 61 Setting the Password 62 Using the VAIO Control Center 67 Upgrading Your VAIO Computer 68 Adding and Removing Memory 69 Precautions 75 Safety Information 76 Care and Maintenance Information 77...

User Guide
Page 3
Troubleshooting 86 Computer 88 System Security 93 Built-in Camera 94 Networking 96 Bluetooth Technology 99 Optical Discs 102 Display 106 Printing 108 Microphone 109 Mouse 110 Speakers 111 Keyboard 112 Floppy Disks 113 Audio/Video 114 "Memory Stick 117 Peripherals 118 Trademarks 119 Notice 121 n3 N
Troubleshooting 86 Computer 88 System Security 93 Built-in Camera 94 Networking 96 Bluetooth Technology 99 Optical Discs 102 Display 106 Printing 108 Microphone 109 Mouse 110 Speakers 111 Keyboard 112 Floppy Disks 113 Audio/Video 114 "Memory Stick 117 Peripherals 118 Trademarks 119 Notice 121 n3 N
User Guide
Page 4
... find out about the configuration of your computer, visit the Sony online support web site at the following URLs: ❑ For customers in USA http://esupport.sony.com/EN/VAIO/ ❑ For customers in Canada http://sony.ca/support/ ❑ For customers in Spanish-speaking Latin ...Use > n4 N Before Use Congratulations on your purchase of this manual may not be available on -screen User Guide. Sony has combined leading-edge technology in this Sony VAIO® computer, and welcome to provide a state-of-the-art personal computing experience. ! External views illustrated in audio, ...
... find out about the configuration of your computer, visit the Sony online support web site at the following URLs: ❑ For customers in USA http://esupport.sony.com/EN/VAIO/ ❑ For customers in Canada http://sony.ca/support/ ❑ For customers in Spanish-speaking Latin ...Use > n4 N Before Use Congratulations on your purchase of this manual may not be available on -screen User Guide. Sony has combined leading-edge technology in this Sony VAIO® computer, and welcome to provide a state-of-the-art personal computing experience. ! External views illustrated in audio, ...
User Guide
Page 5
... the following categories to find useful documentation such as below: - VAIO User Guide (This manual) - On-screen Documentation ❑ Help and Support - Use my VAIO Access interactive help with VAIO Care, system restore, backup and recovery, and contact Sony support. Software Information Troubleshoot my VAIO Maintain and troubleshoot your entire built-in the form of...
... the following categories to find useful documentation such as below: - VAIO User Guide (This manual) - On-screen Documentation ❑ Help and Support - Use my VAIO Access interactive help with VAIO Care, system restore, backup and recovery, and contact Sony support. Software Information Troubleshoot my VAIO Maintain and troubleshoot your entire built-in the form of...
User Guide
Page 6
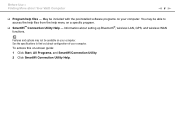
Features and options may be able to find out about configuration of your computer. To access this on your computer. Information about Your VAIO Computer n6 N ❑ Program help menu on your computer. May be available on -screen guide: 1 Click Start, All Programs, and SmartWi Connection Utility. 2 Click SmartWi ...
Features and options may be able to find out about configuration of your computer. To access this on your computer. Information about Your VAIO Computer n6 N ❑ Program help menu on your computer. May be available on -screen guide: 1 Click Start, All Programs, and SmartWi Connection Utility. 2 Click SmartWi ...
User Guide
Page 7
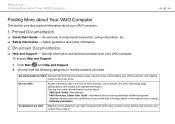
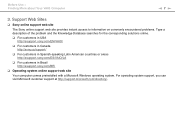
...Microsoft customer support at http://support.microsoft.com/directory/. Before Use > Finding More about Your VAIO Computer n7 N 3. Support Web Sites ❑ Sony online support web site The Sony online support web site provides instant access to information on commonly encountered problems. Type a description... the Knowledge Database searches for the corresponding solutions online. ❑ For customers in USA http://esupport.sony.com/EN/VAIO/ ❑ For customers in Canada http://sony.ca/support/ ❑ For customers in Spanish-speaking Latin American countries or areas http://esupport...
...Microsoft customer support at http://support.microsoft.com/directory/. Before Use > Finding More about Your VAIO Computer n7 N 3. Support Web Sites ❑ Sony online support web site The Sony online support web site provides instant access to information on commonly encountered problems. Type a description... the Knowledge Database searches for the corresponding solutions online. ❑ For customers in USA http://esupport.sony.com/EN/VAIO/ ❑ For customers in Canada http://sony.ca/support/ ❑ For customers in Spanish-speaking Latin American countries or areas http://esupport...
User Guide
Page 8
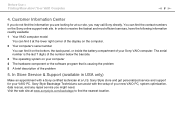
... n8 N 4. You can find the information you are looking for your Sony VAIO computer. The serial number is causing the problem 5 A brief description of your VAIO PC. Sony Style store and get personalized service and support for at the lower right corner of your computer 4 The hardware ...'s serial number You can find the nearest location. In order to find the contact numbers on your new VAIO PC, system optimization, data rescue, and any repair service you may call Sony directly. In Store Service & Support (available in USA only) Make an appointment with the setup of the...
... n8 N 4. You can find the information you are looking for your Sony VAIO computer. The serial number is causing the problem 5 A brief description of your VAIO PC. Sony Style store and get personalized service and support for at the lower right corner of your computer 4 The hardware ...'s serial number You can find the nearest location. In order to find the contact numbers on your new VAIO PC, system optimization, data rescue, and any repair service you may call Sony directly. In Store Service & Support (available in USA only) Make an appointment with the setup of the...

User Guide
Page 9
Take frequent breaks while using the keyboard or the pointing device. Keep your computer - Adjust the level of the chair so your sides. A footrest may strain eyes, muscles, or tendons. ❑ Furniture and posture - Let your upper arms hang naturally at your feet are flat on the floor. Excessive use of the computer may make you should attempt to take account of the following ergonomic considerations: n9 N ❑ Position of you. Sit in a neutral, comfortable position while using your wrists in a relaxed, upright posture and avoid slouching forward or leaning far ...
Take frequent breaks while using the keyboard or the pointing device. Keep your computer - Adjust the level of the chair so your sides. A footrest may strain eyes, muscles, or tendons. ❑ Furniture and posture - Let your upper arms hang naturally at your feet are flat on the floor. Excessive use of the computer may make you should attempt to take account of the following ergonomic considerations: n9 N ❑ Position of you. Sit in a neutral, comfortable position while using your wrists in a relaxed, upright posture and avoid slouching forward or leaning far ...

User Guide
Page 10
Use the display's tilting feature to the proper position. Use indirect lighting to eliminate a risk of the main unit. Choose a location where windows and lights do not exert excessive pressure on each side of mechanical damage. ❑ Lighting - While adjusting the viewing angle, do not cause glare and reflection on the display. Make sure you leave at least 4 inches (10 cm) of space behind and at least 8 inches (20 cm) of space on your comfort and work efficiency. ❑ Ventilation - Adjust the brightness level of the display - Proper lighting adds to your ...
Use the display's tilting feature to the proper position. Use indirect lighting to eliminate a risk of the main unit. Choose a location where windows and lights do not exert excessive pressure on each side of mechanical damage. ❑ Lighting - While adjusting the viewing angle, do not cause glare and reflection on the display. Make sure you leave at least 4 inches (10 cm) of space behind and at least 8 inches (20 cm) of space on your comfort and work efficiency. ❑ Ventilation - Adjust the brightness level of the display - Proper lighting adds to your ...
User Guide
Page 11
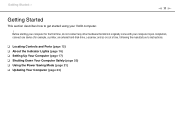
... 21) ❑ Updating Your Computer (page 23) Getting Started > n 11 N Getting Started This section describes how to get started using your computer. Upon completion, connect one device (for the first time, do not connect any other hardware that did not originally come with your...
... 21) ❑ Updating Your Computer (page 23) Getting Started > n 11 N Getting Started This section describes how to get started using your computer. Upon completion, connect one device (for the first time, do not connect any other hardware that did not originally come with your...
User Guide
Page 12
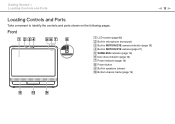
Front A LCD screen (page 80) B Built-in microphone (monaural) C Built-in MOTION EYE camera indicator (page 16) D Built-in MOTION EYE camera (page 27) E WIRELESS indicator (page 16) F Disc drive indicator (page 16) G Power indicator (page 16) H Power button I Built-in speakers (stereo) J Bottom chassis frame (page 76) Getting Started > Locating Controls and Ports n 12 N Locating Controls and Ports Take a moment to identify the controls and ports shown on the following pages.
Front A LCD screen (page 80) B Built-in microphone (monaural) C Built-in MOTION EYE camera indicator (page 16) D Built-in MOTION EYE camera (page 27) E WIRELESS indicator (page 16) F Disc drive indicator (page 16) G Power indicator (page 16) H Power button I Built-in speakers (stereo) J Bottom chassis frame (page 76) Getting Started > Locating Controls and Ports n 12 N Locating Controls and Ports Take a moment to identify the controls and ports shown on the following pages.

User Guide
Page 13
The area around the air vent (1) becomes hot while your computer is on. speeds. ! Be sure to wait until the computer cools down before you touch it. Getting Started > Locating Controls and Ports Back n 13 N A Air vent B Cable clamps (page 17), (page 18) C Prop-up stand (page 76) D DC IN port (page 18) E Network (LAN) port (page 46) F Hi-Speed USB (USB 2.0) ports* (page 57) G OPTICAL OUT port (page 56) (Output Sampling Rate: 44.1 KHz/48.0 KHz/96.0 KHz) H i.LINK 4-pin (S400) port (page 59) I Memory module compartment cover (page 69) * Support high-/full-/low-
The area around the air vent (1) becomes hot while your computer is on. speeds. ! Be sure to wait until the computer cools down before you touch it. Getting Started > Locating Controls and Ports Back n 13 N A Air vent B Cable clamps (page 17), (page 18) C Prop-up stand (page 76) D DC IN port (page 18) E Network (LAN) port (page 46) F Hi-Speed USB (USB 2.0) ports* (page 57) G OPTICAL OUT port (page 56) (Output Sampling Rate: 44.1 KHz/48.0 KHz/96.0 KHz) H i.LINK 4-pin (S400) port (page 59) I Memory module compartment cover (page 69) * Support high-/full-/low-
User Guide
Page 14
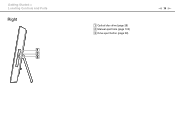
Getting Started > Locating Controls and Ports Right A Optical disc drive (page 28) B Manual eject hole (page 102) C Drive eject button (page 28) n 14 N
Getting Started > Locating Controls and Ports Right A Optical disc drive (page 28) B Manual eject hole (page 102) C Drive eject button (page 28) n 14 N
User Guide
Page 15
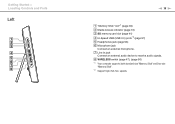
speeds. G Line In jack Connect an external audio device to receive audio signals. Getting Started > Locating Controls and Ports Left n 15 N A "Memory Stick" slot*1 (page 35) B Media Access indicator (page 16) C SD memory card slot (page 41) D Hi-Speed USB (USB 2.0) ports*2 (page 57) E Headphones jack (page 56) F Microphone jack Connect an external microphone. H WIRELESS switch (page 47), (page 50) *1 Your computer supports both standard-size "Memory Stick" and Duo-size "Memory Stick". *2 Support high-/full-/low-
speeds. G Line In jack Connect an external audio device to receive audio signals. Getting Started > Locating Controls and Ports Left n 15 N A "Memory Stick" slot*1 (page 35) B Media Access indicator (page 16) C SD memory card slot (page 41) D Hi-Speed USB (USB 2.0) ports*2 (page 57) E Headphones jack (page 56) F Microphone jack Connect an external microphone. H WIRELESS switch (page 47), (page 50) *1 Your computer supports both standard-size "Memory Stick" and Duo-size "Memory Stick". *2 Support high-/full-/low-
User Guide
Page 16
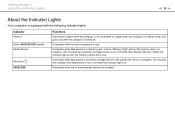
Do not place the computer into Sleep mode or turn it off . Illuminates while the built-in camera is lit. Illuminates while one or more wireless options are enabled. Getting Started > About the Indicator Lights n 16 N About the Indicator Lights Your computer is equipped with the following indicator ...
Do not place the computer into Sleep mode or turn it off . Illuminates while the built-in camera is lit. Illuminates while one or more wireless options are enabled. Getting Started > About the Indicator Lights n 16 N About the Indicator Lights Your computer is equipped with the following indicator ...

User Guide
Page 17
To connect the keyboard and the mouse 1 Plug the keyboard cable (1) and the mouse cable (2) to your desired USB ports (3) on the back of the computer. 2 Route the mouse cable (2) through the cable clamp (4) on the back of your computer. Getting Started > Setting Up Your Computer n 17 N Setting Up Your Computer Connecting the Keyboard and the Mouse A USB keyboard and a USB mouse are supplied with your computer.
To connect the keyboard and the mouse 1 Plug the keyboard cable (1) and the mouse cable (2) to your desired USB ports (3) on the back of the computer. 2 Route the mouse cable (2) through the cable clamp (4) on the back of your computer. Getting Started > Setting Up Your Computer n 17 N Setting Up Your Computer Connecting the Keyboard and the Mouse A USB keyboard and a USB mouse are supplied with your computer.

User Guide
Page 18
n 18 N Getting Started > Setting Up Your Computer Connecting a Power Source You need an AC adapter to connect your computer to an AC power source. ✍ Use only the supplied AC adapter for your computer. To connect the AC adapter 1 Plug one end of the power cord (1) into the AC adapter (3). 2 Plug the other end of the power cord into an AC outlet (2). 3 Plug the AC adapter cable (4) into the DC IN port (5). 4 Route the AC adapter cable through the cable clamp (6).
n 18 N Getting Started > Setting Up Your Computer Connecting a Power Source You need an AC adapter to connect your computer to an AC power source. ✍ Use only the supplied AC adapter for your computer. To connect the AC adapter 1 Plug one end of the power cord (1) into the AC adapter (3). 2 Plug the other end of the power cord into an AC outlet (2). 3 Plug the AC adapter cable (4) into the DC IN port (5). 4 Route the AC adapter cable through the cable clamp (6).

User Guide
Page 19
If you may lose all unsaved data. Make sure that the AC outlets are easily accessible. ! Getting Started > Setting Up Your Computer n 19 N ! The shape of the DC In plug varies depending on the AC adapter. ✍ To disconnect your computer while the computer is on or in Sleep mode, you unplug the AC adapter from your computer completely from AC power, turn off the computer and unplug the AC adapter.
If you may lose all unsaved data. Make sure that the AC outlets are easily accessible. ! Getting Started > Setting Up Your Computer n 19 N ! The shape of the DC In plug varies depending on the AC adapter. ✍ To disconnect your computer while the computer is on or in Sleep mode, you unplug the AC adapter from your computer completely from AC power, turn off the computer and unplug the AC adapter.

User Guide
Page 20
The power indicator light turns off any peripherals connected to the computer. 2 Click Start and the Shut down button. 3 Respond to any prompts warning you to save documents or to consider other users and wait for the computer to shut down your computer properly, as described below. Getting Started > Shutting Down Your Computer Safely n 20 N Shutting Down Your Computer Safely To avoid losing unsaved data, be sure to turn off automatically. To shut down your computer 1 Turn off .
The power indicator light turns off any peripherals connected to the computer. 2 Click Start and the Shut down button. 3 Respond to any prompts warning you to save documents or to consider other users and wait for the computer to shut down your computer properly, as described below. Getting Started > Shutting Down Your Computer Safely n 20 N Shutting Down Your Computer Safely To avoid losing unsaved data, be sure to turn off automatically. To shut down your computer 1 Turn off .

User Guide
Page 21
Mode Normal mode Sleep mode Description This is the normal state of your computer while it for a long period of time. Getting Started > Using the Power Saving Mode n 21 N Using the Power Saving Mode In addition to use . Sleep mode turns off your computer if you do not intend to the normal operating mode, your computer is in this mode. The green power indicator light is lit while the computer is in use it is in storage device(s) and the CPU into a low power consumption mode. Turn off the LCD screen and places the built-in this mode. The orange power indicator light ...
Mode Normal mode Sleep mode Description This is the normal state of your computer while it for a long period of time. Getting Started > Using the Power Saving Mode n 21 N Using the Power Saving Mode In addition to use . Sleep mode turns off your computer if you do not intend to the normal operating mode, your computer is in this mode. The green power indicator light is lit while the computer is in use it is in storage device(s) and the CPU into a low power consumption mode. Turn off the LCD screen and places the built-in this mode. The orange power indicator light ...