

Operating Instructions (primary manual)
Page 1
Record the serial number in the space provided below. Model No. CCD-TRV98 CCD-TRV49/TRV58/TRV68/TRV78/ TRV88/TRV98 ©2001 Sony Corporation Serial No. CCD-TRV Model No. Refer to these numbers whenever you call upon your Sony dealer regarding this manual thoroughly, and retain it for future reference. Owner's Record The model and serial numbers are located on the bottom. AC-L Serial No. 3-065-648-11 (3) Video Camera Recorder Operating Instructions Before operating the unit, please read this product.
Record the serial number in the space provided below. Model No. CCD-TRV98 CCD-TRV49/TRV58/TRV68/TRV78/ TRV88/TRV98 ©2001 Sony Corporation Serial No. CCD-TRV Model No. Refer to these numbers whenever you call upon your Sony dealer regarding this manual thoroughly, and retain it for future reference. Owner's Record The model and serial numbers are located on the bottom. AC-L Serial No. 3-065-648-11 (3) Video Camera Recorder Operating Instructions Before operating the unit, please read this product.

Operating Instructions (primary manual)
Page 2
...your authority to operate this equipment. WARNING To prevent fire or shock hazard, do not expose the unit to the presence of this manual could void your Handycam Vision, you can enjoy for years to use. Note: In some areas the disposal of electric shock to ... be of sufficient magnitude to persons. Welcome! Congratulations on your nearest Sony Service Center or Factory Service Center. Your Handycam Vision is loaded with superior picture and sound quality. For customers in this Sony Handycam VisionTM camcorder. LITHIUM ION BATTERY. This symbol is intended to alert the user ...
...your authority to operate this equipment. WARNING To prevent fire or shock hazard, do not expose the unit to the presence of this manual could void your Handycam Vision, you can enjoy for years to use. Note: In some areas the disposal of electric shock to ... be of sufficient magnitude to persons. Welcome! Congratulations on your nearest Sony Service Center or Factory Service Center. Your Handycam Vision is loaded with superior picture and sound quality. For customers in this Sony Handycam VisionTM camcorder. LITHIUM ION BATTERY. This symbol is intended to alert the user ...
Operating Instructions (primary manual)
Page 4
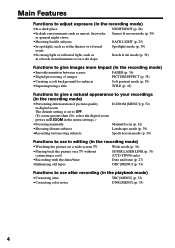
... set to OFF. (To zoom greater than 20×, select the digital zoom power in D ZOOM in the menu settings. ) D ZOOM [MENU] (p. 52) •Focusing manually Manual focus (p. 42) •Shooting distant subjects Landscape mode (p. 39) •Recording fast-moving subjects Sports lesson mode (p. 39) Functions to use in editing (in the...
... set to OFF. (To zoom greater than 20×, select the digital zoom power in D ZOOM in the menu settings. ) D ZOOM [MENU] (p. 52) •Focusing manually Manual focus (p. 42) •Shooting distant subjects Landscape mode (p. 39) •Recording fast-moving subjects Sports lesson mode (p. 39) Functions to use in editing (in the...
Operating Instructions (primary manual)
Page 5
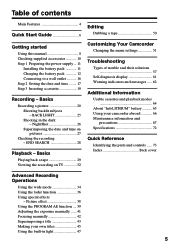
... 47 5 END SEARCH 28 Playback - NightShot 26 Superimposing the date and time on TV 32 Customizing Your Camcorder Changing the menu settings 51 Troubleshooting Types of contents Main Features 4 Quick Start Guide 6 Editing Dubbing a tape 50 Getting started ...built-in the dark - Picture effect 38 Using the PROGRAM AE function .... 39 Adjusting the exposure manually ...... 41 Focusing manually 42 Superimposing a title 43 Making your camcorder abroad 66 Maintenance information and precautions 67 Specifications 72 Quick Reference Identifying the parts and controls ...... ...
... 47 5 END SEARCH 28 Playback - NightShot 26 Superimposing the date and time on TV 32 Customizing Your Camcorder Changing the menu settings 51 Troubleshooting Types of contents Main Features 4 Quick Start Guide 6 Editing Dubbing a tape 50 Getting started ...built-in the dark - Picture effect 38 Using the PROGRAM AE function .... 39 Adjusting the exposure manually ...... 41 Focusing manually 42 Superimposing a title 43 Making your camcorder abroad 66 Maintenance information and precautions 67 Specifications 72 Quick Reference Identifying the parts and controls ...... ...

Operating Instructions (primary manual)
Page 8
..., you can hear a beep sound to indicate that the operation is being carried out. Before you read through this manual, buttons and settings on your camcorder are shown in this manual and operating your camcorder, check the model number by looking at the bottom of differences CCDRemote sensor Digital zoom SUPER LASER LINK SteadyShot... POWER switch to country. Not provided TRV49 z 450× - - e.g. z TRV78 z 560× - When you carry out an operation, you need an NTSC system-based TV. 8 z TRV88 - 560× - -
..., you can hear a beep sound to indicate that the operation is being carried out. Before you read through this manual, buttons and settings on your camcorder are shown in this manual and operating your camcorder, check the model number by looking at the bottom of differences CCDRemote sensor Digital zoom SUPER LASER LINK SteadyShot... POWER switch to country. Not provided TRV49 z 450× - - e.g. z TRV78 z 560× - When you carry out an operation, you need an NTSC system-based TV. 8 z TRV88 - 560× - -
Operating Instructions (primary manual)
Page 9
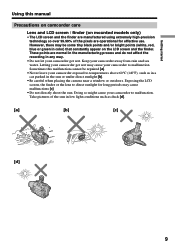
...Take pictures of the pixels are operational for long periods may be repaired [a]. • Never leave your camcorder exposed to malfunction. Letting your camcorder get wet. Getting started Using this malfunction cannot be some tiny black points and/or bright points (white...sunlight [b]. • Be careful when placing the camera near a window or outdoors. Sometimes this manual Precautions on camcorder care Lens and LCD screen / finder (on the LCD screen and the finder. Keep your camcorder to temperatures above 60°C (140°F), such as duck [d]. [a] [b] [c] [d] 9...
...Take pictures of the pixels are operational for long periods may be repaired [a]. • Never leave your camcorder exposed to malfunction. Letting your camcorder get wet. Getting started Using this malfunction cannot be some tiny black points and/or bright points (white...sunlight [b]. • Be careful when placing the camera near a window or outdoors. Sometimes this manual Precautions on camcorder care Lens and LCD screen / finder (on the LCD screen and the finder. Keep your camcorder to temperatures above 60°C (140°F), such as duck [d]. [a] [b] [c] [d] 9...
Operating Instructions (primary manual)
Page 26
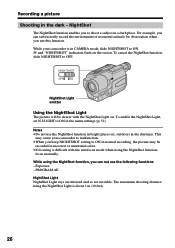
...in the dark - PROGRAM AE NightShot Light NightShot Light rays are infrared and so are invisible. While using the NightShot function, focus manually. The maximum shooting distance using the NightShot Light is difficult with the NightShot Light on the screen. To cancel the NightShot function, ...slide NIGHTSHOT to ON in normal recording, the picture may cause your camcorder is in the daytime). NightShot The NightShot function enables you can satisfactorily record the environment of nocturnal animals for observation when you ...
...in the dark - PROGRAM AE NightShot Light NightShot Light rays are infrared and so are invisible. While using the NightShot function, focus manually. The maximum shooting distance using the NightShot Light is difficult with the NightShot Light on the screen. To cancel the NightShot function, ...slide NIGHTSHOT to ON in normal recording, the picture may cause your camcorder is in the daytime). NightShot The NightShot function enables you can satisfactorily record the environment of nocturnal animals for observation when you ...
Operating Instructions (primary manual)
Page 27
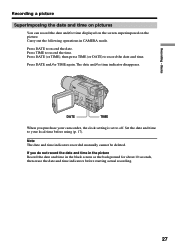
Press DATE to record the date and time. The date and/or time indicator disappears. Set the date and time to your camcorder, the clock setting is set to record the time. Carry out the following operations in the black screen as the background for about 10 seconds, ... DATE and/or TIME again. Press DATE (or TIME), then press TIME (or DATE) to record the date. Note The date and time indicators recorded manually cannot be deleted. DATE TIME When you do not record the date and time in the picture Record the date and time in CAMERA mode...
Press DATE to record the date and time. The date and/or time indicator disappears. Set the date and time to your camcorder, the clock setting is set to record the time. Carry out the following operations in the black screen as the background for about 10 seconds, ... DATE and/or TIME again. Press DATE (or TIME), then press TIME (or DATE) to record the date. Note The date and time indicators recorded manually cannot be deleted. DATE TIME When you do not record the date and time in the picture Record the date and time in CAMERA mode...

Operating Instructions (primary manual)
Page 41
Note When you slide NIGHTSHOT to ON 41 Advanced Recording Operations Adjusting the exposure manually You can manually adjust and set the exposure. Your camcorder automatically returns to the automatic exposure mode Press EXPOSURE again. night scenes) faithfully (1) In CAMERA mode, press EXPOSURE. (2) Turn the SEL/PUSH EXEC dial to ...
Note When you slide NIGHTSHOT to ON 41 Advanced Recording Operations Adjusting the exposure manually You can manually adjust and set the exposure. Your camcorder automatically returns to the automatic exposure mode Press EXPOSURE again. night scenes) faithfully (1) In CAMERA mode, press EXPOSURE. (2) Turn the SEL/PUSH EXEC dial to ...

Operating Instructions (primary manual)
Page 42
...SEL/PUSH EXEC dial to the autofocus mode Press FOCUS. FOCUS To return to sharpen focus. when the subject is not effective when shooting - Focusing manually You can gain better results by first focusing at the "T" (telephoto) position and then shooting at the end of the "W" (wide-angle) position.... at the "W" (wide-angle) position. subjects with little contrast with water droplets - horizontal stripes - To focus precisely Adjust the zoom by manually adjusting the focus in the background •Shooting a stationary subject when using a tripod (1) In CAMERA mode, press FOCUS.
...SEL/PUSH EXEC dial to the autofocus mode Press FOCUS. FOCUS To return to sharpen focus. when the subject is not effective when shooting - Focusing manually You can gain better results by first focusing at the "T" (telephoto) position and then shooting at the end of the "W" (wide-angle) position.... at the "W" (wide-angle) position. subjects with little contrast with water droplets - horizontal stripes - To focus precisely Adjust the zoom by manually adjusting the focus in the background •Shooting a stationary subject when using a tripod (1) In CAMERA mode, press FOCUS.

Operating Instructions (primary manual)
Page 52
...z OFF CINEMA 16:9FULL STEADYSHOT * z ON OFF N.S.LIGHT z ON OFF Meaning To suit your camcorder model The menu display may be different from that in this illustration. If you set to OFF, ... the NightShot Light function POWER switch CAMERA CAMERA CAMERA CAMERA CAMERA CAMERA * CCD-TRV68/TRV78/TRV88/TRV98 only 52 Changing the menu settings Menu items are produced when shooting a stationary object with... mode setting of the POWER switch. Natural pictures are displayed as the following icons: MANUAL SET CAMERA SET PLAYER SET LCD SET TAPE SET SETUP MENU OTHERS Depending on your specific...
...z OFF CINEMA 16:9FULL STEADYSHOT * z ON OFF N.S.LIGHT z ON OFF Meaning To suit your camcorder model The menu display may be different from that in this illustration. If you set to OFF, ... the NightShot Light function POWER switch CAMERA CAMERA CAMERA CAMERA CAMERA CAMERA * CCD-TRV68/TRV78/TRV88/TRV98 only 52 Changing the menu settings Menu items are produced when shooting a stationary object with... mode setting of the POWER switch. Natural pictures are displayed as the following icons: MANUAL SET CAMERA SET PLAYER SET LCD SET TAPE SET SETUP MENU OTHERS Depending on your specific...

Operating Instructions (primary manual)
Page 57
... mode, your Sony dealer or local authorized Sony service facility. See page 61. c Set it to acclimatize. (p. 67) The power goes off. • While being operated in the standby mode for more than 5 minutes. This is not clear. c Remove the cassette and leave your camcorder for autofocus. c Set FOCUS to MANUAL to OFF (CHARGE...
... mode, your Sony dealer or local authorized Sony service facility. See page 61. c Set it to acclimatize. (p. 67) The power goes off. • While being operated in the standby mode for more than 5 minutes. This is not clear. c Remove the cassette and leave your camcorder for autofocus. c Set FOCUS to MANUAL to OFF (CHARGE...
Operating Instructions (primary manual)
Page 79
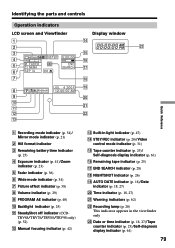
... and Viewfinder Display window 1 qf 2 wd 3 qg 4 40min W T STBY 0:00:00 qh 5 M . TRV68/TRV78/TRV88/TRV98 only) (p. 52) qs Manual focusing indicator (p. 42) qd Built-in the viewfinder only wd Date or time indicator (p. 18, 27)/Tape counter indicator (p. 25...qk JUL 4 2001 ql 8 12:00:00 AM 9 w; 0 wa qa qs ws qd Quick Reference 1 Recording mode indicator (p. 54)/ Mirror mode indicator (p. 21) 2 Hi8 format indicator 3 Remaining battery time indicator (p. 25) 4 Exposure indicator (p. 41)/Zoom indicator (p. 23) 5 Fader indicator (p. 36) 6 Wide mode indicator (p. 34) 7 Picture...
... and Viewfinder Display window 1 qf 2 wd 3 qg 4 40min W T STBY 0:00:00 qh 5 M . TRV68/TRV78/TRV88/TRV98 only) (p. 52) qs Manual focusing indicator (p. 42) qd Built-in the viewfinder only wd Date or time indicator (p. 18, 27)/Tape counter indicator (p. 25...qk JUL 4 2001 ql 8 12:00:00 AM 9 w; 0 wa qa qs ws qd Quick Reference 1 Recording mode indicator (p. 54)/ Mirror mode indicator (p. 21) 2 Hi8 format indicator 3 Remaining battery time indicator (p. 25) 4 Exposure indicator (p. 41)/Zoom indicator (p. 23) 5 Fader indicator (p. 36) 6 Wide mode indicator (p. 34) 7 Picture...

Operating Instructions (primary manual)
Page 80
... E Earphone jack 73 EDIT 53 END SEARCH 28, 31 Exposure 41 F, G, H Fade in/out 37 FADER 36 FOCUS 42 Grip strap 77 Heads 68 Hi8 system 64 M, N Manual focus 42 Menu settings 51 Mirror mode 21 Moisture condensation .......... 67 MONOTONE 36 Mosaic fader 36 NIGHTSHOT 26 NTSC system 66 O, P, Q Operation indicators 79... mode 34 WORLD TIME 56 Write-protect tab 19 Zoom 23 I, J, K, L "InfoLITHIUM" battery ........ 65 Infrared rays emitter ........ 26, 33 LCD screen 21 LP mode 54 Sony Corporation Printed in Japan 306564811
... E Earphone jack 73 EDIT 53 END SEARCH 28, 31 Exposure 41 F, G, H Fade in/out 37 FADER 36 FOCUS 42 Grip strap 77 Heads 68 Hi8 system 64 M, N Manual focus 42 Menu settings 51 Mirror mode 21 Moisture condensation .......... 67 MONOTONE 36 Mosaic fader 36 NIGHTSHOT 26 NTSC system 66 O, P, Q Operation indicators 79... mode 34 WORLD TIME 56 Write-protect tab 19 Zoom 23 I, J, K, L "InfoLITHIUM" battery ........ 65 Infrared rays emitter ........ 26, 33 LCD screen 21 LP mode 54 Sony Corporation Printed in Japan 306564811


