Operating Instructions
Page 2
...dealer or an experienced radio/TV technician for the customers in a particular installation. If this equipment. Notice for a Class B digital device, pursuant to operate this equipment does cause harmful interference to correct the interference by turning the equipment off and on the bottom.... WARNING This equipment has been tested and found to comply with the limits for the customers in Canada This class B digital apparatus complies with the instructions, may cause harmful interference to provide reasonable protection against harmful interference in this manual, ™...
...dealer or an experienced radio/TV technician for the customers in a particular installation. If this equipment. Notice for a Class B digital device, pursuant to operate this equipment does cause harmful interference to correct the interference by turning the equipment off and on the bottom.... WARNING This equipment has been tested and found to comply with the limits for the customers in Canada This class B digital apparatus complies with the instructions, may cause harmful interference to provide reasonable protection against harmful interference in this manual, ™...

Operating Instructions
Page 3
... has been certified to iPod is designed for the iPod functions on the iPod and iPhone, unless otherwise specified by the text or illustrations. • Sony cannot accept responsibility in the event that data recorded to meet Apple performance standards. 3US You can not connect any other iPod models, a compatible Dock...
... has been certified to iPod is designed for the iPod functions on the iPod and iPhone, unless otherwise specified by the text or illustrations. • Sony cannot accept responsibility in the event that data recorded to meet Apple performance standards. 3US You can not connect any other iPod models, a compatible Dock...

Operating Instructions
Page 4
Table of Contents Overview 5 Getting Started 1: Checking supplied items ...6 2: List of parts locations........6 3: Installing the TDM-iP50 ...7 Operating the Unit Selecting the operating mode 10 Using iPod Display mode....10 Using the On Screen Display mode 12 Additional Information Troubleshooting 16 Precautions 18 Specifications 19 4US
Table of Contents Overview 5 Getting Started 1: Checking supplied items ...6 2: List of parts locations........6 3: Installing the TDM-iP50 ...7 Operating the Unit Selecting the operating mode 10 Using iPod Display mode....10 Using the On Screen Display mode 12 Additional Information Troubleshooting 16 Precautions 18 Specifications 19 4US

Operating Instructions
Page 5
iPod and TDM-iP50 AV system Note DIGITAL MEDIA PORT is occasionally abbreviated as a battery charger (page 9). Overview You can enjoy iPod audio, video and photo contents by connecting this unit to an AV system with DIGITAL MEDIA PORT interface (Sony DAV series, etc.). • You can operate your iPod by its control buttons, the control buttons of the AV...
iPod and TDM-iP50 AV system Note DIGITAL MEDIA PORT is occasionally abbreviated as a battery charger (page 9). Overview You can enjoy iPod audio, video and photo contents by connecting this unit to an AV system with DIGITAL MEDIA PORT interface (Sony DAV series, etc.). • You can operate your iPod by its control buttons, the control buttons of the AV...

Operating Instructions
Page 6
Getting Started 1: Checking supplied items Unit (1) Operating Instructions (1) iPod Dock Adapters (1 set) For details on supplied iPod Dock Adapters, refer to the instructions supplied with the Dock Adapters. 2: List of parts locations 1 DIGITAL MEDIA PORT cable (page 7) 2 iPod connector (page 8) 3 OPR MODE button (page 10) 4 LED status indicator (page 10) iPod Display mode (page 10): Lights up in amber. On Screen Display mode (page 12): Lights up in green. 5 VIDEO OUT jack (page 7) 6US
Getting Started 1: Checking supplied items Unit (1) Operating Instructions (1) iPod Dock Adapters (1 set) For details on supplied iPod Dock Adapters, refer to the instructions supplied with the Dock Adapters. 2: List of parts locations 1 DIGITAL MEDIA PORT cable (page 7) 2 iPod connector (page 8) 3 OPR MODE button (page 10) 4 LED status indicator (page 10) iPod Display mode (page 10): Lights up in amber. On Screen Display mode (page 12): Lights up in green. 5 VIDEO OUT jack (page 7) 6US

Operating Instructions
Page 7
...function Connect the composite video cable (not supplied) to the VIDEO OUT jack of the unit. AV system (Sony HT series, etc.) TDM-iP50 TV DIGITAL MEDIA PORT cable Composite video cable (not supplied) Notes • This unit turns on/off automatically whenever the connected AV... output video signals when the system is output from the DIGITAL MEDIA PORT cable of this unit. Video cable (not supplied) DMPORT DIGITAL MEDIA PORT cable TV AV system (Sony DAV series, STR series, etc.) TDM-iP50 DMPORT DIGITAL MEDIA PORT cable TV TDM-iP50 If your AV system for further information.
...function Connect the composite video cable (not supplied) to the VIDEO OUT jack of the unit. AV system (Sony HT series, etc.) TDM-iP50 TV DIGITAL MEDIA PORT cable Composite video cable (not supplied) Notes • This unit turns on/off automatically whenever the connected AV... output video signals when the system is output from the DIGITAL MEDIA PORT cable of this unit. Video cable (not supplied) DMPORT DIGITAL MEDIA PORT cable TV AV system (Sony DAV series, STR series, etc.) TDM-iP50 DMPORT DIGITAL MEDIA PORT cable TV TDM-iP50 If your AV system for further information.

Operating Instructions
Page 8
...off the AV system. 3 Place the iPod into the unit. 8US To remove the DIGITAL MEDIA PORT cable from the DMPORT jack, press both f marks are aligned. Connecting 1 Connect the DIGITAL MEDIA PORT cable of an AV system (DAV series, etc.). Disconnecting Before disconnecting, turn off before .... 2 Turn on supplied iPod Dock Adapters, refer to the instructions supplied with a DIGITAL MEDIA PORT jack connected to this unit to the DIGITAL MEDIA PORT jack of this unit, and select the DIGITAL MEDIA PORT function. For details on the AV system with the Dock Adapters. 2 Insert the Dock...
...off the AV system. 3 Place the iPod into the unit. 8US To remove the DIGITAL MEDIA PORT cable from the DMPORT jack, press both f marks are aligned. Connecting 1 Connect the DIGITAL MEDIA PORT cable of an AV system (DAV series, etc.). Disconnecting Before disconnecting, turn off before .... 2 Turn on supplied iPod Dock Adapters, refer to the instructions supplied with a DIGITAL MEDIA PORT jack connected to this unit to the DIGITAL MEDIA PORT jack of this unit, and select the DIGITAL MEDIA PORT function. For details on the AV system with the Dock Adapters. 2 Insert the Dock...

Operating Instructions
Page 9
The charging status appears in the same angle as that of your fingernail or a flat object using the slot inside the adapter. 9US While the POWER indicator is lit, the battery can use the unit as a battery charger. To remove the iPod Dock Adapter To remove the iPod Dock Adapter, pull it up with one hand and take care not to prevent connector damage. • Do not carry the unit with an iPod set on the connector. For details, see the user's guide of the iPod connector on this unit and do not twist or sway the iPod to press the controls of the iPod by mistake. Notes • ...
The charging status appears in the same angle as that of your fingernail or a flat object using the slot inside the adapter. 9US While the POWER indicator is lit, the battery can use the unit as a battery charger. To remove the iPod Dock Adapter To remove the iPod Dock Adapter, pull it up with one hand and take care not to prevent connector damage. • Do not carry the unit with an iPod set on the connector. For details, see the user's guide of the iPod connector on this unit and do not twist or sway the iPod to press the controls of the iPod by mistake. Notes • ...
Operating Instructions
Page 10
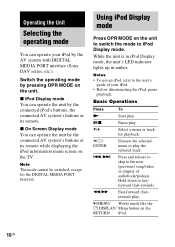
... Press OPR MODE on the RETURN iPod. 10US Basic Operations Press To N Start play . X/x Select a menu or track for the DIGITAL MEDIA PORT function. C/MENU/ Works much like the DISPLAY/ Menu button on the unit to switch the mode to the user's guide of audiobook/...Display mode, the unit's LED indicator lights up in amber. x On Screen Display mode You can operate the unit by the AV system with DIGITAL MEDIA PORT interface (Sony DAV series, etc.). X/x Pause play . m/M Fast-forward (fastrewind) play the selected track. ./> Press and release to skip to fastforward (fast...
... Press OPR MODE on the RETURN iPod. 10US Basic Operations Press To N Start play . X/x Select a menu or track for the DIGITAL MEDIA PORT function. C/MENU/ Works much like the DISPLAY/ Menu button on the unit to switch the mode to the user's guide of audiobook/...Display mode, the unit's LED indicator lights up in amber. x On Screen Display mode You can operate the unit by the AV system with DIGITAL MEDIA PORT interface (Sony DAV series, etc.). X/x Pause play . m/M Fast-forward (fastrewind) play the selected track. ./> Press and release to skip to fastforward (fast...
Operating Instructions
Page 11
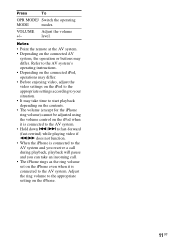
VOLUME Adjust the volume +/- Adjust the ring volume to the appropriate setting on the connected AV system, the operation or buttons may take time to start playback depending on the contents. • The volume (except for the iPhone ring volume) cannot be adjusted using the volume control on the iPod when it is connected to the AV system. • Hold down ./> to fast-forward (fast-rewind) while playing video if m/M does not function. • When the iPhone is connected to the AV system and you receive a call during playback, playback will pause and you can take an incoming call. •...
VOLUME Adjust the volume +/- Adjust the ring volume to the appropriate setting on the connected AV system, the operation or buttons may take time to start playback depending on the contents. • The volume (except for the iPhone ring volume) cannot be adjusted using the volume control on the iPod when it is connected to the AV system. • Hold down ./> to fast-forward (fast-rewind) while playing video if m/M does not function. • When the iPhone is connected to the AV system and you receive a call during playback, playback will pause and you can take an incoming call. •...

Operating Instructions
Page 12
Using the On Screen Display mode Press OPR MODE on the unit to switch the mode to On Screen Display mode. While the unit is in this mode, the unit's LED indicator lights up in green. 1 2 Main Menu 4 Music Videos Settings > > > 3 DIGITAL MEDIA P O R T 1 Selected menu title 2 Current settings ( , Repeat, Shuffle) 3 [Main Menu] list ([Music], [Videos], [Settings]) 4 Selected menu 12US
Using the On Screen Display mode Press OPR MODE on the unit to switch the mode to On Screen Display mode. While the unit is in this mode, the unit's LED indicator lights up in green. 1 2 Main Menu 4 Music Videos Settings > > > 3 DIGITAL MEDIA P O R T 1 Selected menu title 2 Current settings ( , Repeat, Shuffle) 3 [Main Menu] list ([Music], [Videos], [Settings]) 4 Selected menu 12US

Operating Instructions
Page 13
... of tracks 6 Playback status (Play, Pause, Fast-forward, Fast-rewind) Notes • In this mode, you cannot use the iPod's control buttons. • When the TDM-iP50 cannot display a character, it is displayed on the TV, do not disconnect the iPod. • It may take time to start playback depending on the...
... of tracks 6 Playback status (Play, Pause, Fast-forward, Fast-rewind) Notes • In this mode, you cannot use the iPod's control buttons. • When the TDM-iP50 cannot display a character, it is displayed on the TV, do not disconnect the iPod. • It may take time to start playback depending on the...
Operating Instructions
Page 14
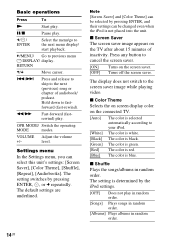
Settings menu In the Settings menu, you can be changed even when the iPod is black. Note [Screen Saver] and [Color Theme] can be selected by pressing ENTER, and their settings can select this unit's settings: [Screen Saver], [Color Theme], [Shuffle], [Repeat], [Audiobooks]. C/MENU/ Go to fastforward (fast-rewind). Hold down to previous menu DISPLAY/ display. level. The setting switches by the iPod settings. [OFF] Does not play . The default settings are underlined. The color is not placed into the unit. The setting is selected automatically according to the...
Settings menu In the Settings menu, you can be changed even when the iPod is black. Note [Screen Saver] and [Color Theme] can be selected by pressing ENTER, and their settings can select this unit's settings: [Screen Saver], [Color Theme], [Shuffle], [Repeat], [Audiobooks]. C/MENU/ Go to fastforward (fast-rewind). Hold down to previous menu DISPLAY/ display. level. The setting switches by the iPod settings. [OFF] Does not play . The default settings are underlined. The color is not placed into the unit. The setting is selected automatically according to the...

Operating Instructions
Page 15
Repeat one song. x Repeat Plays songs repeatedly. x Audiobooks Changes the Audiobook playback speed. The setting is determined by the iPod settings. [Slower] Plays Audiobook slowly. [Normal] Plays Audiobook at normal speed. [Faster] Plays Audiobook rapidly. 15US The setting is determined by the iPod settings. [OFF] [Repeat to One] [Repeat to All] Does not play repeatedly. Repeat all songs. Note When video contents are played, the [Shuffle] setting turns [OFF] automatically.
Repeat one song. x Repeat Plays songs repeatedly. x Audiobooks Changes the Audiobook playback speed. The setting is determined by the iPod settings. [Slower] Plays Audiobook slowly. [Normal] Plays Audiobook at normal speed. [Faster] Plays Audiobook rapidly. 15US The setting is determined by the iPod settings. [OFF] [Repeat to One] [Repeat to All] Does not play repeatedly. Repeat all songs. Note When video contents are played, the [Shuffle] setting turns [OFF] automatically.

Operating Instructions
Page 16
.... Note that the iPod* is needed to determine the location requiring repair. If the problem persists, contact your nearest Sony dealer. This product is a system product, and the entire system is compatible with your unit, find your problem in the entire system. The ...display photo images (page 10). • Make the connection according to your AV system (page 7). • When browsing the on screen display through the DIGITAL MEDIA PORT cable: Disconnect the video cable from the iPod does not appear on the iPod display. • Adjust the video/photo image output settings to bring...
.... Note that the iPod* is needed to determine the location requiring repair. If the problem persists, contact your nearest Sony dealer. This product is a system product, and the entire system is compatible with your unit, find your problem in the entire system. The ...display photo images (page 10). • Make the connection according to your AV system (page 7). • When browsing the on screen display through the DIGITAL MEDIA PORT cable: Disconnect the video cable from the iPod does not appear on the iPod display. • Adjust the video/photo image output settings to bring...

Operating Instructions
Page 17
... On Screen Display mode (page 12). • Make the connection according to your AV system (page 7). • When browsing the on screen display through the DIGITAL MEDIA PORT cable: Disconnect the video cable from the source of the iPhone does not change. • Adjust the ring volume on the iPhone. * See "Compatible iPod...
... On Screen Display mode (page 12). • Make the connection according to your AV system (page 7). • When browsing the on screen display through the DIGITAL MEDIA PORT cable: Disconnect the video cable from the source of the iPhone does not change. • Adjust the ring volume on the iPhone. * See "Compatible iPod...

Operating Instructions
Page 18
... to direct sunlight. • Use caution when placing the unit on surfaces that have any questions or problems concerning your unit, please consult your nearest Sony dealer. Do not use any further. Very humid - Cleaning the unit Clean the unit with a soft cloth slightly moistened with wax, oil, polish, etc.) as...
... to direct sunlight. • Use caution when placing the unit on surfaces that have any questions or problems concerning your unit, please consult your nearest Sony dealer. Do not use any further. Very humid - Cleaning the unit Clean the unit with a soft cloth slightly moistened with wax, oil, polish, etc.) as...

Operating Instructions
Page 19
Specifications Output Video: 1 Vp-p 75 ohm (Composite Video out) General Power requirements: DC IN: 5 V, 0.7 A (via DIGITAL MEDIA PORT) Dimensions: Approx. φ 95 × 23(h) mm (φ 3 3/4 × 29/32(h) inch) Mass: Approx. 225 g (7.3 oz) (includes cable) Cable length: Approx. 1.5 m (5 ft) Design and specifications are subject to change without notice. 19US
Specifications Output Video: 1 Vp-p 75 ohm (Composite Video out) General Power requirements: DC IN: 5 V, 0.7 A (via DIGITAL MEDIA PORT) Dimensions: Approx. φ 95 × 23(h) mm (φ 3 3/4 × 29/32(h) inch) Mass: Approx. 225 g (7.3 oz) (includes cable) Cable length: Approx. 1.5 m (5 ft) Design and specifications are subject to change without notice. 19US

Operating Instructions
Page 60
* 3 8 7 7 7 1 0 2 2 * (1) Sony Corporation Printed in Malaysia
* 3 8 7 7 7 1 0 2 2 * (1) Sony Corporation Printed in Malaysia