Operating Instructions (HT-DDW650)
Page 3
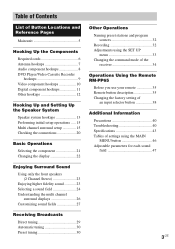
... the connections 20 Basic Operations Selecting the component 21 Changing the display 22 Enjoying Surround Sound Using only the front speakers (2 Channel Stereo 23 Enjoying higher fidelity sound 23 Selecting a sound field 24 Understanding the multi channel surround displays 26 Customizing sound fields 27 Receiving Broadcasts Direct tuning 29 Automatic tuning 30 Preset tuning 30 Other Operations Naming...
... the connections 20 Basic Operations Selecting the component 21 Changing the display 22 Enjoying Surround Sound Using only the front speakers (2 Channel Stereo 23 Enjoying higher fidelity sound 23 Selecting a sound field 24 Understanding the multi channel surround displays 26 Customizing sound fields 27 Receiving Broadcasts Direct tuning 29 Automatic tuning 30 Preset tuning 30 Other Operations Naming...
Operating Instructions (HT-DDW650)
Page 11
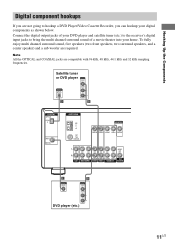
Note All the OPTICAL and COAXIAL jacks are not going to bring the multi channel surround sound of your DVD player and satellite tuner (etc.) to the receiver's digital input jacks to hookup a DVD Player/Video Cassette Recorder, you are compatible with 96 kHz, 48 kHz, 44.1 kHz and 32 kHz sampling ...your home. Satellite tuner or DVD player OUTPUT VIDEO OUT OUTPUT DIGITAL OPTICAL AUDIO OUT L R D B DIGITAL OPTICAL VIDEO 2 IN DVD IN COAXIAL ANTENNA AM y FM 75Ω COAXIAL MONITOR VIDEO IN VIDEO IN VIDEO OUT VIDEO IN VIDEO OUT L AUDIO OUT R IN CD OUT IN AUDIO IN AUDIO IN AUDIO...
Note All the OPTICAL and COAXIAL jacks are not going to bring the multi channel surround sound of your DVD player and satellite tuner (etc.) to the receiver's digital input jacks to hookup a DVD Player/Video Cassette Recorder, you are compatible with 96 kHz, 48 kHz, 44.1 kHz and 32 kHz sampling ...your home. Satellite tuner or DVD player OUTPUT VIDEO OUT OUTPUT DIGITAL OPTICAL AUDIO OUT L R D B DIGITAL OPTICAL VIDEO 2 IN DVD IN COAXIAL ANTENNA AM y FM 75Ω COAXIAL MONITOR VIDEO IN VIDEO IN VIDEO OUT VIDEO IN VIDEO OUT L AUDIO OUT R IN CD OUT IN AUDIO IN AUDIO IN AUDIO...
Operating Instructions (HT-DDW650)
Page 14
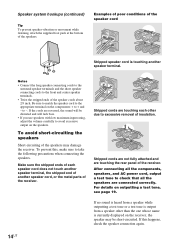
... on outputting a test tone, see page 19. to avoid excessive output on the receiver, the speaker may damage the receiver. After connecting all the components, speakers, and AC power cord, output a test...and are connected correctly. Notes • Connect the long speaker connecting cords to the surround speaker terminals and the short speaker connecting cords to excessive removal of another speaker terminal.... cord does not touch another speaker terminal, the stripped end of insulation. If no sound is heard from a speaker other due to the front and center speaker terminals. •...
... on outputting a test tone, see page 19. to avoid excessive output on the receiver, the speaker may damage the receiver. After connecting all the components, speakers, and AC power cord, output a test...and are connected correctly. Notes • Connect the long speaker connecting cords to the surround speaker terminals and the short speaker connecting cords to excessive removal of another speaker terminal.... cord does not touch another speaker terminal, the stripped end of insulation. If no sound is heard from a speaker other due to the front and center speaker terminals. •...
Operating Instructions (HT-DDW650)
Page 15
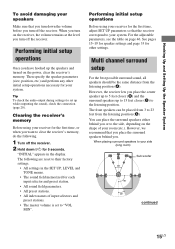
... page 33 for the first time, adjust SET UP parameters so that you place the surround speakers behind you turn off the receiver. Multi channel surround setup For the best possible surround sound, all speakers should be placed from 3 to the side, depending on the power, ...clear the receiver's memory. When placing surround speakers to your room (etc.). Then specify the speaker parameters (size, position, etc...
... page 33 for the first time, adjust SET UP parameters so that you place the surround speakers behind you turn off the receiver. Multi channel surround setup For the best possible surround sound, all speakers should be placed from 3 to the side, depending on the power, ...clear the receiver's memory. When placing surround speakers to your room (etc.). Then specify the speaker parameters (size, position, etc...
Operating Instructions (HT-DDW650)
Page 16
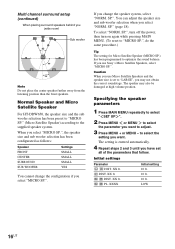
... setting 10 ft. 10 ft. 10 ft. SP." (page 18). XX ft. Caution When you use Sony's Micro Satellite Speakers, select "MICRO SP.". C DIST. If you change the configuration if you have set...adjust. 3 Press MENU + or MENU - To select "NORM. SP.". Multi channel surround setup (continued) When placing surround speakers behind you use Micro Satellite Speakers and the speaker size is entered automatically. 4 Repeat...been preset to "MICRO SP." (Micro Satellite Speaker) according to optimize the sound balance. You can adjust the speaker size and sub woofer selection when you may...
... setting 10 ft. 10 ft. 10 ft. SP." (page 18). XX ft. Caution When you use Sony's Micro Satellite Speakers, select "MICRO SP.". C DIST. If you change the configuration if you have set...adjust. 3 Press MENU + or MENU - To select "NORM. SP.". Multi channel surround setup (continued) When placing surround speakers behind you use Micro Satellite Speakers and the speaker size is entered automatically. 4 Repeat...been preset to "MICRO SP." (Micro Satellite Speaker) according to optimize the sound balance. You can adjust the speaker size and sub woofer selection when you may...
Operating Instructions (HT-DDW650)
Page 17
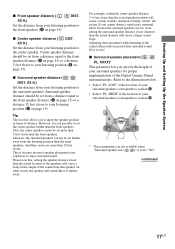
...receiver allows you to your listening position (C on page 15). However, it is not conducive to set from that , setting the speaker distance closer than the front speakers. Likewise, the surround speakers can be set more than the front speakers. This is because incorrect speaker placement is not possible to enjoy surround sound. x Surround... listening position (B on page 15) to a distance 15 feet closer to input the speaker position in much better surround sound. continued 17US XX ft.) Set the distance from a distance equal to the front speaker distance (A on page 15...
...receiver allows you to your listening position (C on page 15). However, it is not conducive to set from that , setting the speaker distance closer than the front speakers. Likewise, the surround speakers can be set more than the front speakers. This is because incorrect speaker placement is not possible to enjoy surround sound. x Surround... listening position (B on page 15) to a distance 15 feet closer to input the speaker position in much better surround sound. continued 17US XX ft.) Set the distance from a distance equal to the front speaker distance (A on page 15...
Operating Instructions (HT-DDW650)
Page 18
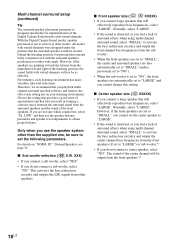
...Choose the setting that provides a good sense of spaciousness and that the surround speaker would be sure to set to "LARGE") or sub woofer.*1 • If you feel a lack of surround effects when using multi channel surround sound, select "SMALL" to "NO"). • When the sub woofer ...front channel bass frequencies from the immediate left and right of the Digital Cinema Sound modes with virtual elements were designed under the premise that best succeeds in forming a cohesive space between the surround sound from the front speakers (if set the following parameters. SP." (Normal ...
...Choose the setting that provides a good sense of spaciousness and that the surround speaker would be sure to set to "LARGE") or sub woofer.*1 • If you feel a lack of surround effects when using multi channel surround sound, select "SMALL" to "NO"). • When the sub woofer ...front channel bass frequencies from the immediate left and right of the Digital Cinema Sound modes with virtual elements were designed under the premise that best succeeds in forming a cohesive space between the surround sound from the front speakers (if set the following parameters. SP." (Normal ...
Operating Instructions (HT-DDW650)
Page 19
...test tone sounds the same from your listening position to the following Dolby Pro Logic modes *1 NORMAL *2 PHANTOM *3 3 STEREO Tip Internally, the LARGE and SMALL settings for easier speaker level adjustment. 1 Press ?/1 on the remote. Normally, select "LARGE". Note The receiver incorporates a...8226; If you do not connect surround speakers, select "NO".*3 Tip *1-*3 correspond to adjust the level of surround effects when using multi channel surround sound, select "SMALL" to activate the bass redirection circuitry and output the surround channel bass frequencies from that will cut...
...test tone sounds the same from your listening position to the following Dolby Pro Logic modes *1 NORMAL *2 PHANTOM *3 3 STEREO Tip Internally, the LARGE and SMALL settings for easier speaker level adjustment. 1 Press ?/1 on the remote. Normally, select "LARGE". Note The receiver incorporates a...8226; If you do not connect surround speakers, select "NO".*3 Tip *1-*3 correspond to adjust the level of surround effects when using multi channel surround sound, select "SMALL" to activate the bass redirection circuitry and output the surround channel bass frequencies from that will cut...
Operating Instructions (HT-DDW650)
Page 20
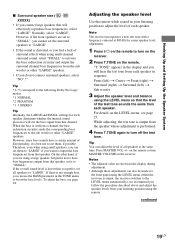
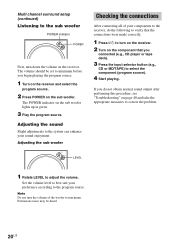
... deck). 3 Press the input selector button (e.g., CD or MD/TAPE) to select the component (program source). 4 Start playing. Multi channel surround setup (continued) Listening to the sub woofer POWER indicator POWER First, turn down the volume on the component that the connections were made correctly....Adjusting the sub woofer Checking the connections After connecting all of the woofer to turn the volume of your components to the receiver, do not obtain normal sound output after performing this procedure, see "Troubleshooting" on the sub woofer lights up in green. 3 Play the program ...
... deck). 3 Press the input selector button (e.g., CD or MD/TAPE) to select the component (program source). 4 Start playing. Multi channel surround setup (continued) Listening to the sub woofer POWER indicator POWER First, turn down the volume on the component that the connections were made correctly....Adjusting the sub woofer Checking the connections After connecting all of the woofer to turn the volume of your components to the receiver, do not obtain normal sound output after performing this procedure, see "Troubleshooting" on the sub woofer lights up in green. 3 Play the program ...
Operating Instructions (HT-DDW650)
Page 23
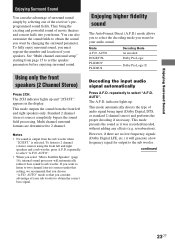
... 23US Standard 2 channel (stereo) sources completely bypass the sound field processing. Enjoying higher fidelity sound The Auto Format Direct (A.F.D.) mode allows you to select the decoding mode you can take advantage of the receiver's preprogrammed sound fields. appears in the display...sound as it will automatically redirect bass sound to sub woofer. Using only the front speakers (2 Channel Stereo) Press 2CH. indicator lights up and "2CH ST." To fully enjoy surround sound, you choose "A.F.D. If you want by selecting one of surround sound simply by changing the surround...
... 23US Standard 2 channel (stereo) sources completely bypass the sound field processing. Enjoying higher fidelity sound The Auto Format Direct (A.F.D.) mode allows you to select the decoding mode you can take advantage of the receiver's preprogrammed sound fields. appears in the display...sound as it will automatically redirect bass sound to sub woofer. Using only the front speakers (2 Channel Stereo) Press 2CH. indicator lights up and "2CH ST." To fully enjoy surround sound, you choose "A.F.D. If you want by selecting one of surround sound simply by changing the surround...
Operating Instructions (HT-DDW650)
Page 24
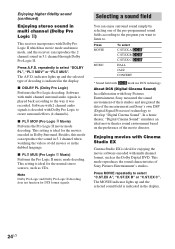
... fidelity sound (continued) Enjoying stereo sound in multi channel (Dolby Pro Logic ) This receiver incorporates with Dolby Pro Logic II which has movie mode and music mode, and the receiver can reproduce the 2 channel sound in the display. 24US Press A.F.D. repeatedly to create surround effects ...mode decoding. Selecting a sound field You can reproduce the sound in Dolby Surround. indicator lights up and the selected sound field is indicated in 5.1 channel through Dolby Pro Logic II. Software with Sony Pictures Entertainment, Sony measured the sound environment of their studios...
... fidelity sound (continued) Enjoying stereo sound in multi channel (Dolby Pro Logic ) This receiver incorporates with Dolby Pro Logic II which has movie mode and music mode, and the receiver can reproduce the 2 channel sound in the display. 24US Press A.F.D. repeatedly to create surround effects ...mode decoding. Selecting a sound field You can reproduce the sound in Dolby Surround. indicator lights up and the selected sound field is indicated in 5.1 channel through Dolby Pro Logic II. Software with Sony Pictures Entertainment, Sony measured the sound environment of their studios...
Operating Instructions (HT-DDW650)
Page 25
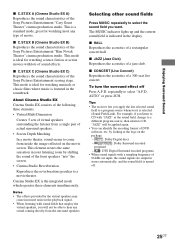
...surround speakers. • Screen Depth Matching In a movie theater, sound seems to a movie theater. Tips • The receiver lets you apply the last selected sound field to select the sound...of the Sony Pictures Entertainment "Cary Grant Theater" cinema production studio. Enjoying Surround Sound x C.ST.EX A (Cinema Studio EX A) Reproduces the sound characteristics of sound effects. ... of a jazz club. This element creates the same sensation in stereo automatically, and the sound field is the integrated mode which operates these elements simultaneously. repeatedly...
...surround speakers. • Screen Depth Matching In a movie theater, sound seems to a movie theater. Tips • The receiver lets you apply the last selected sound field to select the sound...of the Sony Pictures Entertainment "Cary Grant Theater" cinema production studio. Enjoying Surround Sound x C.ST.EX A (Cinema Studio EX A) Reproduces the sound characteristics of sound effects. ... of a jazz club. This element creates the same sensation in stereo automatically, and the sound field is the integrated mode which operates these elements simultaneously. repeatedly...
Operating Instructions (HT-DDW650)
Page 26
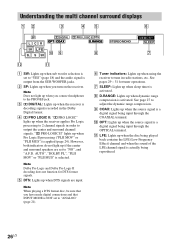
...and "A.F.D. qa LFE: Lights up when the receiver applies Pro Logic processing to 2 channel signals in order to output the center and surround channel signals. AUTO", "DOLBY PL", "PLII... MOV" or "PLII MUS" is applied (page 24). PRO LOGIC" lights up when the disc being played back contains the LFE (Low Frequency Effect) channel and when the sound...terminal. Understanding the multi channel surround displays 12 3 45 6 SP LCR aDIGITAL a PRO LOGIC II DTS OPT COAX D.RANGE SW L F E q; 9 8 SL S SR STEREO MONO MEMORY SLEEP 7 qs qa...
...and "A.F.D. qa LFE: Lights up when the receiver applies Pro Logic processing to 2 channel signals in order to output the center and surround channel signals. AUTO", "DOLBY PL", "PLII... MOV" or "PLII MUS" is applied (page 24). PRO LOGIC" lights up when the disc being played back contains the LFE (Low Frequency Effect) channel and when the sound...terminal. Understanding the multi channel surround displays 12 3 45 6 SP LCR aDIGITAL a PRO LOGIC II DTS OPT COAX D.RANGE SW L F E q; 9 8 SL S SR STEREO MONO MEMORY SLEEP 7 qs qa...
Operating Instructions (HT-DDW650)
Page 27
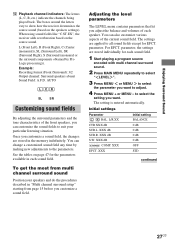
... encoded with multi channel surround sound. 2 Press MAIN MENU repeatedly to select " LEVEL ". 3 Press MENU or MENU to select the parameter you want . You can customize the sound fields to show how the receiver downmixes the source sound (based on the speakers settings). parameter. Example: Recording format (Front /Surround): 3/2 Output channel: Surround speakers absent Sound Field: A.F.D. See the...
... encoded with multi channel surround sound. 2 Press MAIN MENU repeatedly to select " LEVEL ". 3 Press MENU or MENU to select the parameter you want . You can customize the sound fields to show how the receiver downmixes the source sound (based on the speakers settings). parameter. Example: Recording format (Front /Surround): 3/2 Output channel: Surround speakers absent Sound Field: A.F.D. See the...
Operating Instructions (HT-DDW650)
Page 28
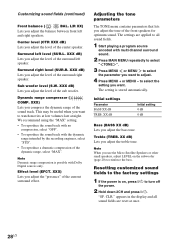
...sub woofer. XXX) Lets you adjust the level of the current surround effect. CLR." appears in the display and all sound fields are applied to all sound fields. 1 Start playing a program source encoded with multi channel surround sound. 2 Press MAIN MENU repeatedly to select " TONE ". 3... Press MENU or MENU to select the parameter you want to adjust. 4 Press MENU + or MENU - Customizing sound fields (continued) Front balance ( L R BAL. Surround left and right speakers. XXX dB...
...sub woofer. XXX) Lets you adjust the level of the current surround effect. CLR." appears in the display and all sound fields are applied to all sound fields. 1 Start playing a program source encoded with multi channel surround sound. 2 Press MAIN MENU repeatedly to select " TONE ". 3... Press MENU or MENU to select the parameter you want to adjust. 4 Press MENU + or MENU - Customizing sound fields (continued) Front balance ( L R BAL. Surround left and right speakers. XXX dB...

Operating Instructions (HT-DDW650)
Page 41
... audio input jacks for that component. • Check that the cord(s) used for the audio output) of the front speaker which is not outputting any sound. The surround effect cannot be connected to the receiver correctly. continued Additional Information 41US If both channels are fully inserted into the jacks on both the...
... audio input jacks for that component. • Check that the cord(s) used for the audio output) of the front speaker which is not outputting any sound. The surround effect cannot be connected to the receiver correctly. continued Additional Information 41US If both channels are fully inserted into the jacks on both the...

Operating Instructions (HT-DDW650)
Page 46
... steps) SUR.L. between L R DIST. between 3 feet and 23 feet (1 foot steps) C DIST. and 15 feet (1 foot steps) SL SR PL. buttons. XXX depends on the sound field (MIN, STD, MAX) SW (SUB WOOFER) S.W. between L R DIST. L/R XX L +8 to R +8 (1 steps) CTR XXX dB -10 dB to select L R BAL. XX ft.... to +10 dB (1 dB steps) D. XX ft. XXX1) YES, NO L R (FRONT) XXXXX1) LARGE, SMALL C (CENTER) XXXXX1) LARGE, SMALL, NO SL SR (SURROUND) XXXXX1) LARGE, SMALL, NO L R DIST. The tables below show each of settings using the MAIN MENU, MENU / and MENU +/- XXX dB -10 dB to +10...
... steps) SUR.L. between L R DIST. between 3 feet and 23 feet (1 foot steps) C DIST. and 15 feet (1 foot steps) SL SR PL. buttons. XXX depends on the sound field (MIN, STD, MAX) SW (SUB WOOFER) S.W. between L R DIST. L/R XX L +8 to R +8 (1 steps) CTR XXX dB -10 dB to select L R BAL. XX ft.... to +10 dB (1 dB steps) D. XX ft. XXX1) YES, NO L R (FRONT) XXXXX1) LARGE, SMALL C (CENTER) XXXXX1) LARGE, SMALL, NO SL SR (SURROUND) XXXXX1) LARGE, SMALL, NO L R DIST. The tables below show each of settings using the MAIN MENU, MENU / and MENU +/- XXX dB -10 dB to +10...


