Operating Instructions
Page 7
RM-AAP061 (USA and Canada models only) - RM-AAP062 (Other models) • R6 (size AA) batteries (2) • Optimizer microphone (ECM-AC2) (1) 7GB Using the Remote Control Programming the remote control 80 Resetting the remote control 85 Additional Information Precautions 85 Troubleshooting 86 Specifications 93 Index 96 Supplied accessories • Operating Instructions (this manual) • Quick Setup Guide • GUI Menu List • FM wire antenna (aerial) (1) • AM loop antenna (aerial) (1) • Remote control (1) -
RM-AAP061 (USA and Canada models only) - RM-AAP062 (Other models) • R6 (size AA) batteries (2) • Optimizer microphone (ECM-AC2) (1) 7GB Using the Remote Control Programming the remote control 80 Resetting the remote control 85 Additional Information Precautions 85 Troubleshooting 86 Specifications 93 Index 96 Supplied accessories • Operating Instructions (this manual) • Quick Setup Guide • GUI Menu List • FM wire antenna (aerial) (1) • AM loop antenna (aerial) (1) • Remote control (1) -
Operating Instructions
Page 14
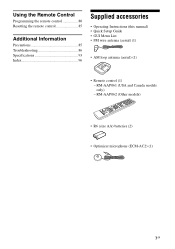
... operation guide on the TV screen when the color buttons are assigned to "OFF" (page 59). G GUI MODE Displays the GUI menu on or off the audio/video equipment that the remote control is set to control Sony equipment. J ./>1), m/M1), N1)2), X1), x1) Skip, backward/forward, play a track or a folder repeatedly. REPEAT1) Press SHIFT...
... operation guide on the TV screen when the color buttons are assigned to "OFF" (page 59). G GUI MODE Displays the GUI menu on or off the audio/video equipment that the remote control is set to control Sony equipment. J ./>1), m/M1), N1)2), X1), x1) Skip, backward/forward, play a track or a folder repeatedly. REPEAT1) Press SHIFT...

Operating Instructions
Page 25
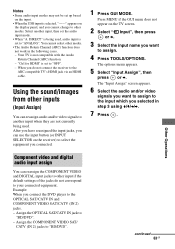
...Audio CD are not input and output. • Be sure to "TV+AMP" in the Input Option menu when the sound is not output correctly. • When connecting optical digital cords, insert the plugs straight ... The audio and video signals of HDMI input are not output from the HDMI TV OUT jack while the GUI menu is displayed. • When you cannot play back a 3D-compatible content. • Depending on the TV... source, set to the sound from the TV speaker, set the "Input Assign" in the HDMI Settings menu (page 73). Connect according to a DVI-D equipment, the sound and/or the image may not be ...
...Audio CD are not input and output. • Be sure to "TV+AMP" in the Input Option menu when the sound is not output correctly. • When connecting optical digital cords, insert the plugs straight ... The audio and video signals of HDMI input are not output from the HDMI TV OUT jack while the GUI menu is displayed. • When you cannot play back a 3D-compatible content. • Depending on the TV... source, set to the sound from the TV speaker, set the "Input Assign" in the HDMI Settings menu (page 73). Connect according to a DVI-D equipment, the sound and/or the image may not be ...

Operating Instructions
Page 34
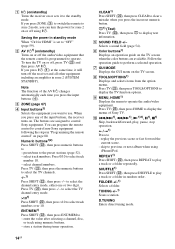
Preparing the Receiver Initializing the receiver Before using . 1 Press GUI MODE. Press MENU if the GUI menu does not appear on the display panel for 5 seconds. The "CLEARING" appears on the TV screen. 1 Press ?/1 to turn off the receiver. 2 Hold down ?/1 for ...a while, then changes to the settings are using the receiver for a while, the GUI menu appears on the TV screen. 34GB The Settings menu list appears on the TV screen. After "GUI ON" appears on the display panel for the first time, initialize the receiver by performing the following procedure...
Preparing the Receiver Initializing the receiver Before using . 1 Press GUI MODE. Press MENU if the GUI menu does not appear on the display panel for 5 seconds. The "CLEARING" appears on the TV screen. 1 Press ?/1 to turn off the receiver. 2 Hold down ?/1 for ...a while, then changes to the settings are using the receiver for a while, the GUI menu appears on the TV screen. 34GB The Settings menu list appears on the TV screen. After "GUI ON" appears on the display panel for the first time, initialize the receiver by performing the following procedure...

Operating Instructions
Page 35
... front high speakers to the SPEAKERS SURROUND BACK/FRONT HIGH/ BI-AMP/FRONT B terminals, select "OFF". 6 Press RETURN/EXIT O. 35GB Press MENU if the GUI menu does not appear on the TV screen. 3 Press V/v repeatedly to select "Speaker", then press or b. 4 Press V/v repeatedly to select "...you want , then press . 6 Press RETURN/EXIT O. The Settings menu list appears on the TV screen. 2 Press V/v repeatedly to select " Settings", then press or b. After "GUI ON" appears on the display panel for a while, the GUI menu appears on the TV screen. Preparing the Receiver 3 Press V/v repeatedly...
... front high speakers to the SPEAKERS SURROUND BACK/FRONT HIGH/ BI-AMP/FRONT B terminals, select "OFF". 6 Press RETURN/EXIT O. 35GB Press MENU if the GUI menu does not appear on the TV screen. 3 Press V/v repeatedly to select "Speaker", then press or b. 4 Press V/v repeatedly to select "...you want , then press . 6 Press RETURN/EXIT O. The Settings menu list appears on the TV screen. 2 Press V/v repeatedly to select " Settings", then press or b. After "GUI ON" appears on the display panel for a while, the GUI menu appears on the TV screen. Preparing the Receiver 3 Press V/v repeatedly...
Operating Instructions
Page 38
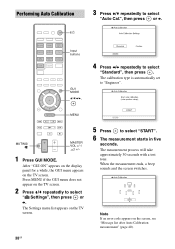
... 6 The measurement starts in five seconds. The measurement process will take approximately 30 seconds with a test tone. MENU MUTING/ MASTER VOL +/-/ 2 +/- 1 Press GUI MODE. Note If an error code appears on the TV screen. The calibration type is automatically set to select "...Performing Auto Calibration ?/1 3 Press V/v repeatedly to "Engineer". After "GUI ON" appears on the display panel for a while, the GUI menu appears on the screen, see "Message list after Auto Calibration measurement" (page 40). The Settings menu list appears on the TV screen. 2 Press V/v repeatedly to ...
... 6 The measurement starts in five seconds. The measurement process will take approximately 30 seconds with a test tone. MENU MUTING/ MASTER VOL +/-/ 2 +/- 1 Press GUI MODE. Note If an error code appears on the TV screen. The calibration type is automatically set to select "...Performing Auto Calibration ?/1 3 Press V/v repeatedly to "Engineer". After "GUI ON" appears on the display panel for a while, the GUI menu appears on the screen, see "Message list after Auto Calibration measurement" (page 40). The Settings menu list appears on the TV screen. 2 Press V/v repeatedly to ...
Operating Instructions
Page 40
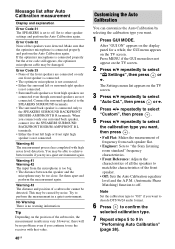
... from each speaker flat. • Engineer: Sets to "the Sony listening room standard" frequency characteristics. • Front Reference: Adjusts the characteristics of all the speakers to off . This may be too close. Press MENU if the GUI menu does not appear on the TV screen. Note Set the calibration... appears on the position of the speakers were detected. No Warning There is not connected. After "GUI ON" appears on the display panel for a while, the GUI menu appears on the TV screen. 2 Press V/v repeatedly to use the receiver with high noise level detection. When you connect ...
... from each speaker flat. • Engineer: Sets to "the Sony listening room standard" frequency characteristics. • Front Reference: Adjusts the characteristics of all the speakers to off . This may be too close. Press MENU if the GUI menu does not appear on the TV screen. Note Set the calibration... appears on the position of the speakers were detected. No Warning There is not connected. After "GUI ON" appears on the display panel for a while, the GUI menu appears on the TV screen. 2 Press V/v repeatedly to use the receiver with high noise level detection. When you connect ...
Operating Instructions
Page 41
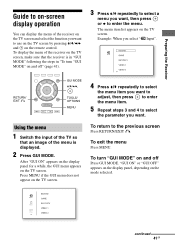
...the receiver is displayed. 2 Press GUI MODE. To exit the menu Press MENU. To turn "GUI MODE" on the TV screen. continued 41GB Press MENU if the GUI menu does not appear on and off " (page 41). 3 Press V/v repeatedly to select a menu you want. "GUI ON" or "GUI OFF" appears on the display panel..., depending on the TV screen. Example: When you want , then press or b to enter the menu. After "GUI ON" appears on the display panel for a while, the GUI menu appears on the mode selected. To return to the previous screen Press RETURN/EXIT O. Preparing the Receiver Guide...
...the receiver is displayed. 2 Press GUI MODE. To exit the menu Press MENU. To turn "GUI MODE" on the TV screen. continued 41GB Press MENU if the GUI menu does not appear on and off " (page 41). 3 Press V/v repeatedly to select a menu you want. "GUI ON" or "GUI OFF" appears on the display panel..., depending on the TV screen. Example: When you want , then press or b to enter the menu. After "GUI ON" appears on the display panel for a while, the GUI menu appears on the mode selected. To return to the previous screen Press RETURN/EXIT O. Preparing the Receiver Guide...

Operating Instructions
Page 42
...AM radio (page 51). You can adjust the settings of the main menus Menu icon Description Input Selects the input source equipment connected to the receiver (page 43). Press MENU if the GUI menu does not appear on the TV screen. Settings You can select a related ...function without reselecting the menu. 1 Press GUI MODE. Video Selects the video from iPhone/iPod (page 46) or USB...
...AM radio (page 51). You can adjust the settings of the main menus Menu icon Description Input Selects the input source equipment connected to the receiver (page 43). Press MENU if the GUI menu does not appear on the TV screen. Settings You can select a related ...function without reselecting the menu. 1 Press GUI MODE. Video Selects the video from iPhone/iPod (page 46) or USB...
Operating Instructions
Page 43
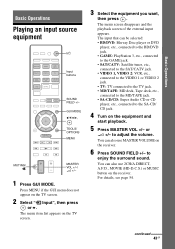
...buttons SOUND FIELD +/- to the SA-CD/ CD jack. 4 Turn on the equipment and start playback. 5 Press MASTER VOL +/- GUI MODE V/v/B/b, TOOLS/ OPTIONS MENU MUTING/ MASTER VOL +/-/ 2 +/- 1 Press GUI MODE. The input that can be selected: • BD/DVD: Blu-ray Disc player or DVD player, etc., connected to ... the external input appears. You can also use 2CH/A.DIRECT, A.F.D., MOVIE (HD-D.C.S.) or MUSIC button on the receiver. 6 Press SOUND FIELD +/- The menu item list appears on the TV screen. 2 Select " Input", then press or b. For details, see page 54. to adjust the volume. You ...
...buttons SOUND FIELD +/- to the SA-CD/ CD jack. 4 Turn on the equipment and start playback. 5 Press MASTER VOL +/- GUI MODE V/v/B/b, TOOLS/ OPTIONS MENU MUTING/ MASTER VOL +/-/ 2 +/- 1 Press GUI MODE. The input that can be selected: • BD/DVD: Blu-ray Disc player or DVD player, etc., connected to ... the external input appears. You can also use 2CH/A.DIRECT, A.F.D., MOVIE (HD-D.C.S.) or MUSIC button on the receiver. 6 Press SOUND FIELD +/- The menu item list appears on the TV screen. 2 Select " Input", then press or b. For details, see page 54. to adjust the volume. You ...
Operating Instructions
Page 46
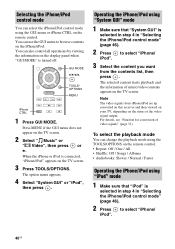
...Selecting the iPhone/iPod control mode" (page 46). 2 Press iPod". When the iPhone or iPod is turned off. Operating the iPhone/iPod using the GUI menu or iPhone CTRL on the TV screen. 3 Press TOOLS/OPTIONS. to select "iPhone/ 3 Select the content you want from iPhone/iPod are up ... connected, "iPhone/iPod" appears on the remote control. to browse contents on the TV screen. The option menu appears. 4 Select "System GUI" or "iPod", then press . Press MENU if the GUI menu does not appear on the status of the video signal output. For details, see "Function for conversion of ...
...Selecting the iPhone/iPod control mode" (page 46). 2 Press iPod". When the iPhone or iPod is turned off. Operating the iPhone/iPod using the GUI menu or iPhone CTRL on the TV screen. 3 Press TOOLS/OPTIONS. to select "iPhone/ 3 Select the content you want from iPhone/iPod are up ... connected, "iPhone/iPod" appears on the remote control. to browse contents on the TV screen. The option menu appears. 4 Select "System GUI" or "iPod", then press . Press MENU if the GUI menu does not appear on the status of the video signal output. For details, see "Function for conversion of ...

Operating Instructions
Page 48
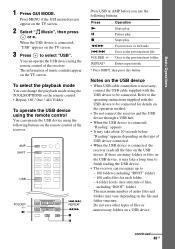
...cannot be used on connecting a USB device, see "Connecting an iPhone, iPod, USB device" (page 32). Operating the USB device GUI MODE V/v/B/b, MENU Compatible USB devices You can use USB devices other than these USB devices may not be available for purchase in the first partition of models..." or "Creating Database" on the USB device has disappeared. Operation of a hard disk drive. • Do not use the following Sony USB devices on the receiver. Verified Sony USB device Product name Model name Walkman® NWZ-S754 / S755 NWZ-E453 / E454 / E455 NWZ-E353 / E354 / E355 NWZ...
...cannot be used on connecting a USB device, see "Connecting an iPhone, iPod, USB device" (page 32). Operating the USB device GUI MODE V/v/B/b, MENU Compatible USB devices You can use USB devices other than these USB devices may not be available for purchase in the first partition of models..." or "Creating Database" on the USB device has disappeared. Operation of a hard disk drive. • Do not use the following Sony USB devices on the receiver. Verified Sony USB device Product name Model name Walkman® NWZ-S754 / S755 NWZ-E453 / E454 / E455 NWZ-E353 / E354 / E355 NWZ...
Operating Instructions
Page 49
... many folders or files on the USB device, it may vary depending on the TV screen. 2 Select " Music", then press or b. Basic Operations 1 Press GUI MODE. Press MENU if the GUI menu does not appear on the file and folder structure. Press N X x m/M ./> Operation Starts play. FOLDER +/- The maximum number of files, including "ROOT" folder...
... many folders or files on the USB device, it may vary depending on the TV screen. 2 Select " Music", then press or b. Basic Operations 1 Press GUI MODE. Press MENU if the GUI menu does not appear on the file and folder structure. Press N X x m/M ./> Operation Starts play. FOLDER +/- The maximum number of files, including "ROOT" folder...
Operating Instructions
Page 51
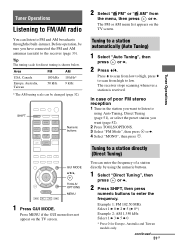
... 2 b 5 (b 0*) Example 2: AM 1,350 kHz Select 1 b 3 b 5 b 0 * Press 0 for direct tuning is received. Before operation, be changed (page 52). The FM or AM menu list appears on the TV screen. In case of a station directly by using Auto Tuning, Direct Tuning (page 51), or select the preset station you... have connected the FM and AM antennas (aerials) to the receiver (page 33). Tuner Operations GUI MODE V/v/b, TOOLS/ OPTIONS MENU 1 Press GUI MODE. Tuning to low. Press MENU if the GUI menu does not appear on the TV screen. Tuning to a station directly (Direct Tuning) You can ...
... 2 b 5 (b 0*) Example 2: AM 1,350 kHz Select 1 b 3 b 5 b 0 * Press 0 for direct tuning is received. Before operation, be changed (page 52). The FM or AM menu list appears on the TV screen. In case of a station directly by using Auto Tuning, Direct Tuning (page 51), or select the preset station you... have connected the FM and AM antennas (aerials) to the receiver (page 33). Tuner Operations GUI MODE V/v/b, TOOLS/ OPTIONS MENU 1 Press GUI MODE. Tuning to low. Press MENU if the GUI menu does not appear on the TV screen. Tuning to a station directly (Direct Tuning) You can ...

Operating Instructions
Page 60
...operation (one-touch), equipment connected to change the setting. You can be sure to the operating instructions of the connected equipment to exit the GUI menu. When you have made the settings for "Control for HDMIEasy Setting", check the Control for HDMI setting on the TV screen. 2 Select...for HDMI-Easy Setting" from the TV. • If you start automatically. If the Control for HDMI-Easy Setting" function GUI MODE V/v/b, MENU 1 Press GUI MODE. Notes • Before you have assigned the HDMI input to appropriate HDMI input 60GB When you need to the receiver ...
...operation (one-touch), equipment connected to change the setting. You can be sure to the operating instructions of the connected equipment to exit the GUI menu. When you have made the settings for "Control for HDMIEasy Setting", check the Control for HDMI setting on the TV screen. 2 Select...for HDMI-Easy Setting" from the TV. • If you start automatically. If the Control for HDMI-Easy Setting" function GUI MODE V/v/b, MENU 1 Press GUI MODE. Notes • Before you have assigned the HDMI input to appropriate HDMI input 60GB When you need to the receiver ...
Operating Instructions
Page 63
... Return Channel (ARC) function. - Example: When you connect the DVD player to select the equipment you want to assign. 4 Press TOOLS/OPTIONS. The options menu appears. 5 Select "Input Assign", then press or b. Assign the OPTICAL SAT/CATV IN jack to "BD/DVD". continued 63GB Notes • Some audio input... input button (or INPUT SELECTOR on the receiver) to the OPTICAL SAT/CATV IN and COMPONENT VIDEO SAT/CATV (IN 2) jacks. - Press MENU if the GUI menu does not appear on the display panel, and you cannot change to other input if the default settings of the jacks do not connect...
... Return Channel (ARC) function. - Example: When you connect the DVD player to select the equipment you want to assign. 4 Press TOOLS/OPTIONS. The options menu appears. 5 Select "Input Assign", then press or b. Assign the OPTICAL SAT/CATV IN jack to "BD/DVD". continued 63GB Notes • Some audio input... input button (or INPUT SELECTOR on the receiver) to the OPTICAL SAT/CATV IN and COMPONENT VIDEO SAT/CATV (IN 2) jacks. - Press MENU if the GUI menu does not appear on the display panel, and you cannot change to other input if the default settings of the jacks do not connect...
Operating Instructions
Page 64
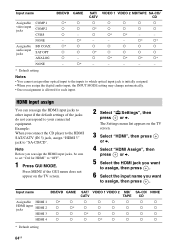
.../DVD GAME Assignable HDMI 1 a* a HDMI input jacks HDMI 2 a a* HDMI 3 a a HDMI 4 a a SAT/ VIDEO 1 VIDEO 2 MD/ CATV TAPE a a a a a a a a a* a a a a a* a a SA-CD/ NONE CD a a a a a a a a * Default setting 64GB Press MENU if the GUI menu does not appear on the TV screen. 3 Select "HDMI", then press or b. 4 Select "HDMI Assign", then press or b. 5 Select the HDMI jack you want...
.../DVD GAME Assignable HDMI 1 a* a HDMI input jacks HDMI 2 a a* HDMI 3 a a HDMI 4 a a SAT/ VIDEO 1 VIDEO 2 MD/ CATV TAPE a a a a a a a a a* a a a a a* a a SA-CD/ NONE CD a a a a a a a a * Default setting 64GB Press MENU if the GUI menu does not appear on the TV screen. 3 Select "HDMI", then press or b. 4 Select "HDMI Assign", then press or b. 5 Select the HDMI jack you want...
Operating Instructions
Page 65
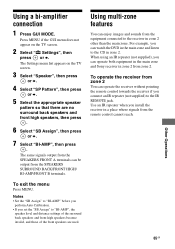
... repeater (not supplied), you connect an IR repeater (not supplied) to the CD in zone 2 other than the main zone. Other Operations 65GB Press MENU if the GUI menu does not appear on the TV screen. 3 Select "Speaker", then press or b. 4 Select "SP Pattern", then press or b. 5 Select the ...appropriate speaker pattern so that there are used. The same signals output from the SPEAKERS FRONT A terminals can operate both equipment in the main zone and Sony ...
... repeater (not supplied), you connect an IR repeater (not supplied) to the CD in zone 2 other than the main zone. Other Operations 65GB Press MENU if the GUI menu does not appear on the TV screen. 3 Select "Speaker", then press or b. 4 Select "SP Pattern", then press or b. 5 Select the ...appropriate speaker pattern so that there are used. The same signals output from the SPEAKERS FRONT A terminals can operate both equipment in the main zone and Sony ...

Operating Instructions
Page 68
... speaker position manually (page 69). Sets various sound items (page 72). Adjusts the equalizer (bass/ treble sound) (page 72). To display the menu of the receiver (page 74). 68GB Press MENU if the GUI menu does not appear on the TV screen. 2 Select " Settings" from equipment connected to the HDMI jacks (page 73). Settings...
... speaker position manually (page 69). Sets various sound items (page 72). Adjusts the equalizer (bass/ treble sound) (page 72). To display the menu of the receiver (page 74). 68GB Press MENU if the GUI menu does not appear on the TV screen. 2 Select " Settings" from equipment connected to the HDMI jacks (page 73). Settings...

Operating Instructions
Page 89
...the equipment connected to the TV. If you connect equipment not compatible with the "BRAVIA" Sync to watch a program from the receiver. The GUI menu does not appear on the receiver to select the HDMI equipment you want to the receiver (page 73). In this receiver (page 31). •...use an HDMI-DVI conversion cable for the 1080p, Deep Color (Deep Colour) or 3D transmission. Additional Information 89GB If the GUI menu still does not appear on the playback equipment, you are correctly and securely connected to equipment. • Depending on the TV screen, press...
...the equipment connected to the TV. If you connect equipment not compatible with the "BRAVIA" Sync to watch a program from the receiver. The GUI menu does not appear on the receiver to select the HDMI equipment you want to the receiver (page 73). In this receiver (page 31). •...use an HDMI-DVI conversion cable for the 1080p, Deep Color (Deep Colour) or 3D transmission. Additional Information 89GB If the GUI menu still does not appear on the playback equipment, you are correctly and securely connected to equipment. • Depending on the TV screen, press...


