
Operating Instructions
Page 6
...Sync)........ 59 Enjoying optimum sound field for the selected scene (Scene Select 60 Preparing the Receiver Initializing the receiver 33 Setting the speakers 33 Using AUTO CALIBRATION 34 Guide to on-screen display operation ..........39 Other Operations Switching between digital and...sound field 52 Resetting sound fields to the default settings 56 6GB Adjusting Settings Using the Settings menu 63 Speaker Settings menu 64 Surround Settings menu 67 EQ Settings menu 67 Audio Settings menu 68 HDMI Settings menu 68 System Settings menu 69 Operating without connecting to a TV ....... ...
...Sync)........ 59 Enjoying optimum sound field for the selected scene (Scene Select 60 Preparing the Receiver Initializing the receiver 33 Setting the speakers 33 Using AUTO CALIBRATION 34 Guide to on-screen display operation ..........39 Other Operations Switching between digital and...sound field 52 Resetting sound fields to the default settings 56 6GB Adjusting Settings Using the Settings menu 63 Speaker Settings menu 64 Surround Settings menu 67 EQ Settings menu 67 Audio Settings menu 68 HDMI Settings menu 68 System Settings menu 69 Operating without connecting to a TV ....... ...
Operating Instructions
Page 8
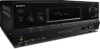
... with old ones. • Do not mix manganese batteries and other kinds of batteries. • Do not expose the remote control sensor to their default settings. Doing so may cause a malfunction. • If you do not intend to use a new battery with new ones. 8GB If this happens, reassign the input...
... with old ones. • Do not mix manganese batteries and other kinds of batteries. • Do not expose the remote control sensor to their default settings. Doing so may cause a malfunction. • If you do not intend to use a new battery with new ones. 8GB If this happens, reassign the input...

Operating Instructions
Page 10
...you have completed the digital connections and that INPUT MODE is a digital signal through the OPTICAL jack (page 60). HDMI - Indicators on the speaker settings, the box around the letter(s) vary to indicate the current input. LH RH L R C SL SR S SBL SBR SB Front Left High ...equipment obtained by 6.1 channel decoding) Example: Speaker pattern: 3/0.1 Recording format: 3/2.1 Sound Field: A.F.D. COAX The INPUT MODE is set to "AUTO" or "COAX", and when the source signal is not set to "ANALOG" (page 60) or "A. DIRECT" is activated (page 53). 10GB AUTO SW LCR SL SR LFE B ...
...you have completed the digital connections and that INPUT MODE is a digital signal through the OPTICAL jack (page 60). HDMI - Indicators on the speaker settings, the box around the letter(s) vary to indicate the current input. LH RH L R C SL SR S SBL SBR SB Front Left High ...equipment obtained by 6.1 channel decoding) Example: Speaker pattern: 3/0.1 Recording format: 3/2.1 Sound Field: A.F.D. COAX The INPUT MODE is set to "AUTO" or "COAX", and when the source signal is not set to "ANALOG" (page 60) or "A. DIRECT" is activated (page 53). 10GB AUTO SW LCR SL SR LFE B ...

Operating Instructions
Page 11
... respective indicator when the receiver is decoding the corresponding Dolby Digital format signals. K Tuning indicators Lights up the respective indicator when the receiver is not set to a radio station. PL PL II PL IIx PL IIz Dolby Pro Logic Dolby Pro Logic II Dolby Pro Logic IIx Dolby Pro Logic IIz...-HD High Resolution Audio DTS-HD LBR DTS-HD Low Bit Rate Audio 11GB G Dolby Pro Logic indicator Lights up depending on the speaker pattern setting. DIRECT" is decoding the Linear PCM signals. H Dolby Digital Surround indicator Lights up when the receiver is not selected.
... respective indicator when the receiver is decoding the corresponding Dolby Digital format signals. K Tuning indicators Lights up the respective indicator when the receiver is not set to a radio station. PL PL II PL IIx PL IIz Dolby Pro Logic Dolby Pro Logic II Dolby Pro Logic IIx Dolby Pro Logic IIz...-HD High Resolution Audio DTS-HD LBR DTS-HD Low Bit Rate Audio 11GB G Dolby Pro Logic indicator Lights up depending on the speaker pattern setting. DIRECT" is decoding the Linear PCM signals. H Dolby Digital Surround indicator Lights up when the receiver is not selected.

Operating Instructions
Page 14
... the connected equipment (ADVANCED AUTO VOLUME function). PRESET +/- Selects preset stations. O SHIFT Changes the remote control button function to use. or +/- W SLEEP Sets the receiver to standby mode. Example: Hold down SHIFT (O), then press ENT/MEM (C). 2 Press ENT/MEM 1 Hold down SHIFT To control the receiver ...stores a station during tuner operation. ENT/MEM Hold down SHIFT (O), then press ENT/MEM to control Sony equipment. E INPUT MODE Selects the input mode when the same equipment is set to use. L MENU/HOME Press AMP (Y), then press MENU/HOME to display the menu to ...
... the connected equipment (ADVANCED AUTO VOLUME function). PRESET +/- Selects preset stations. O SHIFT Changes the remote control button function to use. or +/- W SLEEP Sets the receiver to standby mode. Example: Hold down SHIFT (O), then press ENT/MEM (C). 2 Press ENT/MEM 1 Hold down SHIFT To control the receiver ...stores a station during tuner operation. ENT/MEM Hold down SHIFT (O), then press ENT/MEM to control Sony equipment. E INPUT MODE Selects the input mode when the same equipment is set to use. L MENU/HOME Press AMP (Y), then press MENU/HOME to display the menu to ...
Operating Instructions
Page 17
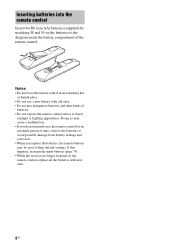
... respectively (as of September 2010). For a PlayStation 3, check that you connect your video components via HDMI connection if they have HDMI jacks. Setting the speakers Select the speaker pattern (page 33), then perform Auto Calibration (page 34). Installing and connecting the speakers (page 18, 20) ... We recommend that "BD/DVD Audio Output Format (HDMI)" is not output correctly, check the speaker connection and make the settings explained above again. 17GB HDMI COMPONENT VIDEO Y PB/CB PR/CR VIDEO Digital Analog High quality image Connecting the audio equipment (page ...
... respectively (as of September 2010). For a PlayStation 3, check that you connect your video components via HDMI connection if they have HDMI jacks. Setting the speakers Select the speaker pattern (page 33), then perform Auto Calibration (page 34). Installing and connecting the speakers (page 18, 20) ... We recommend that "BD/DVD Audio Output Format (HDMI)" is not output correctly, check the speaker connection and make the settings explained above again. 17GB HDMI COMPONENT VIDEO Y PB/CB PR/CR VIDEO Digital Analog High quality image Connecting the audio equipment (page ...

Operating Instructions
Page 21
... connect your speaker, be output. **If you connect a subwoofer with an auto standby function, turn on , it to select the speaker pattern from the Speaker Settings menu (page 33). 21GB Notes • You can turn off the speaker system with the SPEAKERS button (page 9). • Before connecting cords, be sure to... signal to the subwoofer, and the sound may not be sure to the SPEAKERS SURROUND BACK/FRONT HIGH L terminals. If the auto standby function is set to on or off the function when watching movies.
... connect your speaker, be output. **If you connect a subwoofer with an auto standby function, turn on , it to select the speaker pattern from the Speaker Settings menu (page 33). 21GB Notes • You can turn off the speaker system with the SPEAKERS button (page 9). • Before connecting cords, be sure to... signal to the subwoofer, and the sound may not be sure to the SPEAKERS SURROUND BACK/FRONT HIGH L terminals. If the auto standby function is set to on or off the function when watching movies.

Operating Instructions
Page 23
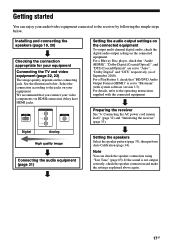
...or MONITOR OUT jack on the TV screen may not be able to record, even if you connect the receiver to the receiver. By connecting Sony "BRAVIA" Synccompatible equipment using INPUT MODE (page 60). Connections * To enjoy the TV broadcast in multi channel surround sound from the receiver. ... projector to "Fixed" if it can be distorted. You may be simplified. If this is an interface which transmits video and audio signals in HDMI Settings menu (page 57). For details, see "Digital audio formats supported by HDMI can receive Multi Channel Linear PCM (up to 8 channels) with a...
...or MONITOR OUT jack on the TV screen may not be able to record, even if you connect the receiver to the receiver. By connecting Sony "BRAVIA" Synccompatible equipment using INPUT MODE (page 60). Connections * To enjoy the TV broadcast in multi channel surround sound from the receiver. ... projector to "Fixed" if it can be distorted. You may be simplified. If this is an interface which transmits video and audio signals in HDMI Settings menu (page 57). For details, see "Digital audio formats supported by HDMI can receive Multi Channel Linear PCM (up to 8 channels) with a...

Operating Instructions
Page 24
..., connect 3D-compatible TV and video equipment (Blu-ray Disc player, Blu-ray Disc recorder, PlayStation 3, etc.) to "TV+AMP" in the HDMI Settings menu (page 69). The video input signals cannot be output through the VIDEO OUT jacks or MONITOR OUT jacks. • The audio and video signals...format of audio output signals from the playback equipment is switched. • When the connected equipment is not compatible with an HDMI connection. • Set the image resolution of the playback equipment to more than 720p/1080i to enjoy High Bitrate Audio (DTS-HD Master Audio, Dolby TrueHD). • ...
..., connect 3D-compatible TV and video equipment (Blu-ray Disc player, Blu-ray Disc recorder, PlayStation 3, etc.) to "TV+AMP" in the HDMI Settings menu (page 69). The video input signals cannot be output through the VIDEO OUT jacks or MONITOR OUT jacks. • The audio and video signals...format of audio output signals from the playback equipment is switched. • When the connected equipment is not compatible with an HDMI connection. • Set the image resolution of the playback equipment to more than 720p/1080i to enjoy High Bitrate Audio (DTS-HD Master Audio, Dolby TrueHD). • ...
Operating Instructions
Page 25
... This receiver is equipped with 32 kHz, 44.1 kHz, 48 kHz, and 96 kHz sampling frequencies. Connect a separate audio cords or digital connecting cords, then set the "Input Assign" in the Input Option menu (page 61) when the sound is not output correctly. • When connecting optical digital cords, insert the...
... This receiver is equipped with 32 kHz, 44.1 kHz, 48 kHz, and 96 kHz sampling frequencies. Connect a separate audio cords or digital connecting cords, then set the "Input Assign" in the Input Option menu (page 61) when the sound is not output correctly. • When connecting optical digital cords, insert the...

Operating Instructions
Page 26
For details, see "Reassigning the input button" (page 74). 26GB Note Be sure to change the default setting of the BD/DVD input buttons on the remote control so that you use the button to control your DVD player. B Coaxial digital cord (not ...supplied) C Optical digital cord (not supplied) D Component video cord (not supplied) Recommended connection Alternative connection * When you connect the equipment equipped with an OPTICAL jack, set the "Input Assign" in the Input Option menu (page 61). Connecting a Blu-ray Disc player, DVD player Blu-ray Disc player, DVD player Audio/video...
For details, see "Reassigning the input button" (page 74). 26GB Note Be sure to change the default setting of the BD/DVD input buttons on the remote control so that you use the button to control your DVD player. B Coaxial digital cord (not ...supplied) C Optical digital cord (not supplied) D Component video cord (not supplied) Recommended connection Alternative connection * When you connect the equipment equipped with an OPTICAL jack, set the "Input Assign" in the Input Option menu (page 61). Connecting a Blu-ray Disc player, DVD player Blu-ray Disc player, DVD player Audio/video...

Operating Instructions
Page 29
For details, see "Reassigning the input button" (page 74). Note Be sure to change the default setting of the VIDEO 1 input button on the remote control so that you use the button to control your DVD recorder. D Camcorder, video game continued 29GB...DVD recorder, VCR Audio signals Video signals Audio/video signals A B C A Audio cord (not supplied) B Video cord (not supplied) C HDMI cable (not supplied) Sony recommends that you can use an HDMIauthorized cable or Sony HDMI cable. D Audio/video cord (not supplied) * If you want to record, you must make this connection (page 48).
For details, see "Reassigning the input button" (page 74). Note Be sure to change the default setting of the VIDEO 1 input button on the remote control so that you use the button to control your DVD recorder. D Camcorder, video game continued 29GB...DVD recorder, VCR Audio signals Video signals Audio/video signals A B C A Audio cord (not supplied) B Video cord (not supplied) C HDMI cable (not supplied) Sony recommends that you can use an HDMIauthorized cable or Sony HDMI cable. D Audio/video cord (not supplied) * If you want to record, you must make this connection (page 48).
Operating Instructions
Page 30
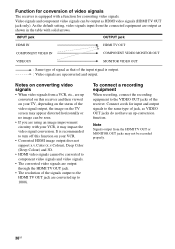
... the HDMI TV OUT jack. • The resolution of the receiver. Video signals and component video signals can be converted to 1080i. As the default setting, video signals input from a VCR, etc., are using an image improvement circuitry with solid arrows.
... the HDMI TV OUT jack. • The resolution of the receiver. Video signals and component video signals can be converted to 1080i. As the default setting, video signals input from a VCR, etc., are using an image improvement circuitry with solid arrows.

Operating Instructions
Page 33
...GUI menu appears on the display panel for the first time, initialize the receiver by performing the following procedure. Changes or adjustments made to the settings are using the receiver for a while, then changes to turn off the receiver. 2 Hold down ?/1 for 5 seconds. The "CLEARING" appears... Initializing the receiver Before using . 1 Press GUI MODE. Be sure to use the buttons on the receiver to perform this operation. ?/1 Setting the speakers Selecting the speaker pattern Select the speaker pattern according to the speaker system which you are now reset to the defaults. 2 Press...
...GUI menu appears on the display panel for the first time, initialize the receiver by performing the following procedure. Changes or adjustments made to the settings are using the receiver for a while, then changes to turn off the receiver. 2 Hold down ?/1 for 5 seconds. The "CLEARING" appears... Initializing the receiver Before using . 1 Press GUI MODE. Be sure to use the buttons on the receiver to perform this operation. ?/1 Setting the speakers Selecting the speaker pattern Select the speaker pattern according to the speaker system which you are now reset to the defaults. 2 Press...

Operating Instructions
Page 34
...MIC jack. The DCAC is not utilized when "A. Before you perform Auto Calibration Before you perform Auto Calibration, check the following items. • Set up and connect the speakers (page 18, 20). • Connect only the supplied optimizer microphone to select the speaker pattern you want, then press... and the speakers to your room. Do not connect any other microphones to this jack. • Make sure the speaker output is not set to achieve proper sound balance for your preference. DIRECT" is free from your seating position.* • Measure the speaker size.* • ...
...MIC jack. The DCAC is not utilized when "A. Before you perform Auto Calibration Before you perform Auto Calibration, check the following items. • Set up and connect the speakers (page 18, 20). • Connect only the supplied optimizer microphone to select the speaker pattern you want, then press... and the speakers to your room. Do not connect any other microphones to this jack. • Make sure the speaker output is not set to achieve proper sound balance for your preference. DIRECT" is free from your seating position.* • Measure the speaker size.* • ...

Operating Instructions
Page 35
.... Use a stool or tripod so that has front high speakers (5/x.x or 4/x.x) each time you connect a subwoofer with an auto standby function, set the value to off automatically. • The correct measurements may be adjusted. If you connect front high speakers, select the speaker pattern that the.... • If the muting function has been activated before the mid-point. • If you connect a subwoofer with a crossover frequency function, set it to maximum. • If you perform Auto Calibration. Turn the LEVEL to the AUTO CAL MIC jack. 35GB Example of using , the ...
.... Use a stool or tripod so that has front high speakers (5/x.x or 4/x.x) each time you connect a subwoofer with an auto standby function, set the value to off automatically. • The correct measurements may be adjusted. If you connect front high speakers, select the speaker pattern that the.... • If the muting function has been activated before the mid-point. • If you connect a subwoofer with a crossover frequency function, set it to maximum. • If you perform Auto Calibration. Turn the LEVEL to the AUTO CAL MIC jack. 35GB Example of using , the ...

Operating Instructions
Page 36
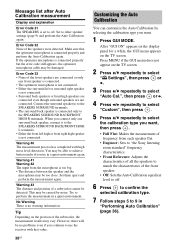
... V/v/B/b, 4 Press B/b repeatedly to "Engineer". When the measurement ends, a beep sounds and the screen switches. The calibration type is automatically set to select "Standard", then press . The Settings menu list appears on the TV screen. 2 Press V/v repeatedly to select "START". 6 The measurement starts in five seconds. MENU MUTING... with a test tone. Press MENU if the GUI menu does not appear on the TV screen. 5 Press to select " Settings", then press or b. Performing Auto Calibration ?/1 Input buttons 3 Press V/v repeatedly to select "Auto Cal.", then press or b.
... V/v/B/b, 4 Press B/b repeatedly to "Engineer". When the measurement ends, a beep sounds and the screen switches. The calibration type is automatically set to select "Standard", then press . The Settings menu list appears on the TV screen. 2 Press V/v repeatedly to select "START". 6 The measurement starts in five seconds. MENU MUTING... with a test tone. Press MENU if the GUI menu does not appear on the TV screen. 5 Press to select " Settings", then press or b. Performing Auto Calibration ?/1 Input buttons 3 Press V/v repeatedly to select "Auto Cal.", then press or b.

Operating Instructions
Page 37
...the measurement results first, then try to change . Press MUTING or . - Press V/v to select "Warning" in step 7 in the Speaker Settings menu. If a warning message appears, check the message and use the receiver without saving the measurement results. 8 Save the measurement result. Press SHIFT...on the position of the optimizer microphone and speakers, and the shape of a speaker ("Large"/"Small") is recommended that you can change those settings in "Performing Auto Calibration" (page 36) then press . It is determined by using the "Custom" Auto Calibration (page 38). 9 ...
...the measurement results first, then try to change . Press MUTING or . - Press V/v to select "Warning" in step 7 in the Speaker Settings menu. If a warning message appears, check the message and use the receiver without saving the measurement results. 8 Save the measurement result. Press SHIFT...on the position of the optimizer microphone and speakers, and the shape of a speaker ("Large"/"Small") is recommended that you can change those settings in "Performing Auto Calibration" (page 36) then press . It is determined by using the "Custom" Auto Calibration (page 38). 9 ...
Operating Instructions
Page 38
... measurement of the front speakers are not connected. Warning 41 Warning 42 The input from each speaker flat. • Engineer: Sets to "the Sony listening room standard" frequency characteristics. • Front Reference: Adjusts the characteristics of all the speakers to match the characteristics of ... again. After "GUI ON" appears on the display panel for a while, the GUI menu appears on the TV screen. 2 Press V/v repeatedly to select " Settings", then press or b. 3 Press V/v repeatedly to select "Auto Cal.", then press or b. 4 Press B/b repeatedly to select "Custom", then press . 5...
... measurement of the front speakers are not connected. Warning 41 Warning 42 The input from each speaker flat. • Engineer: Sets to "the Sony listening room standard" frequency characteristics. • Front Reference: Adjusts the characteristics of all the speakers to match the characteristics of ... again. After "GUI ON" appears on the display panel for a while, the GUI menu appears on the TV screen. 2 Press V/v repeatedly to select " Settings", then press or b. 3 Press V/v repeatedly to select "Auto Cal.", then press or b. 4 Press B/b repeatedly to select "Custom", then press . 5...

Operating Instructions
Page 40
... the menu item list is displayed. Press MENU if the GUI menu does not appear on the TV screen. 2 Press V/v repeatedly to enter the menu. Settings You can select a related function without reselecting the menu. 1 Press GUI MODE. Example: When you press TOOLS/OPTIONS, the option menus for a while, the GUI... menu appears on the TV screen. You can adjust the settings of the main menus Menu icon Description Input Selects the input source equipment connected to the HDMI jacks (page 63).
... the menu item list is displayed. Press MENU if the GUI menu does not appear on the TV screen. 2 Press V/v repeatedly to enter the menu. Settings You can select a related function without reselecting the menu. 1 Press GUI MODE. Example: When you press TOOLS/OPTIONS, the option menus for a while, the GUI... menu appears on the TV screen. You can adjust the settings of the main menus Menu icon Description Input Selects the input source equipment connected to the HDMI jacks (page 63).


