

Operating Instructions
Page 3
... Union and other European countries with the apparatus. Also disconnect the AC power cord from the MAINS before disconnecting the speaker cord from the apparatus and the speakers. Instead it shall be handed over . 13)Unplug this apparatus during lightning storms or when unused for the environment ... to which could void your household waste disposal service or the shop where you will help prevent potential negative consequences for long periods of speaker cord by hand. continued 3GB 12)Use only with the cart, stand, tripod, bracket, or table specified by the manufacturer, or ...
... Union and other European countries with the apparatus. Also disconnect the AC power cord from the MAINS before disconnecting the speaker cord from the apparatus and the speakers. Instead it shall be handed over . 13)Unplug this apparatus during lightning storms or when unused for the environment ... to which could void your household waste disposal service or the shop where you will help prevent potential negative consequences for long periods of speaker cord by hand. continued 3GB 12)Use only with the cart, stand, tripod, bracket, or table specified by the manufacturer, or ...
Operating Instructions
Page 5
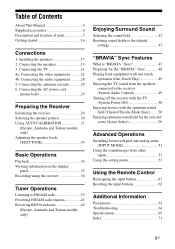
Table of Contents About This Manual 4 Supplied accessories 6 Description and location of parts 7 Getting started 16 Connections 1: Installing the speakers 17 2: Connecting the speakers 19 3: Connecting the TV 21 4a: Connecting the video equipment ...........22 4b: Connecting the audio equipment...........28 5: Connecting the ...for the "BRAVIA" Sync 48 Playing back equipment with one-touch operation (One-Touch Play 49 Enjoying the TV sound from the speakers connected to the receiver (System Audio Control 49 Turning off the receiver with the TV (System Power-Off 50 Enjoying movies with...
Table of Contents About This Manual 4 Supplied accessories 6 Description and location of parts 7 Getting started 16 Connections 1: Installing the speakers 17 2: Connecting the speakers 19 3: Connecting the TV 21 4a: Connecting the video equipment ...........22 4b: Connecting the audio equipment...........28 5: Connecting the ...for the "BRAVIA" Sync 48 Playing back equipment with one-touch operation (One-Touch Play 49 Enjoying the TV sound from the speakers connected to the receiver (System Audio Control 49 Turning off the receiver with the TV (System Power-Off 50 Enjoying movies with...
Operating Instructions
Page 8
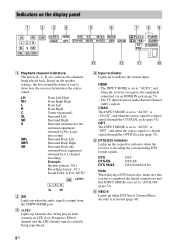
... by Pro Logic processing) Surround Back Left Surround Back Right Surround Back (the surround back equipment obtained by 6.1 channel decoding) Example: Speaker pattern: 3/0.1 Recording format: 3/2.1 Sound Field: A.F.D. Indicators on the speaker settings, the box around the letter(s) vary to show how the receiver downmixes the source sound. A Playback channel indicators The letters...
... by Pro Logic processing) Surround Back Left Surround Back Right Surround Back (the surround back equipment obtained by 6.1 channel decoding) Example: Speaker pattern: 3/0.1 Recording format: 3/2.1 Sound Field: A.F.D. Indicators on the speaker settings, the box around the letter(s) vary to show how the receiver downmixes the source sound. A Playback channel indicators The letters...
Operating Instructions
Page 9
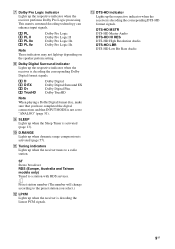
... Low Bit Rate Audio 9GB I SLEEP Lights up when dynamic range compression is activated (page 13). G Dolby Pro Logic indicator Lights up depending on the speaker pattern setting. PL PL II PL IIx PL IIz Dolby Pro Logic Dolby Pro Logic II Dolby Pro Logic IIx Dolby Pro Logic IIz Note...
... Low Bit Rate Audio 9GB I SLEEP Lights up when dynamic range compression is activated (page 13). G Dolby Pro Logic indicator Lights up depending on the speaker pattern setting. PL PL II PL IIx PL IIz Dolby Pro Logic Dolby Pro Logic II Dolby Pro Logic IIx Dolby Pro Logic IIz Note...
Operating Instructions
Page 11
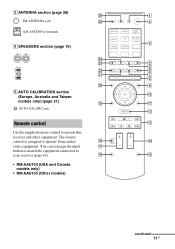
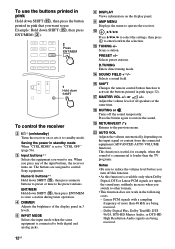
... 11GB The remote control is assigned to operate this receiver and other equipment. C ANTENNA section (page 28) wh 1 FM ANTENNA jack wg 2 AM ANTENNA terminals 3 D SPEAKERS section (page 19) wf wd 4 5 ws 6 wa 7 8 w; 9 E AUTO CALIBRATION section 0 (Europe, Australia and Taiwan models only) (page 31) ql ...qa AUTO CAL MIC jack qs Remote control qd Use the supplied remote control to operate Sony audio/ qk qf video equipment. You can reassign the input qj button to match the equipment connected to your receiver (page 61).
... 11GB The remote control is assigned to operate this receiver and other equipment. C ANTENNA section (page 28) wh 1 FM ANTENNA jack wg 2 AM ANTENNA terminals 3 D SPEAKERS section (page 19) wf wd 4 5 ws 6 wa 7 8 w; 9 E AUTO CALIBRATION section 0 (Europe, Australia and Taiwan models only) (page 31) ql ...qa AUTO CAL MIC jack qs Remote control qd Use the supplied remote control to operate Sony audio/ qk qf video equipment. You can reassign the input qj button to match the equipment connected to your receiver (page 61).
Operating Instructions
Page 12
...to preset or tune to standby mode. D DIMMER Adjusts the brightness of more than the TV programs. Notes • Be sure to control Sony equipment. I AMP MENU Displays the menu to enter/confirm the selection. W AUTO VOL Adjusts the volume automatically depending on the display panel....AUTO VOLUME function). M TUNING +/- N SOUND FIELD +**/- Adjust the volume level of a commercial is useful, for example, when the sound of all speakers at the same time. This function is louder than 48 kHz are input, the sound may suddenly increase when you press any of the input...
...to preset or tune to standby mode. D DIMMER Adjusts the brightness of more than the TV programs. Notes • Be sure to control Sony equipment. I AMP MENU Displays the menu to enter/confirm the selection. W AUTO VOL Adjusts the volume automatically depending on the display panel....AUTO VOLUME function). M TUNING +/- N SOUND FIELD +**/- Adjust the volume level of a commercial is useful, for example, when the sound of all speakers at the same time. This function is louder than 48 kHz are input, the sound may suddenly increase when you press any of the input...

Operating Instructions
Page 16
...the AC power cord (mains lead)" (page 29) and "Initializing the receiver" (page 29). Setting the speakers (USA and Canada models only) Select the speaker pattern (page 30), then check the speaker connection using "T. TONE" in LEVEL menu (page 35). See the illustration below . For a Blu-ray...If the sound is not output correctly, check the speaker connection and make the settings explained above again. (Other models) Select the speaker pattern (page 30), then perform Auto Calibration (page 31). Installing and connecting the speakers (page 17, 19) Checking the connection appropriate for ...
...the AC power cord (mains lead)" (page 29) and "Initializing the receiver" (page 29). Setting the speakers (USA and Canada models only) Select the speaker pattern (page 30), then check the speaker connection using "T. TONE" in LEVEL menu (page 35). See the illustration below . For a Blu-ray...If the sound is not output correctly, check the speaker connection and make the settings explained above again. (Other models) Select the speaker pattern (page 30), then perform Auto Calibration (page 31). Installing and connecting the speakers (page 17, 19) Checking the connection appropriate for ...

Operating Instructions
Page 17
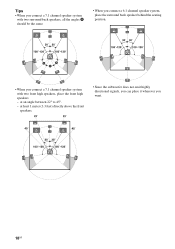
AFront speaker (Left) BFront speaker (Right) CCenter speaker DSurround speaker (Left) ESurround speaker (Right) FSurround back speaker (Left)* GSurround back speaker (Right)* HFront high speaker (Left)* IFront high speaker (Right)* JSubwoofer * You cannot use a 7.1 channel system (7 speakers and one surround back speaker (6.1 channel) or two surround back speakers (7.1 channel). 7.1 channel speaker system using front high speakers You can enjoy high fidelity reproduction of DVD or...
AFront speaker (Left) BFront speaker (Right) CCenter speaker DSurround speaker (Left) ESurround speaker (Right) FSurround back speaker (Left)* GSurround back speaker (Right)* HFront high speaker (Left)* IFront high speaker (Right)* JSubwoofer * You cannot use a 7.1 channel system (7 speakers and one surround back speaker (6.1 channel) or two surround back speakers (7.1 channel). 7.1 channel speaker system using front high speakers You can enjoy high fidelity reproduction of DVD or...
Operating Instructions
Page 18
at least 1 meter (3.3 feet) directly above the front speakers. • Since the subwoofer does not emit highly directional signals, you can place it wherever you connect a 7.1 channel speaker system with two front high speakers, place the front high speakers - at an angle between 22° to 45°. - Tips • When you connect a 7.1 channel speaker system with two surround back speakers, all the angles A should be the same. • When you connect a 6.1 channel speaker system, place the surround back speaker behind the seating position. • When you want. 18GB
at least 1 meter (3.3 feet) directly above the front speakers. • Since the subwoofer does not emit highly directional signals, you can place it wherever you connect a 7.1 channel speaker system with two front high speakers, place the front high speakers - at an angle between 22° to 45°. - Tips • When you connect a 7.1 channel speaker system with two surround back speakers, all the angles A should be the same. • When you connect a 6.1 channel speaker system, place the surround back speaker behind the seating position. • When you want. 18GB
Operating Instructions
Page 19
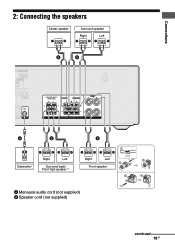
Connections 2: Connecting the speakers Center speaker Surround speaker Right Left B B A B Subwoofer * Right Left Surround back/ Front high speaker** B 1 10 mm (13/32") Right Left 4 2 3 Front speaker 2 4 3 A Monaural audio cord (not supplied) B Speaker cord (not supplied) continued 19GB
Connections 2: Connecting the speakers Center speaker Surround speaker Right Left B B A B Subwoofer * Right Left Surround back/ Front high speaker** B 1 10 mm (13/32") Right Left 4 2 3 Front speaker 2 4 3 A Monaural audio cord (not supplied) B Speaker cord (not supplied) continued 19GB
Operating Instructions
Page 20
If the auto standby function is set to on the level of the speaker cords are not touching each other within the SPEAKERS terminals. • After you have install and connect your speaker, be output. **If you connect a subwoofer with an auto standby function, turn off the function when ...watching movies. * When you connect only one surround back speaker, connect it turns to standby mode automatically based on , it to select the speaker pattern from SPEAKER menu (page 30). 20GB Notes • Before connecting the cords, be sure to disconnect the...
If the auto standby function is set to on the level of the speaker cords are not touching each other within the SPEAKERS terminals. • After you have install and connect your speaker, be output. **If you connect a subwoofer with an auto standby function, turn off the function when ...watching movies. * When you connect only one surround back speaker, connect it turns to standby mode automatically based on , it to select the speaker pattern from SPEAKER menu (page 30). 20GB Notes • Before connecting the cords, be sure to disconnect the...
Operating Instructions
Page 22
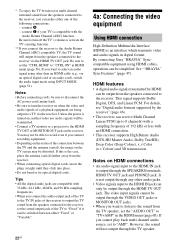
...channels) with a sampling frequency of 192 kHz or less with the Audio Return Channel (ARC) function. You may be output through the TV speaker. By connecting Sony "BRAVIA" Synccompatible equipment using HDMI cables, operations can only be distorted. See ""BRAVIA" Sync Features" (page 47). Notes on , neither video...plugs straight until they click into place. • Do not bend or tie optical digital cords. However, the sound will output from the speakers connected to the receiver. connect E if your TV is output through any other than an HDMI cable (e.g., via the HDMI TV OUT ...
...channels) with a sampling frequency of 192 kHz or less with the Audio Return Channel (ARC) function. You may be output through the TV speaker. By connecting Sony "BRAVIA" Synccompatible equipment using HDMI cables, operations can only be distorted. See ""BRAVIA" Sync Features" (page 47). Notes on , neither video...plugs straight until they click into place. • Do not bend or tie optical digital cords. However, the sound will output from the speakers connected to the receiver. connect E if your TV is output through any other than an HDMI cable (e.g., via the HDMI TV OUT ...
Operating Instructions
Page 28
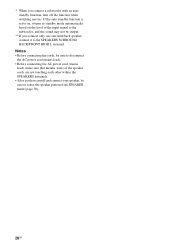
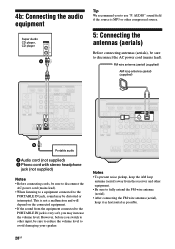
... (aerials) Before connecting antennas (aerials), be sure to disconnect the AC power cord (mains lead). • When listening to a equipment connected to avoid damaging your speaker. Notes • To prevent noise pickup, keep it as horizontal as possible. 28GB FM wire antenna (aerial) (supplied) AM loop antenna (aerial) (supplied) B Portable audio...
... (aerials) Before connecting antennas (aerials), be sure to disconnect the AC power cord (mains lead). • When listening to a equipment connected to avoid damaging your speaker. Notes • To prevent noise pickup, keep it as horizontal as possible. 28GB FM wire antenna (aerial) (supplied) AM loop antenna (aerial) (supplied) B Portable audio...
Operating Instructions
Page 30
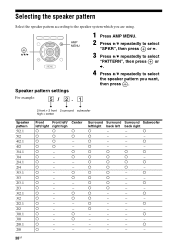
... Press V/v repeatedly to select "SPKR", then press or b. 3 Press V/v repeatedly to select "PATTERN", then press or b. 4 Press V/v repeatedly to select the speaker pattern you want, then press . a a - - a a - - - a a a a a a a - a a - - - - -...right high a a a a Center a a - - a - - - - - - - a - - - - 30GB For example: 5 / 2. 1 2 front + 2 front 2 surround subwoofer high + center Speaker pattern 5/2.1 5/2 4/2.1 4/2 3/4.1 3/4 2/4.1 2/4 3/3.1 3/3 2/3.1 2/3 3/2.1 3/2 2/2.1 2/2 3/0.1 3/0 2/0.1 2/0 Front left/right a a a a a a a a a a a a a a a a a a a...
... Press V/v repeatedly to select "SPKR", then press or b. 3 Press V/v repeatedly to select "PATTERN", then press or b. 4 Press V/v repeatedly to select the speaker pattern you want, then press . a a - - a a - - - a a a a a a a - a a - - - - -...right high a a a a Center a a - - a - - - - - - - a - - - - 30GB For example: 5 / 2. 1 2 front + 2 front 2 surround subwoofer high + center Speaker pattern 5/2.1 5/2 4/2.1 4/2 3/4.1 3/4 2/4.1 2/4 3/3.1 3/3 2/3.1 2/3 3/2.1 3/2 2/2.1 2/2 3/0.1 3/0 2/0.1 2/0 Front left/right a a a a a a a a a a a a a a a a a a a...
Operating Instructions
Page 31
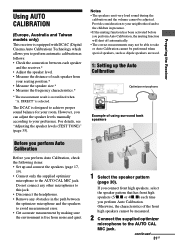
...sure the environment is free from your room. If you connect front high speakers, select the speaker pattern that has front high speakers (5/x.x or 4/x.x) each speaker from noise and quiet. 1 Select the speaker pattern (page 30). The DCAC is designed to your neighborhood and to... Cinema Auto Calibration) Technology which allows you to perform automatic calibration as dipole speakers are used. 1: Setting up the Auto Calibration Optimizer microphone Example of using surround back speakers Before you perform Auto Calibration Before you perform Auto Calibration, check the following ...
...sure the environment is free from your room. If you connect front high speakers, select the speaker pattern that has front high speakers (5/x.x or 4/x.x) each speaker from noise and quiet. 1 Select the speaker pattern (page 30). The DCAC is designed to your neighborhood and to... Cinema Auto Calibration) Technology which allows you to perform automatic calibration as dipole speakers are used. 1: Setting up the Auto Calibration Optimizer microphone Example of using surround back speakers Before you perform Auto Calibration Before you perform Auto Calibration, check the following ...
Operating Instructions
Page 33
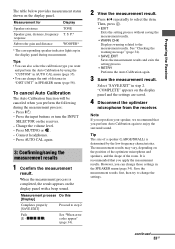
... beep sound. Press ?/1. - When the measurement process is completed, the result appears on the position of the optimizer microphone and speakers, and the shape of the room. Tip The size of distance in "DIST.UNIT" in the display panel during the measurement ... Connect headphones. - Preparing the Receiver The table below provides measurement status shown on the display panel. Measurement for Display Speaker existence TONE Speaker gain, distance, frequency response Subwoofer gain and distance T. To cancel Auto Calibration The Auto Calibration function will be canceled ...
... beep sound. Press ?/1. - When the measurement process is completed, the result appears on the position of the optimizer microphone and speakers, and the shape of the room. Tip The size of distance in "DIST.UNIT" in the display panel during the measurement ... Connect headphones. - Preparing the Receiver The table below provides measurement status shown on the display panel. Measurement for Display Speaker existence TONE Speaker gain, distance, frequency response Subwoofer gain and distance T. To cancel Auto Calibration The Auto Calibration function will be canceled ...
Operating Instructions
Page 34
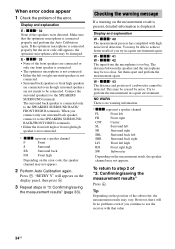
... E - When you try in a quiet environment again. Checking the warning message If a warning on the position of the front speakers are not meant to the SPEAKERS SURROUND BACK/FRONT HIGH L terminals. • Either the front left high RH Front right high SW Subwoofer Depending on the error code...Center SL Surround left SR Surround right SBL Surround back left SBR Surround back right LH Front left high or front right high speaker is displayed. You may not appears. 2 Perform Auto Calibration again. Press . Set them apart and perform the measurement again. ...
... E - When you try in a quiet environment again. Checking the warning message If a warning on the position of the front speakers are not meant to the SPEAKERS SURROUND BACK/FRONT HIGH L terminals. • Either the front left high RH Front right high SW Subwoofer Depending on the error code...Center SL Surround left SR Surround right SBL Surround back left SBR Surround back right LH Front left high or front right high speaker is displayed. You may not appears. 2 Perform Auto Calibration again. Press . Set them apart and perform the measurement again. ...
Operating Instructions
Page 35
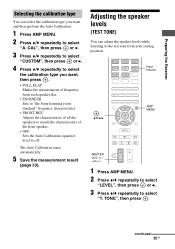
... press . • FULL.FLAT Makes the measurement of frequency from each speaker flat. • ENGINEER Sets to "the Sony listening room standard" frequency characteristics. • FRONT.REF Adjusts the characteristics of all the speakers to match the characteristics of the front speaker. • OFF Sets the Auto Calibration equalizer level to the test tone...
... press . • FULL.FLAT Makes the measurement of frequency from each speaker flat. • ENGINEER Sets to "the Sony listening room standard" frequency characteristics. • FRONT.REF Adjusts the characteristics of all the speakers to match the characteristics of the front speaker. • OFF Sets the Auto Calibration equalizer level to the test tone...
Operating Instructions
Page 36
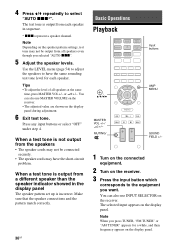
..."OFF" under step 4. When a test tone is not output from a different speaker than the speaker indicator showed in sequence. * xxx represent a speaker channel. When a test tone is output from the speakers • The speaker cords may have the same sounding test tone level for a while, and then ...+/-. You can also use MASTER VOLUME on the receiver. • The adjusted value are shown on the display panel. Make sure that the speaker connections and the pattern match correctly. 36GB Basic Operations Playback Input buttons , V/v/B/b AMP MENU MASTER VOL +/-/ 2 +/- You can also use ...
..."OFF" under step 4. When a test tone is not output from a different speaker than the speaker indicator showed in sequence. * xxx represent a speaker channel. When a test tone is output from the speakers • The speaker cords may have the same sounding test tone level for a while, and then ...+/-. You can also use MASTER VOLUME on the receiver. • The adjusted value are shown on the display panel. Make sure that the speaker connections and the pattern match correctly. 36GB Basic Operations Playback Input buttons , V/v/B/b AMP MENU MASTER VOL +/-/ 2 +/- You can also use ...
Operating Instructions
Page 37
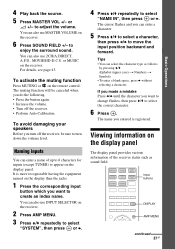
... select a character, then press B/b to turn down the volume level. or MUSIC on the remote control. For details, see page 43. To avoid damaging your speakers Before you turn off the receiver. • Perform Auto Calibration. or 2 +/- The muting function will be sure to move the input position backward and forward...
... select a character, then press B/b to turn down the volume level. or MUSIC on the remote control. For details, see page 43. To avoid damaging your speakers Before you turn off the receiver. • Perform Auto Calibration. or 2 +/- The muting function will be sure to move the input position backward and forward...


