Operating Instructions
Page 6
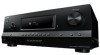
...adjust brightness of all speakers at the same time (page 25, 26, 27, 28). The current status of the selected component or a list of parts Front panel 1 2 3 4 ?/1 INPUT SELECTOR 5 MASTER VOLUME PHONES INPUT MODE TUNING MODE TUNING MEMORY/ 2CH/ ENTER A.DIRECT A.F.D. Press to turn the receiver... items appears here (page 7). Press MUTING again to both digital and analog jacks (page 49). I 2CH/ A.DIRECT Press to adjust the volume level of the display. A.F.D. TUNING +/- MOVIE MUSIC DISPLAY DIMMER MUTING qs qa q; 9 8 76 Name A ?/1 (on/standby) B INPUT...
...adjust brightness of all speakers at the same time (page 25, 26, 27, 28). The current status of the selected component or a list of parts Front panel 1 2 3 4 ?/1 INPUT SELECTOR 5 MASTER VOLUME PHONES INPUT MODE TUNING MODE TUNING MEMORY/ 2CH/ ENTER A.DIRECT A.F.D. Press to turn the receiver... items appears here (page 7). Press MUTING again to both digital and analog jacks (page 49). I 2CH/ A.DIRECT Press to adjust the volume level of the display. A.F.D. TUNING +/- MOVIE MUSIC DISPLAY DIMMER MUTING qs qa q; 9 8 76 Name A ?/1 (on/standby) B INPUT...
Operating Instructions
Page 11
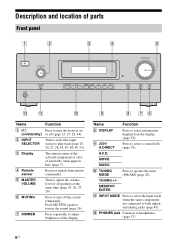
...receiver. MASTER VOL +a)/- Press to perform menu operations. If you want to enter direct tuning mode. You can change the button assignments following the steps in the forward/ reverse direction of all Sony components, press ?/1 and AV ?/1 (A) at the same time (SYSTEM STANDBY). Then, use V, v, B, b and (P) to adjust the volume... level of the DVD player. - Press to turn off . Press to adjust the volume level of the VCR...
...receiver. MASTER VOL +a)/- Press to perform menu operations. If you want to enter direct tuning mode. You can change the button assignments following the steps in the forward/ reverse direction of all Sony components, press ?/1 and AV ?/1 (A) at the same time (SYSTEM STANDBY). Then, use V, v, B, b and (P) to adjust the volume... level of the DVD player. - Press to turn off . Press to adjust the volume level of the VCR...
Operating Instructions
Page 23
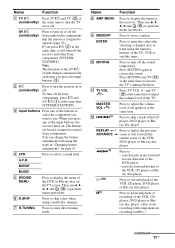
...AKERS To the wall outlet Performing initial setup operations Before using the receiver for a while, "CLEARED" appears. "PUSH" and "ENTER" appears on the receiver for 5 seconds. All the settings you have changed or adjusted are not touching each other between the speaker terminals. • ... speaker cords are reset to turn off the receiver. 2 Hold down ?/1 for this operation. ?/1 ?/1 INPUT SELECTOR MASTER VOLUME PHONES INPUT MODE TUNING MODE TUNING MEMORY/ 2CH/ ENTER A.DIRECT A.F.D. Getting Started 6: Preparing the receiver and the remote Connecting the AC power cord...
...AKERS To the wall outlet Performing initial setup operations Before using the receiver for a while, "CLEARED" appears. "PUSH" and "ENTER" appears on the receiver for 5 seconds. All the settings you have changed or adjusted are not touching each other between the speaker terminals. • ... speaker cords are reset to turn off the receiver. 2 Hold down ?/1 for this operation. ?/1 ?/1 INPUT SELECTOR MASTER VOLUME PHONES INPUT MODE TUNING MODE TUNING MEMORY/ 2CH/ ENTER A.DIRECT A.F.D. Getting Started 6: Preparing the receiver and the remote Connecting the AC power cord...
Operating Instructions
Page 25
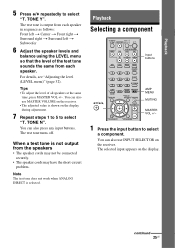
... level (LEVEL menu)" (page 32). TONE N". The test tone is shown on the display. You can also use MASTER VOLUME on the receiver. • The adjusted value is output from the speakers • The speaker cords may not be connected securely. • The speaker cords may ...have the short-circuit problem. When a test tone is selected. The selected input appears on the display during adjustment. 7 Repeat steps 1 to 5 to select ...
... level (LEVEL menu)" (page 32). TONE N". The test tone is shown on the display. You can also use MASTER VOLUME on the receiver. • The adjusted value is output from the speakers • The speaker cords may not be connected securely. • The speaker cords may ...have the short-circuit problem. When a test tone is selected. The selected input appears on the display during adjustment. 7 Repeat steps 1 to 5 to select ...
Operating Instructions
Page 26
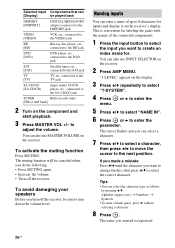
... b without selecting a character. 8 Press . The name you do the following. • Press MUTING again. • Increase the volume. • Turn off the receiver, be played back DMPORT [DMPORT] DIGITAL MEDIA PORT adapter connected to the DMPORT jack VIDEO [VIDEO] VCR, etc., connected to the ... etc., connected to the next position. If you made a mistake Press B/b until the character you want to change flashes, then press V/v to adjust the volume. Naming inputs You can select a character. 7 Press V/v to select a character, then press B/b to move the cursor to the SAT jack ...
... b without selecting a character. 8 Press . The name you do the following. • Press MUTING again. • Increase the volume. • Turn off the receiver, be played back DMPORT [DMPORT] DIGITAL MEDIA PORT adapter connected to the DMPORT jack VIDEO [VIDEO] VCR, etc., connected to the ... etc., connected to the next position. If you made a mistake Press B/b until the character you want to change flashes, then press V/v to adjust the volume. Naming inputs You can select a character. 7 Press V/v to select a character, then press B/b to move the cursor to the SAT jack ...
Operating Instructions
Page 27
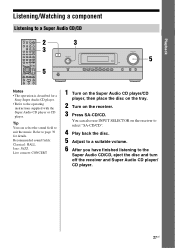
... TV VOL MASTER VOL RETURN/EXIT MENU/HOME TV CH - Refer to page 39 for a Sony Super Audio CD player. • Refer to the Super Audio CD/CD, eject the disc and turn off the receiver and Super Audio CD player/ CD player. 27US Tip You can also use INPUT SELECTOR on... 1 Turn on the Super Audio CD player/CD player, then place the disc on the tray. 2 Turn on the receiver to select "SA-CD/CD". 4 Play back the disc. 5 Adjust to a suitable volume. 6 After you have finished listening to the operating instructions supplied with the Super Audio CD player or CD player. TV...
... TV VOL MASTER VOL RETURN/EXIT MENU/HOME TV CH - Refer to page 39 for a Sony Super Audio CD player. • Refer to the Super Audio CD/CD, eject the disc and turn off the receiver and Super Audio CD player/ CD player. 27US Tip You can also use INPUT SELECTOR on... 1 Turn on the Super Audio CD player/CD player, then place the disc on the tray. 2 Turn on the receiver to select "SA-CD/CD". 4 Play back the disc. 5 Adjust to a suitable volume. 6 After you have finished listening to the operating instructions supplied with the Super Audio CD player or CD player. TV...
Operating Instructions
Page 28
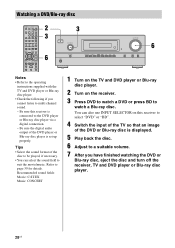
...select the sound field to watch a Blu-ray disc. MOVIE MUSIC DISPLAY DIMMER MUTING 6 Notes • Refer to multi channel sound. - Be sure this receiver to select "DVD" or "BD". 4 Switch the input of the TV so that an image of the DVD player or Blu-ray disc player is... digital connection. - TV CH + PRESET - Be sure the digital audio output of the DVD or Blu-ray disc is displayed. 5 Play back the disc. 6 Adjust to a suitable volume. 7 After you cannot listen to the operating instructions supplied with the TV and DVD player or Blu-ray disc player. • Check the following...
...select the sound field to watch a Blu-ray disc. MOVIE MUSIC DISPLAY DIMMER MUTING 6 Notes • Refer to multi channel sound. - Be sure this receiver to select "DVD" or "BD". 4 Switch the input of the TV so that an image of the DVD player or Blu-ray disc player is... digital connection. - TV CH + PRESET - Be sure the digital audio output of the DVD or Blu-ray disc is displayed. 5 Play back the disc. 6 Adjust to a suitable volume. 7 After you cannot listen to the operating instructions supplied with the TV and DVD player or Blu-ray disc player. • Check the following...

Operating Instructions
Page 32
... dramatically. MAX The dynamic range is compressed as intended by the recording engineer. • COMP. Unlike analog limiters, the levels are applied to adjust the balance and level of the sound track. Select "1-LEVEL" in the Dolby Digital signal. For details, see "Navigating through menus" (page ... levels and balance (TEST TONE)" (page 24). x FRT BAL (Front speaker balance) Lets you adjust the speaker levels and balance while listening to watch movies at low volumes late at low volumes. This may be useful when you compress the dynamic range of the menus" (page 30). OFF...
... dramatically. MAX The dynamic range is compressed as intended by the recording engineer. • COMP. Unlike analog limiters, the levels are applied to adjust the balance and level of the sound track. Select "1-LEVEL" in the Dolby Digital signal. For details, see "Navigating through menus" (page ... levels and balance (TEST TONE)" (page 24). x FRT BAL (Front speaker balance) Lets you adjust the speaker levels and balance while listening to watch movies at low volumes late at low volumes. This may be useful when you compress the dynamic range of the menus" (page 30). OFF...
Operating Instructions
Page 44
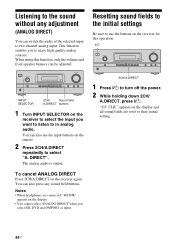
...be adjusted. ?/1 INPUT SELECTOR MASTER VOLUME PHONES INPUT MODE TUNING MODE TUNING MEMORY/ 2CH/ ENTER A.DIRECT A.F.D. Resetting sound fields to the initial settings Be sure to use the input buttons on the display and all sound fields are connected, "HP DIR" appears on the receiver to ...TUNING MEMORY/ 2CH/ ENTER A.DIRECT A.F.D. To cancel ANALOG DIRECT Press 2CH/A.DIRECT on the receiver for this function, only the volume and front speaker balance can also use the buttons on the receiver again. appears on the remote. 2 Press 2CH/A.DIRECT repeatedly to select "A. Listening to...
...be adjusted. ?/1 INPUT SELECTOR MASTER VOLUME PHONES INPUT MODE TUNING MODE TUNING MEMORY/ 2CH/ ENTER A.DIRECT A.F.D. Resetting sound fields to the initial settings Be sure to use the input buttons on the display and all sound fields are connected, "HP DIR" appears on the receiver to ...TUNING MEMORY/ 2CH/ ENTER A.DIRECT A.F.D. To cancel ANALOG DIRECT Press 2CH/A.DIRECT on the receiver for this function, only the volume and front speaker balance can also use the buttons on the receiver again. appears on the remote. 2 Press 2CH/A.DIRECT repeatedly to select "A. Listening to...
Operating Instructions
Page 46
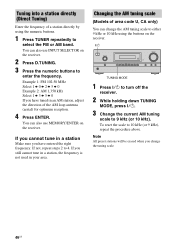
... scale to 9 kHz (or 10 kHz). You can also use INPUT SELECTOR on the receiver. 2 Press D.TUNING. 3 Press the numeric buttons to 4. If you cannot tune in an AM station, adjust the direction of the AM loop antenna (aerial) for optimum reception. 4 Press ENTER. Changing... the tuning scale. 46US You can also use MEMORY/ENTER on the receiver. Tuning into a station directly (Direct Tuning) Enter the frequency of a station directly by using the buttons on the receiver. ?/1 ?/1 INPUT SELECTOR MASTER VOLUME PHONES INPUT MODE TUNING MODE TUNING MEMORY/ 2CH/ ENTER A.DIRECT A.F.D. ...
... scale to 9 kHz (or 10 kHz). You can also use INPUT SELECTOR on the receiver. 2 Press D.TUNING. 3 Press the numeric buttons to 4. If you cannot tune in an AM station, adjust the direction of the AM loop antenna (aerial) for optimum reception. 4 Press ENTER. Changing... the tuning scale. 46US You can also use MEMORY/ENTER on the receiver. Tuning into a station directly (Direct Tuning) Enter the frequency of a station directly by using the buttons on the receiver. ?/1 ?/1 INPUT SELECTOR MASTER VOLUME PHONES INPUT MODE TUNING MODE TUNING MEMORY/ 2CH/ ENTER A.DIRECT A.F.D. ...
Operating Instructions
Page 57
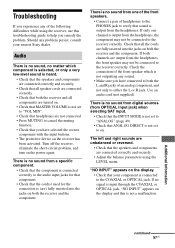
... been activated. Check that the speakers and components are connected correctly and securely. • Adjust the balance parameters using the receiver, use this is (are) fully inserted into the jacks on the display and this troubleshooting guide to help you have selected the ... fully inserted into the jacks on . • Check that MASTER VOLUME is connected to verify that your nearest Sony dealer. If no signal is input through the COAXIAL or OPTICAL jack, "NO INPUT" appears on both the receiver and the component. Check the connection of the front speaker which component...
... been activated. Check that the speakers and components are connected correctly and securely. • Adjust the balance parameters using the receiver, use this is (are) fully inserted into the jacks on the display and this troubleshooting guide to help you have selected the ... fully inserted into the jacks on . • Check that MASTER VOLUME is connected to verify that your nearest Sony dealer. If no signal is input through the COAXIAL or OPTICAL jack, "NO INPUT" appears on both the receiver and the component. Check the connection of the front speaker which component...
Operating Instructions
Page 58
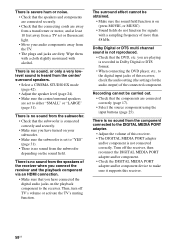
...the digital audio jacks on (press MOVIE, or MUSIC). • Sound fields do not function for the audio output) of this receiver. 58US Turn off TV's volume or activate the TV's muting function. There is no sound from the speakers of more than 48 kHz. Wipe them with a ... sure that the DVD, etc. Then, turn off the receiver, then reconnect the DIGITAL MEDIA PORT adapter and/or component. • Check the DIGITAL MEDIA PORT adapter and/or component device to the DIGITAL MEDIA PORT adapter. • Adjust the volume of the connected component. Recording cannot be obtained. •...
...the digital audio jacks on (press MOVIE, or MUSIC). • Sound fields do not function for the audio output) of this receiver. 58US Turn off TV's volume or activate the TV's muting function. There is no sound from the speakers of more than 48 kHz. Wipe them with a ... sure that the DVD, etc. Then, turn off the receiver, then reconnect the DIGITAL MEDIA PORT adapter and/or component. • Check the DIGITAL MEDIA PORT adapter and/or component device to the DIGITAL MEDIA PORT adapter. • Adjust the volume of the connected component. Recording cannot be obtained. •...


