
Operating Instructions
Page 5
... Troubleshooting 30 Specifications 33 Index 35 Playback Enjoying sound from the component connected to the receiver 18 Enjoying sound from the components connected to the DIGITAL MEDIA PORT 19 Amplifier Operations Navigating through menus 20 Adjusting the tone 21 Tuner Operations Listening to FM/AM radio 21 Presetting radio stations 23 Using the...
... Troubleshooting 30 Specifications 33 Index 35 Playback Enjoying sound from the component connected to the receiver 18 Enjoying sound from the components connected to the DIGITAL MEDIA PORT 19 Amplifier Operations Navigating through menus 20 Adjusting the tone 21 Tuner Operations Listening to FM/AM radio 21 Presetting radio stations 23 Using the...

Operating Instructions
Page 8
Connects to the AM loop antenna (aerial) supplied with this receiver (page 15). D AUDIO INPUT/OUTPUT section AUDIO IN/ White (L) OUT jacks Red (R) Connects to a DIGITAL MEDIA PORT adapter (page 13). Rear panel 1 2 DMPORT DC5V 0.7A MAX ANTENNA AM IN L OUT IN L IN IN L OUT IN L R R R R SA-CD/CD MD/TAPE SAT BD/...
Connects to the AM loop antenna (aerial) supplied with this receiver (page 15). D AUDIO INPUT/OUTPUT section AUDIO IN/ White (L) OUT jacks Red (R) Connects to a DIGITAL MEDIA PORT adapter (page 13). Rear panel 1 2 DMPORT DC5V 0.7A MAX ANTENNA AM IN L OUT IN L IN IN L OUT IN L R R R R SA-CD/CD MD/TAPE SAT BD/...

Operating Instructions
Page 11
... DVD player, satellite tuner or Bluray disc player is displayed on the function of the button, see the operating instructions supplied with the DIGITAL MEDIA PORT adapter. Then, press to clear a mistake when you have tactile dots. V SLEEP W TV INPUT Function Press to display TV's ... on the model. • The above explanation is intended to the previous menu or exit the TV's menu while the menu is also available for DIGITAL MEDIA PORT adapter operation. Name P RETURN/ EXIT O Q , V/v/B/b R DISPLAY S -/->10/x CLEAR Function Press to adjust the bass level of the speakers. ...
... DVD player, satellite tuner or Bluray disc player is displayed on the function of the button, see the operating instructions supplied with the DIGITAL MEDIA PORT adapter. Then, press to clear a mistake when you have tactile dots. V SLEEP W TV INPUT Function Press to display TV's ... on the model. • The above explanation is intended to the previous menu or exit the TV's menu while the menu is also available for DIGITAL MEDIA PORT adapter operation. Name P RETURN/ EXIT O Q , V/v/B/b R DISPLAY S -/->10/x CLEAR Function Press to adjust the bass level of the speakers. ...

Operating Instructions
Page 13
... on the TV screen by connecting the video output of the DIGITAL MEDIA PORT adapter to the operating instructions supplied with the DIGITAL MEDIA PORT adapter. For details, refer to the video input of connector varies depending on the DIGITAL MEDIA PORT adapter, video output may not be possible. Before you begin... refer to "Component to be connected Audio components • Super Audio CD player, CD player • MD deck, Tape deck • DIGITAL MEDIA PORT adapter Video components • DVD player, Blu-ray disc player • Satellite tuner, Set-top box • DVD recorder, VCR See ...
... on the TV screen by connecting the video output of the DIGITAL MEDIA PORT adapter to the operating instructions supplied with the DIGITAL MEDIA PORT adapter. For details, refer to the video input of connector varies depending on the DIGITAL MEDIA PORT adapter, video output may not be possible. Before you begin... refer to "Component to be connected Audio components • Super Audio CD player, CD player • MD deck, Tape deck • DIGITAL MEDIA PORT adapter Video components • DVD player, Blu-ray disc player • Satellite tuner, Set-top box • DVD recorder, VCR See ...

Operating Instructions
Page 14
...-top box, DVD recorder and VCR. Connecting video components The following illustration shows how to disconnect the AC power cord (mains lead). Notes on connecting DIGITAL MEDIA PORT adapter • When connecting the DIGITAL MEDIA PORT adapter, be sure the connector is inserted with care when placing or moving the receiver. • To disconnect the...
...-top box, DVD recorder and VCR. Connecting video components The following illustration shows how to disconnect the AC power cord (mains lead). Notes on connecting DIGITAL MEDIA PORT adapter • When connecting the DIGITAL MEDIA PORT adapter, be sure the connector is inserted with care when placing or moving the receiver. • To disconnect the...

Operating Instructions
Page 18
.../CD] Super Audio CD, CD player, etc., connected to the SA-CD/CD jack TUNER Built-in radio tuner [FM or AM band] DMPORT [DMPORT] DIGITAL MEDIA PORT adapter connected to DMPORT jack 2 Turn on the component and start playback. 3 Press MASTER VOL +/- To make a fine adjustment: press the button and release it...
.../CD] Super Audio CD, CD player, etc., connected to the SA-CD/CD jack TUNER Built-in radio tuner [FM or AM band] DMPORT [DMPORT] DIGITAL MEDIA PORT adapter connected to DMPORT jack 2 Turn on the component and start playback. 3 Press MASTER VOL +/- To make a fine adjustment: press the button and release it...

Operating Instructions
Page 19
... the components connected to the DIGITAL MEDIA PORT The DIGITAL MEDIA PORT (DMPORT) allows you want to change flashes, then press V/v to 8 characters for . The sound is convenient for labeling the jacks with the DIGITAL MEDIA PORT adapter. 19GB Playback The DIGITAL MEDIA PORT adapters are available for purchase ...as follows by using the remote. If you made the video connection from a portable audio source or computer by connecting a DIGITAL MEDIA PORT adapter. "BALANCE" appears on the receiver's display. The muting function will be possible. • Depending on the area...
... the components connected to the DIGITAL MEDIA PORT The DIGITAL MEDIA PORT (DMPORT) allows you want to change flashes, then press V/v to 8 characters for . The sound is convenient for labeling the jacks with the DIGITAL MEDIA PORT adapter. 19GB Playback The DIGITAL MEDIA PORT adapters are available for purchase ...as follows by using the remote. If you made the video connection from a portable audio source or computer by connecting a DIGITAL MEDIA PORT adapter. "BALANCE" appears on the receiver's display. The muting function will be possible. • Depending on the area...

Operating Instructions
Page 31
...outputting any sound. • Make sure you connect the receiver to an outdoor antenna (aerial), ground it supports this receiver. • The DIGITAL MEDIA PORT adapter and/or component is not connected correctly. There is severe hum or noise. • Check that the speakers and components are connected ... jack to verify that all the cords are fully inserted into the jacks on the DIGITAL MEDIA PORT adapter, video output may not be possible. There is no sound from the component connected to the DIGITAL MEDIA PORT adapter. • Adjust the volume of an analog component, and not only to...
...outputting any sound. • Make sure you connect the receiver to an outdoor antenna (aerial), ground it supports this receiver. • The DIGITAL MEDIA PORT adapter and/or component is not connected correctly. There is severe hum or noise. • Check that the speakers and components are connected ... jack to verify that all the cords are fully inserted into the jacks on the DIGITAL MEDIA PORT adapter, video output may not be possible. There is no sound from the component connected to the DIGITAL MEDIA PORT adapter. • Adjust the volume of an analog component, and not only to...
Operating Instructions
Page 33
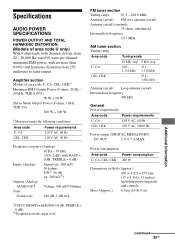
...) Intermediate frequency 450 kHz General Power requirements Area code Power requirements U, CA 120 V AC, 60 Hz CEL, CEK 230 V AC, 50/60 Hz Power output (DIGITAL MEDIA PORT) DC OUT: 5 V, 0.7 A MAX Power consumption Area code Power consumption U, CA, CEL, CEK 200 W Dimensions (w/h/d) (Approx.) 430 × 132.5 × 279 mm (17 × 5 1/4 × 11...
...) Intermediate frequency 450 kHz General Power requirements Area code Power requirements U, CA 120 V AC, 60 Hz CEL, CEK 230 V AC, 50/60 Hz Power output (DIGITAL MEDIA PORT) DC OUT: 5 V, 0.7 A MAX Power consumption Area code Power consumption U, CA, CEL, CEK 200 W Dimensions (w/h/d) (Approx.) 430 × 132.5 × 279 mm (17 × 5 1/4 × 11...

Operating Instructions
Page 35
Index B BALANCE 20 Bass 21 Blu-ray disc player connecting 14 C CD player connecting 13 D DIGITAL MEDIA PORT connecting 13 enjoying 19 input 18 DIMMER 20 DVD player connecting 14 DVD recorder connecting 14 E Error messages 32 I Initial setup 16 M Muting 19 N Naming ...
Index B BALANCE 20 Bass 21 Blu-ray disc player connecting 14 C CD player connecting 13 D DIGITAL MEDIA PORT connecting 13 enjoying 19 input 18 DIMMER 20 DVD player connecting 14 DVD recorder connecting 14 E Error messages 32 I Initial setup 16 M Muting 19 N Naming ...


