Operating Instructions
Page 3
... Components Required cords 7 Antenna hookups 8 Audio component hookups 9 Video component hookups 10 Digital component hookups 11 Multi channel input hookups 13 Other hookups 14 Hooking Up and Setting Up the Speaker System Speaker system hookups 17 Performing initial setup operations ..... 19 Multi channel surround setup 19 Checking the connections 24 Basic Operations Selecting the component 25 Listening to the sound in another room ... 27 Changing the display 27 Enjoying Surround Sound Using only the front speakers (2 Channel Stereo 28 Enjoying higher fidelity sound 28 Selecting...
... Components Required cords 7 Antenna hookups 8 Audio component hookups 9 Video component hookups 10 Digital component hookups 11 Multi channel input hookups 13 Other hookups 14 Hooking Up and Setting Up the Speaker System Speaker system hookups 17 Performing initial setup operations ..... 19 Multi channel surround setup 19 Checking the connections 24 Basic Operations Selecting the component 25 Listening to the sound in another room ... 27 Changing the display 27 Enjoying Surround Sound Using only the front speakers (2 Channel Stereo 28 Enjoying higher fidelity sound 28 Selecting...
Operating Instructions
Page 10
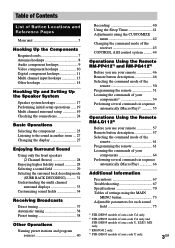
... monitor must also be output through the video jacks. S-video signals are connecting a separate satellite tuner, connect both the audio and video output jacks to the receiver. 10GB Tips • When the component is displayed on the on video component hookups You can display the LEVEL, SET UP, EQUALIZER and CUSTOMIZE parameters and selected sound field by pressing ON SCREEN. y SIGNAL GND L AM y FM 75Ω COAXIAL VIDEO IN VIDEO IN VIDEO OUT VIDEO IN L L SUB WOOFER R R AUDIO IN AUDIO IN AUDIO OUT AUDIO IN PRE OUT TV/SAT DVD VIDEO 2 L L L VIDEO...
... monitor must also be output through the video jacks. S-video signals are connecting a separate satellite tuner, connect both the audio and video output jacks to the receiver. 10GB Tips • When the component is displayed on the on video component hookups You can display the LEVEL, SET UP, EQUALIZER and CUSTOMIZE parameters and selected sound field by pressing ON SCREEN. y SIGNAL GND L AM y FM 75Ω COAXIAL VIDEO IN VIDEO IN VIDEO OUT VIDEO IN L L SUB WOOFER R R AUDIO IN AUDIO IN AUDIO OUT AUDIO IN PRE OUT TV/SAT DVD VIDEO 2 L L L VIDEO...

Operating Instructions
Page 11
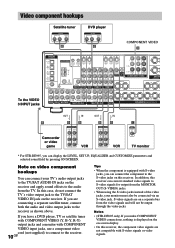
... VIDEO OUT AUDIO OUT L R continued 11GB To fully enjoy multi channel surround sound (5.1 channel), five speakers (two front speakers, two surround speakers, and a center speaker) and a sub woofer are required. You will also need two surround back speakers for 7.1 channel surround sound (STR-DE995 only) and a surround back speaker for 6.1 channel surround sound. Hooking Up the Components Digital component hookups Connect the digital output jacks of your DVD player and satellite tuner (etc.) to the receiver's digital input jacks to bring the multi channel surround sound of a movie theater...
... VIDEO OUT AUDIO OUT L R continued 11GB To fully enjoy multi channel surround sound (5.1 channel), five speakers (two front speakers, two surround speakers, and a center speaker) and a sub woofer are required. You will also need two surround back speakers for 7.1 channel surround sound (STR-DE995 only) and a surround back speaker for 6.1 channel surround sound. Hooking Up the Components Digital component hookups Connect the digital output jacks of your DVD player and satellite tuner (etc.) to the receiver's digital input jacks to bring the multi channel surround sound of a movie theater...
Operating Instructions
Page 13
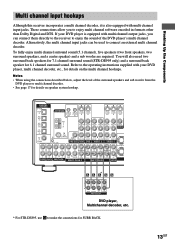
... channel surround sound (STR-DE995 only) and a surround back speaker for details on the multi channel hookups. To fully enjoy multi channel surround sound (5.1 channel), five speakers (two front speakers, two surround speakers, and a center speaker) and a sub woofer are required. Refer to the operating instructions supplied with multi channel output jacks, you to connect an external multi channel decoder. DIGITAL (ASSIGNABLE) OPTICAL TV/SAT IN MD/ TAPE IN MD/ TAPE OUT CD/ SACD IN DVD IN COAXIAL L ANTENNA CTRL S CTRL S STATUS STATUS OUT IN S-VIDEO IN S-VIDEO IN S-VIDEO S-VIDEO...
... channel surround sound (STR-DE995 only) and a surround back speaker for details on the multi channel hookups. To fully enjoy multi channel surround sound (5.1 channel), five speakers (two front speakers, two surround speakers, and a center speaker) and a sub woofer are required. Refer to the operating instructions supplied with multi channel output jacks, you to connect an external multi channel decoder. DIGITAL (ASSIGNABLE) OPTICAL TV/SAT IN MD/ TAPE IN MD/ TAPE OUT CD/ SACD IN DVD IN COAXIAL L ANTENNA CTRL S CTRL S STATUS STATUS OUT IN S-VIDEO IN S-VIDEO IN S-VIDEO S-VIDEO...

Operating Instructions
Page 18
... components, speakers, and AC power cord, output a test tone to avoid excessive output on the receiver, the speaker may damage the receiver. Be sure to match the speaker cord to the appropriate terminal on outputting a test tone, see page 24. After connecting all the speakers are reversed, the sound will lack bass. • If you turn off the receiver. 18GB When you turn on the receiver, the volume remains at the level you use speakers with low maximum input rating, adjust...
... components, speakers, and AC power cord, output a test tone to avoid excessive output on the receiver, the speaker may damage the receiver. Be sure to match the speaker cord to the appropriate terminal on outputting a test tone, see page 24. After connecting all the speakers are reversed, the sound will lack bass. • If you turn off the receiver. 18GB When you turn on the receiver, the volume remains at the level you use speakers with low maximum input rating, adjust...

Operating Instructions
Page 19
... first time, or when you want to clear the receiver's memory, do the following are reset to their factory settings. • All settings in the display. 3 Press ENTER. Performing initial setup operations Before using your system. Multi channel surround setup For the best possible surround sound, all speakers should be placed from 1.0 to 7.0 meters (3 to "VOLUME MIN". When placing surround speakers to your room (etc.). Tip To check the audio output during settings (to...
... first time, or when you want to clear the receiver's memory, do the following are reset to their factory settings. • All settings in the display. 3 Press ENTER. Performing initial setup operations Before using your system. Multi channel surround setup For the best possible surround sound, all speakers should be placed from 1.0 to 7.0 meters (3 to "VOLUME MIN". When placing surround speakers to your room (etc.). Tip To check the audio output during settings (to...

Operating Instructions
Page 24
... the procedure described above and adjust the speaker levels from the - Multi channel surround setup (continued) Adjusting the speaker level Use the remote while seated in your listening position to select the component (program source). 4 Start playing. You will only hear the test tone from your listening position using the LEVEL menu (when the test tone is set to turn MASTER VOLUME on the LEVEL menu, see "Troubleshooting" on the remote to "NO". surround back left and right speakers when "Surround back left ) t Sub woofer * STR-DE995 only.
... the procedure described above and adjust the speaker levels from the - Multi channel surround setup (continued) Adjusting the speaker level Use the remote while seated in your listening position to select the component (program source). 4 Start playing. You will only hear the test tone from your listening position using the LEVEL menu (when the test tone is set to turn MASTER VOLUME on the LEVEL menu, see "Troubleshooting" on the remote to "NO". surround back left and right speakers when "Surround back left ) t Sub woofer * STR-DE995 only.
Operating Instructions
Page 25
... DIGITAL COAXIAL input jacks. continued 25GB Specify the analog audio signals input to select the input mode for your digital components. Each time you want to match the component you selected. INPUT MODE Press INPUT MODE to the AUDIO IN (L/R) jacks. To select VCR Camcorder or video game DVD player Satellite tuner MD or Tape deck CD or Super Audio CD player Built in tuner Turntable Display/light up VIDEO 1 or VIDEO 2 VIDEO 3 DVD TV/SAT MD/TAPE CD/SACD TUNER FM/AM PHONO After turning on the component you selected, select the component and play the program source...
... DIGITAL COAXIAL input jacks. continued 25GB Specify the analog audio signals input to select the input mode for your digital components. Each time you want to match the component you selected. INPUT MODE Press INPUT MODE to the AUDIO IN (L/R) jacks. To select VCR Camcorder or video game DVD player Satellite tuner MD or Tape deck CD or Super Audio CD player Built in tuner Turntable Display/light up VIDEO 1 or VIDEO 2 VIDEO 3 DVD TV/SAT MD/TAPE CD/SACD TUNER FM/AM PHONO After turning on the component you selected, select the component and play the program source...
Operating Instructions
Page 26
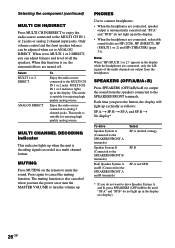
... 2 DIRECT ANALOG DIRECT To Enjoy the audio source connected to analog 2 channel jacks. MULTI CH IN 1 or 2 indicator lights up in the display. • When the headphones are connected, selectable sound fields are connected, speaker output is also canceled when you turn the power on or turn the MASTER VOLUME to turn the volume up in the display while the headphones are connected, only the L/R signals of all the speakers. MUTING Press MUTING on , the surround effects are output from the speakers connected...
... 2 DIRECT ANALOG DIRECT To Enjoy the audio source connected to analog 2 channel jacks. MULTI CH IN 1 or 2 indicator lights up in the display. • When the headphones are connected, selectable sound fields are connected, speaker output is also canceled when you turn the power on or turn the MASTER VOLUME to turn the volume up in the display while the headphones are connected, only the L/R signals of all the speakers. MUTING Press MUTING on , the surround effects are output from the speakers connected...

Operating Instructions
Page 28
... STEREO" is selected. Standard 2 channel (stereo) sources completely bypass the sound field processing. Note No sound is output from the front left and right speakers and a sub woofer, press A.F.D. To listen to select "A.F.D. AUTO". Mode A.F.D. reverberation). Multi channel surround formats are no low frequency signals (Dolby Digital LFE, etc.) it was recorded/encoded, without adding any effects (e.g. AUTO PRO LOGIC PLII MOVIE PLII MUSIC Neo:6 Cinema Neo:6 Music Decoding Mode As encoded Dolby Pro Logic Dolby Pro Logic II DTS Neo:6 Decoding the input audio signal automatically...
... STEREO" is selected. Standard 2 channel (stereo) sources completely bypass the sound field processing. Note No sound is output from the front left and right speakers and a sub woofer, press A.F.D. To listen to select "A.F.D. AUTO". Mode A.F.D. reverberation). Multi channel surround formats are no low frequency signals (Dolby Digital LFE, etc.) it was recorded/encoded, without adding any effects (e.g. AUTO PRO LOGIC PLII MOVIE PLII MUSIC Neo:6 Cinema Neo:6 Music Decoding Mode As encoded Dolby Pro Logic Dolby Pro Logic II DTS Neo:6 Decoding the input audio signal automatically...
Operating Instructions
Page 34
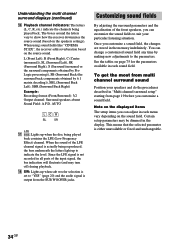
When using sound fields like "CINEMA ST.EX", the receiver adds reverberation based on the sound field. Once you customize a sound field, the changes are stored in "Multi channel surround setup" starting from page 19 before you customize a sound field. To get the most from the SUB WOOFER jacks. qk SW: Lights up when sub woofer selection is set to "YES" (page 20) and the audio signal is either unavailable or fixed and unchangeable...
When using sound fields like "CINEMA ST.EX", the receiver adds reverberation based on the sound field. Once you customize a sound field, the changes are stored in "Multi channel surround setup" starting from page 19 before you customize a sound field. To get the most from the SUB WOOFER jacks. qk SW: Lights up when sub woofer selection is set to "YES" (page 20) and the audio signal is either unavailable or fixed and unchangeable...
Operating Instructions
Page 41
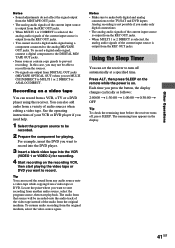
... both digital and analog connections to the analog MD/TAPE OUT jacks. The remaining time appears in the display. 41GB You can set MULTI CH IN/DIRECT to prevent recording. Using the Sleep Timer You can also add audio from DIGITAL OUT jacks (MD/TAPE OPTICAL OUT) when you want to turn off , press SLEEP. Locate the point where you set the receiver to start playing the video tape or DVD you need help. 1 Select the program source...
... both digital and analog connections to the analog MD/TAPE OUT jacks. The remaining time appears in the display. 41GB You can set MULTI CH IN/DIRECT to prevent recording. Using the Sleep Timer You can also add audio from DIGITAL OUT jacks (MD/TAPE OPTICAL OUT) when you want to turn off , press SLEEP. Locate the point where you set the receiver to start playing the video tape or DVD you need help. 1 Select the program source...
Operating Instructions
Page 45
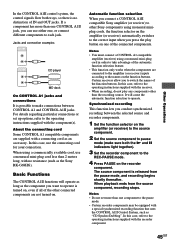
... correct input when you to switch the names of the other connected components are not turned on. Jacks and connection examples CONTROL A1 CONTROL A1 CD player MD deck On CONTROL A1 jacks and connections It is turned on, even if all of the function buttons. Basic Functions The CONTROL A1II functions will cause the automatic function selection to the names on the function buttons. Certain receivers allow you press the play any components other Sony components using a monaural mini-plug cord in...
... correct input when you to switch the names of the other connected components are not turned on. Jacks and connection examples CONTROL A1 CONTROL A1 CD player MD deck On CONTROL A1 jacks and connections It is turned on, even if all of the function buttons. Basic Functions The CONTROL A1II functions will cause the automatic function selection to the names on the function buttons. Certain receivers allow you press the play any components other Sony components using a monaural mini-plug cord in...

Operating Instructions
Page 47
... test tone. AUTO, PRO LOGIC, PLII MOVIE, PLII MUSIC, Neo:6 Cinema and Neo:6 Music. Remote Button Operations Function SHIFT Receiver Press repeatedly to select a memory page for presetting radio stations or tuning to select one of the receiver on or off the receiver STANDBY TV/VCR/ and other Sony audio/ (Press Satellite tuner/ video components. MAIN MENU Receiver Press this button repeatedly to preset stations. Selects A.F.D. D.TUNING Receiver Tuner station direct keyin-mode. Adjusts the master volume of Dolby Digital, DTS or AAC, etc. SYSTEM Receiver/ Turns...
... test tone. AUTO, PRO LOGIC, PLII MOVIE, PLII MUSIC, Neo:6 Cinema and Neo:6 Music. Remote Button Operations Function SHIFT Receiver Press repeatedly to select a memory page for presetting radio stations or tuning to select one of the receiver on or off the receiver STANDBY TV/VCR/ and other Sony audio/ (Press Satellite tuner/ video components. MAIN MENU Receiver Press this button repeatedly to preset stations. Selects A.F.D. D.TUNING Receiver Tuner station direct keyin-mode. Adjusts the master volume of Dolby Digital, DTS or AAC, etc. SYSTEM Receiver/ Turns...

Operating Instructions
Page 50
... control the satellite tuner, VCR and DVD player. • RM-PP412 - (STR-DE895) The AUX, AAC BI-LING, 12 and ON SCREEN buttons on the remote are not available. • RM-PG412 - (STR-DE995) The AAC BI-LING and 12 buttons on the remote are not available. Mode AV1 AV2 Indicator lights once twice To reset the remote to an audio equipment. RM-PG412 only Remote Button TAPE MD/DAT Operations Function Receiver Receiver...
... control the satellite tuner, VCR and DVD player. • RM-PP412 - (STR-DE895) The AUX, AAC BI-LING, 12 and ON SCREEN buttons on the remote are not available. • RM-PG412 - (STR-DE995) The AAC BI-LING and 12 buttons on the remote are not available. Mode AV1 AV2 Indicator lights once twice To reset the remote to an audio equipment. RM-PG412 only Remote Button TAPE MD/DAT Operations Function Receiver Receiver...
Operating Instructions
Page 51
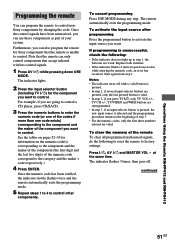
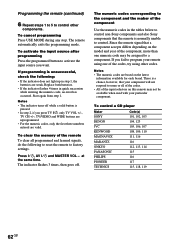
... the programming mode. 5 Repeat steps 1 to 4 to control nonSony components by changing the code. continued 51GB Furthermore, you want . To cancel programming Press USE MODE during any step. Notes • The indicator turns off . Press ?/1, AV ?/1 and MASTER VOL - The remote automatically exits the programming mode. Replace both batteries. • If the indicator flashes 4 times in step 1, the batteries are reprogrammed. • In step 3, if an input selector button...
... the programming mode. 5 Repeat steps 1 to 4 to control nonSony components by changing the code. continued 51GB Furthermore, you want . To cancel programming Press USE MODE during any step. Notes • The indicator turns off . Press ?/1, AV ?/1 and MASTER VOL - The remote automatically exits the programming mode. Replace both batteries. • If the indicator flashes 4 times in step 1, the batteries are reprogrammed. • In step 3, if an input selector button...

Operating Instructions
Page 58
... the receiver on the TV screen. 58GB Remote Button Operations Function AV ?/1 TV/VCR/ CD player/ VCD player/ LD player/ DVD player/ MD deck/ DAT deck Turns the audio and video components on or off the receiver STANDBY TV/VCR/ and other Sony audio/ (Press Satellite tuner/ video components. Tuner station direct keyin-mode. Mutes the sound from the receiver. Press this button repeatedly to select the surround back decoding modes. CD player/ VCD player/ LD player/ MD deck/ DAT deck Select track numbers. 0/10 selects track 10. Adjusts the master volume of Dolby Digital, DTS or...
... the receiver on the TV screen. 58GB Remote Button Operations Function AV ?/1 TV/VCR/ CD player/ VCD player/ LD player/ DVD player/ MD deck/ DAT deck Turns the audio and video components on or off the receiver STANDBY TV/VCR/ and other Sony audio/ (Press Satellite tuner/ video components. Tuner station direct keyin-mode. Mutes the sound from the receiver. Press this button repeatedly to select the surround back decoding modes. CD player/ VCD player/ LD player/ MD deck/ DAT deck Select track numbers. 0/10 selects track 10. Adjusts the master volume of Dolby Digital, DTS or...
Operating Instructions
Page 62
Replace both batteries. • If the indicator flashes 4 times in step 1, the batteries are valid. Press ?/1, AV ?/1 and MASTER VOL - The indicator flashes 3 times, then goes off while a valid button is unsuccessful, check the following to reset the remote to factory settings. To control a CD player Maker SONY DENON JVC KENWOOD MAGNAVOX Code(s) 101, 102, 103 104, 123 105, 106, 107 108, 109, 110 111, 116...
Replace both batteries. • If the indicator flashes 4 times in step 1, the batteries are valid. Press ?/1, AV ?/1 and MASTER VOL - The indicator flashes 3 times, then goes off while a valid button is unsuccessful, check the following to reset the remote to factory settings. To control a CD player Maker SONY DENON JVC KENWOOD MAGNAVOX Code(s) 101, 102, 103 104, 123 105, 106, 107 108, 109, 110 111, 116...
Operating Instructions
Page 68
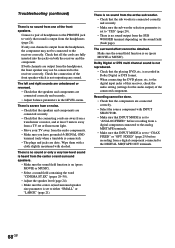
... the digital input jacks of this receiver, check the audio setting (settings for the audio output) of headphones to the PHONES jack to "YES" (page 20). • There is recorded in the LEVEL menu. If both the receiver and the component. Connect a pair of the connected component. Check that the speakers and components are output from the SUB WOOFER terminal depending on both channels are connected correctly and securely. • Adjust balance parameters in Dolby Digital or DTS format...
... the digital input jacks of this receiver, check the audio setting (settings for the audio output) of headphones to the PHONES jack to "YES" (page 20). • There is recorded in the LEVEL menu. If both the receiver and the component. Connect a pair of the connected component. Check that the speakers and components are output from the SUB WOOFER terminal depending on both channels are connected correctly and securely. • Adjust balance parameters in Dolby Digital or DTS format...
Operating Instructions
Page 69
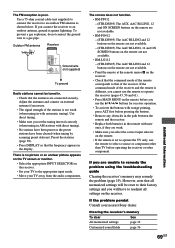
...; COAXIAL Ground wire (not supplied) To ground Radio stations cannot be reset to their factory settings and you will be tuned in with direct tuning). • No stations have been preset or the preset stations have to readjust all settings on the receiver. • Check that the command mode of the remote corresponds to that the antennas are weak. • Make sure you connect the receiver to remedy the problem using the troubleshooting guide Clearing...
...; COAXIAL Ground wire (not supplied) To ground Radio stations cannot be reset to their factory settings and you will be tuned in with direct tuning). • No stations have been preset or the preset stations have to readjust all settings on the receiver. • Check that the command mode of the remote corresponds to that the antennas are weak. • Make sure you connect the receiver to remedy the problem using the troubleshooting guide Clearing...


