Technical Background
Page 19
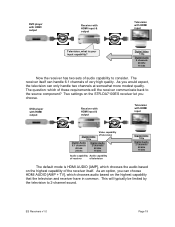
..., you choose. The receiver itself . DVD player with HDMI output Receiver with HDMI input & output Television with HDMI input Digital Video 720p Video capability of television Digital Audio 6.1 channels 48 kHz 24 bits Digital Audio 2 channels 48 kHz 16 bits Audio capability Audio capability of receiver of television Digital Video 720p Digital Audio 2 channels 48 kHz 16 bits The default mode is your input capability? As you would expect, the television can choose HDMI AUDIO [AMP + TV], which of audio capability to 2-channel sound. The question: which...
..., you choose. The receiver itself . DVD player with HDMI output Receiver with HDMI input & output Television with HDMI input Digital Video 720p Video capability of television Digital Audio 6.1 channels 48 kHz 24 bits Digital Audio 2 channels 48 kHz 16 bits Audio capability Audio capability of receiver of television Digital Video 720p Digital Audio 2 channels 48 kHz 16 bits The default mode is your input capability? As you would expect, the television can choose HDMI AUDIO [AMP + TV], which of audio capability to 2-channel sound. The question: which...

Technical Background
Page 21
... the minimum of the television Digital Video 720p Digital Audio 2 channels 48 kHz 16 bits Sound available from television As you can satisfy both the STR-DA7100ES receiver and the television. Choosing HDMI AUDIO [AMP+TV] sets up a different set of receiver Digital Video 720p Digital Audio 2 channels 48 kHz 16 bits Once again, the DVD player can see, the selection process is available for audio back to the source component. ES Receivers v1.0 Page 21
... the minimum of the television Digital Video 720p Digital Audio 2 channels 48 kHz 16 bits Sound available from television As you can satisfy both the STR-DA7100ES receiver and the television. Choosing HDMI AUDIO [AMP+TV] sets up a different set of receiver Digital Video 720p Digital Audio 2 channels 48 kHz 16 bits Once again, the DVD player can see, the selection process is available for audio back to the source component. ES Receivers v1.0 Page 21

Operating Instructions
Page 3
...cords 6 Antenna hookups 7 Audio component hookups 8 Video component hookups 9 Digital component hookups 10 Multi channel input hookups 12 Other hookups 13 Hooking Up and Setting Up the Speaker System Speaker system hookup 16 Performing initial setup operations ..... 19 Multi channel surround setup 19 Checking the connections 25 Basic Operations Selecting the component 26 Setting to the 7.1 channel mode .......... 28 Listening to the sound in another room 29 Changing the display 30 Enjoying Surround Sound Selecting a sound field 31 Understanding the multi channel surround displays...
...cords 6 Antenna hookups 7 Audio component hookups 8 Video component hookups 9 Digital component hookups 10 Multi channel input hookups 12 Other hookups 13 Hooking Up and Setting Up the Speaker System Speaker system hookup 16 Performing initial setup operations ..... 19 Multi channel surround setup 19 Checking the connections 25 Basic Operations Selecting the component 26 Setting to the 7.1 channel mode .......... 28 Listening to the sound in another room 29 Changing the display 30 Enjoying Surround Sound Selecting a sound field 31 Understanding the multi channel surround displays...

Operating Instructions
Page 6
...D Optical digital cord (not supplied) Black Black E Coaxial digital cord (not supplied) Yellow Yellow F Monaural audio cord (not supplied) Black Black G Audio/video/control S cord (1) Yellow (video) White (L/audio) Red (R/audio) Black (control S) Yellow (video) White (L/audio) Red (R/audio) Black (control S) H Control S cord (mini jack) (1) Black Black 6 Hooking Up the Components Required cords Before you get started • Turn off the connectors and insert the cord plugs straight in until all components before making any connections. • Do not connect the AC power cord...
...D Optical digital cord (not supplied) Black Black E Coaxial digital cord (not supplied) Yellow Yellow F Monaural audio cord (not supplied) Black Black G Audio/video/control S cord (1) Yellow (video) White (L/audio) Red (R/audio) Black (control S) Yellow (video) White (L/audio) Red (R/audio) Black (control S) H Control S cord (mini jack) (1) Black Black 6 Hooking Up the Components Required cords Before you get started • Turn off the connectors and insert the cord plugs straight in until all components before making any connections. • Do not connect the AC power cord...

Operating Instructions
Page 9
... COMPONENT VIDEO input jacks, use a video cord (not supplied) to connect to the audio from the video signals and will not be connected via an S-video jack. Notes • If you make COMPONENT VIDEO connections, nothing is displayed on the on-screen display. • On this case, do not connect the TV's video output jack to the TV/SAT VIDEO IN jack on the receiver and apply sound effects to the receiver. If you have a satellite tuner, DVD player, or LD player with COMPONENT VIDEO...
... COMPONENT VIDEO input jacks, use a video cord (not supplied) to connect to the audio from the video signals and will not be connected via an S-video jack. Notes • If you make COMPONENT VIDEO connections, nothing is displayed on the on-screen display. • On this case, do not connect the TV's video output jack to the TV/SAT VIDEO IN jack on the receiver and apply sound effects to the receiver. If you have a satellite tuner, DVD player, or LD player with COMPONENT VIDEO...

Operating Instructions
Page 12
... multi channel surround sound, five speakers (two front speakers, two surround speakers, and a center speaker) and a sub woofer are required. Refer to the operating instructions supplied with your DVD player is also equipped with multi channel output jacks, you can be used to enjoy multi channel software encoded in formats other than Dolby Digital and DTS. Notes • When using the connections described below, adjust the level of the DVD player's multi channel decoder. If your DVD player, multi channel decoder, etc., for details on the multi channel hookups. Multi channel input...
... multi channel surround sound, five speakers (two front speakers, two surround speakers, and a center speaker) and a sub woofer are required. Refer to the operating instructions supplied with your DVD player is also equipped with multi channel output jacks, you can be used to enjoy multi channel software encoded in formats other than Dolby Digital and DTS. Notes • When using the connections described below, adjust the level of the DVD player's multi channel decoder. If your DVD player, multi channel decoder, etc., for details on the multi channel hookups. Multi channel input...

Operating Instructions
Page 19
... reset to 15 feet closer (C) and the surround back speakers up while outputting the sound), check the connection (see the table on the power, clear the receiver's memory. Performing initial setup operations Before using your system. However, the receiver lets you to place the center speaker up to 5 feet closer (B), the surround speakers up to their factory settings. • All index names (of preset stations and program sources) are cleared. • All SET...
... reset to 15 feet closer (C) and the surround back speakers up while outputting the sound), check the connection (see the table on the power, clear the receiver's memory. Performing initial setup operations Before using your system. However, the receiver lets you to place the center speaker up to 5 feet closer (B), the surround speakers up to their factory settings. • All index names (of preset stations and program sources) are cleared. • All SET...

Operating Instructions
Page 25
... precise speaker level adjustment You can use the jog dial on the receiver for easier speaker level adjustment. 1 Press ?/1 to turn off .* Therefore, when you output the test tone in this procedure, see "Troubleshooting" on the remote. • You can output the test tone or sound source from your listening position using the remote. • When you select analog audio using the MULTI/ 2CH ANALOG DIRECT button, the power of the digital circuits is set "TEST TONE" to "FIX" (page 41). Checking the connections After connecting all speakers...
... precise speaker level adjustment You can use the jog dial on the receiver for easier speaker level adjustment. 1 Press ?/1 to turn off .* Therefore, when you output the test tone in this procedure, see "Troubleshooting" on the remote. • You can output the test tone or sound source from your listening position using the remote. • When you select analog audio using the MULTI/ 2CH ANALOG DIRECT button, the power of the digital circuits is set "TEST TONE" to "FIX" (page 41). Checking the connections After connecting all speakers...

Operating Instructions
Page 26
... select "DIGITAL: ONLY COAX" or "DIGITAL: ONLY OPT" for DVD/LD, only coaxial or optical digital input is convenient when you can select the audio input assigned by this function using a number of digital components. The audio input you are using INPUT MODE (page 27). You cannot assign the audio input for TUNER. 1 Turn FUNCTION to select the source for PHONO NO ASSIGN t DVD/LD (COAXIAL) t DVD/LD (OPTICAL) t TV/SAT (OPTICAL) t MD/DAT (OPTICAL) t CD/SACD (COAXIAL) t CD/SACD (OPTICAL) PHONO NO ASSIGN t VIDEO 1 t VIDEO 2 t VIDEO 3 t DVD/LD (ANALOG) t TV/SAT (ANALOG) t TAPE t MD/DAT (ANALOG...
... select "DIGITAL: ONLY COAX" or "DIGITAL: ONLY OPT" for DVD/LD, only coaxial or optical digital input is convenient when you can select the audio input assigned by this function using a number of digital components. The audio input you are using INPUT MODE (page 27). You cannot assign the audio input for TUNER. 1 Turn FUNCTION to select the source for PHONO NO ASSIGN t DVD/LD (COAXIAL) t DVD/LD (OPTICAL) t TV/SAT (OPTICAL) t MD/DAT (OPTICAL) t CD/SACD (COAXIAL) t CD/SACD (OPTICAL) PHONO NO ASSIGN t VIDEO 1 t VIDEO 2 t VIDEO 3 t DVD/LD (ANALOG) t TV/SAT (ANALOG) t TAPE t MD/DAT (ANALOG...

Operating Instructions
Page 27
... balance and level of other functions assigned by AUDIO SPLIT. COAXIAL FIXED Specify the digital audio signals input to the DIGITAL OPTICAL input jacks. OPTICAL FIXED Specify the digital audio signals input to the DIGITAL COAXIAL input jacks. Only volume control and the front speaker balance can be adjusted when set to MULTI CH 1 or 2 DIRECT, you can also select the COAXIAL or OPTICAL audio input of all the speakers. When set to turn the volume up in the main room and 3rd room. MULTI CH IN 1 or 2 indicator lights up . SPEAKERS switch Select To MAIN Output the sound...
... balance and level of other functions assigned by AUDIO SPLIT. COAXIAL FIXED Specify the digital audio signals input to the DIGITAL OPTICAL input jacks. OPTICAL FIXED Specify the digital audio signals input to the DIGITAL COAXIAL input jacks. Only volume control and the front speaker balance can be adjusted when set to MULTI CH 1 or 2 DIRECT, you can also select the COAXIAL or OPTICAL audio input of all the speakers. When set to turn the volume up in the main room and 3rd room. MULTI CH IN 1 or 2 indicator lights up . SPEAKERS switch Select To MAIN Output the sound...

Operating Instructions
Page 31
... enjoying surround sound. x NORMAL SURROUND Software with a sampling frequency of the receiver's pre-programmed sound fields. Though this receiver incorporates the 6.1 channel amplifier, you can identify the encoding format of program software by selecting one of more than 48 kHz are input, the sound signals are selected, "Digital Cinema Sound" indicator in the display lights up -todate facilities in Hollywood. See "Multi channel surround setup" starting from a single pair of movie theaters and concert halls into your home...
... enjoying surround sound. x NORMAL SURROUND Software with a sampling frequency of the receiver's pre-programmed sound fields. Though this receiver incorporates the 6.1 channel amplifier, you can identify the encoding format of program software by selecting one of more than 48 kHz are input, the sound signals are selected, "Digital Cinema Sound" indicator in the display lights up -todate facilities in Hollywood. See "Multi channel surround setup" starting from a single pair of movie theaters and concert halls into your home...

Operating Instructions
Page 36
...)) Example: Recording format (Front /Surround): 3/2 Output channel: Surround speakers absent Sound Field: A.F.D. See page 41 to adjust the dynamic range compression. 7 Tuner indicators: Light up when Dolby Digital signals are set to show how the receiver downmixes the source sound (based on the source sound. However, this indicator does not light if the center and surround speakers are input. 36 See pages 44-45 for tuner operations. 8 EQ: Lights up when the equalizer functions. 9 SLEEP: Lights up when sleep timer...
...)) Example: Recording format (Front /Surround): 3/2 Output channel: Surround speakers absent Sound Field: A.F.D. See page 41 to adjust the dynamic range compression. 7 Tuner indicators: Light up when Dolby Digital signals are set to show how the receiver downmixes the source sound (based on the source sound. However, this indicator does not light if the center and surround speakers are input. 36 See pages 44-45 for tuner operations. 8 EQ: Lights up when the equalizer functions. 9 SLEEP: Lights up when sleep timer...

Operating Instructions
Page 38
... described in "Multi channel surround setup" starting from multi channel surround sound Position your particular listening situation. Once you customize a sound field, the changes are stored individually for decoding Digital PCM, analog input, or the 2 channel audio signals of [2/0] format sound. • When set to "AUTO", the receiver performs the decoding when the Dolby Surround or DTS Surround encode flag is automaticallty set to "AUTO" setting. You can change a customized sound field any time by making new adjustments to select the setting you specify...
... described in "Multi channel surround setup" starting from multi channel surround sound Position your particular listening situation. Once you customize a sound field, the changes are stored individually for decoding Digital PCM, analog input, or the 2 channel audio signals of [2/0] format sound. • When set to "AUTO", the receiver performs the decoding when the Dolby Surround or DTS Surround encode flag is automaticallty set to "AUTO" setting. You can change a customized sound field any time by making new adjustments to select the setting you specify...

Operating Instructions
Page 47
... the time you want using Sleep Timer, "SLEEP" lights up to MULTI CH 1 or 2 DIRECT. Tips • You can also add audio from a variety of the audio from the REC OUT jacks. The analog audio signals of the current function is set the receiver to the DIGITAL MD/DAT OUT jacks. • Sound adjustments do not affect the signal output from another audio source, select the program source, then start playing the video tape or laser disc you want...
... the time you want using Sleep Timer, "SLEEP" lights up to MULTI CH 1 or 2 DIRECT. Tips • You can also add audio from a variety of the audio from the REC OUT jacks. The analog audio signals of the current function is set the receiver to the DIGITAL MD/DAT OUT jacks. • Sound adjustments do not affect the signal output from another audio source, select the program source, then start playing the video tape or laser disc you want...
Operating Instructions
Page 49
..." setting when digital circuits are turned on . x Digital input decode mode (DECODE FORMAT) Lets you specify the decode type for CD, etc.) is set to "AUTO", and the sound from the digital audio jacks (for the signal input to the digital audio jacks. • "AUTO" switches between DTS, Dolby Digital, or PCM decoding automatically. • "PCM" decodes all the input signals as the sound field, change to a different program source, then return to "MAIN+2ND ROOM". x CONTROL A1 auto function (AUTO FUNCTION) Lets you switch the function...
..." setting when digital circuits are turned on . x Digital input decode mode (DECODE FORMAT) Lets you specify the decode type for CD, etc.) is set to "AUTO", and the sound from the digital audio jacks (for the signal input to the digital audio jacks. • "AUTO" switches between DTS, Dolby Digital, or PCM decoding automatically. • "PCM" decodes all the input signals as the sound field, change to a different program source, then return to "MAIN+2ND ROOM". x CONTROL A1 auto function (AUTO FUNCTION) Lets you switch the function...

Operating Instructions
Page 67
..., then press the key to some Sony components. The function list appears. DVD/LD p TV/SAT TAPE MD/DAT 2 Move the easy scroll key to select "MACRO1" or "MACRO2", then press the key to enter selection. AV ?/1 - ?/1 - SET UP • When the Macro Play function does not work properly, set "WAIT TIME" between each operation. To turn off all Sony components (SYSTEM STANDBY) 1 In step 4, move the easy...
..., then press the key to some Sony components. The function list appears. DVD/LD p TV/SAT TAPE MD/DAT 2 Move the easy scroll key to select "MACRO1" or "MACRO2", then press the key to enter selection. AV ?/1 - ?/1 - SET UP • When the Macro Play function does not work properly, set "WAIT TIME" between each operation. To turn off all Sony components (SYSTEM STANDBY) 1 In step 4, move the easy...

Operating Instructions
Page 77
... humid place. • Do not use the remote for about 6 months. properly oriented in the 3rd room Main room Audio/Video components SPEAKERS 3RD ROOM 7 8 9 •• STR-DA5ES 3rd room Speaker Speaker IR repeater (not supplied) IR repeater (not supplied) AV ?/1 SYSTEM STANDBY SOUND FIELD FUNCTION ?/1 SET UP PUSH ENTER h SUB H X x . > m M CH/PRESET/D.SKIP - + BASS BOOST MASTER VOL + MUTING - continued 77 x When using in the battery compartment.
... humid place. • Do not use the remote for about 6 months. properly oriented in the 3rd room Main room Audio/Video components SPEAKERS 3RD ROOM 7 8 9 •• STR-DA5ES 3rd room Speaker Speaker IR repeater (not supplied) IR repeater (not supplied) AV ?/1 SYSTEM STANDBY SOUND FIELD FUNCTION ?/1 SET UP PUSH ENTER h SUB H X x . > m M CH/PRESET/D.SKIP - + BASS BOOST MASTER VOL + MUTING - continued 77 x When using in the battery compartment.

Operating Instructions
Page 79
... default setting is in the 2nd room Switch to serve as the MULTI/2CH ANALOG DIRECT button on the receiver. 1 Press USE MODE. DIRECT button The function of this button is same as an example only. qa Operation buttons** The following table describes the function of the buttons. The above operation may not be possible or may operate differently than described. When controlling Sony receivers in recording standby. Stops play on the remote, the current remote mode button lights up 5 times...
... default setting is in the 2nd room Switch to serve as the MULTI/2CH ANALOG DIRECT button on the receiver. 1 Press USE MODE. DIRECT button The function of this button is same as an example only. qa Operation buttons** The following table describes the function of the buttons. The above operation may not be possible or may operate differently than described. When controlling Sony receivers in recording standby. Stops play on the remote, the current remote mode button lights up 5 times...

Operating Instructions
Page 83
... no digital signal is input, or INPUT MODE is set to "MULTI CH 1 or 2 FIXED", you cannot change the sound field (page 27). The left and right sounds are unbalanced or reversed. • Check that the speakers and components are connected correctly. • Select the source component with FUNCTION control. • When recording from a digital component, make sure the INPUT MODE is set to COAXIAL FIXED or OPTICAL FIXED (see page 27) before recording with a component connected to the analog MD...
... no digital signal is input, or INPUT MODE is set to "MULTI CH 1 or 2 FIXED", you cannot change the sound field (page 27). The left and right sounds are unbalanced or reversed. • Check that the speakers and components are connected correctly. • Select the source component with FUNCTION control. • When recording from a digital component, make sure the INPUT MODE is set to COAXIAL FIXED or OPTICAL FIXED (see page 27) before recording with a component connected to the analog MD...

Operating Instructions
Page 84
...'s optical or coaxial digital output to an outdoor antenna, ground it against lightning. The component names appearing in the remote with new ones, if they are different. • Select the correct function using RM-US105, the buttons for the tuner operation do not match, transmission is set INPUT MODE manually (see the operating instructions supplied with direct tuning). • No stations have been preset or the preset stations have been cleared (when tuning by scanning preset stations). The receiver...
...'s optical or coaxial digital output to an outdoor antenna, ground it against lightning. The component names appearing in the remote with new ones, if they are different. • Select the correct function using RM-US105, the buttons for the tuner operation do not match, transmission is set INPUT MODE manually (see the operating instructions supplied with direct tuning). • No stations have been preset or the preset stations have been cleared (when tuning by scanning preset stations). The receiver...


