Operating Instructions
Page 2
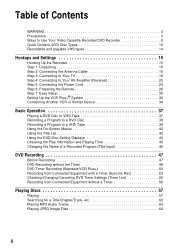
... and, if not installed and used in this VCR-DVD recorder is harmful to eyes, do not attempt to radio communications. Note This equipment has been tested and found to comply with this manual could void your authority to provide reasonable protection against harmful interference in the literature accompanying the appliance. Refer servicing to Part 15 of optical instruments...
... and, if not installed and used in this VCR-DVD recorder is harmful to eyes, do not attempt to radio communications. Note This equipment has been tested and found to comply with this manual could void your authority to provide reasonable protection against harmful interference in the literature accompanying the appliance. Refer servicing to Part 15 of optical instruments...
Operating Instructions
Page 6
... VHS Tape 39 Using the On-Screen Menus 40 Using the Title List 42 Using the DVD Disc Setting Displays 43 Checking the Play Information and Playing Time 45 Changing the Name of a Recorded Program (Title Input 46 DVD Recording 47 Before Recording 47 DVD Recording without the Timer 48 DVD Timer Recording (Standard/VCR Plus 50 Recording from Connected Equipment with a Timer (Synchro Rec 53 Checking/Changing/Canceling DVD Timer Settings (Timer List 55 Recording from Connected Equipment without a Timer 56 Playing Discs 57 Playing 57 Searching for a Title/Chapter/Track, etc 62 Playing...
... VHS Tape 39 Using the On-Screen Menus 40 Using the Title List 42 Using the DVD Disc Setting Displays 43 Checking the Play Information and Playing Time 45 Changing the Name of a Recorded Program (Title Input 46 DVD Recording 47 Before Recording 47 DVD Recording without the Timer 48 DVD Timer Recording (Standard/VCR Plus 50 Recording from Connected Equipment with a Timer (Synchro Rec 53 Checking/Changing/Canceling DVD Timer Settings (Timer List 55 Recording from Connected Equipment without a Timer 56 Playing Discs 57 Playing 57 Searching for a Title/Chapter/Track, etc 62 Playing...
Operating Instructions
Page 8
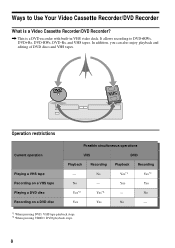
...also enjoy playback and editing of DVD discs and VHS tapes. It allows recording to Use Your Video Cassette Recorder/DVD Recorder What is a Video Cassette Recorder/DVD Recorder? , This is a DVD recorder with built-in VHS video deck. Operation restrictions Current operation Playing a VHS tape Recording on a VHS tape Playing a DVD disc Recording on a DVD disc Possible simultaneous operations VHS DVD Playback - Recording No Playback Yes*1 Recording Yes*1 No - Ways to DVD+RWs, DVD+Rs, DVD-RWs, DVD-Rs, and VHS tapes. No Yes Yes No - *1 When pressing DVD, VHS tape playback stops...
...also enjoy playback and editing of DVD discs and VHS tapes. It allows recording to Use Your Video Cassette Recorder/DVD Recorder What is a Video Cassette Recorder/DVD Recorder? , This is a DVD recorder with built-in VHS video deck. Operation restrictions Current operation Playing a VHS tape Recording on a VHS tape Playing a DVD disc Recording on a DVD disc Possible simultaneous operations VHS DVD Playback - Recording No Playback Yes*1 Recording Yes*1 No - Ways to DVD+RWs, DVD+Rs, DVD-RWs, DVD-Rs, and VHS tapes. No Yes Yes No - *1 When pressing DVD, VHS tape playback stops...

Operating Instructions
Page 13
... the instructions supplied with copyright protection technologies This product is recommended that you use discs with copyright protection technologies are some that among those discs, there are being marketed by this recorder. Since this recorder, the data may be erased. 13 DVD VIDEOs labeled ALL will not play any other DVD equipment. The disc will also play DVD VIDEOs (playback only) labeled with high-speed discs. To change the disc's format, reformat the disc (page...
... the instructions supplied with copyright protection technologies This product is recommended that you use discs with copyright protection technologies are some that among those discs, there are being marketed by this recorder. Since this recorder, the data may be erased. 13 DVD VIDEOs labeled ALL will not play any other DVD equipment. The disc will also play DVD VIDEOs (playback only) labeled with high-speed discs. To change the disc's format, reformat the disc (page...
Operating Instructions
Page 26
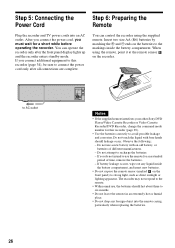
... as direct sunlight or lighting apparatus. When using the supplied remote. to connect the power cord only after the front panel display lights up and the recorder enters standby mode. Do not use the remote for this recorder (page 34), be sure to AC outlet DIGITAL AUDIO OUT PCM/DTS/ DOLBY DIGITAL AUDIO OUT R L COAXIAL OPTICAL S VIDEO OUT Notes • If the supplied remote interferes your other Sony DVD Player/Video Cassette Recorder or Video Cassette Recorder/DVD Recorder, change the command mode number for...
... as direct sunlight or lighting apparatus. When using the supplied remote. to connect the power cord only after the front panel display lights up and the recorder enters standby mode. Do not use the remote for this recorder (page 34), be sure to AC outlet DIGITAL AUDIO OUT PCM/DTS/ DOLBY DIGITAL AUDIO OUT R L COAXIAL OPTICAL S VIDEO OUT Notes • If the supplied remote interferes your other Sony DVD Player/Video Cassette Recorder or Video Cassette Recorder/DVD Recorder, change the command mode number for...
Operating Instructions
Page 29
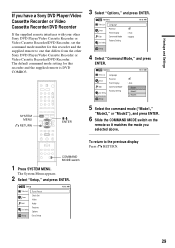
... the supplied remote to the previous display Press O RETURN. 29 Setup Title List Timer Edit Disc Setting Setup Tuner Preset Clock Set Video Audio Features Options Easy Setup 10:10 AM To return to one that differs from the other Sony DVD Player/Video Cassette Recorder or Video Cassette Recorder/DVD Recorder. Hookups and Settings If you selected above. Options Title List Timer Edit Disc Setting Language Parental Front Display Command Mode Factory Setting : Auto : Mode3 10:10 AM Setup 4 Select "Command Mode," and press ENTER. The System Menu appears. 2 Select "Setup," and...
... the supplied remote to the previous display Press O RETURN. 29 Setup Title List Timer Edit Disc Setting Setup Tuner Preset Clock Set Video Audio Features Options Easy Setup 10:10 AM To return to one that differs from the other Sony DVD Player/Video Cassette Recorder or Video Cassette Recorder/DVD Recorder. Hookups and Settings If you selected above. Options Title List Timer Edit Disc Setting Language Parental Front Display Command Mode Factory Setting : Auto : Mode3 10:10 AM Setup 4 Select "Command Mode," and press ENTER. The System Menu appears. 2 Select "Setup," and...
Operating Instructions
Page 43
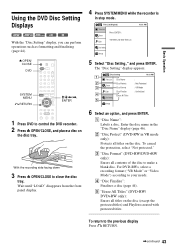
Z OPEN/ CLOSE DVD SYSTEM MENU O RETURN M/m/ Basic Operation Using the DVD Disc Setting Displays +RW -RWVR -RWVideo +R -R With the "Disc Setting" display, you can perform operations such as formatting and finalizing (page 44).
Z OPEN/ CLOSE DVD SYSTEM MENU O RETURN M/m/ Basic Operation Using the DVD Disc Setting Displays +RW -RWVR -RWVideo +R -R With the "Disc Setting" display, you can perform operations such as formatting and finalizing (page 44).
Operating Instructions
Page 49
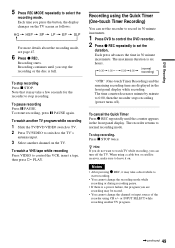
DVD Recording 5 Press REC MODE repeatedly to the TV's antenna input. 3 Select another channel on the TV. Recording starts. To watch TV while recording, you can set the duration. To watch a VHS tape while recording Press VIDEO to watch another TV program. ,continued 49 Each press advances the time in the front panel display while recording. To cancel the Quick Timer Press z REC repeatedly until you press the button, the display changes on . z Hint If you are displayed in 30...
DVD Recording 5 Press REC MODE repeatedly to the TV's antenna input. 3 Select another channel on the TV. Recording starts. To watch TV while recording, you can set the duration. To watch a VHS tape while recording Press VIDEO to watch another TV program. ,continued 49 Each press advances the time in the front panel display while recording. To cancel the Quick Timer Press z REC repeatedly until you press the button, the display changes on . z Hint If you are displayed in 30...
Operating Instructions
Page 52
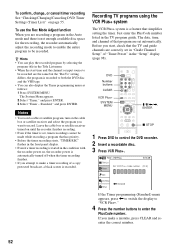
... the Auto mode and there is recorded to both the DVD disc and the VHS tape. • You can play the recorded program by selecting the program title in the Title List menu. • When the start , check that the TV and guide channels are correctly set in "Guide Channel Setup" of "Tuner Preset" in the TV program guide. Recording TV programs using the VCR Plus+ system The VCR Plus+ system is recorded. To use the Rec Mode Adjust function When you attempt to record. Notes • To record a cable...
... the Auto mode and there is recorded to both the DVD disc and the VHS tape. • You can play the recorded program by selecting the program title in the Title List menu. • When the start , check that the TV and guide channels are correctly set in "Guide Channel Setup" of "Tuner Preset" in the TV program guide. Recording TV programs using the VCR Plus+ system The VCR Plus+ system is recorded. To use the Rec Mode Adjust function When you attempt to record. Notes • To record a cable...
Operating Instructions
Page 71
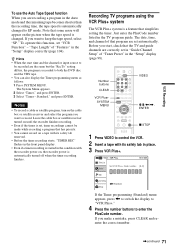
... date, time, and channel of that program are the same but the "RecTo" setting differs, the program is changed to record. Number buttons CLEAR VCR Plus+ SYSTEM MENU VIDEO M/m/ "Tape Length" of "Features" in the TV program guide. Notes • To record a cable or satellite program, turn on the picture when the tape speed is recorded to keep the tape speed, select "SP." VCR Recording To use the Auto Tape Speed function When you are correctly set in "Guide Channel Setup" of "Tuner Preset" in the "Setup" display (page...
... date, time, and channel of that program are the same but the "RecTo" setting differs, the program is changed to record. Number buttons CLEAR VCR Plus+ SYSTEM MENU VIDEO M/m/ "Tape Length" of "Features" in the TV program guide. Notes • To record a cable or satellite program, turn on the picture when the tape speed is recorded to keep the tape speed, select "SP." VCR Recording To use the Auto Tape Speed function When you are correctly set in "Guide Channel Setup" of "Tuner Preset" in the "Setup" display (page...
Operating Instructions
Page 92
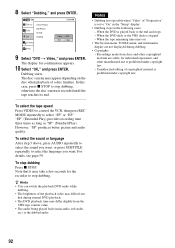
... select the sound or language After step 5 above, press AUDIO repeatedly to select the sound you want. The disc's menu may differ slightly from discs and other unauthorized use is set to stop dubbing, otherwise the disc's menu is prohibited under copyright law. - Unauthorized editing of "Progressive" is prohibited under copyright law. Note that it may differ from that during dubbing. • Copyrights - Edit Title List Timer Edit Create Playlist Edit Playlist DV Edit Dubbing Disc Setting Setup 10:10 AM Video --> DVD DVD --> Video 9 Select "DVD t Video...
... select the sound or language After step 5 above, press AUDIO repeatedly to select the sound you want. The disc's menu may differ slightly from discs and other unauthorized use is set to stop dubbing, otherwise the disc's menu is prohibited under copyright law. - Unauthorized editing of "Progressive" is prohibited under copyright law. Note that it may differ from that during dubbing. • Copyrights - Edit Title List Timer Edit Create Playlist Edit Playlist DV Edit Dubbing Disc Setting Setup 10:10 AM Video --> DVD DVD --> Video 9 Select "DVD t Video...
Operating Instructions
Page 94
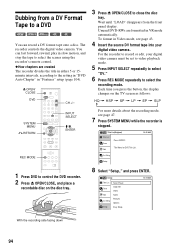
... recording mode. Wait until "LOAD" disappears from a DV Format Tape to a DVD +RW -RWVR -RWVideo +R -R You can fast forward, rewind, play in slow motion, and stop the tape to select the scenes using the recorder's remote control. ◆How chapters are formatted in Video mode, see page 47. 7 Press SYSTEM MENU while the recorder is stopped. The recorder controls the digital video camera. To format in VR mode automatically. For the recorder to record or edit, your digital video camera. Setup Title List Timer Edit Disc Setting Setup Tuner Preset Clock Set Video Audio...
... recording mode. Wait until "LOAD" disappears from a DV Format Tape to a DVD +RW -RWVR -RWVideo +R -R You can fast forward, rewind, play in slow motion, and stop the tape to select the scenes using the recorder's remote control. ◆How chapters are formatted in Video mode, see page 47. 7 Press SYSTEM MENU while the recorder is stopped. The recorder controls the digital video camera. To format in VR mode automatically. For the recorder to record or edit, your digital video camera. Setup Title List Timer Edit Disc Setting Setup Tuner Preset Clock Set Video Audio...
Operating Instructions
Page 95
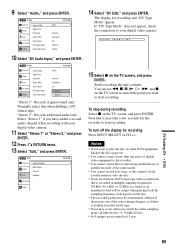
... If you record from a DV format tape with your digital video camera. "Stereo 2": Records additional audio only. Edit Title List Timer Edit Create Playlist Edit Playlist DV Edit Dubbing 10:10 AM Disc Setting Setup 14 Select "DV Edit," and press ENTER. If "DV Tape Mode" does not appear, check the connection to start recording. Audio Title list Timer Edit Disc Setting Setup Tuner Audio Digital Out Downmix Audio DRC Scan Audio DV Audio Input Line Audio Input : Main 10:10 AM : Normal : Standard : On : Stereo 1 : Stereo 2 "Stereo 1": Records original sound only. Select "Stereo...
... If you record from a DV format tape with your digital video camera. "Stereo 2": Records additional audio only. Edit Title List Timer Edit Create Playlist Edit Playlist DV Edit Dubbing 10:10 AM Disc Setting Setup 14 Select "DV Edit," and press ENTER. If "DV Tape Mode" does not appear, check the connection to start recording. Audio Title list Timer Edit Disc Setting Setup Tuner Audio Digital Out Downmix Audio DRC Scan Audio DV Audio Input Line Audio Input : Main 10:10 AM : Normal : Standard : On : Stereo 1 : Stereo 2 "Stereo 1": Records original sound only. Select "Stereo...
Operating Instructions
Page 96
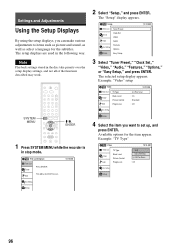
... Setup 2 Select "Setup," and press ENTER. The setup displays are used in stop mode. Example: "Video" setup Video Title list Timer Edit TV Type Black Level Picture Control Progressive Disc Setting Setup 10:10 AM : 4:3 Pan Scan : On : Standard : Off 4 Select the item you can make various adjustments to set up, and press ENTER. Setup Title List Timer Edit Disc Setting Setup Tuner Preset Clock Set Video Audio Features Options Easy Setup 10:10 AM 3 Select "Tuner Preset," "Clock Set," "Video," "Audio," "Features," "Options," or "Easy Setup," and press ENTER. SYSTEM MENU...
... Setup 2 Select "Setup," and press ENTER. The setup displays are used in stop mode. Example: "Video" setup Video Title list Timer Edit TV Type Black Level Picture Control Progressive Disc Setting Setup 10:10 AM : 4:3 Pan Scan : On : Standard : Off 4 Select the item you can make various adjustments to set up, and press ENTER. Setup Title List Timer Edit Disc Setting Setup Tuner Preset Clock Set Video Audio Features Options Easy Setup 10:10 AM 3 Select "Tuner Preset," "Clock Set," "Video," "Audio," "Features," "Options," or "Easy Setup," and press ENTER. SYSTEM MENU...
Operating Instructions
Page 97
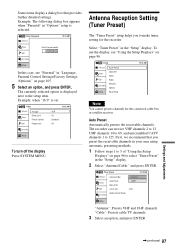
...Video Title list Timer Edit TV Type Black Level Picture Control Progressive 10:10 AM : 16:9 : On : Standard : Off Disc Setting Setup To turn off the display Press SYSTEM MENU. Select "Tuner Preset" in "Language, Parental Control Settings/Factory Settings (Options)" on page 105. 5 Select an option, and press ENTER. Setup Title List Timer Edit Disc Setting Setup Tuner Preset Clock Set Video Audio Features Options Easy Setup 10:10 AM Note You cannot presets channels for the recorder. First, we recommend that provides further detailed settings. Antenna Reception Setting (Tuner...
...Video Title list Timer Edit TV Type Black Level Picture Control Progressive 10:10 AM : 16:9 : On : Standard : Off Disc Setting Setup To turn off the display Press SYSTEM MENU. Select "Tuner Preset" in "Language, Parental Control Settings/Factory Settings (Options)" on page 105. 5 Select an option, and press ENTER. Setup Title List Timer Edit Disc Setting Setup Tuner Preset Clock Set Video Audio Features Options Easy Setup 10:10 AM Note You cannot presets channels for the recorder. First, we recommend that provides further detailed settings. Antenna Reception Setting (Tuner...
Operating Instructions
Page 98
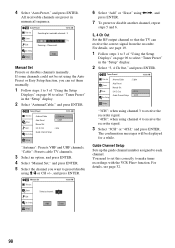
... AM Title list Searching for receivable channels: 3 Timer 7% Edit Scanning... Manual Set Title list 10:10 AM Timer Edit Select a channel: 69 Disc Setting Setup Add Erase 6 Select "Add" or "Erase" using M/m or CH +/-, and press ENTER. Tuner Preset 10:10 AM Title list Timer Edit Disc Setting Antenna/Cable : 4:3ALnetettnenraBox Auto Preset : OnCable Manual Set 3,4 Ch Out : 3CH Guide Channel Setup Setup "Antenna": Presets VHF and UHF channels. 4 Select "Auto Preset," and press ENTER. All receivable channels are preset in the "Setup" display. 2 Select "Antenna/Cable...
... AM Title list Searching for receivable channels: 3 Timer 7% Edit Scanning... Manual Set Title list 10:10 AM Timer Edit Select a channel: 69 Disc Setting Setup Add Erase 6 Select "Add" or "Erase" using M/m or CH +/-, and press ENTER. Tuner Preset 10:10 AM Title list Timer Edit Disc Setting Antenna/Cable : 4:3ALnetettnenraBox Auto Preset : OnCable Manual Set 3,4 Ch Out : 3CH Guide Channel Setup Setup "Antenna": Presets VHF and UHF channels. 4 Select "Auto Preset," and press ENTER. All receivable channels are preset in the "Setup" display. 2 Select "Antenna/Cable...
Operating Instructions
Page 108
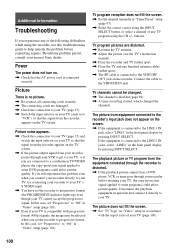
... screen. , If the picture output signal from a DVD player, VCR, or tuner goes through the recorder is connected securely. If you still experience this problem even when you connect your recorder directly to your TV, try connecting your recorder to your TV's S VIDEO input. , You have set "Progressive" to "Off" in accordance with progressive format (480p) signals, the image may be changed the channels. Should any bunched antenna cables farther apart. , The RF cable is compatible with the aspect ratio...
... screen. , If the picture output signal from a DVD player, VCR, or tuner goes through the recorder is connected securely. If you still experience this problem even when you connect your recorder directly to your TV, try connecting your recorder to your TV's S VIDEO input. , You have set "Progressive" to "Off" in accordance with progressive format (480p) signals, the image may be changed the channels. Should any bunched antenna cables farther apart. , The RF cable is compatible with the aspect ratio...
Operating Instructions
Page 111
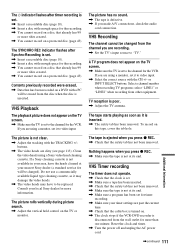
... z REC. , Check that already has 99 or more titles created. , You cannot record on . , The clock stops if the VCR-DVD recorder is not clear. , Adjust the tracking with a PC will be changed from the disc when the disc is set for more information. Contents previously recorded were erased. , Data that the cable box is turned on a protected disc (page 43). VHS Playback The playback picture does not appear on a DVD with the TRACKING +/- VHS Recording The channel cannot be charged). select "LINE1...
... z REC. , Check that already has 99 or more titles created. , You cannot record on . , The clock stops if the VCR-DVD recorder is not clear. , Adjust the tracking with a PC will be changed from the disc when the disc is set for more information. Contents previously recorded were erased. , Data that the cable box is turned on a protected disc (page 43). VHS Playback The playback picture does not appear on a DVD with the TRACKING +/- VHS Recording The channel cannot be charged). select "LINE1...
Operating Instructions
Page 112
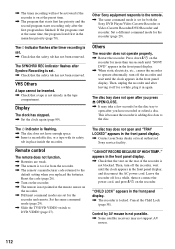
... Sony DVD Player/Video Cassette Recorder or Video Cassette Recorder/DVD Recorder and recorder. The SYNCHRO REC indicator flashes after timer recording is too far from the recorder. , The remote's manufacturer code returned to the default setting when you have enough space. , Insert a recordable disc or a tape with its safety tab in the front panel display. Remote control The remote does not function. , Batteries are set . , Check that the safety tab has not been removed. Set a different command mode for a while, then re-connect the power cord...
... Sony DVD Player/Video Cassette Recorder or Video Cassette Recorder/DVD Recorder and recorder. The SYNCHRO REC indicator flashes after timer recording is too far from the recorder. , The remote's manufacturer code returned to the default setting when you have enough space. , Insert a recordable disc or a tape with its safety tab in the front panel display. Remote control The remote does not function. , Batteries are set . , Check that the safety tab has not been removed. Set a different command mode for a while, then re-connect the power cord...
Operating Instructions
Page 124
... 17 AUDIO 59, 80 "Audio" 105 Audio cords 23 "Audio DRC" 103 Audio settings 102 Auto Clock Set 99 "Auto Play" 104 "Auto Preset" 97 "Auto Repeat" 104 B Batteries 26 "Black Level" 100 Bookmark 62 C Cable box 16, 17 Chapter 122 CHAPTER ERASE 84 CHAPTER MARK 84 Checking/changing/canceling timer settings (Timer List) 55, 74 Child Lock 58 Cleaning discs 113 Cleaning the video heads 111 CLEAR 52, 62, 71, 76 "Clock Set CH" 99 Clock Set settings 99 "Command Mode" 29, 106 COMPONENT VIDEO OUT 21 Connecting the antenna cable...
... 17 AUDIO 59, 80 "Audio" 105 Audio cords 23 "Audio DRC" 103 Audio settings 102 Auto Clock Set 99 "Auto Play" 104 "Auto Preset" 97 "Auto Repeat" 104 B Batteries 26 "Black Level" 100 Bookmark 62 C Cable box 16, 17 Chapter 122 CHAPTER ERASE 84 CHAPTER MARK 84 Checking/changing/canceling timer settings (Timer List) 55, 74 Child Lock 58 Cleaning discs 113 Cleaning the video heads 111 CLEAR 52, 62, 71, 76 "Clock Set CH" 99 Clock Set settings 99 "Command Mode" 29, 106 COMPONENT VIDEO OUT 21 Connecting the antenna cable...


