
Operating Instructions
Page 2
... to correct the interference by turning the equipment off and on, the user is no guarantee that the AC power cord can be changed only at the rear of the following measures: - Model No. This equipment generates, uses, and can radiate radio frequency energy and, if not installed and used in a particular installation. Record the serial number in accordance with this product...
... to correct the interference by turning the equipment off and on, the user is no guarantee that the AC power cord can be changed only at the rear of the following measures: - Model No. This equipment generates, uses, and can radiate radio frequency energy and, if not installed and used in a particular installation. Record the serial number in accordance with this product...
Operating Instructions
Page 5
... 30 Checking the playing/remaining time 31 Checking the remaining disc space 32 5. Getting to a Satellite or Digital Tuner 26 Eight Basic Operations - Labeling and Protecting a Disc 34 Labeling a disc 34 Protecting a disc 35 7. Playing the Recorded Program (Title List 28 4. Table of Contents WARNING 2 Precautions 3 Quick Guide to Disc Types 8 Recordable and playable discs 8 Playable discs 10 Hookups and Settings 12 Hooking Up the Recorder 12 Step 1: Connecting the Antenna Cable 12 A: Cable box or satellite receiver with a video/audio output 13 B: Cable box with...
... 30 Checking the playing/remaining time 31 Checking the remaining disc space 32 5. Getting to a Satellite or Digital Tuner 26 Eight Basic Operations - Labeling and Protecting a Disc 34 Labeling a disc 34 Protecting a disc 35 7. Playing the Recorded Program (Title List 28 4. Table of Contents WARNING 2 Precautions 3 Quick Guide to Disc Types 8 Recordable and playable discs 8 Playable discs 10 Hookups and Settings 12 Hooking Up the Recorder 12 Step 1: Connecting the Antenna Cable 12 A: Cable box or satellite receiver with a video/audio output 13 B: Cable box with...

Operating Instructions
Page 6
... stereo/SAP program 40 Unrecordable pictures 40 Timer Recording 40 Using the Quick Timer function 42 Adjusting the recording picture quality and size 42 Creating chapters in a title 43 Checking/Changing/Canceling Timer Settings (Timer List 44 Changing the priority of overlapped settings 45 Recording From Connected Equipment 47 Recording from connected equipment with a timer (Synchro Rec). . . . . 47 Recording from connected equipment without a timer 48 Playback 49 Playing 49 Playback options 51 Adjusting the picture quality 52 Adjusting the delay between the picture and sound (AV...
... stereo/SAP program 40 Unrecordable pictures 40 Timer Recording 40 Using the Quick Timer function 42 Adjusting the recording picture quality and size 42 Creating chapters in a title 43 Checking/Changing/Canceling Timer Settings (Timer List 44 Changing the priority of overlapped settings 45 Recording From Connected Equipment 47 Recording from connected equipment with a timer (Synchro Rec). . . . . 47 Recording from connected equipment without a timer 48 Playback 49 Playing 49 Playback options 51 Adjusting the picture quality 52 Adjusting the delay between the picture and sound (AV...
Operating Instructions
Page 7
Settings and Adjustments 71 Antenna Reception and Language Settings (Basic 71 Tuner Preset 71 Clock 72 OSD (On-Screen Display 73 Video Settings (Video 74 Audio Settings (Audio 76 Recording Settings (Recording 78 Disc Settings (DVD 79 Remote Control Settings/Factory Settings (Others 81 Easy Setup (Resetting the Recorder 82 Additional Information 83 Troubleshooting 83 Self-diagnosis Function (When letters/numbers appear in the display) . . . . 88 Notes About This Recorder 88 Specifications 89 About i.LINK 90 Guide to Parts and Controls 92 Language Code List 95 Area Code 95 ...
Settings and Adjustments 71 Antenna Reception and Language Settings (Basic 71 Tuner Preset 71 Clock 72 OSD (On-Screen Display 73 Video Settings (Video 74 Audio Settings (Audio 76 Recording Settings (Recording 78 Disc Settings (DVD 79 Remote Control Settings/Factory Settings (Others 81 Easy Setup (Resetting the Recorder 82 Additional Information 83 Troubleshooting 83 Self-diagnosis Function (When letters/numbers appear in the display) . . . . 88 Notes About This Recorder 88 Specifications 89 About i.LINK 90 Guide to Parts and Controls 92 Language Code List 95 Area Code 95 ...
Operating Instructions
Page 11
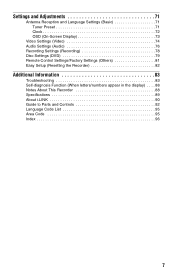
... the operating instructions for recording even with high-speed discs. • It is used to the recording quality or physical condition of the disc, or the characteristics of the recording device and authoring software. To change the disc's format, reformat the disc (page 37). Since this recorder plays DVD VIDEOs/VIDEO CDs according to play DVD VIDEOs (playback only) labeled with identical region codes. Region code (DVD VIDEO only) Your recorder has a region code printed on the rear of the unit and...
... the operating instructions for recording even with high-speed discs. • It is used to the recording quality or physical condition of the disc, or the characteristics of the recording device and authoring software. To change the disc's format, reformat the disc (page 37). Since this recorder plays DVD VIDEOs/VIDEO CDs according to play DVD VIDEOs (playback only) labeled with identical region codes. Region code (DVD VIDEO only) Your recorder has a region code printed on the rear of the unit and...
Operating Instructions
Page 13
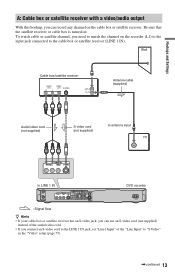
... cable (supplied) Audio/video cord (not supplied) S-video cord (not supplied) to antenna input TV to LINE 1 IN DVD recorder : Signal flow z Hints • If your cable box or satellite receiver has an S-video jack, you can record any channel on the cable box or satellite receiver. Hookups and Settings A: Cable box or satellite receiver with a video/audio output With this hookup, you connect an S-video cord to the LINE 1 IN jack, set "Line1 Input" of the audio/video cord. • If you can use an S-video cord...
... cable (supplied) Audio/video cord (not supplied) S-video cord (not supplied) to antenna input TV to LINE 1 IN DVD recorder : Signal flow z Hints • If your cable box or satellite receiver has an S-video jack, you can record any channel on the cable box or satellite receiver. Hookups and Settings A: Cable box or satellite receiver with a video/audio output With this hookup, you connect an S-video cord to the LINE 1 IN jack, set "Line1 Input" of the audio/video cord. • If you can use an S-video cord...
Operating Instructions
Page 14
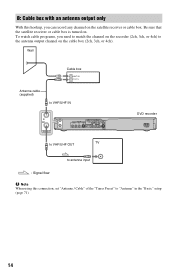
..." setup (page 71). 14 B: Cable box with an antenna output only With this connection, set "Antenna / Cable" of the "Tuner Preset" to the antenna output channel on the cable box (2ch, 3ch, or 4ch). To watch cable programs, you can record any channel on the satellite receiver or cable box. Wall Cable box ANT IN TO TV Antenna cable (supplied) to VHF/UHF IN DVD recorder to VHF/UHF OUT TV to antenna input : Signal flow b Note When using...
..." setup (page 71). 14 B: Cable box with an antenna output only With this connection, set "Antenna / Cable" of the "Tuner Preset" to the antenna output channel on the cable box (2ch, 3ch, or 4ch). To watch cable programs, you can record any channel on the satellite receiver or cable box. Wall Cable box ANT IN TO TV Antenna cable (supplied) to VHF/UHF IN DVD recorder to VHF/UHF OUT TV to antenna input : Signal flow b Note When using...
Operating Instructions
Page 16
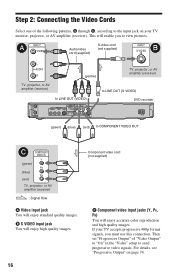
... 74. For details, see "Progressive Output" on your TV accepts progressive 480p format signals, you to view pictures. If your TV monitor, projector, or AV amplifier (receiver). Step 2: Connecting the Video Cords Select one of "Video Output" to "On" in the "Video" setup to send progressive video signals. A INPUT VIDEO Audio/video cord (supplied) S-video cord (not supplied) INPUT B S VIDEO L AUDIO R (yellow) TV, projector, or AV amplifier (receiver) TV, projector, or AV amplifier (receiver) to LINE OUT (VIDEO) to LINE OUT (S VIDEO) DVD recorder (green) (blue) (red) to...
... 74. For details, see "Progressive Output" on your TV accepts progressive 480p format signals, you to view pictures. If your TV monitor, projector, or AV amplifier (receiver). Step 2: Connecting the Video Cords Select one of "Video Output" to "On" in the "Video" setup to send progressive video signals. A INPUT VIDEO Audio/video cord (supplied) S-video cord (not supplied) INPUT B S VIDEO L AUDIO R (yellow) TV, projector, or AV amplifier (receiver) TV, projector, or AV amplifier (receiver) to LINE OUT (VIDEO) to LINE OUT (S VIDEO) DVD recorder (green) (blue) (red) to...
Operating Instructions
Page 20
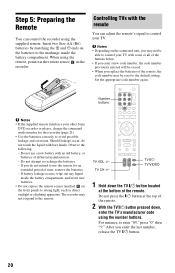
... new batteries. • Do not expose the remote sensor (marked on the recorder. Number buttons b Notes • If the supplied remote interferes your other Sony DVD recorder or player, change the command mode number for an extended period of time, remove the batteries. - Observe the following: - Do not use the remote for this recorder (page 21). • Use the batteries correctly to control your TV. Insert two Size AA (R6) batteries...
... new batteries. • Do not expose the remote sensor (marked on the recorder. Number buttons b Notes • If the supplied remote interferes your other Sony DVD recorder or player, change the command mode number for an extended period of time, remove the batteries. - Observe the following: - Do not use the remote for this recorder (page 21). • Use the batteries correctly to control your TV. Insert two Size AA (R6) batteries...

Operating Instructions
Page 21
... and Settings Code numbers of your TV TV CH +/- Adjusts the volume of controllable TVs If more than one that works with your TV's input source If you have completed "Step 6: Easy Setup." The System Menu appears. 3 Select "SETUP," and press ENTER. ,continued 21 Number buttons SYSTEM MENU M/m, ENTER 1 Check that differs from the other Sony DVD recorder or player, set the command mode number for this recorder and the supplied remote to one at a time until you have a Sony DVD player or...
... and Settings Code numbers of your TV TV CH +/- Adjusts the volume of controllable TVs If more than one that works with your TV's input source If you have completed "Step 6: Easy Setup." The System Menu appears. 3 Select "SETUP," and press ENTER. ,continued 21 Number buttons SYSTEM MENU M/m, ENTER 1 Check that differs from the other Sony DVD recorder or player, set the command mode number for this recorder and the supplied remote to one at a time until you have a Sony DVD player or...
Operating Instructions
Page 23
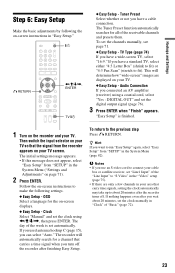
Hookups and Settings Step 6: Easy Setup Make the basic adjustments by following the on-screen instructions in "Easy Setup." [/1 O RETURN
Hookups and Settings Step 6: Easy Setup Make the basic adjustments by following the on-screen instructions in "Easy Setup." [/1 O RETURN

Operating Instructions
Page 25
... Settings b Notes • Pictures containing copy protection signals that prohibit any copying cannot be recorded. • If you pass the recorder signals through a second line input on your TV screen. Connecting to the LINE 2 IN jacks on the front panel Connect a VCR or similar recording device to the LINE 2 IN jacks of the recorder. S-video cord (not supplied) to LINE 2 IN Audio/video cord (not supplied) : Signal flow DVD recorder z Hint When the connected equipment outputs only monaural sound, connect to the input...
... Settings b Notes • Pictures containing copy protection signals that prohibit any copying cannot be recorded. • If you pass the recorder signals through a second line input on your TV screen. Connecting to the LINE 2 IN jacks on the front panel Connect a VCR or similar recording device to the LINE 2 IN jacks of the recorder. S-video cord (not supplied) to LINE 2 IN Audio/video cord (not supplied) : Signal flow DVD recorder z Hint When the connected equipment outputs only monaural sound, connect to the input...
Operating Instructions
Page 26
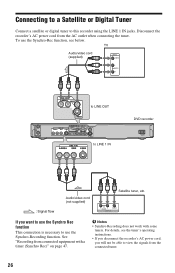
... • Synchro-Recording does not work with a timer (Synchro Rec)" on page 47. To use the Synchro-Rec function, see the tuner's operating instructions. • If you disconnect the recorder's AC power cord, you want to use the Synchro Rec function This connection is necessary to this recorder using the LINE 1 IN jacks. Disconnect the recorder's AC power cord from the connected tuner. 26 TV Audio/video cord (supplied) INPUT VIDEO L AUDIO R to LINE OUT DVD recorder to view the signals from the AC outlet when connecting the tuner. R AUDIO L VIDEO OUTPUT If...
... • Synchro-Recording does not work with a timer (Synchro Rec)" on page 47. To use the Synchro-Rec function, see the tuner's operating instructions. • If you disconnect the recorder's AC power cord, you want to use the Synchro Rec function This connection is necessary to this recorder using the LINE 1 IN jacks. Disconnect the recorder's AC power cord from the connected tuner. 26 TV Audio/video cord (supplied) INPUT VIDEO L AUDIO R to LINE OUT DVD recorder to view the signals from the AC outlet when connecting the tuner. R AUDIO L VIDEO OUTPUT If...

Operating Instructions
Page 27
... Your DVD Recorder 1 Press Z OPEN/CLOSE, and place a disc on the TV screen changes as follows: For more details about the recording mode, see page 39. DISPLAY Recording/playing side facing down z REC x REC STOP REC MODE TV/VIDEO 2 Press Z OPEN/CLOSE to a disc (DVD). To format an unused DVD-R in Video mode. Each time you want to record. 3 Press REC MODE repeatedly to select the channel or input source you press the button, the display on the disc tray. Inserting a Disc +RW -RWVR -RWVideo +R -RVR -RVideo DVD VCD CD DATA DVD DATA CD Z OPEN/ CLOSE 2. For...
... Your DVD Recorder 1 Press Z OPEN/CLOSE, and place a disc on the TV screen changes as follows: For more details about the recording mode, see page 39. DISPLAY Recording/playing side facing down z REC x REC STOP REC MODE TV/VIDEO 2 Press Z OPEN/CLOSE to a disc (DVD). To format an unused DVD-R in Video mode. Each time you want to record. 3 Press REC MODE repeatedly to select the channel or input source you press the button, the display on the disc tray. Inserting a Disc +RW -RWVR -RWVideo +R -RVR -RVideo DVD VCD CD DATA DVD DATA CD Z OPEN/ CLOSE 2. For...

Operating Instructions
Page 28
... using the TV/ VIDEO button (page 20). Checking the disc status while recording You can turn off the TV. Playing the Recorded Program (Title List) +RW -RWVR -RWVideo +R -RVideo -RVR To play a recorded title, select the title from the Title List. z Hint If you do not want to watch another TV program while recording Set your TV to the TV input using a decoder, make sure to stop recording Press x REC STOP. The recording information appears. 3. TITLE LIST / mc Press DISPLAY during recording. Note that it may be erased. To stop recording...
... using the TV/ VIDEO button (page 20). Checking the disc status while recording You can turn off the TV. Playing the Recorded Program (Title List) +RW -RWVR -RWVideo +R -RVideo -RVR To play a recorded title, select the title from the Title List. z Hint If you do not want to watch another TV program while recording Set your TV to the TV input using a decoder, make sure to stop recording Press x REC STOP. The recording information appears. 3. TITLE LIST / mc Press DISPLAY during recording. Note that it may be erased. To stop recording...
Operating Instructions
Page 31
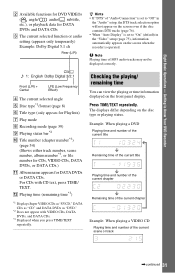
... playing a VIDEO CD Playing time and number of MP3 audio tracks may not be displayed correctly. L Playing time (remaining time*3) *1 Displays Super VIDEO CDs as "SVCD," DATA CDs as "CD" and DATA DVDs as "DVD." *2 Does not appear with CD text, press TIME/ TEXT. Eight Basic Operations - Front (L/R) + Center LFE (Low Frequency Effect) D The current selected angle E Disc type*1/format (page 8) F Title type (only appears for Playlists) G Play mode H Recording mode (page 39) I Playing status bar*2 J Title number (chapter number*3) (page 54) (Shows either track number...
... playing a VIDEO CD Playing time and number of MP3 audio tracks may not be displayed correctly. L Playing time (remaining time*3) *1 Displays Super VIDEO CDs as "SVCD," DATA CDs as "CD" and DATA DVDs as "DVD." *2 Does not appear with CD text, press TIME/ TEXT. Eight Basic Operations - Front (L/R) + Center LFE (Low Frequency Effect) D The current selected angle E Disc type*1/format (page 8) F Title type (only appears for Playlists) G Play mode H Recording mode (page 39) I Playing status bar*2 J Title number (chapter number*3) (page 54) (Shows either track number...

Operating Instructions
Page 80
... Menu," "Subtitle," or "Audio" that is selected. VR Automatically formats the disc in Video mode. To change the Parental Control level while playing the disc. Subtitle Switches the language of the sound track. When you select "Audio Follow," the subtitle language changes according to finalize the disc manually. 80 Auto Automatically finalizes the disc following One Touch Dubbing (page 68). Manual Allows you select "Others" in "DVD Menu," "Subtitle," or "Audio," select and enter a language code from "Language Code List" on the DVD VIDEO, one of "Factory Setup...
... Menu," "Subtitle," or "Audio" that is selected. VR Automatically formats the disc in Video mode. To change the Parental Control level while playing the disc. Subtitle Switches the language of the sound track. When you select "Audio Follow," the subtitle language changes according to finalize the disc manually. 80 Auto Automatically finalizes the disc following One Touch Dubbing (page 68). Manual Allows you select "Others" in "DVD Menu," "Subtitle," or "Audio," select and enter a language code from "Language Code List" on the DVD VIDEO, one of "Factory Setup...
Operating Instructions
Page 83
... you connect your recorder directly to your TV, try connecting your recorder to your TV's S VIDEO input. , You have set the recorder to progressive format even though your nearest Sony dealer. Connect the cable to help remedy the problem before requesting repairs. Power The power does not turn on again. 3Disconnect and then connect the i.LINK cable again. In this troubleshooting guide to the VHF/UHF IN jack. TV program reception does not fill the screen. , Set the channel manually in "Tuner Preset...
... you connect your recorder directly to your TV, try connecting your recorder to your TV's S VIDEO input. , You have set the recorder to progressive format even though your nearest Sony dealer. Connect the cable to help remedy the problem before requesting repairs. Power The power does not turn on again. 3Disconnect and then connect the i.LINK cable again. In this troubleshooting guide to the VHF/UHF IN jack. TV program reception does not fill the screen. , Set the channel manually in "Tuner Preset...
Operating Instructions
Page 85
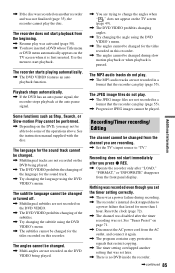
... changed from the front panel display. See "Tuner Preset" on page 71. , Disconnect the AC power cord from the beginning. , Resume play was activated (page 50). , You have inserted a DVD whose Title menu or DVD menu automatically appears on the TV screen when it again. , The program contains copy protection signals that restrict copying. , The timer setting overlapped another recorder and was not finalized (page 35), the recorder cannot play the disc. See the instruction manual supplied with the disc...
... changed from the front panel display. See "Tuner Preset" on page 71. , Disconnect the AC power cord from the beginning. , Resume play was activated (page 50). , You have inserted a DVD whose Title menu or DVD menu automatically appears on the TV screen when it again. , The program contains copy protection signals that restrict copying. , The timer setting overlapped another recorder and was not finalized (page 35), the recorder cannot play the disc. See the instruction manual supplied with the disc...

Operating Instructions
Page 87
... disc tray opens. "FAN ERROR" appears in the front panel display. , Check that the vent on the unit while the recorder is turned off or if the clock does not appear in the front panel display. , The disc tray is locked. Others The recorder does not operate properly. , Restart the recorder. Mechanical sound is heard when the recorder is off. , While the recorder is adjusting the clock for this recorder and the supplied remote is DVD3. , Press x STOP...
... disc tray opens. "FAN ERROR" appears in the front panel display. , Check that the vent on the unit while the recorder is turned off or if the clock does not appear in the front panel display. , The disc tray is locked. Others The recorder does not operate properly. , Restart the recorder. Mechanical sound is heard when the recorder is off. , While the recorder is adjusting the clock for this recorder and the supplied remote is DVD3. , Press x STOP...


