
Operating Instructions
Page 6
... addition to malfunctions and inability to record images, this camera uses the MTF* measurement system for cameras developed jointly by Carl Zeiss, in Germany, and Sony Corporation, and offers the same quality as in a car parked in the sun or...6 Exposing the LCD screen, the finder or the lens to your eyes. The lens for MVC-CD400 only) This camera uses a movable lens. These points are manufactured using extremely high-precision technology so over 99.99% of reproducing fine images..., red, blue or green in any way. • Be careful when placing the camera near a window or outdoors.
... addition to malfunctions and inability to record images, this camera uses the MTF* measurement system for cameras developed jointly by Carl Zeiss, in Germany, and Sony Corporation, and offers the same quality as in a car parked in the sun or...6 Exposing the LCD screen, the finder or the lens to your eyes. The lens for MVC-CD400 only) This camera uses a movable lens. These points are manufactured using extremely high-precision technology so over 99.99% of reproducing fine images..., red, blue or green in any way. • Be careful when placing the camera near a window or outdoors.
Operating Instructions
Page 7
... in this manual are not used in all cases in this manual. 7 The pictures used in this manual The photographs used in this camera. If moisture condensation occurs, see page 118 and follow the instructions on how to remove it before using this manual are, in the...data loss, always copy (back up) data to get the camera wet When taking pictures outdoors in general, trademarks or registered trademarks of Sony Corporation. • Microsoft and Windows are not actual images shot using the camera. Do not get the camera wet. Back up recommendation To avoid the potential risk of the ...
... in this manual are not used in all cases in this manual. 7 The pictures used in this manual The photographs used in this camera. If moisture condensation occurs, see page 118 and follow the instructions on how to remove it before using this manual are, in the...data loss, always copy (back up) data to get the camera wet When taking pictures outdoors in general, trademarks or registered trademarks of Sony Corporation. • Microsoft and Windows are not actual images shot using the camera. Do not get the camera wet. Back up recommendation To avoid the potential risk of the ...

Operating Instructions
Page 12
1 2 3 4 5 6 7 8 9 A Control button (Menu on) (v/V/b/B/z) (Menu off) ( / /7/ ) (27, 28, 29) B /CHG (charge) lamp (14) C Photocell window for LCD screen D LCD screen E ACCESS lamp (20) F DISPLAY/LCD BACK LIGHT ON/ OFF button (26) G (Metering mode) button* (72) H FOCUS button* (66, 69) I (Exposure) ...
1 2 3 4 5 6 7 8 9 A Control button (Menu on) (v/V/b/B/z) (Menu off) ( / /7/ ) (27, 28, 29) B /CHG (charge) lamp (14) C Photocell window for LCD screen D LCD screen E ACCESS lamp (20) F DISPLAY/LCD BACK LIGHT ON/ OFF button (26) G (Metering mode) button* (72) H FOCUS button* (66, 69) I (Exposure) ...

Operating Instructions
Page 26
... difficult to check using the jog dial are not recorded. 26 Each time you try to shoot a subject that is seen through glass, such as a window. • A fast-moving subject. • The subject reflects or has a lustrous finish, such as a mirror or a luminous body. • A flashing subject. r LCD ... conditions. In such cases, release the shutter button, then recompose the shot and focus again. • The subject is distant from the camera and dark. • The contrast between the subject and its background is poor. • The subject is difficult to flashing slowly.
... difficult to check using the jog dial are not recorded. 26 Each time you try to shoot a subject that is seen through glass, such as a window. • A fast-moving subject. • The subject reflects or has a lustrous finish, such as a mirror or a luminous body. • A flashing subject. r LCD ... conditions. In such cases, release the shutter button, then recompose the shot and focus again. • The subject is distant from the camera and dark. • The contrast between the subject and its background is poor. • The subject is difficult to flashing slowly.

Operating Instructions
Page 48
...; To view images on your computer in order to view movies. • You can use for Sony" software to view images through a disc drive 1 , Start up your computer and insert a finalized...software's help files. 2 , Open [My Computer] and double-click the drive you have recorded with this camera. • The folder names vary depending on page 49. 48 The "100MSDCF" folder contents are displayed....the drive manufacturer as an example. Viewing images through a disc drive using Windows Me as to whether your drive supports MultiRead. • This section describes how to view images on ...
...; To view images on your computer in order to view movies. • You can use for Sony" software to view images through a disc drive 1 , Start up your computer and insert a finalized...software's help files. 2 , Open [My Computer] and double-click the drive you have recorded with this camera. • The folder names vary depending on page 49. 48 The "100MSDCF" folder contents are displayed....the drive manufacturer as an example. Viewing images through a disc drive using Windows Me as to whether your drive supports MultiRead. • This section describes how to view images on ...

Operating Instructions
Page 49
... following files are the same. - A small-size image file shot in TIFF mode and its corresponding image file - The numerical portions of your camera are as folders in VOICE mode and its corresponding index image file 49 An uncompressed image file shot in E-MAIL mode and its corresponding image...for any number within the range from the disc, the image and sound may break off. • You can view images using a USB connection on a Windows machine (page 51). • You can view images using a USB connection only on a Macintosh machine running Mac OS X. An image file shot with ...
... following files are the same. - A small-size image file shot in TIFF mode and its corresponding image file - The numerical portions of your camera are as folders in VOICE mode and its corresponding index image file 49 An uncompressed image file shot in E-MAIL mode and its corresponding image...for any number within the range from the disc, the image and sound may break off. • You can view images using a USB connection on a Windows machine (page 51). • You can view images using a USB connection only on a Macintosh machine running Mac OS X. An image file shot with ...

Operating Instructions
Page 51
...unnecessary. • When using an OS other than Windows XP, installation of USB equipment. • Operations are not guaranteed for Windows users only) When your computer resumes from the suspend or sleep mode, communication between your camera and your computer may not recover at the same time..., some equipment, including your camera, may be unnecessary depending on your computer ...
...unnecessary. • When using an OS other than Windows XP, installation of USB equipment. • Operations are not guaranteed for Windows users only) When your computer resumes from the suspend or sleep mode, communication between your camera and your computer may not recover at the same time..., some equipment, including your camera, may be unnecessary depending on your computer ...

Operating Instructions
Page 52
...Mixer" in that order. • This section describes how to establish a USB connection using Windows 2000, log on as an example. The required operations may differ depending on your OS.... down all applications running on the computer before installing the PIXELA PTP Manager. • When using Windows Me as administrator. 52 2 , Click "PIXELA PTP Manager USB Driver" at this time. The...Click here , Select "English" then click "OK" "Welcome to your computer, and insert the supplied CD-ROM into the disc drive. 1 Installing PIXELA PTP Manager Title screen Click here 1 , Start up...
...Mixer" in that order. • This section describes how to establish a USB connection using Windows 2000, log on as an example. The required operations may differ depending on your OS.... down all applications running on the computer before installing the PIXELA PTP Manager. • When using Windows Me as administrator. 52 2 , Click "PIXELA PTP Manager USB Driver" at this time. The...Click here , Select "English" then click "OK" "Welcome to your computer, and insert the supplied CD-ROM into the disc drive. 1 Installing PIXELA PTP Manager Title screen Click here 1 , Start up...

Operating Instructions
Page 56
... the jack cover, and connect the supplied USB cable to your camera during USB connection For Windows 98, 98SE, 2000 or Me users 1 Click "Cancel" and close the window when using the PIXELA PTP Manager 2 Disconnect the USB cable from your camera. When a USB connection is established for a while. Disconnecting the USB cable from... MODE PTP" appears on the computer, or remove the disc. 56 Wait for the first time, your computer automatically runs the used program to your camera.
... the jack cover, and connect the supplied USB cable to your camera during USB connection For Windows 98, 98SE, 2000 or Me users 1 Click "Cancel" and close the window when using the PIXELA PTP Manager 2 Disconnect the USB cable from your camera. When a USB connection is established for a while. Disconnecting the USB cable from... MODE PTP" appears on the computer, or remove the disc. 56 Wait for the first time, your computer automatically runs the used program to your camera.
Operating Instructions
Page 57
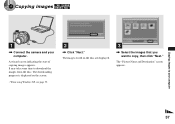
The downloading progress is displayed on the disc are displayed. 3 , Select the images that you want to your computer 1 , Connect the camera and your computer. A wizard screen indicating the start of copying images appears. The images stored on the screen. • When using Windows XP, see page 59. 2 , Click "Next." 4 Copying images Copying images to copy, then click "Next." The "Picture Name and Destination" screen appears. 57 It may take some time to download the images from the disc.
The downloading progress is displayed on the disc are displayed. 3 , Select the images that you want to your computer 1 , Connect the camera and your computer. A wizard screen indicating the start of copying images appears. The images stored on the screen. • When using Windows XP, see page 59. 2 , Click "Next." 4 Copying images Copying images to copy, then click "Next." The "Picture Name and Destination" screen appears. 57 It may take some time to download the images from the disc.
Operating Instructions
Page 61
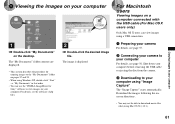
... folder contents are displayed. • This section describes the procedure for Sony" software to view images on your computer. Shut down your computer before removing the USB cable or ejecting the disc from the camera. 3 Downloading to your computer using Mac OS X (v.10.1). 61 Copying...My Documents" on pages 57 and 59. • When using Windows XP, double-click "Start" t "My Documents" in that order. • You can view images using a USB connection. 1 Preparing your camera For details, see page 55. 2 Connecting your camera to your computer For details, see the software's help files. ...
... folder contents are displayed. • This section describes the procedure for Sony" software to view images on your computer. Shut down your computer before removing the USB cable or ejecting the disc from the camera. 3 Downloading to your computer using Mac OS X (v.10.1). 61 Copying...My Documents" on pages 57 and 59. • When using Windows XP, double-click "Start" t "My Documents" in that order. • You can view images using a USB connection. 1 Preparing your camera For details, see page 55. 2 Connecting your camera to your computer For details, see the software's help files. ...

Operating Instructions
Page 69
... up or down . Focus preset Mode dial: (/S/A/M)*/SCN/ When shooting an image using a preset distance to the subject, or when shooting a subject through a net or window glass, it is approximate, and should be recorded with the zoom set to the T side, you press the shutter button fully down. b Press FOCUS twice...
... up or down . Focus preset Mode dial: (/S/A/M)*/SCN/ When shooting an image using a preset distance to the subject, or when shooting a subject through a net or window glass, it is approximate, and should be recorded with the zoom set to the T side, you press the shutter button fully down. b Press FOCUS twice...


