
Operating Instructions
Page 1
Record the serial number in the space provided below. MVC-CD1000 Serial No MVC-CD1000 ©2000 Sony Corporation Owner's Record The model and serial numbers are located on the bottom. Refer to these numbers whenever you call upon your Sony dealer regarding this manual thoroughly, and retain it for future reference. Model No. 3-062-473-12(1) Digital Still Camera Operating Instructions Before operating the unit, please read this product.
Record the serial number in the space provided below. MVC-CD1000 Serial No MVC-CD1000 ©2000 Sony Corporation Owner's Record The model and serial numbers are located on the bottom. Refer to these numbers whenever you call upon your Sony dealer regarding this manual thoroughly, and retain it for future reference. Model No. 3-062-473-12(1) Digital Still Camera Operating Instructions Before operating the unit, please read this product.

Operating Instructions
Page 2
...No.: MVC-CD1000 Responsible Party:Sony Electronics Inc. This equipment generates, uses, and can be of sufficient magnitude to correct the interference by one or more of important operating and maintenance (servicing) instructions in the literature accompanying the appliance. If you have any changes or modifications not expressly approved in this camera is ... found to comply with the instructions, may not cause harmful interference, and (2) this product will not occur in accordance with the limits for a Class B digital device, pursuant to disassemble the cabinet.
...No.: MVC-CD1000 Responsible Party:Sony Electronics Inc. This equipment generates, uses, and can be of sufficient magnitude to correct the interference by one or more of important operating and maintenance (servicing) instructions in the literature accompanying the appliance. If you have any changes or modifications not expressly approved in this camera is ... found to comply with the instructions, may not cause harmful interference, and (2) this product will not occur in accordance with the limits for a Class B digital device, pursuant to disassemble the cabinet.

Operating Instructions
Page 3
... picture and sound of FCC Rules. If the plug supplied with the limits for a digital device pursuant to attach the fuse cover after you should lose the fuse cover, please contact your nearest Sony service station. Consult the dealer or an experienced radio/TV technician for your nearest... Center nearest you call 1-800-222-SONY (United States only) For the Sony Factory Service Center nearest you call 416-499-SONY (Canada only) Caution: Do not handle damaged or leaking lithium ion battery. For the Customers in order to comply with this camera. 3 marked with or mark) must be...
... picture and sound of FCC Rules. If the plug supplied with the limits for a digital device pursuant to attach the fuse cover after you should lose the fuse cover, please contact your nearest Sony service station. Consult the dealer or an experienced radio/TV technician for your nearest... Center nearest you call 1-800-222-SONY (United States only) For the Sony Factory Service Center nearest you call 416-499-SONY (Canada only) Caution: Do not handle damaged or leaking lithium ion battery. For the Customers in order to comply with this camera. 3 marked with or mark) must be...

Operating Instructions
Page 4
Before you may want to make sure that you read through this manual and operating the unit, check the model number. This digital still camera uses 8 cm CD-Rs as "disc" in capital letters. When this lamp is not possible due to a malfunction of the recording cannot be careful...of such materials may occur. However, there may cause malfunctions. Back up recommendation To avoid the potential risk of the pixels are shown in this camera with Mavica discs*. • While the image is an 8 cm CD-R with the Design Rules for long periods may be some tiny black points and/...
Before you may want to make sure that you read through this manual and operating the unit, check the model number. This digital still camera uses 8 cm CD-Rs as "disc" in capital letters. When this lamp is not possible due to a malfunction of the recording cannot be careful...of such materials may occur. However, there may cause malfunctions. Back up recommendation To avoid the potential risk of the pixels are shown in this camera with Mavica discs*. • While the image is an 8 cm CD-R with the Design Rules for long periods may be some tiny black points and/...

Operating Instructions
Page 5
... Changing the recorded still image size (RESIZE 62 Selecting still images to print (PRINT MARK 62 Additional information Precautions 64 On discs 66 Using your camera abroad 67 Troubleshooting 68 Warning and notice messages .......72 Self-diagnosis display 73 Specifications 74 LCD screen/viewfinder indicators .75 Index 77 5
... Changing the recorded still image size (RESIZE 62 Selecting still images to print (PRINT MARK 62 Additional information Precautions 64 On discs 66 Using your camera abroad 67 Troubleshooting 68 Warning and notice messages .......72 Self-diagnosis display 73 Specifications 74 LCD screen/viewfinder indicators .75 Index 77 5

Operating Instructions
Page 7
...surface) Use a tripod with a screw length of less than 7/32 inch (6.5 mm). You will be unable to firmly secure the camera to tripods having longer screws, and may damage the camera. 7 q; buttons (27) I LCD screen J Hooks for strap K SPOT METER button (52) L Control button (40) ...M ACCESS lamp (18) Do not shake or strike the camera while the ACCESS lamp is lit. Getting started 1 2 3 4 5 6 7 8 9 A (Macro) button (50) B (Flash) button (...
...surface) Use a tripod with a screw length of less than 7/32 inch (6.5 mm). You will be unable to firmly secure the camera to tripods having longer screws, and may damage the camera. 7 q; buttons (27) I LCD screen J Hooks for strap K SPOT METER button (52) L Control button (40) ...M ACCESS lamp (18) Do not shake or strike the camera while the ACCESS lamp is lit. Getting started 1 2 3 4 5 6 7 8 9 A (Macro) button (50) B (Flash) button (...

Operating Instructions
Page 8
...trademark of the arrow while pressing the PUSH button. 2 Install the battery pack. "InfoLITHIUM" is "InfoLITHIUM"? Slide the battery cover in the direction of Sony Corporation. 8 Be careful not to drop the battery pack when removing it. "InfoLITHIUM" L series battery packs have the mark. Insert the battery pack.... Slide the battery eject lever rightward, and remove the battery pack. Preparing the power supply Installing the battery pack Your camera operates only with the NP-F550 (supplied) "InfoLITHIUM" battery pack* (L series). 1 2 1 2 3 1 2 1 Open the battery cover...
...trademark of the arrow while pressing the PUSH button. 2 Install the battery pack. "InfoLITHIUM" is "InfoLITHIUM"? Slide the battery cover in the direction of Sony Corporation. 8 Be careful not to drop the battery pack when removing it. "InfoLITHIUM" L series battery packs have the mark. Insert the battery pack.... Slide the battery eject lever rightward, and remove the battery pack. Preparing the power supply Installing the battery pack Your camera operates only with the NP-F550 (supplied) "InfoLITHIUM" battery pack* (L series). 1 2 1 2 3 1 2 1 Open the battery cover...

Operating Instructions
Page 9
... cord 2 (mains lead) Battery pack 1 3 to a wall outlet (mains) 1 Insert the battery pack into your camera. 2 Open the DC IN cover and connect the DC connecting plug to the DC IN jack of use the battery longer...is completed. This indication may not be entirely accurate depending on the conditions of your camera with the v mark facing up when charging begins. When the POWER ON/OFF (CHG) lamp goes off ...the power of the camera. The POWER ON/OFF (CHG) lamp (amber) above the control button lights up . 3 Connect the...
... cord 2 (mains lead) Battery pack 1 3 to a wall outlet (mains) 1 Insert the battery pack into your camera. 2 Open the DC IN cover and connect the DC connecting plug to the DC IN jack of use the battery longer...is completed. This indication may not be entirely accurate depending on the conditions of your camera with the v mark facing up when charging begins. When the POWER ON/OFF (CHG) lamp goes off ...the power of the camera. The POWER ON/OFF (CHG) lamp (amber) above the control button lights up . 3 Connect the...

Operating Instructions
Page 10
... Battery pack Continuous NP-F550 (supplied) recording Battery life (min.) Approx. 120 (110) Approximate time that can be smaller depending on the camera again. Notes • The battery life and number of images will be recorded with a fully charged battery pack at a temperature of 77 ...battery pack. ∗ Recording at about 5-second intervals ∗∗ Playing back single images continuously at about three minutes during recording, the camera turns off frequently, or using the zoom. • The number of images shown on tables above is indicated but the battery power runs...
... Battery pack Continuous NP-F550 (supplied) recording Battery life (min.) Approx. 120 (110) Approximate time that can be smaller depending on the camera again. Notes • The battery life and number of images will be recorded with a fully charged battery pack at a temperature of 77 ...battery pack. ∗ Recording at about 5-second intervals ∗∗ Playing back single images continuously at about three minutes during recording, the camera turns off frequently, or using the zoom. • The number of images shown on tables above is indicated but the battery power runs...
Operating Instructions
Page 11
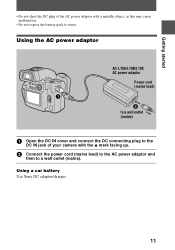
Using a car battery Use Sony DC adaptor/charger. 11 Using the AC power adaptor AC-L10A/L10B/L10C AC power adaptor Power cord (mains lead) 1 2 to a wall outlet (mains) 1 Open the DC IN cover and connect the DC connecting plug to the DC IN jack of the AC power adaptor with the v mark facing up. 2 Connect the power cord (mains lead) to the AC power adaptor and then to water. Getting started • Do not short the DC plug of your camera with a metallic object, as this may cause malfunction. • Do not expose the battery pack to a wall outlet (mains).
Using a car battery Use Sony DC adaptor/charger. 11 Using the AC power adaptor AC-L10A/L10B/L10C AC power adaptor Power cord (mains lead) 1 2 to a wall outlet (mains) 1 Open the DC IN cover and connect the DC connecting plug to the DC IN jack of the AC power adaptor with the v mark facing up. 2 Connect the power cord (mains lead) to the AC power adaptor and then to water. Getting started • Do not short the DC plug of your camera with a metallic object, as this may cause malfunction. • Do not expose the battery pack to a wall outlet (mains).

Operating Instructions
Page 12
Setting the date and time When you first use your camera for recording. The POWER ON/OFF (CHG) (green) lamp lights up. 2 Press v on the viewfinder. The menu bar appears on the LCD screen or on ... SELECT/ADJUST CANCEL OK VIDEO OUT /LANGUAGE CLOCK SET BEEP LCD BRIGHT INDEX DELETE FILE TOOL SETUP SELECT CLOSE 4 Select [CLOCK SET] with B on your camera, set , the CLOCK SET screen appears whenever you turn on the power. If these are not set the date and time. POWER ON/OFF (CHG...
Setting the date and time When you first use your camera for recording. The POWER ON/OFF (CHG) (green) lamp lights up. 2 Press v on the viewfinder. The menu bar appears on the LCD screen or on ... SELECT/ADJUST CANCEL OK VIDEO OUT /LANGUAGE CLOCK SET BEEP LCD BRIGHT INDEX DELETE FILE TOOL SETUP SELECT CLOSE 4 Select [CLOCK SET] with B on your camera, set , the CLOCK SET screen appears whenever you turn on the power. If these are not set the date and time. POWER ON/OFF (CHG...

Operating Instructions
Page 18
..., the image is frozen, however, the image is ready for recording. When the camera finishes the automatic adjustments*, the AE lock indicator z lights up and the camera is not yet recorded. The focus is not automatically adjusted when the camera is recorded on the power and insert a disc. 1 2, 3 ACCESS lamp 1 Set the PLAY...
..., the image is frozen, however, the image is ready for recording. When the camera finishes the automatic adjustments*, the AE lock indicator z lights up and the camera is not yet recorded. The focus is not automatically adjusted when the camera is recorded on the power and insert a disc. 1 2, 3 ACCESS lamp 1 Set the PLAY...
Operating Instructions
Page 19
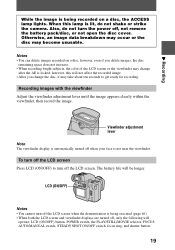
... viewfinder Adjust the viewfinder adjustment lever until the image appears clearly within the viewfinder, then record the image. Also, do not shake or strike the camera. Notes • You can delete images recorded on a disc, the ACCESS lamp lights.
... viewfinder Adjust the viewfinder adjustment lever until the image appears clearly within the viewfinder, then record the image. Also, do not shake or strike the camera. Notes • You can delete images recorded on a disc, the ACCESS lamp lights.

Operating Instructions
Page 20
... more T side: About 31 1/2 inches (80 cm) or more To record even closer subjects, see page 50. Adjusting the brightness of the bar shows the digital zooming zone. 20 W T The T-side of the LCD screen Adjust the brightness with b/B on a close subject Slide the zoom lever to the W side and...DELETE] on the review screen with v on the control button, then press the center x. Minimum focal distance to function when the zoom exceeds 10×. Digital zoom function This camera has a digital zoom function. And select [OK] with b/B on the control button, then press the center x.
... more T side: About 31 1/2 inches (80 cm) or more To record even closer subjects, see page 50. Adjusting the brightness of the bar shows the digital zooming zone. 20 W T The T-side of the LCD screen Adjust the brightness with b/B on a close subject Slide the zoom lever to the W side and...DELETE] on the review screen with v on the control button, then press the center x. Minimum focal distance to function when the zoom exceeds 10×. Digital zoom function This camera has a digital zoom function. And select [OK] with b/B on the control button, then press the center x.

Operating Instructions
Page 21
... is not necessary, set [DIGITAL ZOOM] to [OFF] in advanced operations. • The indicators on the LCD screen or on the viewfinder. (SteadyShot) indicator Notes • The SteadyShot function will not correct excessive camera-shake. • If you use a wide conversion lens (optional...is working, the camera compensates for moving images. LCD screen or viewfinder indicators during recording Press DISPLAY to ON. B Recording Using digital zoom • The maximum zoom magnification is 20×. • Digital zooming may influence the SteadyShot function. Note Digital zoom does not work...
... is not necessary, set [DIGITAL ZOOM] to [OFF] in advanced operations. • The indicators on the LCD screen or on the viewfinder. (SteadyShot) indicator Notes • The SteadyShot function will not correct excessive camera-shake. • If you use a wide conversion lens (optional...is working, the camera compensates for moving images. LCD screen or viewfinder indicators during recording Press DISPLAY to ON. B Recording Using digital zoom • The maximum zoom magnification is 20×. • Digital zooming may influence the SteadyShot function. Note Digital zoom does not work...

Operating Instructions
Page 28
...This section describes the general method for your personal computer and application software. Notes on using a personal computer You can view data with your camera on a personal computer. Uncompressed mode still image: TIFF mode - Be sure to also see the operation manuals for viewing images on a ...may appear and you may increase when you open the file. 28 Viewing images using your personal computer Software • Data recorded with your camera is stored in the following formats. For Windows users A Viewing images with a CD-ROM drive (page 33) Finalize the disc beforehand (...
...This section describes the general method for your personal computer and application software. Notes on using a personal computer You can view data with your camera on a personal computer. Uncompressed mode still image: TIFF mode - Be sure to also see the operation manuals for viewing images on a ...may appear and you may increase when you open the file. 28 Viewing images using your personal computer Software • Data recorded with your camera is stored in the following formats. For Windows users A Viewing images with a CD-ROM drive (page 33) Finalize the disc beforehand (...

Operating Instructions
Page 29
...from Suspend, or Sleep. • Windows and Windows NT, ActiveMovie, DirectShow are either registered trademarks or trademarks of Microsoft Corporation in this camera on CD-ROM drives (FINALIZE) You can record new images on the finalized disc if you execute the finalization, approximate 13.5 MB of...QuickTime are not mentioned in each case in the United States and /or other product names mentioned herein may not recover after recovering from the camera. Furthermore, "™" and "®" are trademarks of the disc will decrease. The menu bar appears on the LCD screen or on the ...
...from Suspend, or Sleep. • Windows and Windows NT, ActiveMovie, DirectShow are either registered trademarks or trademarks of Microsoft Corporation in this camera on CD-ROM drives (FINALIZE) You can record new images on the finalized disc if you execute the finalization, approximate 13.5 MB of...QuickTime are not mentioned in each case in the United States and /or other product names mentioned herein may not recover after recovering from the camera. Furthermore, "™" and "®" are trademarks of the disc will decrease. The menu bar appears on the LCD screen or on the ...

Operating Instructions
Page 30
...control button, then press the center x. 5 Select [OK] with V on a stable surface during this operation. Do not shake or jar the camera during the finalization. • When you execute the finalization, we recommend that you cannot cancel it. Finalization starts and the disc remaining indicator changes ...from to avoid any vibration during the finalization. Place the camera on the control button, then press the center x. OK CANCEL INDEX DELETE FILE TOOL SETUP SELECT OK CANCEL FINALIZE PLACE ON ...
...control button, then press the center x. 5 Select [OK] with V on a stable surface during this operation. Do not shake or jar the camera during the finalization. • When you execute the finalization, we recommend that you cannot cancel it. Finalization starts and the disc remaining indicator changes ...from to avoid any vibration during the finalization. Place the camera on the control button, then press the center x. OK CANCEL INDEX DELETE FILE TOOL SETUP SELECT OK CANCEL FINALIZE PLACE ON ...

Operating Instructions
Page 33
... driver to view images on your personal computer. 2 Open [ My Computer] and double click the drive recognizing the camera (Example:[ CD-ROM (D:)]). 3 Double-click the desired data file. You can exchange data between the camera and a computer using the supplied USB cable and CD-ROMs. Installing the USB driver Before connecting your...
... driver to view images on your personal computer. 2 Open [ My Computer] and double click the drive recognizing the camera (Example:[ CD-ROM (D:)]). 3 Double-click the desired data file. You can exchange data between the camera and a computer using the supplied USB cable and CD-ROMs. Installing the USB driver Before connecting your...
Operating Instructions
Page 34
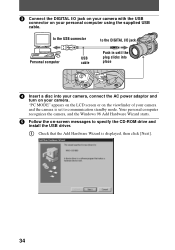
... on your camera and the camera is displayed, then click [Next]. 34 "PC MODE" appears on the LCD screen or on -screen messages to specify the CD-ROM drive and install the USB driver. 1 Check that the Add Hardware Wizard is set to the DIGITAL I /O jack on your camera with the ...USB connector on your camera. Your personal computer recognizes the camera, and the Windows 98 Add Hardware Wizard starts. 5 Follow the on the viewfinder of your personal computer...
... on your camera and the camera is displayed, then click [Next]. 34 "PC MODE" appears on the LCD screen or on -screen messages to specify the CD-ROM drive and install the USB driver. 1 Check that the Add Hardware Wizard is set to the DIGITAL I /O jack on your camera with the ...USB connector on your camera. Your personal computer recognizes the camera, and the Windows 98 Add Hardware Wizard starts. 5 Follow the on the viewfinder of your personal computer...


