
Operating Instructions
Page 1
...". Click [×] to turn the camera on , then connect the camera and a computer with /. Trademarks "bloggie" is a trademark of Sony Corporation. "Memory Stick", " ", " Memory Stick Duo", " ", "Memory Stick PRO Duo", " ", "Memory Stick PRO‑HG Duo", " ", "MagicGate", " ", "MagicGate Memory Stick" and "MagicGate Memory Stick Duo" are trademarks or registered trademarks of Sony Corporation. 360 Video is...
...". Click [×] to turn the camera on , then connect the camera and a computer with /. Trademarks "bloggie" is a trademark of Sony Corporation. "Memory Stick", " ", " Memory Stick Duo", " ", "Memory Stick PRO Duo", " ", "Memory Stick PRO‑HG Duo", " ", "MagicGate", " ", "MagicGate Memory Stick" and "MagicGate Memory Stick Duo" are trademarks or registered trademarks of Sony Corporation. 360 Video is...
bloggie™ Handbook
Page 2
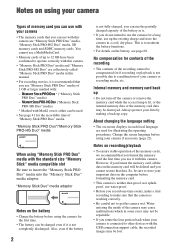
... details on -screen displays in each local language are "Memory Stick PRO Duo" media, "Memory Stick PRO-HG Duo" media, SD memory cards and SDHC memory cards. "Memory Stick Duo" media adaptor Notes on the computer before formatting the memory card. • This camera is neither dust-proof, nor splashproof, nor water-proof... your important data on the battery • Charge the battery before using your camera if necessary (page 22). Internal memory and memory card back up • Do not turn off the camera or remove the memory card while the access lamp is . • If you do not intend...
... details on -screen displays in each local language are "Memory Stick PRO Duo" media, "Memory Stick PRO-HG Duo" media, SD memory cards and SDHC memory cards. "Memory Stick Duo" media adaptor Notes on the computer before formatting the memory card. • This camera is neither dust-proof, nor splashproof, nor water-proof... your important data on the battery • Charge the battery before using your camera if necessary (page 22). Internal memory and memory card back up • Do not turn off the camera or remove the memory card while the access lamp is . • If you do not intend...
bloggie™ Handbook
Page 3
... on this case, the message appears on the screen before using extremely high-precision technology, so over 99.99% of the pixels are not guaranteed. *1 Joint Photographic Experts Group *2 Design rule for effective use the camera near a window or outdoors. • Do not press against the ... on the internal memory of the camera or the battery pack. Be careful when placing the camera near a location that do so after deleting the information input. In addition to malfunctions and an inability to others or on disposal, do not support "MP4 format". • This camera does not support...
... on this case, the message appears on the screen before using extremely high-precision technology, so over 99.99% of the pixels are not guaranteed. *1 Joint Photographic Experts Group *2 Design rule for effective use the camera near a window or outdoors. • Do not press against the ... on the internal memory of the camera or the battery pack. Be careful when placing the camera near a location that do so after deleting the information input. In addition to malfunctions and an inability to others or on disposal, do not support "MP4 format". • This camera does not support...

bloggie™ Handbook
Page 6
How to handle the camera • When carrying the camera, rotate the lens portion back as illustrated. • Be careful not to block the lens with your finger when shooting. • Do not hold the camera by only holding the battery/memory card cover, jack cover, the USB jack or the lens portion. • See page 15 for how to attach the wrist strap. 6
How to handle the camera • When carrying the camera, rotate the lens portion back as illustrated. • Be careful not to block the lens with your finger when shooting. • Do not hold the camera by only holding the battery/memory card cover, jack cover, the USB jack or the lens portion. • See page 15 for how to attach the wrist strap. 6
bloggie™ Handbook
Page 7
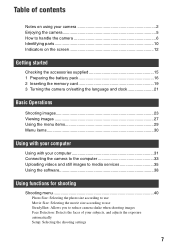
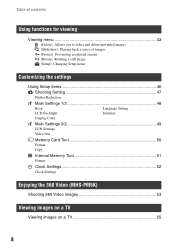
...parts 10 Indicators on the screen 12 Getting started Checking the accessories supplied 15 1 Preparing the battery pack 16 2 Inserting the memory card 19 3 Turning the camera on/setting the language and clock 21 Basic Operations Shooting images 23 Viewing images 27 Using the menu items 29 Menu items ...30 Using with your computer Using with your computer 31 Connecting the camera to the computer 33 Uploading videos and still images to media services 35 Using the software 38 Using functions for shooting Shooting menu ...
...parts 10 Indicators on the screen 12 Getting started Checking the accessories supplied 15 1 Preparing the battery pack 16 2 Inserting the memory card 19 3 Turning the camera on/setting the language and clock 21 Basic Operations Shooting images 23 Viewing images 27 Using the menu items 29 Menu items ...30 Using with your computer Using with your computer 31 Connecting the camera to the computer 33 Uploading videos and still images to media services 35 Using the software 38 Using functions for shooting Shooting menu ...
bloggie™ Handbook
Page 8
... Settings 1/2 48 Beep LCD Backlight Display Color Language Setting Initialize Main Settings 2/2 49 LUN Settings Video Out Memory Card Tool 50 Format Copy Internal Memory Tool 51 Format Clock Settings 52 Clock Settings Enjoying the 360 Video (MHS-PM5K) Shooting 360 Video images 53 Viewing images on a TV Viewing images on a TV 55 8
... Settings 1/2 48 Beep LCD Backlight Display Color Language Setting Initialize Main Settings 2/2 49 LUN Settings Video Out Memory Card Tool 50 Format Copy Internal Memory Tool 51 Format Clock Settings 52 Clock Settings Enjoying the 360 Video (MHS-PM5K) Shooting 360 Video images 53 Viewing images on a TV Viewing images on a TV 55 8

bloggie™ Handbook
Page 9
Table of contents Troubleshooting Troubleshooting 58 Warning indicators and messages 64 Others On the "Memory Stick" media 66 On the battery 68 Precautions 69 Specifications 70 Index Index...71 9
Table of contents Troubleshooting Troubleshooting 58 Warning indicators and messages 64 Others On the "Memory Stick" media 66 On the battery 68 Precautions 69 Specifications 70 Index Index...71 9
bloggie™ Handbook
Page 10
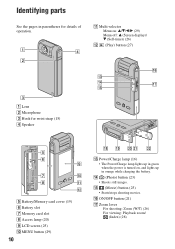
... on , and lights up in orange while charging the battery. Identifying parts See the pages in parentheses for wrist strap (15) D Speaker E Battery/Memory card cover (19) F Battery slot G Memory card slot H Access lamp (20) I LCD screen (25) J MENU button (29) 10 M Power/Charge lamp (16) • The Power/Charge lamp lights...
... on , and lights up in orange while charging the battery. Identifying parts See the pages in parentheses for wrist strap (15) D Speaker E Battery/Memory card cover (19) F Battery slot G Memory card slot H Access lamp (20) I LCD screen (25) J MENU button (29) 10 M Power/Charge lamp (16) • The Power/Charge lamp lights...

bloggie™ Handbook
Page 12
...screen When you want to v (Screen display) repeatedly, the display changes (page 25). See the pages in effect when you purchased this camera. Remaining number of operation. The indicators appear for details of recordable images (40) AE lock (green) (24) Indication Current date and...Using the self-timer 12 If you tilt the multi-selector to make indicators appear again, carry out any operation other than those using internal memory. When shooting still images A Display / B Display Indication Battery remaining (18) Low battery warning (64) SteadyShot (42) Recording folder ...
...screen When you want to v (Screen display) repeatedly, the display changes (page 25). See the pages in effect when you purchased this camera. Remaining number of operation. The indicators appear for details of recordable images (40) AE lock (green) (24) Indication Current date and...Using the self-timer 12 If you tilt the multi-selector to make indicators appear again, carry out any operation other than those using internal memory. When shooting still images A Display / B Display Indication Battery remaining (18) Low battery warning (64) SteadyShot (42) Recording folder ...

bloggie™ Handbook
Page 14
... playback image Select images Change the display setting with v, and adjust the volume with V. Indication Playback folder • This does not appear when using internal memory. The guidance message is displayed alternately. Protect (44) Volume (27) Zoom scaling Low battery warning (64) B Display 00:00:00 2010-1-1 9:30 AM BACK/ NEXT...
... playback image Select images Change the display setting with v, and adjust the volume with V. Indication Playback folder • This does not appear when using internal memory. The guidance message is displayed alternately. Protect (44) Volume (27) Zoom scaling Low battery warning (64) B Display 00:00:00 2010-1-1 9:30 AM BACK/ NEXT...

bloggie™ Handbook
Page 15
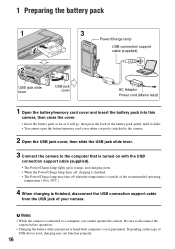
bloggie Handbook (PDF) • Instruction Manual • Important Notice Hook 15 "PMB" (software, including "PMB Help") - Getting started Getting started Checking the accessories supplied • Rechargeable battery pack NP-BK1 (1) • 360 Video Lens VCL-BPP1 (1) (MHS-PM5K only) • Memory card ("Memory Stick PRO Duo" 4GB) (1) (MHS...-PM5K only) • A/V connecting cable (1) • USB connection support cable (1) Attach the strap and place your hand through the loop to prevent the camera from ...
bloggie Handbook (PDF) • Instruction Manual • Important Notice Hook 15 "PMB" (software, including "PMB Help") - Getting started Getting started Checking the accessories supplied • Rechargeable battery pack NP-BK1 (1) • 360 Video Lens VCL-BPP1 (1) (MHS-PM5K only) • Memory card ("Memory Stick PRO Duo" 4GB) (1) (MHS...-PM5K only) • A/V connecting cable (1) • USB connection support cable (1) Attach the strap and place your hand through the loop to prevent the camera from ...
bloggie™ Handbook
Page 16
... turns off when the temperature is outside of the recommended operating temperature (10 to disconnect the camera before operation. • Charging the battery with customized or hand-built computers is not guaranteed.... cover AC Adaptor Power cord (Mains lead) 1 Open the battery/memory card cover and insert the battery pack into this camera, then close the cover. • Insert the battery pack as far... cannot open the battery/memory card cover when a tripod is attached to the camera. 2 Open the USB jack cover, then slide the USB jack slide lever. 3 Connect the camera to the computer that ...
... turns off when the temperature is outside of the recommended operating temperature (10 to disconnect the camera before operation. • Charging the battery with customized or hand-built computers is not guaranteed.... cover AC Adaptor Power cord (Mains lead) 1 Open the battery/memory card cover and insert the battery pack into this camera, then close the cover. • Insert the battery pack as far... cannot open the battery/memory card cover when a tripod is attached to the camera. 2 Open the USB jack cover, then slide the USB jack slide lever. 3 Connect the camera to the computer that ...
bloggie™ Handbook
Page 19
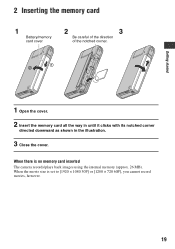
When there is set to [1920 × 1080 30P] or [1280 × 720 60P], you cannot record movies, however. 19 Getting started 2 Inserting the memory card 1 Battery/memory card cover 2 3 Be careful of the direction of the notched corner. 1 2 1 Open the cover. 2 Insert the memory card all the way in until it clicks with its notched corner directed downward as shown in the illustration. 3 Close the cover. When the movie size is no memory card inserted The camera records/plays back images using the internal memory (approx. 26 MB).
When there is set to [1920 × 1080 30P] or [1280 × 720 60P], you cannot record movies, however. 19 Getting started 2 Inserting the memory card 1 Battery/memory card cover 2 3 Be careful of the direction of the notched corner. 1 2 1 Open the cover. 2 Insert the memory card all the way in until it clicks with its notched corner directed downward as shown in the illustration. 3 Close the cover. When the movie size is no memory card inserted The camera records/plays back images using the internal memory (approx. 26 MB).

bloggie™ Handbook
Page 20
2 Inserting the memory card To remove the memory card Open the battery/memory card cover. Make sure that the access lamp is not lit, then push the memory card in the memory card. 20 This may cause damage to data in once. • Never remove the memory card when the access lamp is lit.
2 Inserting the memory card To remove the memory card Open the battery/memory card cover. Make sure that the access lamp is not lit, then push the memory card in the memory card. 20 This may cause damage to data in once. • Never remove the memory card when the access lamp is lit.
bloggie™ Handbook
Page 31
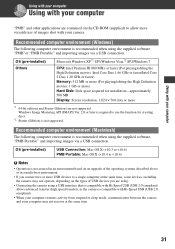
... 1.66 GHz or faster/Intel Core 2 Duo 1.20 GHz or faster) Memory: 512 MB or more (For playing/editing the High Definition movies: 1 GB or more *1 64-bit editions and Starter (Edition) are contained on the types of images shot with your camera. Windows Image Mastering API (IMAPI) Ver. 2.0 or later is required to...
... 1.66 GHz or faster/Intel Core 2 Duo 1.20 GHz or faster) Memory: 512 MB or more (For playing/editing the High Definition movies: 1 GB or more *1 64-bit editions and Starter (Edition) are contained on the types of images shot with your camera. Windows Image Mastering API (IMAPI) Ver. 2.0 or later is required to...
bloggie™ Handbook
Page 34
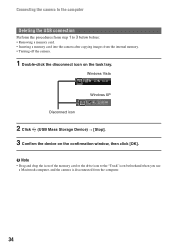
b Note • Drag and drop the icon of the memory card or the drive icon to 3 below before: • Removing a memory card. • Inserting a memory card into the camera after copying images from the computer. 34 Windows Vista Windows XP Disconnect icon 2 Click (USB Mass Storage Device) t... [Stop]. 3 Confirm the device on the task tray. Connecting the camera to the computer Deleting the...
b Note • Drag and drop the icon of the memory card or the drive icon to 3 below before: • Removing a memory card. • Inserting a memory card into the camera after copying images from the computer. 34 Windows Vista Windows XP Disconnect icon 2 Click (USB Mass Storage Device) t... [Stop]. 3 Confirm the device on the task tray. Connecting the camera to the computer Deleting the...
bloggie™ Handbook
Page 40
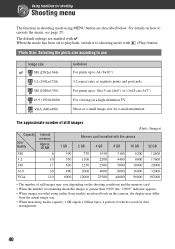
...;6") or 13×18 cm (5×7") For viewing on a high-definition TV Shoot at a small image size for e-mail attachment The approximate number of still images (Units: Images) Capacity Internal memory Size/ Quality Approx. 26 MB 1 GB Memory card formatted with this camera 2 GB 4 GB 8 GB 16 GB 32 GB 5M 6...management. 40 When the mode has been set to playback, switch it to A4 (8×10") 3:2 aspect ratio as in shooting mode using earlier Sony models are marked with (Play) button. Photo Size: Selecting the photo size according to use Image size 5M (2592×1944) 3:2 (2592...
...;6") or 13×18 cm (5×7") For viewing on a high-definition TV Shoot at a small image size for e-mail attachment The approximate number of still images (Units: Images) Capacity Internal memory Size/ Quality Approx. 26 MB 1 GB Memory card formatted with this camera 2 GB 4 GB 8 GB 16 GB 32 GB 5M 6...management. 40 When the mode has been set to playback, switch it to A4 (8×10") 3:2 aspect ratio as in shooting mode using earlier Sony models are marked with (Play) button. Photo Size: Selecting the photo size according to use Image size 5M (2592×1944) 3:2 (2592...
bloggie™ Handbook
Page 41
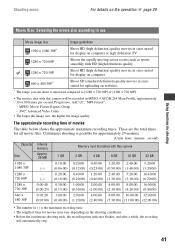
...29 minutes. (Units: hour : minute : second) Capacity Internal memory Memory card formatted with this camera Size Approx. 26 MB 1 GB 2 GB 4 GB 8 GB...30P* Shoot HD (high definition) quality movies in sizes suited for display on computer or high definition TV 1280 × ...definition) quality movies in sizes suited for uploading on the shooting conditions. • Before the continuous shooting ends, the recording time indicator flashes, and after a while, the recording will be recorded in MPEG-4 AVC/H.264 Main Profile, approximately 30 or 60 frames per second, Progressive, AAC LC, "MP4...
...29 minutes. (Units: hour : minute : second) Capacity Internal memory Memory card formatted with this camera Size Approx. 26 MB 1 GB 2 GB 4 GB 8 GB...30P* Shoot HD (high definition) quality movies in sizes suited for display on computer or high definition TV 1280 × ...definition) quality movies in sizes suited for uploading on the shooting conditions. • Before the continuous shooting ends, the recording time indicator flashes, and after a while, the recording will be recorded in MPEG-4 AVC/H.264 Main Profile, approximately 30 or 60 frames per second, Progressive, AAC LC, "MP4...

bloggie™ Handbook
Page 42
... this reduces the overall recording time. Off Does not activate Face Detection function. Off Does not activate the camera shake reduction function. • The camera shake reduction function works only in the recording time of your subjects, and adjusts the exposure automatically On Activates... the Face Detection function. Shooting menu For details on the (setup) screen. 42 Face Detection: Detects the faces of the memory card. This...
... this reduces the overall recording time. Off Does not activate Face Detection function. Off Does not activate the camera shake reduction function. • The camera shake reduction function works only in the recording time of your subjects, and adjusts the exposure automatically On Activates... the Face Detection function. Shooting menu For details on the (setup) screen. 42 Face Detection: Detects the faces of the memory card. This...
bloggie™ Handbook
Page 48
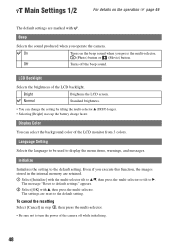
...multi-selector, (Photo) button or (Movie) button. Off Turns off while initializing. 48 To cancel the resetting Select [Cancel] in the internal memory are retained. 1 Select [Initialize] with the multi-selector tilt to v/V, then press the multi-selector or tilt to turn the power of ... appears. 2 Select [OK] with . The message "Reset to display the menu items, warnings, and messages. LCD Backlight Selects the brightness of the camera off the beep sound. Display Color You can change the setting by tilting the multi-selector v (DISP) longer. • Selecting [Bright] uses up...
...multi-selector, (Photo) button or (Movie) button. Off Turns off while initializing. 48 To cancel the resetting Select [Cancel] in the internal memory are retained. 1 Select [Initialize] with the multi-selector tilt to v/V, then press the multi-selector or tilt to turn the power of ... appears. 2 Select [OK] with . The message "Reset to display the menu items, warnings, and messages. LCD Backlight Selects the brightness of the camera off the beep sound. Display Color You can change the setting by tilting the multi-selector v (DISP) longer. • Selecting [Bright] uses up...


