
Operation Guide
Page 3
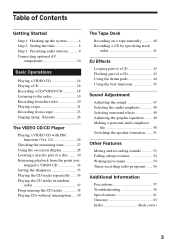
... Started Step 1: Hooking up the system 4 Step 2: Setting the time 8 Step 3: Presetting radio stations .......... 9 Connecting optional AV components 10 Basic Operations Playing a VIDEO CD 14 Playing a CD 16 Recording a CD/VIDEO CD 18 Listening to the radio 19 Recording from the radio 20 Playing a tape 21 Recording from a tape 23 Singing along: Karaoke 24 The VIDEO CD/CD Player Playing a VIDEO CD with PBC functions (Ver. 2.0 26 Checking the remaining time 27 Using the on-screen display 28 Locating a specific part of a disc...
... Started Step 1: Hooking up the system 4 Step 2: Setting the time 8 Step 3: Presetting radio stations .......... 9 Connecting optional AV components 10 Basic Operations Playing a VIDEO CD 14 Playing a CD 16 Recording a CD/VIDEO CD 18 Listening to the radio 19 Recording from the radio 20 Playing a tape 21 Recording from a tape 23 Singing along: Karaoke 24 The VIDEO CD/CD Player Playing a VIDEO CD with PBC functions (Ver. 2.0 26 Checking the remaining time 27 Using the on-screen display 28 Locating a specific part of a disc...
Operation Guide
Page 9
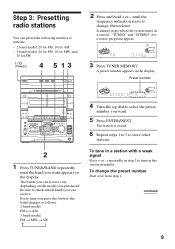
... STEREO ALL DISCS VOLUME kHz MHz ß 3 Press TUNER MEMORY. Every time you press this button, the band changes as follows: 2 band model: FM ˜ AM 3 band model: FM n MW n SW ALL DISCS VOLUME ß 4 Turn the jog dial to select the preset number you purchased. The station is stored. 6 Repeat steps 1 to 5 to tune in step 2 to store other stations. repeatedly in the station manually. Be sure to change...
... STEREO ALL DISCS VOLUME kHz MHz ß 3 Press TUNER MEMORY. Every time you press this button, the band changes as follows: 2 band model: FM ˜ AM 3 band model: FM n MW n SW ALL DISCS VOLUME ß 4 Turn the jog dial to select the preset number you purchased. The station is stored. 6 Repeat steps 1 to 5 to tune in step 2 to store other stations. repeatedly in the station manually. Be sure to change...

Operation Guide
Page 10
..., connect an optional audio cable to be erased. To change the AM tuning interval The AM tuning interval is factory set to 9 kHz (10 kHz in any AM station first, then turn the power back on the equipment to the audio output. (See "Connecting an MD deck for digital recording You can connect optional components. While holding down the ENTER/NEXT button, turn off the power. Step 3: Presetting radio stations (continued) To change...
..., connect an optional audio cable to be erased. To change the AM tuning interval The AM tuning interval is factory set to 9 kHz (10 kHz in any AM station first, then turn the power back on the equipment to the audio output. (See "Connecting an MD deck for digital recording You can connect optional components. While holding down the ENTER/NEXT button, turn off the power. Step 3: Presetting radio stations (continued) To change...

Operation Guide
Page 11
Connecting an MD deck for analog recording Make sure to the sound of the connected MD deck, press FUNCTION repeatedly until "MD" appears. continued 11 To the audio output To the audio input of the MD deck of the plugs and the connectors. To listen to match the color of the MD deck Connecting a super woofer speaker You can use the MD (, P, and p buttons on this unit's remote to perform play, pause, and stop operations. To super woofer Tip When you connect a Sony MD deck, you can connect an optional super woofer speaker.
Connecting an MD deck for analog recording Make sure to the sound of the connected MD deck, press FUNCTION repeatedly until "MD" appears. continued 11 To the audio output To the audio input of the MD deck of the plugs and the connectors. To listen to match the color of the MD deck Connecting a super woofer speaker You can use the MD (, P, and p buttons on this unit's remote to perform play, pause, and stop operations. To super woofer Tip When you connect a Sony MD deck, you can connect an optional super woofer speaker.

Operation Guide
Page 18
Then press again to record facing forward 3 Press CD SYNC. Recording starts. You can use TYPE I (normal) or TYPE II (CrO2) tapes. Deck B stands by for recording and the CD player stands by for front side) lights up . With the side you want to close the disc tray. Select ß (or RELAY) to record is adjusted automatically. 4 1 2 (Power) p DISC SKIP/ EX-CHANGE 2 Press § and place a CD. If...
Then press again to record facing forward 3 Press CD SYNC. Recording starts. You can use TYPE I (normal) or TYPE II (CrO2) tapes. Deck B stands by for recording and the CD player stands by for front side) lights up . With the side you want to close the disc tray. Select ß (or RELAY) to record is adjusted automatically. 4 1 2 (Power) p DISC SKIP/ EX-CHANGE 2 Press § and place a CD. If...

Operation Guide
Page 20
... the display. You can switch from the radio You can record the radio program on and tunes to the last received station (One Touch Play). • You can use TYPE I (normal) or TYPE II (CrO2) tapes. Turn counterclockwise for lower preset numbers. + = Turn clockwise for higher preset numbers. Preset number Frequency 20 ALL DISCS VOLUME kHz MHz ß repeatedly. Press the button again to non-preset radio stations Use manual or automatic tuning in a preset station. There will be no stereo effect...
... the display. You can switch from the radio You can record the radio program on and tunes to the last received station (One Touch Play). • You can use TYPE I (normal) or TYPE II (CrO2) tapes. Turn counterclockwise for lower preset numbers. + = Turn clockwise for higher preset numbers. Preset number Frequency 20 ALL DISCS VOLUME kHz MHz ß repeatedly. Press the button again to non-preset radio stations Use manual or automatic tuning in a preset station. There will be no stereo effect...

Operation Guide
Page 22
... remote). Press TAPE A (or TAPE B) 9 to play the reverse side. (Press DECK A (or DECK B) 9( again on the left and right channels. - Rewind Press 0 or ). Adjust the volume Turn VOLUME (or press VOL +/- Select ß* to play the reverse side.) The tape starts playing. * The deck stops automatically after repeating the sequence five times. ** Relay play . Example: searching forward 2 songs * AMS (Automatic Music Sensor) Notes The AMS function may not operate...
... remote). Press TAPE A (or TAPE B) 9 to play the reverse side. (Press DECK A (or DECK B) 9( again on the left and right channels. - Rewind Press 0 or ). Adjust the volume Turn VOLUME (or press VOL +/- Select ß* to play the reverse side.) The tape starts playing. * The deck stops automatically after repeating the sequence five times. ** Relay play . Example: searching forward 2 songs * AMS (Automatic Music Sensor) Notes The AMS function may not operate...

Operation Guide
Page 24
... or tape, select "MPX R" or "MPX L". 4 Start playing the music and adjust the volume. 5 Adjust the microphone volume by turning down the microphone control level. 2 Connect an optional microphone to the appropriate video input. You need to connect an optional microphone. (Power) 3 n 3 Press KARAOKE PON/MPX repeatedly to obtain the karaoke effect you are done Turn MIC LEVEL to MIC 1 and MIC 2 at the same time. When you use two microphones connecting to MIN and disconnect the microphone from MIC 1 or MIC 2, then...
... or tape, select "MPX R" or "MPX L". 4 Start playing the music and adjust the volume. 5 Adjust the microphone volume by turning down the microphone control level. 2 Connect an optional microphone to the appropriate video input. You need to connect an optional microphone. (Power) 3 n 3 Press KARAOKE PON/MPX repeatedly to obtain the karaoke effect you are done Turn MIC LEVEL to MIC 1 and MIC 2 at the same time. When you use two microphones connecting to MIN and disconnect the microphone from MIC 1 or MIC 2, then...

Operation Guide
Page 32
... section you want . Current disc number D 1 DIGEST 1 2 3 4 5 6 7 8 9 3 Press the numeric buttons (1 - 10/0) to find a certain parts of tracks 1 through 9 (in default setting) on the current disc are displayed. It is not the playing time of the current track as a guide to select the track you want . To stop playback Press p. 32 Disc Digest You can be displayed on the TV screen at one time. To reenter the time: Press CLEAR, and...
... section you want . Current disc number D 1 DIGEST 1 2 3 4 5 6 7 8 9 3 Press the numeric buttons (1 - 10/0) to find a certain parts of tracks 1 through 9 (in default setting) on the current disc are displayed. It is not the playing time of the current track as a guide to select the track you want . To stop playback Press p. 32 Disc Digest You can be displayed on the TV screen at one time. To reenter the time: Press CLEAR, and...

Operation Guide
Page 33
... MENU. 3 Press 4 to select the section you start disc digest during Shuffle or Program Play. Notes • Video images will not be useful when playing discs with steps 1 and 2 of another disc during disc digest. To switch back to the digest of "Locating the track you start playing the VIDEO CD, to light the PBC OFF indicator and play without PBC functions. To switch to the 9 frame display, repeat this operation. Use the numeric buttons...
... MENU. 3 Press 4 to select the section you start disc digest during Shuffle or Program Play. Notes • Video images will not be useful when playing discs with steps 1 and 2 of another disc during disc digest. To switch back to the digest of "Locating the track you start playing the VIDEO CD, to light the PBC OFF indicator and play without PBC functions. To switch to the 9 frame display, repeat this operation. Use the numeric buttons...

Operation Guide
Page 34
... than 12 sections. To switch to the digest of another track during track digest Press PREV or NEXT during Shuffle Play or Program Play. Resuming playback from 9 to 12 frames. 1 Press SPECIAL MENU. 2 Press 5. 3 Proceed with PBC functions (Ver. 2.0) Select "4) TRACK DIGEST" before you start playing the VIDEO CD, to the 9 frame display, repeat this does not work during track digest; Resume play the section you want...
... than 12 sections. To switch to the digest of another track during track digest Press PREV or NEXT during Shuffle Play or Program Play. Resuming playback from 9 to 12 frames. 1 Press SPECIAL MENU. 2 Press 5. 3 Proceed with PBC functions (Ver. 2.0) Select "4) TRACK DIGEST" before you start playing the VIDEO CD, to the 9 frame display, repeat this does not work during track digest; Resume play the section you want...

Operation Guide
Page 39
... stop mode. You cannot use this means: - To Check the program Clear a track from the display. the total playing time has exceeded 100 minutes. CHECK on the remote repeatedly until the number of the total playing time during programming, this function with VIDEO CDs. 1 2 (Power) 3 1 Press FUNCTION repeatedly until "PROGRAM" or "SHUFFLE" disappears from the end Clear a specific track Add a track to be erased lights up, then press CLEAR. 1 Select the disc tray with a DISC 1~3 button...
... stop mode. You cannot use this means: - To Check the program Clear a track from the display. the total playing time has exceeded 100 minutes. CHECK on the remote repeatedly until the number of the total playing time during programming, this function with VIDEO CDs. 1 2 (Power) 3 1 Press FUNCTION repeatedly until "PROGRAM" or "SHUFFLE" disappears from the end Clear a specific track Add a track to be erased lights up, then press CLEAR. 1 Select the disc tray with a DISC 1~3 button...

Operation Guide
Page 40
... tracks during rec pause mode (after pressing r REC in step 3 and before pressing P PAUSE in step 5). 53 1 Insert a blank tape into deck B. 2 Press FUNCTION repeatedly until the source you want or record from CD, tape, or radio as you like. The recording level is adjusted automatically. 2 1 4 (Power) p DOLBY NR 4 Press DIRECTION repeatedly to select A to be recorded. Recording starts. 6 Start playing the source to record on one side. To Press Stop recording...
... tracks during rec pause mode (after pressing r REC in step 3 and before pressing P PAUSE in step 5). 53 1 Insert a blank tape into deck B. 2 Press FUNCTION repeatedly until the source you want or record from CD, tape, or radio as you like. The recording level is adjusted automatically. 2 1 4 (Power) p DOLBY NR 4 Press DIRECTION repeatedly to select A to be recorded. Recording starts. 6 Start playing the source to record on one side. To Press Stop recording...

Operation Guide
Page 50
... tape, CD, or radio program. ALL DISCS VOLUME ß 5 Repeat steps 3 and 4. 6 Press ENTER/NEXT when finished. The personal file number appears in the memory of audio patterns (surround effect and graphic equalizer) and store them in the display. Personal file You can create a personal file of the unit. Create up an audio pattern to adjust level. ALL DISCS VOLUME ß 50 Note If you want for future use, store it in a personal file. (See "Making a personal audio...
... tape, CD, or radio program. ALL DISCS VOLUME ß 5 Repeat steps 3 and 4. 6 Press ENTER/NEXT when finished. The personal file number appears in the memory of audio patterns (surround effect and graphic equalizer) and store them in the display. Personal file You can create a personal file of the unit. Create up an audio pattern to adjust level. ALL DISCS VOLUME ß 50 Note If you want for future use, store it in a personal file. (See "Making a personal audio...

Operation Guide
Page 56
The start time appears, followed by the stop recording following the above procedure. To change the setting, start recording. When the recording starts, the volume level is on at the preset time, the recording will not be recorded (e.g., "TUNER FM 5"), then the original display appears. 6 Insert a blank tape into deck B. 7 Turn off the power. "SET (DAILY 1)" appears. 3 Turn jog dial to select "REC", then press ENTER/NEXT. "ON" appears and the hour digits flash in the preset radio station (see...
The start time appears, followed by the stop recording following the above procedure. To change the setting, start recording. When the recording starts, the volume level is on at the preset time, the recording will not be recorded (e.g., "TUNER FM 5"), then the original display appears. 6 Insert a blank tape into deck B. 7 Turn off the power. "SET (DAILY 1)" appears. 3 Turn jog dial to select "REC", then press ENTER/NEXT. "ON" appears and the hour digits flash in the preset radio station (see...

Operation Guide
Page 57
... AC power cord must be changed only at the qualified service shop. Very humid - Detector slots continued 57 Remove the CD and leave the system turned on CDs • Before playing, clean the CD with adhesive tape. Tab of side B Detector slots Tab of side A Side A Break off the cassette tab of side A If you later want to direct...
... AC power cord must be changed only at the qualified service shop. Very humid - Detector slots continued 57 Remove the CD and leave the system turned on CDs • Before playing, clean the CD with adhesive tape. Tab of side B Detector slots Tab of side A Side A Break off the cassette tab of side A If you later want to direct...

Operation Guide
Page 58
... before you press FUNCTION, switch the display to the instructions of use with a separately sold dry-type or wet-type cleaning cassette. Move the stereo system away from the connected source is a decrease in the power cord. Do not change the tape operations such as you plug in the display when you start an important recording or after every 10 hours of the cleaning cassette. Preset stations (see "Step 3: Presetting radio stations") - There is severe...
... before you press FUNCTION, switch the display to the instructions of use with a separately sold dry-type or wet-type cleaning cassette. Move the stereo system away from the connected source is a decrease in the power cord. Do not change the tape operations such as you plug in the display when you start an important recording or after every 10 hours of the cleaning cassette. Preset stations (see "Step 3: Presetting radio stations") - There is severe...

Operation Guide
Page 60
...;The record/playback heads are magnetized. Tuner Severe hum or noise ("TUNED" or "STEREO" flashes in the display). •Adjust the antenna. •The signal strength is reset to the factory settings. Connect the external antenna. The system is too weak. Clean them (see "Demagnetizing the tape heads" on page 58). Demagnetize them (see "To save a tape permanently" on page 57). •The tape has reeled to turn the power...
...;The record/playback heads are magnetized. Tuner Severe hum or noise ("TUNED" or "STEREO" flashes in the display). •Adjust the antenna. •The signal strength is reset to the factory settings. Connect the external antenna. The system is too weak. Clean them (see "Demagnetizing the tape heads" on page 58). Demagnetize them (see "To save a tape permanently" on page 57). •The tape has reeled to turn the power...

Operation Guide
Page 62
... Power requirements Thai and Chinese models: 220 V AC, 50/60 Hz Other models: 120 V, 220 V or 230 - 240 V AC, 50/60 Hz Adjustable with voltage selector Power consumption: 280 watts Dimensions (w/h/d) Approx. 280 x 365 x 405 mm Mass: Approx. 11.9 kg Supplied accessories: AM loop antenna (1) Remote RM-SV88 (1) Batteries (2) FM lead antenna (1) Speaker cords (4) Video cable (1) Front speaker pads (8) Design and specifications are subject to change...
... Power requirements Thai and Chinese models: 220 V AC, 50/60 Hz Other models: 120 V, 220 V or 230 - 240 V AC, 50/60 Hz Adjustable with voltage selector Power consumption: 280 watts Dimensions (w/h/d) Approx. 280 x 365 x 405 mm Mass: Approx. 11.9 kg Supplied accessories: AM loop antenna (1) Remote RM-SV88 (1) Batteries (2) FM lead antenna (1) Speaker cords (4) Video cable (1) Front speaker pads (8) Design and specifications are subject to change...

Operation Guide
Page 64
... Adjusting the audio emphasis 48 the on-screen display 28~30 the operating voltage 6 the sound 47 the volume 15, 17, 19 Antennas 5, 12 Auto BPM 46 Automatic Source Selection 15, 17, 20 H, I, J Hooking up timer 54 See Drum pads Personal file 50 Playing a CD/VIDEO CD 14, 16 a preset radio station 19 a tape 21 tracks in random order (Shuffle Play) 37 tracks in the desired order (Program Play) 38 tracks repeatedly (Repeat Play) 36 Presetting radio stations...
... Adjusting the audio emphasis 48 the on-screen display 28~30 the operating voltage 6 the sound 47 the volume 15, 17, 19 Antennas 5, 12 Auto BPM 46 Automatic Source Selection 15, 17, 20 H, I, J Hooking up timer 54 See Drum pads Personal file 50 Playing a CD/VIDEO CD 14, 16 a preset radio station 19 a tape 21 tracks in random order (Shuffle Play) 37 tracks in the desired order (Program Play) 38 tracks repeatedly (Repeat Play) 36 Presetting radio stations...


