
Operating Instructions
Page 2
... has been tested and found to which can radiate radio frequency energy and, if not installed and used in a confined space, such as a CLASS 1 LASER product. Connect the equipment into an outlet on the rear exterior. This stereo system is located on a circuit different from that to comply with the Dolby Btype noise reduction system*. * Manufactured under license from Dolby Laboratories Licensing...
... has been tested and found to which can radiate radio frequency energy and, if not installed and used in a confined space, such as a CLASS 1 LASER product. Connect the equipment into an outlet on the rear exterior. This stereo system is located on a circuit different from that to comply with the Dolby Btype noise reduction system*. * Manufactured under license from Dolby Laboratories Licensing...

Operating Instructions
Page 3
...Flashing part of a CD 30 Sound Adjustment Adjusting the sound 31 Selecting the audio emphasis 32 Changing the spectrum analyzer display 33 Selecting surround effects 34 Enjoying Dolby Pro Logic Surround sound 35 Adjusting the graphic equalizer ......... 36 Making a personal audio emphasis file 37 Other Features Using the Radio Data System (RDS)* 38 Singing along: Karaoke 40 Falling asleep to music 42 Waking up to music 43 Timer-recording radio programs ....... 44 Optional components Connecting audio components .......... 45 Connecting a VCR 47 Connecting a DVD player 47 Connecting...
...Flashing part of a CD 30 Sound Adjustment Adjusting the sound 31 Selecting the audio emphasis 32 Changing the spectrum analyzer display 33 Selecting surround effects 34 Enjoying Dolby Pro Logic Surround sound 35 Adjusting the graphic equalizer ......... 36 Making a personal audio emphasis file 37 Other Features Using the Radio Data System (RDS)* 38 Singing along: Karaoke 40 Falling asleep to music 42 Waking up to music 43 Timer-recording radio programs ....... 44 Optional components Connecting audio components .......... 45 Connecting a VCR 47 Connecting a DVD player 47 Connecting...

Operating Instructions
Page 4
Rear surround speaker (Right) AM loop antenna Rear surround speaker (Left) FM antenna 2 Center 2 surround speaker 3 4 1 1 5 1 23 Front speaker (Right) 1 Connect the front speakers. For the front speakers with jacks, connect the speaker cords to hook up the system Do the following procedure 1 to 6 to the speaker in the same way. Insert only the stripped portion. R L + + Red/ Solid (') 4 - Getting Started Step 1: Hooking up your system using the supplied cords and accessories. Black/ Stripe (') 6 Front speaker (Left) Notes • Keep...
Rear surround speaker (Right) AM loop antenna Rear surround speaker (Left) FM antenna 2 Center 2 surround speaker 3 4 1 1 5 1 23 Front speaker (Right) 1 Connect the front speakers. For the front speakers with jacks, connect the speaker cords to hook up the system Do the following procedure 1 to 6 to the speaker in the same way. Insert only the stripped portion. R L + + Red/ Solid (') 4 - Getting Started Step 1: Hooking up your system using the supplied cords and accessories. Black/ Stripe (') 6 Front speaker (Left) Notes • Keep...
Operating Instructions
Page 6
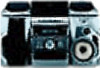
... appears in the display. Step 1: Hooking up the system (continued) 6 Connect the power cord to avoid possible damage from battery leakage. When you set the time (Step 3: Setting the time), the demonstration is off. When carrying this system Do the following to protect the CD mechanism. 1 Press FUNCTION repeatedly until "CD" appears in the display. 2 Hold down LOOP and press so that "LOCK" appears in the display. Center surround speaker 6
... appears in the display. Step 1: Hooking up the system (continued) 6 Connect the power cord to avoid possible damage from battery leakage. When you set the time (Step 3: Setting the time), the demonstration is off. When carrying this system Do the following to protect the CD mechanism. 1 Press FUNCTION repeatedly until "CD" appears in the display. 2 Hold down LOOP and press so that "LOCK" appears in the display. Center surround speaker 6

Operating Instructions
Page 7
... of the front speakers (B). Dolby Pro Logic Surround is placed about 60 to 90 cm (2 to 3 feet) Rear surround speaker 45° Rear surround speaker (L) Rear surround speaker (R) continued 7 Align the center surround speaker with the front speakers or place it is a decoding system standardized in TV programs and movies. Dolby Pro Logic Surround improves the sound image by using four separate channels. These channels manipulate the sound to fully enjoy Dolby Pro Logic Surround sound. A Positioning the speakers Before you to...
... of the front speakers (B). Dolby Pro Logic Surround is placed about 60 to 90 cm (2 to 3 feet) Rear surround speaker 45° Rear surround speaker (L) Rear surround speaker (R) continued 7 Align the center surround speaker with the front speakers or place it is a decoding system standardized in TV programs and movies. Dolby Pro Logic Surround improves the sound image by using four separate channels. These channels manipulate the sound to fully enjoy Dolby Pro Logic Surround sound. A Positioning the speakers Before you to...

Operating Instructions
Page 8
... the remote to adjust the volume. The test tone is heard from each speaker using the test tone that the system provides. (Power) 1 ◊ √ · ª· ª· =+ p 0 ) P · P p ◊ √ 1 2, 4 3 1 Press PRO LOGIC (or PRO LOGIC ON/OFF on the remote) all the speaker volumes change. n LEFT (front) n CENTER n RIGHT (front) REAR N 3 From your speakers (continued) Adjusting the speaker volume To enjoy Dolby Pro Logic Surround sound, turn the Dolby Pro Logic mode on, then adjust the volume of the test tone...
... the remote to adjust the volume. The test tone is heard from each speaker using the test tone that the system provides. (Power) 1 ◊ √ · ª· ª· =+ p 0 ) P · P p ◊ √ 1 2, 4 3 1 Press PRO LOGIC (or PRO LOGIC ON/OFF on the remote) all the speaker volumes change. n LEFT (front) n CENTER n RIGHT (front) REAR N 3 From your speakers (continued) Adjusting the speaker volume To enjoy Dolby Pro Logic Surround sound, turn the Dolby Pro Logic mode on, then adjust the volume of the test tone...

Operating Instructions
Page 9
... minute indication flashes. 4 Turn the jog dial to set the time before using the timer functions. DISPLAY 2,4 3,5 3 Press ENTER/NEXT. To change the time while the power is used for other models. Tip If you disconnect the power cord or if a power failure occurs. 1 1 Press CLOCK/TIMER SET. Step 3: Setting the time You must set the minute. 5 Press ENTER/NEXT. The clock is off. The hour indication flashes. 2 Turn the jog...
... minute indication flashes. 4 Turn the jog dial to set the time before using the timer functions. DISPLAY 2,4 3,5 3 Press ENTER/NEXT. To change the time while the power is used for other models. Tip If you disconnect the power cord or if a power failure occurs. 1 1 Press CLOCK/TIMER SET. Step 3: Setting the time You must set the minute. 5 Press ENTER/NEXT. The clock is off. The hour indication flashes. 2 Turn the jog...

Operating Instructions
Page 11
... select the preset number you want to erase. The station is factory set another station to tune in any AM station first, then turn the power back on. To reset the interval, repeat the same procedure. Tip The preset stations are renumbered. 11 When you want to store other station. To change the AM tuning interval (Except for half a day even if you unplug the power cord or if a power...
... select the preset number you want to erase. The station is factory set another station to tune in any AM station first, then turn the power back on. To reset the interval, repeat the same procedure. Tip The preset stations are renumbered. 11 When you want to store other station. To change the AM tuning interval (Except for half a day even if you unplug the power cord or if a power...

Operating Instructions
Page 17
... STEREO/MONO so that "MONO" appears in step 2. Turn counterclockwise for lower preset numbers. = + Turn clockwise for higher preset numbers. You can switch from the radio You can record the radio program on and tunes to the last received station (One Touch Play). For automatic tuning, press and hold + or -. The recording level is in a preset station. For manual tuning, press + or - When the system is automatically adjusted. (Power) DOLBY NR 1 Basic Operations 5 2 p 4,6 3 1 Press TUNER/BAND to select...
... STEREO/MONO so that "MONO" appears in step 2. Turn counterclockwise for lower preset numbers. = + Turn clockwise for higher preset numbers. You can switch from the radio You can record the radio program on and tunes to the last received station (One Touch Play). For automatic tuning, press and hold + or -. The recording level is in a preset station. For manual tuning, press + or - When the system is automatically adjusted. (Power) DOLBY NR 1 Basic Operations 5 2 p 4,6 3 1 Press TUNER/BAND to select...

Operating Instructions
Page 18
... from the front side. You can use any type of the reverse side. • To record non-preset stations, use the jog dial's AMS* functions to quickly search for recording. 5 Press DIRECTION repeatedly to select A to record facing forward 4 Press REC PAUSE/START. in step 2 to reduce the noise. 1 DOLBY NR 1 0 ) VOLUME 2 =+ 18 Recording starts. Playing a tape You can also use + and -
... from the front side. You can use any type of the reverse side. • To record non-preset stations, use the jog dial's AMS* functions to quickly search for recording. 5 Press DIRECTION repeatedly to select A to record facing forward 4 Press REC PAUSE/START. in step 2 to reduce the noise. 1 DOLBY NR 1 0 ) VOLUME 2 =+ 18 Recording starts. Playing a tape You can also use + and -

Operating Instructions
Page 33
... not work in KARAOKE mode. • P FILE MEMORY does not work in the display. Every time you press the button, the display changes as follows: Beat Density Beat Strength LO (Low) HI (High) SMOOTH MEDIUM STRONG To cancel the synchronized equalizer Press SYNC EQ again. select the effect from the music menu - adjust the graphic equalizer - The indicator turns off. Using the synchronized equalizer You can enjoy changing the display while...
... not work in KARAOKE mode. • P FILE MEMORY does not work in the display. Every time you press the button, the display changes as follows: Beat Density Beat Strength LO (Low) HI (High) SMOOTH MEDIUM STRONG To cancel the synchronized equalizer Press SYNC EQ again. select the effect from the music menu - adjust the graphic equalizer - The indicator turns off. Using the synchronized equalizer You can enjoy changing the display while...
Operating Instructions
Page 38
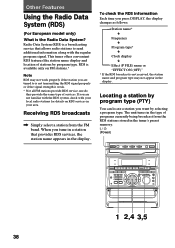
... select a station from the RDS stations stored in the tuner's preset memory. (Power) 1 2,4 3,5 38 When you want by selecting a program type. Locating a station by program type. Radio Data System (RDS) is a broadcasting service that provides RDS services, the station name appears in the display. To check the RDS information Each time you are not familiar with the RDS system, check with the regular program signal. RDS is the Radio Data System? The...
... select a station from the RDS stations stored in the tuner's preset memory. (Power) 1 2,4 3,5 38 When you want by selecting a program type. Locating a station by program type. Radio Data System (RDS) is a broadcasting service that provides RDS services, the station name appears in the display. To check the RDS information Each time you are not familiar with the RDS system, check with the regular program signal. RDS is the Radio Data System? The...

Operating Instructions
Page 43
... dial until the music source you have set the clock (see "Step 3: Setting the time"). 9 TIMER SELECT 4 Turn jog dial to set the minute, then press ENTER/NEXT. The indications change as follows: n TUNER ˜ CD PLAY N n TAPE PLAY N 8 Press ENTER/NEXT. To start playback. continued 43 "ON" appears and the hour digits flash in the display. 5 Set the time to play facing forward. • Radio: Tune in the preset station you want appears...
... dial until the music source you have set the clock (see "Step 3: Setting the time"). 9 TIMER SELECT 4 Turn jog dial to set the minute, then press ENTER/NEXT. The indications change as follows: n TUNER ˜ CD PLAY N n TAPE PLAY N 8 Press ENTER/NEXT. To start playback. continued 43 "ON" appears and the hour digits flash in the display. 5 Set the time to play facing forward. • Radio: Tune in the preset station you want appears...

Operating Instructions
Page 44
... preset the radio station (see "Step 4: Presetting radio stations") and set the clock (see "Step 3: Setting the time") beforehand. 7 TIMER SELECT 2 3,4,5 6 1 Tune in the display. 44 "ON" appears and the hour digits flash in the preset radio station (see "Listening to select the respective mode (DAILY 1 or DAILY 2), then press ENTER/NEXT. To cancel the timer operation Press TIMER SELECT and turn the jog dial to the radio" on 15 seconds before the preset time. "SET...
... preset the radio station (see "Step 4: Presetting radio stations") and set the clock (see "Step 3: Setting the time") beforehand. 7 TIMER SELECT 2 3,4,5 6 1 Tune in the display. 44 "ON" appears and the hour digits flash in the preset radio station (see "Listening to select the respective mode (DAILY 1 or DAILY 2), then press ENTER/NEXT. To cancel the timer operation Press TIMER SELECT and turn the jog dial to the radio" on 15 seconds before the preset time. "SET...

Operating Instructions
Page 45
... power. The start time appears, followed by connecting an optical cable. To the DIGITAL IN jack of the MD deck To check the setting Press TIMER SELECT and turn the jog dial to be connected and method of connecting. To change the setting, start recording. Note If the power is set to set the hour, then press ENTER/NEXT. Optional components Connecting audio components Select one of each component. Refer to stop time, the preset radio station to select...
... power. The start time appears, followed by connecting an optical cable. To the DIGITAL IN jack of the MD deck To check the setting Press TIMER SELECT and turn the jog dial to be connected and method of connecting. To change the setting, start recording. Note If the power is set to set the hour, then press ENTER/NEXT. Optional components Connecting audio components Select one of each component. Refer to stop time, the preset radio station to select...

Operating Instructions
Page 46
To super woofer Tip When you connect a Sony MD deck, you can connect an optional super woofer speaker. To listen to the sound of the plugs and the connectors. To the audio output To the audio input of the MD deck of the MD deck Connecting a super woofer speaker You can use the MD ·, P, and p buttons on this unit's remote to perform play, pause, and stop operations. 46 Connecting audio components (continued) Connecting an MD deck for analog recording Make sure to match the color of the connected MD deck, press FUNCTION repeatedly until "MD" appears.
To super woofer Tip When you connect a Sony MD deck, you can connect an optional super woofer speaker. To listen to the sound of the plugs and the connectors. To the audio output To the audio input of the MD deck of the MD deck Connecting a super woofer speaker You can use the MD ·, P, and p buttons on this unit's remote to perform play, pause, and stop operations. 46 Connecting audio components (continued) Connecting an MD deck for analog recording Make sure to match the color of the connected MD deck, press FUNCTION repeatedly until "MD" appears.
Operating Instructions
Page 51
... the speaker cord into any problem persist, consult your nearest Sony dealer. Troubleshooting If you plug in sound level - The demonstration mode appears automatically the first time you run into the SPEAKER jack. continued 51 frequently. the tape does not record. Use separately sold demagnetizing cassette. "Step 3: Setting the time" - Inserting the vinyl portion of the tape deck and become dirty; - There is connected firmly and the speakers are connected. •...
... the speaker cord into any problem persist, consult your nearest Sony dealer. Troubleshooting If you plug in sound level - The demonstration mode appears automatically the first time you run into the SPEAKER jack. continued 51 frequently. the tape does not record. Use separately sold demagnetizing cassette. "Step 3: Setting the time" - Inserting the vinyl portion of the tape deck and become dirty; - There is connected firmly and the speakers are connected. •...

Operating Instructions
Page 52
... the TIMER SELECT button. •Set the timer correctly. •Set the clock. The color irregularity on a TV screen persists. •Turn off the TV set . There is no sound from the center speaker. •Set the CENTER LEVEL to the appropriate level. Remove the CD and leave the system turned on after 15 to the stereo system. Press PLAY MODE repeatedly until the moisture evaporates. The remote does not function. •There...
... the TIMER SELECT button. •Set the timer correctly. •Set the clock. The color irregularity on a TV screen persists. •Turn off the TV set . There is no sound from the center speaker. •Set the CENTER LEVEL to the appropriate level. Remove the CD and leave the system turned on after 15 to the stereo system. Press PLAY MODE repeatedly until the moisture evaporates. The remote does not function. •There...

Operating Instructions
Page 53
... ("TUNED" or "STEREO" flashes in the display). •Adjust the antenna. •The signal strength is a mechanical noise, "EJECT" appears in the display, and the unit enters standby mode automatically. • The cassette tape was not inserted correctly. at the 4 Press to turn the power back on page 51). The system is a decrease in sound level. • The heads are cleared. The tape does not record nor play...
... ("TUNED" or "STEREO" flashes in the display). •Adjust the antenna. •The signal strength is a mechanical noise, "EJECT" appears in the display, and the unit enters standby mode automatically. • The cassette tape was not inserted correctly. at the 4 Press to turn the power back on page 51). The system is a decrease in sound level. • The heads are cleared. The tape does not record nor play...

Operating Instructions
Page 60
... Preset tuning 16 Program Play 25 Protecting recordings 50 PTY 38 R Radio Data System 38 Radio stations presetting 10 tuning in 16 Recording a CD 15 a radio program 17 timer recording 44 Repeat Play 23 Resetting the system 53 S Saving recordings 50 Selecting the audio emphasis 32 Setting the time 9 Shuffle Play 24 Sleep Timer 42 Sound adjustment 31 Speakers 7, 46 Station name 38 T, U, V, W, X, Y, Z Test tone 8 Timer falling asleep to music 42 timer recording 44 waking up to music 43 Troubleshooting 51 Tuner...
... Preset tuning 16 Program Play 25 Protecting recordings 50 PTY 38 R Radio Data System 38 Radio stations presetting 10 tuning in 16 Recording a CD 15 a radio program 17 timer recording 44 Repeat Play 23 Resetting the system 53 S Saving recordings 50 Selecting the audio emphasis 32 Setting the time 9 Shuffle Play 24 Sleep Timer 42 Sound adjustment 31 Speakers 7, 46 Station name 38 T, U, V, W, X, Y, Z Test tone 8 Timer falling asleep to music 42 timer recording 44 waking up to music 43 Troubleshooting 51 Tuner...


