Operating Instructions (primary manual)
Page 2
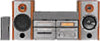
... that interference will increase eye hazard. A/V control amplifier STR-NX3 - Speaker system 2 • Front speaker SS-NX1 • Centre speaker SS-RC100 • Rear speaker SS-RC100 CAUTION The use of Dolby Laboratories Licensing Corporation. However, there... located on , the user is intended to alert the user to the presence of the following components: - Connect the equipment into an outlet on a circuit different from Dolby Laboratories Licensing Corporation. Consult...PRODUCT MARKING is connected. - If this equipment. The MHC-NX3AV consist of the FCC Rules.
... that interference will increase eye hazard. A/V control amplifier STR-NX3 - Speaker system 2 • Front speaker SS-NX1 • Centre speaker SS-RC100 • Rear speaker SS-RC100 CAUTION The use of Dolby Laboratories Licensing Corporation. However, there... located on , the user is intended to alert the user to the presence of the following components: - Connect the equipment into an outlet on a circuit different from Dolby Laboratories Licensing Corporation. Consult...PRODUCT MARKING is connected. - If this equipment. The MHC-NX3AV consist of the FCC Rules.
Operating Instructions (primary manual)
Page 3
Table of Contents Getting Started Step 1: Hooking up the system 4 Step 2: Setting up your speakers ......... 7 Step 3: Setting the time 9 Step 4: Presetting radio stations ........ 10 Saving the power in standby mode ... 11 Basic Operations Playing a CD ............ 31 Making a personal audio emphasis file 32 Other Features Using the Radio Data System (RDS)* 33 Falling asleep to music 35 Waking up to music 36 Timer-recording radio programmes .. 37 Optional components Connecting audio components .......... 38 Connecting a VCR 39 Connecting a DVD player 40 Connecting external antennas 41...
Table of Contents Getting Started Step 1: Hooking up the system 4 Step 2: Setting up your speakers ......... 7 Step 3: Setting the time 9 Step 4: Presetting radio stations ........ 10 Saving the power in standby mode ... 11 Basic Operations Playing a CD ............ 31 Making a personal audio emphasis file 32 Other Features Using the Radio Data System (RDS)* 33 Falling asleep to music 35 Waking up to music 36 Timer-recording radio programmes .. 37 Optional components Connecting audio components .......... 38 Connecting a VCR 39 Connecting a DVD player 40 Connecting external antennas 41...
Operating Instructions (primary manual)
Page 4
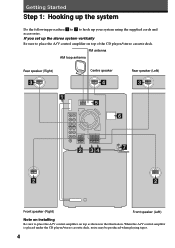
... when playing tapes. 4 FM antenna AM loop antenna Rear speaker (Right) 3 Centre speaker 4 Rear speaker (Left) 3 1 5 6 2 34 7 2 2 Front speaker (Right) Front speaker (Left) Note on installing Be sure to place the A/V control amplifier on top of the CD player/stereo cassette deck. If you set up the stereo system vertically Be sure to hook up the...
... when playing tapes. 4 FM antenna AM loop antenna Rear speaker (Right) 3 Centre speaker 4 Rear speaker (Left) 3 1 5 6 2 34 7 2 2 Front speaker (Right) Front speaker (Left) Note on installing Be sure to place the A/V control amplifier on top of the CD player/stereo cassette deck. If you set up the stereo system vertically Be sure to hook up the...

Operating Instructions (primary manual)
Page 5
... Black/ Stripe (') • Keep the speaker cords away from the main unit. 5 continued AM CFOMA7X5IAΩL Jack type B AM loop aerial Extend the FM lead aerial horizontally. 1 Connect the flat cord to the SYSTEM CONTROL connectors until it . R L + + Red/ Solid (') - Jack type A ...AM loop aerial Extend the FM lead aerial horizontally. Connect the speaker cords to the REAR SPEAKER jacks. Insert only the stripped portion. Otherwise, the sound...
... Black/ Stripe (') • Keep the speaker cords away from the main unit. 5 continued AM CFOMA7X5IAΩL Jack type B AM loop aerial Extend the FM lead aerial horizontally. 1 Connect the flat cord to the SYSTEM CONTROL connectors until it . R L + + Red/ Solid (') - Jack type A ...AM loop aerial Extend the FM lead aerial horizontally. Connect the speaker cords to the REAR SPEAKER jacks. Insert only the stripped portion. Otherwise, the sound...
Operating Instructions (primary manual)
Page 6
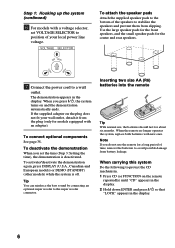
...To activate/deactivate the demonstration again, press DISPLAY (U.S.A., Canadian and European models) or DEMO (STANDBY) (other models) while the system is deactivated. To connect optional components See page 38. Inserting two size AA (R6) batteries into the remote ] } } ] Tip With normal use the remote... with new ones. VOLTAGE SELECTOR 230 - 240V To attach the speaker pads Attach the supplied speaker pads to the bottom of the speakers to stabilize the speakers and prevent them from battery leakage. Step 1: Hooking up the system (continued) 6 For models with a voltage selector, set the ...
...To activate/deactivate the demonstration again, press DISPLAY (U.S.A., Canadian and European models) or DEMO (STANDBY) (other models) while the system is deactivated. To connect optional components See page 38. Inserting two size AA (R6) batteries into the remote ] } } ] Tip With normal use the remote... with new ones. VOLTAGE SELECTOR 230 - 240V To attach the speaker pads Attach the supplied speaker pads to the bottom of the speakers to stabilize the speakers and prevent them from battery leakage. Step 1: Hooking up the system (continued) 6 For models with a voltage selector, set the ...
Operating Instructions (primary manual)
Page 7
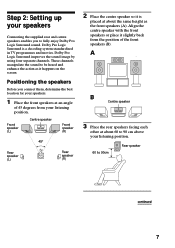
... each other at about the same height as it is a decoding system standardized in TV programmes and movies. Dolby Pro Logic Surround is placed at an angle of the front speakers (B). Positioning the speakers Before you to 90cm Rear speaker continued 7 Dolby Pro Logic Surround improves the sound image by using four separate channels...
... each other at about the same height as it is a decoding system standardized in TV programmes and movies. Dolby Pro Logic Surround is placed at an angle of the front speakers (B). Positioning the speakers Before you to 90cm Rear speaker continued 7 Dolby Pro Logic Surround improves the sound image by using four separate channels...
Operating Instructions (primary manual)
Page 8
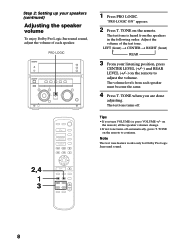
...(+/-) and REAR LEVEL (+/-) on the remote to adjust the volume. TONE on the remote) all the speaker volumes change. • If test tone turns-off . Adjust the volume of each speaker must become the same. 4 Press T. Note The test tone feature works only for Dolby Pro Logic... Surround sound. 8 "PRO LOGIC ON" appears. 2 Press T. LEFT (front) n CENTER n RIGHT (front) REAR 3 From your speakers (contnued) Adjusting the speaker volume To enjoy Dolby Pro Logic Surround sound, adjust the volume of the test tone. The test tone turns off automatically, press T. TONE on...
...(+/-) and REAR LEVEL (+/-) on the remote to adjust the volume. TONE on the remote) all the speaker volumes change. • If test tone turns-off . Adjust the volume of each speaker must become the same. 4 Press T. Note The test tone feature works only for Dolby Pro Logic... Surround sound. 8 "PRO LOGIC ON" appears. 2 Press T. LEFT (front) n CENTER n RIGHT (front) REAR 3 From your speakers (contnued) Adjusting the speaker volume To enjoy Dolby Pro Logic Surround sound, adjust the volume of the test tone. The test tone turns off automatically, press T. TONE on...

Operating Instructions (primary manual)
Page 27
Every time you use the DBFB system with headphones. 1/u (power) DBFB - + 0 ) ≠ + - + g PHONES GROOVE To reinforce bass (DBFB) Press DBFB*. The volume switches to power mode, DBFB is too strong. Sound Adjustment ... off ) * DBFB = Dynamic Bass Feedback For a powerful sound (GROOVE) Press GROOVE. Note If you have connected a super woofer, please note that sound comes from the speakers. No sound will sound distorted when you press the button, the display changes as follows: n DBFB NORMAL ( DBFB ) µ DBFB HIGH ( DBFB ) µ DBFB OFF...
Every time you use the DBFB system with headphones. 1/u (power) DBFB - + 0 ) ≠ + - + g PHONES GROOVE To reinforce bass (DBFB) Press DBFB*. The volume switches to power mode, DBFB is too strong. Sound Adjustment ... off ) * DBFB = Dynamic Bass Feedback For a powerful sound (GROOVE) Press GROOVE. Note If you have connected a super woofer, please note that sound comes from the speakers. No sound will sound distorted when you press the button, the display changes as follows: n DBFB NORMAL ( DBFB ) µ DBFB HIGH ( DBFB ) µ DBFB OFF...
Operating Instructions (primary manual)
Page 39
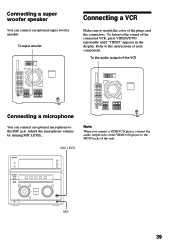
... the color of this unit. Refer to the instructions of the VCR Connecting a microphone You can connect an optional super woofer speaker. To the audio output of each component. Connecting a super woofer speaker You can connect an optional microphone to the sound of the connected VCR, press VIDEO/DVD repeatedly until "VIDEO" appears...
... the color of this unit. Refer to the instructions of the VCR Connecting a microphone You can connect an optional super woofer speaker. To the audio output of each component. Connecting a super woofer speaker You can connect an optional microphone to the sound of the connected VCR, press VIDEO/DVD repeatedly until "VIDEO" appears...
Operating Instructions (primary manual)
Page 42
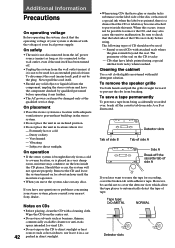
... - Should this unit. To remove the speaker grille Use both hands and pull the grille straight forward to prevent heat build-up in the stereo system. • Do not place the unit...if the unit itself . • Should any questions or problems concerning your stereo system, please consult your nearest Sony dealer. Notes on for recording, cover the broken tab with mild detergent solution. ...solid object or liquid fall into the component, unplug the stereo system and have glue or similar tacky substance on the lens inside this occur, the system will not operate properly. Cleaning the ...
... - Should this unit. To remove the speaker grille Use both hands and pull the grille straight forward to prevent heat build-up in the stereo system. • Do not place the unit...if the unit itself . • Should any questions or problems concerning your stereo system, please consult your nearest Sony dealer. Notes on for recording, cover the broken tab with mild detergent solution. ...solid object or liquid fall into the component, unplug the stereo system and have glue or similar tacky substance on the lens inside this occur, the system will not operate properly. Cleaning the ...
Operating Instructions (primary manual)
Page 43
...the metal parts that the power cord is connected firmly and the speakers are connected. •Insert only the stripped portion of the speaker cord into any problem persist, consult your nearest Sony dealer. Troubleshooting If you run into the SPEAKER jack. General The display starts flashing as soon as play, stop... a cassette in the tape deck Take up to clean the tape heads before you haven't turned on page 37. When using this stereo system, use with a separately sold dry-type or wet-type cleaning cassette. The tape may get entangled in the power cord even though you start...
...the metal parts that the power cord is connected firmly and the speakers are connected. •Insert only the stripped portion of the speaker cord into any problem persist, consult your nearest Sony dealer. Troubleshooting If you run into the SPEAKER jack. General The display starts flashing as soon as play, stop... a cassette in the tape deck Take up to clean the tape heads before you haven't turned on page 37. When using this stereo system, use with a separately sold dry-type or wet-type cleaning cassette. The tape may get entangled in the power cord even though you start...
Operating Instructions (primary manual)
Page 44
...the TV set . There is monaural. Play does not start from the centre speaker only. •The source being played back has limited sound effects. "OVER" is inserted label side down . Press 1/u to the stereo system. Speakers Sound comes from TV set once, then turn on the power. Press PRO LOGIC... and turn off the power, leave the system turned off the Pro Logic mode. Check the volume with the test tone. jacks ...
...the TV set . There is monaural. Play does not start from the centre speaker only. •The source being played back has limited sound effects. "OVER" is inserted label side down . Press 1/u to the stereo system. Speakers Sound comes from TV set once, then turn on the power. Press PRO LOGIC... and turn off the power, leave the system turned off the Pro Logic mode. Check the volume with the test tone. jacks ...
Operating Instructions (primary manual)
Page 46
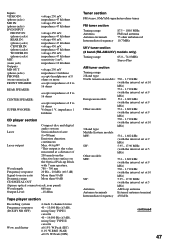
...output (reference) 110 + 110 watts (6 ohms at 1 kHz, 10% THD) Music power output (reference) 180 + 180 watts (6 ohms at 1 kHz, 10% THD) Center Speaker: DIN power output (rated) 25 watts (8 ohms at 1 kHz, DIN) Continuous RMS power output (reference) 35 watts (8 ohms at 1 kHz, 10% THD) Music power ...output (reference) 70 watts (8 ohms at 1 kHz, 10% THD) Rear Speaker: DIN power output (rated) 25 + 25 watts (8 ohms at 1 kHz, DIN) Continuous RMS power output (reference) 35 + 35 watts (8 ohms at 1 kHz, 10% ...
...output (reference) 110 + 110 watts (6 ohms at 1 kHz, 10% THD) Music power output (reference) 180 + 180 watts (6 ohms at 1 kHz, 10% THD) Center Speaker: DIN power output (rated) 25 watts (8 ohms at 1 kHz, DIN) Continuous RMS power output (reference) 35 watts (8 ohms at 1 kHz, 10% THD) Music power ...output (reference) 70 watts (8 ohms at 1 kHz, 10% THD) Rear Speaker: DIN power output (rated) 25 + 25 watts (8 ohms at 1 kHz, DIN) Continuous RMS power output (reference) 35 + 35 watts (8 ohms at 1 kHz, 10% ...
Operating Instructions (primary manual)
Page 47
... 660 nm Output Level -18 dBm Tape player section Recording system Frequency response (DOLBY NR OFF) Wow and flutter 4-track 2-channel stereo 40 - 13,000 Hz (±3 dB), using Sony TYPE I cassette 40 - 14,000 Hz (±3 dB), using Sony TYPE II cassette ±0.15% W.Peak (IEC) 0.1% ...jacks) REAR IN: (phono jacks) CENTER IN: (phono jacks) WOOFER IN: (phono jacks) MIC: (mini jack) Outputs MD OUT: (phono jacks) PHONES: (stereo mini jack) FRONT SPEAKER: REAR SPEAKER: CENTER SPEAKER: SUPER WOOFER: voltage 250 mV, impedance 47 kilohms voltage 450 mV, impedance 47 kilohms voltage 450 mV, ...
... 660 nm Output Level -18 dBm Tape player section Recording system Frequency response (DOLBY NR OFF) Wow and flutter 4-track 2-channel stereo 40 - 13,000 Hz (±3 dB), using Sony TYPE I cassette 40 - 14,000 Hz (±3 dB), using Sony TYPE II cassette ±0.15% W.Peak (IEC) 0.1% ...jacks) REAR IN: (phono jacks) CENTER IN: (phono jacks) WOOFER IN: (phono jacks) MIC: (mini jack) Outputs MD OUT: (phono jacks) PHONES: (stereo mini jack) FRONT SPEAKER: REAR SPEAKER: CENTER SPEAKER: SUPER WOOFER: voltage 250 mV, impedance 47 kilohms voltage 450 mV, impedance 47 kilohms voltage 450 mV, ...
Operating Instructions (primary manual)
Page 48
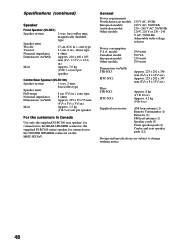
.../8 x 111/8 in.) Approx. 7.0 kg (15 lb 7 oz) net per speaker Centre/Rear Speaker (SS-RC100) Speaker system 1-way, 2-unit, bass-reflex type Speaker units Full-range: 8 cm (31/4 in.), cone type Nominal impedance 8 ohms ...speaker For the customers in .) Mass STR-NX3: HTC-NX1: Approx. 8 kg (17 lb 10 oz) Approx. 4.2 kg (9 lb 4 oz) Supplied accessories: AM loop antenna (1) Remote Commander (1) Batteries (2) FM lead antenna (1) Speaker cords (5) Front speaker pads (8) Center and rear speaker pads (12) Design and specifications are subject to the CENTER SPEAKER connector on the MHC-NX3AV...
.../8 x 111/8 in.) Approx. 7.0 kg (15 lb 7 oz) net per speaker Centre/Rear Speaker (SS-RC100) Speaker system 1-way, 2-unit, bass-reflex type Speaker units Full-range: 8 cm (31/4 in.), cone type Nominal impedance 8 ohms ...speaker For the customers in .) Mass STR-NX3: HTC-NX1: Approx. 8 kg (17 lb 10 oz) Approx. 4.2 kg (9 lb 4 oz) Supplied accessories: AM loop antenna (1) Remote Commander (1) Batteries (2) FM lead antenna (1) Speaker cords (5) Front speaker pads (8) Center and rear speaker pads (12) Design and specifications are subject to the CENTER SPEAKER connector on the MHC-NX3AV...
Operating Instructions (primary manual)
Page 52
...Surround 30 E, F Edit 25 G GROOVE 27 H, I, J, K, L, M Hooking up optional components 38 the aerials 5, 41 the main unit 4 the power 6 the optional speakers 7 N Normal Play 12 O One Touch Play 13, 15, 18 P , Q Personal ...10 Preset tuning 14 Programme Play 22 Protecting recordings 42 PTY 33 R Radio Data System (RDS) 33 Radio stations presetting 10 tuning in 14 Recording a CD 13 a radio ...adjustment 27 Speakers 7, 39 Station name 33 T, U, V, W, X, Y, Z Timer falling asleep to music 35 timer recording 37 waking up to music 36 Troubleshooting 43 Tuner 14, 33 Tuning interval 11 Sony Corporation ...
...Surround 30 E, F Edit 25 G GROOVE 27 H, I, J, K, L, M Hooking up optional components 38 the aerials 5, 41 the main unit 4 the power 6 the optional speakers 7 N Normal Play 12 O One Touch Play 13, 15, 18 P , Q Personal ...10 Preset tuning 14 Programme Play 22 Protecting recordings 42 PTY 33 R Radio Data System (RDS) 33 Radio stations presetting 10 tuning in 14 Recording a CD 13 a radio ...adjustment 27 Speakers 7, 39 Station name 33 T, U, V, W, X, Y, Z Timer falling asleep to music 35 timer recording 37 waking up to music 36 Troubleshooting 43 Tuner 14, 33 Tuning interval 11 Sony Corporation ...


