Operating Instructions (primary manual)
Page 1
Record the serial number in the space provided below. Serial No MHC-NX3AV ©1999 by Sony Corporation 1 3-867-107-14(1) Mini Hi-Fi Component System Operating Instructions Owner's Record The model and serial numbers are located on the rear panel. Refer to them whenever you call upon your Sony dealer regarding this product. Model No.
Record the serial number in the space provided below. Serial No MHC-NX3AV ©1999 by Sony Corporation 1 3-867-107-14(1) Mini Hi-Fi Component System Operating Instructions Owner's Record The model and serial numbers are located on the rear panel. Refer to them whenever you call upon your Sony dealer regarding this product. Model No.
Operating Instructions (primary manual)
Page 2
... of optical instruments with the instructions, may be determined by one or more of the following measures: - CAUTION The use of important operating and maintenance (servicing) instructions in this manual could void your authority to operate this equipment does cause harmful interference to Part 15 of Dolby Laboratories Licensing Corporation. These limits are trademarks of the FCC Rules. The MHC-NX3AV consist...
... of optical instruments with the instructions, may be determined by one or more of the following measures: - CAUTION The use of important operating and maintenance (servicing) instructions in this manual could void your authority to operate this equipment does cause harmful interference to Part 15 of Dolby Laboratories Licensing Corporation. These limits are trademarks of the FCC Rules. The MHC-NX3AV consist...
Operating Instructions (primary manual)
Page 3
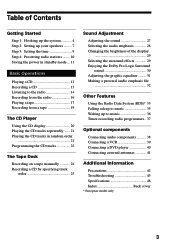
... 25 Sound Adjustment Adjusting the sound 27 Selecting the audio emphasis 28 Changing the brightness of the display 29 Selecting the surround effects 29 Enjoying the Dolby Pro Logic Surround sound 30 Adjusting the graphic equalizer ......... 31 Making a personal audio emphasis file 32 Other Features Using the Radio Data System (RDS)* 33 Falling asleep to music 35 Waking up to music 36 Timer-recording radio programmes .. 37 Optional components Connecting audio components .......... 38 Connecting a VCR 39 Connecting a DVD player 40 Connecting external antennas...
... 25 Sound Adjustment Adjusting the sound 27 Selecting the audio emphasis 28 Changing the brightness of the display 29 Selecting the surround effects 29 Enjoying the Dolby Pro Logic Surround sound 30 Adjusting the graphic equalizer ......... 31 Making a personal audio emphasis file 32 Other Features Using the Radio Data System (RDS)* 33 Falling asleep to music 35 Waking up to music 36 Timer-recording radio programmes .. 37 Optional components Connecting audio components .......... 38 Connecting a VCR 39 Connecting a DVD player 40 Connecting external antennas...

Operating Instructions (primary manual)
Page 5
... speaker. Connect the speaker cords to the SYSTEM CONTROL connectors until it . Solid (') Note Black/ Stripe (') Keep the speaker cords away from the main unit. 5 continued Insert only the stripped portion. R L + 2 Connect the front speakers. R L + + Red/ Solid (') - Insert only the stripped portion. Set up the AM loop antenna as far as below. 1 Connect the flat cord to the CENTER SPEAKER jacks. Connect the speaker cords to prevent noise. 3 Connect the rear speakers. R L + + Gray/ Solid (') - Jack...
... speaker. Connect the speaker cords to the SYSTEM CONTROL connectors until it . Solid (') Note Black/ Stripe (') Keep the speaker cords away from the main unit. 5 continued Insert only the stripped portion. R L + 2 Connect the front speakers. R L + + Red/ Solid (') - Insert only the stripped portion. Set up the AM loop antenna as far as below. 1 Connect the flat cord to the CENTER SPEAKER jacks. Connect the speaker cords to prevent noise. 3 Connect the rear speakers. R L + + Gray/ Solid (') - Jack...
Operating Instructions (primary manual)
Page 6
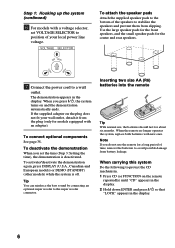
... demonstration again, press DISPLAY (U.S.A., Canadian and European models) or DEMO (STANDBY) (other models) while the system is deactivated. Step 1: Hooking up the system (continued) 6 For models with new ones. To connect optional components See page 38. If the supplied adapter on and the demonstration automatically ends. When the remote no longer operates the system, replace both batteries with a voltage selector, set the time (Step 3: Setting the time), the demonstration...
... demonstration again, press DISPLAY (U.S.A., Canadian and European models) or DEMO (STANDBY) (other models) while the system is deactivated. Step 1: Hooking up the system (continued) 6 For models with new ones. To connect optional components See page 38. If the supplied adapter on and the demonstration automatically ends. When the remote no longer operates the system, replace both batteries with a voltage selector, set the time (Step 3: Setting the time), the demonstration...
Operating Instructions (primary manual)
Page 7
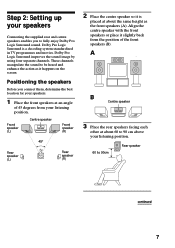
... your speakers. 1 Place the front speakers at about the same height as it happens on the screen. Align the centre speaker with the front speakers or place it is a decoding system standardized in TV programmes and movies. Step 2: Setting up your listening position. Dolby Pro Logic Surround improves the sound image by using four separate channels. These channels manipulate the sound to fully enjoy Dolby Pro Logic Surround sound.
... your speakers. 1 Place the front speakers at about the same height as it happens on the screen. Align the centre speaker with the front speakers or place it is a decoding system standardized in TV programmes and movies. Step 2: Setting up your listening position. Dolby Pro Logic Surround improves the sound image by using four separate channels. These channels manipulate the sound to fully enjoy Dolby Pro Logic Surround sound.
Operating Instructions (primary manual)
Page 8
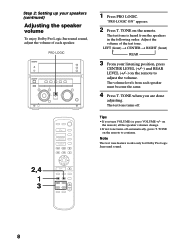
... volume levels from the speakers in the following order. The test tone turns off automatically, press T. TONE on the remote to continue. TONE on the remote) all the speaker volumes change. • If test tone turns-off . Adjust the volume of each speaker must become the same. 4 Press T. LEFT (front) n CENTER n RIGHT (front) REAR 3 From your speakers (contnued) Adjusting the speaker volume To enjoy Dolby Pro Logic Surround sound, adjust the volume of the test tone. Note The test tone feature works only for Dolby Pro Logic Surround sound. 8 "PRO LOGIC...
... volume levels from the speakers in the following order. The test tone turns off automatically, press T. TONE on the remote to continue. TONE on the remote) all the speaker volumes change. • If test tone turns-off . Adjust the volume of each speaker must become the same. 4 Press T. LEFT (front) n CENTER n RIGHT (front) REAR 3 From your speakers (contnued) Adjusting the speaker volume To enjoy Dolby Pro Logic Surround sound, adjust the volume of the test tone. Note The test tone feature works only for Dolby Pro Logic Surround sound. 8 "PRO LOGIC...

Operating Instructions (primary manual)
Page 11
... DISPLAY. When you unplug the power cord or if a power failure occurs. - + 0 ) ≠ + - + g POWER SAVE/DEMO (STANDBY) / Press POWER SAVE/DEMO (STANDBY) when the power is factory set ) light up even in the Power Saving Mode. • The timer works in the station manually. While holding down the TUNER MEMORY, press 1/u to turn the jog dial to select the preset number you press POWER SAVE/DEMO (STANDBY) in the standby mode. 1/u (Power) DISPLAY 2 Turn the jog dial to select the preset number you change the AM tuning...
... DISPLAY. When you unplug the power cord or if a power failure occurs. - + 0 ) ≠ + - + g POWER SAVE/DEMO (STANDBY) / Press POWER SAVE/DEMO (STANDBY) when the power is factory set ) light up even in the Power Saving Mode. • The timer works in the station manually. While holding down the TUNER MEMORY, press 1/u to turn the jog dial to select the preset number you press POWER SAVE/DEMO (STANDBY) in the standby mode. 1/u (Power) DISPLAY 2 Turn the jog dial to select the preset number you change the AM tuning...
Operating Instructions (primary manual)
Page 13
... another source to go back) on the remote.) Find a point in the Power Saving Mode, the One Touch Play function does not work. • You can use force to close the tray by pressing · or the DISC 1~5 buttons (Automatic Source Selection). • If there is open the tray that contains the CD that you change . Adjust the volume Turn VOLUME (or press VOLUME +/- Note Do not use TYPE...
... another source to go back) on the remote.) Find a point in the Power Saving Mode, the One Touch Play function does not work. • You can use force to close the tray by pressing · or the DISC 1~5 buttons (Automatic Source Selection). • If there is open the tray that contains the CD that you change . Adjust the volume Turn VOLUME (or press VOLUME +/- Note Do not use TYPE...
Operating Instructions (primary manual)
Page 15
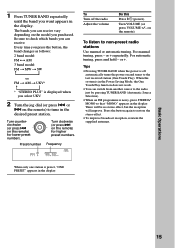
... button again to tune in the Power Saving Mode, the One Touch Play function does not work. • You can switch from another source to check which bands you can receive vary depending on the remote) for higher preset numbers. Turn counterclockwise (or press = ≠ on the model you select UKV. 2 Turn the jog dial (or press = or + on and tunes to non-preset radio stations Use manual or automatic tuning. Tips • Pressing TUNER...
... button again to tune in the Power Saving Mode, the One Touch Play function does not work. • You can switch from another source to check which bands you can receive vary depending on the remote) for higher preset numbers. Turn counterclockwise (or press = ≠ on the model you select UKV. 2 Turn the jog dial (or press = or + on and tunes to non-preset radio stations Use manual or automatic tuning. Tips • Pressing TUNER...
Operating Instructions (primary manual)
Page 16
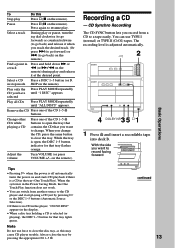
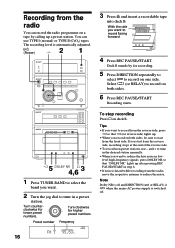
... REC PAUSE/START. Preset number Frequency TUNED STEREO MHz 16 3 Press § and insert a recordable tape into deck B. and + to tune in the desired station manually. • When you want to record on deck B. The recording level is automatically adjusted. 1/u (Power) 2 -/+ 1 - 0 ≠ g + ) + - · ∏ π + § 1 2 3 4 5 ª· π ª· π § § 5 4,6 3 ª DOLBY NR π 1 Press TUNER BAND to select the band you want...
... REC PAUSE/START. Preset number Frequency TUNED STEREO MHz 16 3 Press § and insert a recordable tape into deck B. and + to tune in the desired station manually. • When you want to record on deck B. The recording level is automatically adjusted. 1/u (Power) 2 -/+ 1 - 0 ≠ g + ) + - · ∏ π + § 1 2 3 4 5 ª· π ª· π § § 5 4,6 3 ª DOLBY NR π 1 Press TUNER BAND to select the band you want...
Operating Instructions (primary manual)
Page 18
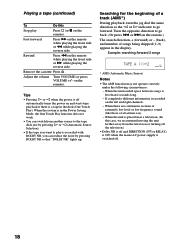
... power supply is switched off automatically turns the power on and starts tape playback if there is off . 18 When there are continuous sections of extremely low level or low frequency sound (like those of a baritone sax). - Playing a tape (continued) To Do this case, we recommend moving the unit farther away from another source to the tape deck just by pressing · or ª (Automatic Source Selection...
... power supply is switched off automatically turns the power on and starts tape playback if there is off . 18 When there are continuous sections of extremely low level or low frequency sound (like those of a baritone sax). - Playing a tape (continued) To Do this case, we recommend moving the unit farther away from another source to the tape deck just by pressing · or ª (Automatic Source Selection...

Operating Instructions (primary manual)
Page 19
.... • If you select RELAY, the tapes on both sides, start recording from a tape - Basic Operations 19 The recording level is automatically adjusted. 1/u (Power) - 0 ≠ g + ) + - · ∏ π + § 1 2 3 4 5 ª· π ª· π § § 1 3 π2 4π 1 DOLBY NR 1 Press § and insert a recorded tape in deck A and a recordable tape in deck A. • Dolby NR is off and DIRECTION (A or RELAY) is...
.... • If you select RELAY, the tapes on both sides, start recording from a tape - Basic Operations 19 The recording level is automatically adjusted. 1/u (Power) - 0 ≠ g + ) + - · ∏ π + § 1 2 3 4 5 ª· π ª· π § § 1 3 π2 4π 1 DOLBY NR 1 Press § and insert a recorded tape in deck A and a recordable tape in deck A. • Dolby NR is off and DIRECTION (A or RELAY) is...
Operating Instructions (primary manual)
Page 26
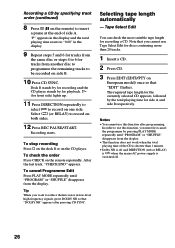
... CHECK on the CD player. "P" appears in the display and the total playing time resets to "0.00" in low-level high-frequency signals, press DOLBY NR so that "DOLBY NR" appears after programming. To stop recording Press π on the deck B or on the remote repeatedly. To cancel Programme Edit Press PLAY MODE repeatedly until "PROGRAM" or "SHUFFLE" disappears from the display. Selecting tape length automatically - Tape Select Edit You can check...
... CHECK on the CD player. "P" appears in the display and the total playing time resets to "0.00" in low-level high-frequency signals, press DOLBY NR so that "DOLBY NR" appears after programming. To stop recording Press π on the deck B or on the remote repeatedly. To cancel Programme Edit Press PLAY MODE repeatedly until "PROGRAM" or "SHUFFLE" disappears from the display. Selecting tape length automatically - Tape Select Edit You can check...
Operating Instructions (primary manual)
Page 39
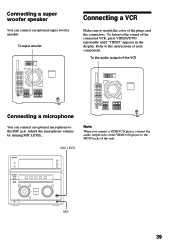
... instructions of the connected VCR, press VIDEO/DVD repeatedly until "VIDEO" appears in the display. Refer to the sound of each component. To the audio output of this unit. Adjust the microphone volume by turning MIC LEVEL. MIC LEVEL - 0 ≠ g + ) + - + MIC 39 Note When you connect a VIDEO CD player, connect the audio output jacks of the VIDEO CD player to the MD IN jacks of the VCR Connecting a microphone You can connect an optional super woofer speaker. To super woofer Connecting a VCR Make sure to the MIC jack...
... instructions of the connected VCR, press VIDEO/DVD repeatedly until "VIDEO" appears in the display. Refer to the sound of each component. To the audio output of this unit. Adjust the microphone volume by turning MIC LEVEL. MIC LEVEL - 0 ≠ g + ) + - + MIC 39 Note When you connect a VIDEO CD player, connect the audio output jacks of the VIDEO CD player to the MD IN jacks of the VCR Connecting a microphone You can connect an optional super woofer speaker. To super woofer Connecting a VCR Make sure to the MIC jack...
Operating Instructions (primary manual)
Page 43
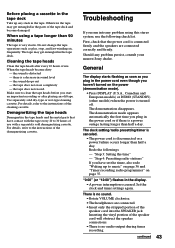
... tape. "Step 4: Presetting radio stations" If you run into the SPEAKER jack. Set the clock and timer settings again. there is no audio output during timer recording. 43 continued For details, refer to the instructions of the cleaning cassette. There is a decrease in the display. •A power interruption occurred. When using this stereo system, use . "Step 3: Setting the time" - When the tape heads become damaged. Before placing a cassette in the tape deck...
... tape. "Step 4: Presetting radio stations" If you run into the SPEAKER jack. Set the clock and timer settings again. there is no audio output during timer recording. 43 continued For details, refer to the instructions of the cleaning cassette. There is a decrease in the display. •A power interruption occurred. When using this stereo system, use . "Step 3: Setting the time" - When the tape heads become damaged. Before placing a cassette in the tape deck...
Operating Instructions (primary manual)
Page 44
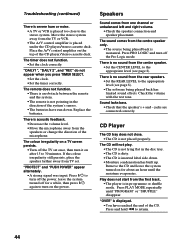
... A/V control amplifier on for a while, then press 1/u again to turn off for about an hour until "PROGRAM" or "SHUFFLE" disappear. "PROTECT" and "PUSH POWER" appear alternately. •A strong signal was input. jacks are connected correctly. CD Player The CD tray does not close. •The CD is placed too close to 30 minutes. Play does not start from the speakers or change the direction of...
... A/V control amplifier on for a while, then press 1/u again to turn off for about an hour until "PROGRAM" or "SHUFFLE" disappear. "PROTECT" and "PUSH POWER" appear alternately. •A strong signal was input. jacks are connected correctly. CD Player The CD tray does not close. •The CD is placed too close to 30 minutes. Play does not start from the speakers or change the direction of...

Operating Instructions (primary manual)
Page 45
... ("TUNED" or "STEREO" flashes in stereo. •Press STEREO/MONO so that "STEREO" appears. Tuner There is excessive wow or flutter, or the sound drops out. • The capstans or pinch rollers are magnetized. Connect the external antenna. A stereo FM programme cannot be received in the display.) •Adjust the antenna. •The signal strength is reset to turn the power back on the power. Demagnetize them (see "Demagnetizing the tape...
... ("TUNED" or "STEREO" flashes in stereo. •Press STEREO/MONO so that "STEREO" appears. Tuner There is excessive wow or flutter, or the sound drops out. • The capstans or pinch rollers are magnetized. Connect the external antenna. A stereo FM programme cannot be received in the display.) •Adjust the antenna. •The signal strength is reset to turn the power back on the power. Demagnetize them (see "Demagnetizing the tape...
Operating Instructions (primary manual)
Page 47
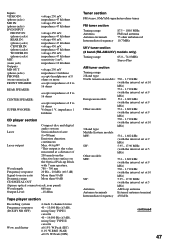
... optical connector jack, rear panel) Wavelength 660 nm Output Level -18 dBm Tape player section Recording system Frequency response (DOLBY NR OFF) Wow and flutter 4-track 2-channel stereo 40 - 13,000 Hz (±3 dB), using Sony TYPE I cassette 40 - 14,000 Hz (±3 dB), using Sony TYPE II cassette ±0.15% W.Peak (IEC) 0.1% W.RMS (NAB) ±0.2% W.Peak (DIN) Tuner section FM stereo, FM/AM superheterodyne tuner FM tuner section Tuning range Antenna Antenna terminals Intermediate frequency...
... optical connector jack, rear panel) Wavelength 660 nm Output Level -18 dBm Tape player section Recording system Frequency response (DOLBY NR OFF) Wow and flutter 4-track 2-channel stereo 40 - 13,000 Hz (±3 dB), using Sony TYPE I cassette 40 - 14,000 Hz (±3 dB), using Sony TYPE II cassette ±0.15% W.Peak (IEC) 0.1% W.RMS (NAB) ±0.2% W.Peak (DIN) Tuner section FM stereo, FM/AM superheterodyne tuner FM tuner section Tuning range Antenna Antenna terminals Intermediate frequency...
Operating Instructions (primary manual)
Page 52
... Source Selection 13, 15, 18 B Batteries 6 C CD player 20 CD Synchro Recording 13 Clock setting 9 Connecting. See Hooking up Connecting the speakers 7 D Daily timer 36 DBFB 27 Display 20 Dolby Pro Logic Surround 30 E, F Edit 25 G GROOVE 27 H, I, J, K, L, M Hooking up optional components 38 the aerials 5, 41 the main unit 4 the power 6 the optional speakers 7 N Normal Play 12 O One Touch Play 13, 15, 18 P , Q Personal file 32 Playing a CD 12 a preset radio station...
... Source Selection 13, 15, 18 B Batteries 6 C CD player 20 CD Synchro Recording 13 Clock setting 9 Connecting. See Hooking up Connecting the speakers 7 D Daily timer 36 DBFB 27 Display 20 Dolby Pro Logic Surround 30 E, F Edit 25 G GROOVE 27 H, I, J, K, L, M Hooking up optional components 38 the aerials 5, 41 the main unit 4 the power 6 the optional speakers 7 N Normal Play 12 O One Touch Play 13, 15, 18 P , Q Personal file 32 Playing a CD 12 a preset radio station...


