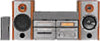
Sony MHC-NX3AV Support Question
Sony MHC-NX3AV Support Question
Find answers below for this question about Sony MHC-NX3AV - Mini Hi-fi Component System.Need a Sony MHC-NX3AV manual? We have 1 online manual for this item!
Question posted by Michael4top on September 4th, 2020
Power Push Protect On Screen
Current Answers
Answer #1: Posted by techyagent on September 4th, 2020 8:54 AM

Member since:
June 17th, 2014 Points: 4,799,790

Try following these steps to resolve this issue:
NOTE: Because each of these steps represents a possible solution to this issue, check the A/V receiver status after completing each step. If there has been an electrical surge or power outage, then the internal surge protection inside the home audio device may have been triggered to protect the device from the surge.
This is normal. To reset the internal surge protection circuit unplug the AC power cord from the wall for at least 30 minutes. Ensure the top of the home audio device has proper ventilation to keep it from overheating. Running the home audio device in a poorly ventilated cabinet can trigger the protection circuit.
Reduce the volume level. If the impedance of any of the speakers is below the rated impedance range indicated on the rear of the home audio device next to the speaker connections, the home audio device may enter the PROTECT mode. Raising the volume with a low impedance speaker will trigger the protection circuit.
NOTES: Replace low impedance (outside of specifications) speakers with the correct impedance to prevent this from occurring. If you continue to use the low impedance (outside of specifications) speakers and you ran the Auto Calibration, check your SPEAKER SETUP and individual speaker LEVEL to reduce any speaker LEVEL with a positive gain to 0.0dB or less.
To isolate the problem, do the following: Turn off the home audio device, and remove all speaker wires from the back.
Then turn the device back on and check if the issue is resolved. If it is still having the same issue, turn off the device again and let it rest for at least 30 minutes before turning it on again. Inspect the speaker cords.
If a cord is frayed or in contact with another terminal, an error will occur. Fix the connection to prevent a short circuit. Make sure the speaker impedance is within the recommended range. If the impedance is not correct, sound will not come out properly and the speaker may be damaged.
If speakers that are within the recommended impedance range, check the connections. If the speakers being used is within the suitable range and is still not working, there may be a malfunction or some other flaw within the speakers. Test by using a different set of speakers if available.
Please check this link for reference:-
https://www.sony.co.in/electronics/support/article...
Thanks
Techygirl
Related Sony MHC-NX3AV Manual Pages


Similar Questions

I'm looking for subwoofer or connector that clips into the back of stereo for subwoofer I've searche...


can headphones be plugged into the Sony CMT-MX500i Micro Mini Hi Fi Component Systrm?if so,what size...

*what sony mp3 players are compatible with sony mini hi-fi component system mhc-ec691 *(not walkman ...