Operating Instructions (primary manual)
Page 2
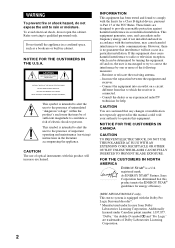
... with the Dolby Pro Logic Surround decoder*. * Manufactured under Canadian patent number 1,037,877. Refer servicing to provide reasonable protection against harmful interference in cabinet. This symbol is connected. - CAUTION The use of uninsulated "dangerous voltage" within the product's enclosure that any changes or modification not expressly approved in a particular installation. INFORMATION This equipment has been tested and found to radio communications...
... with the Dolby Pro Logic Surround decoder*. * Manufactured under Canadian patent number 1,037,877. Refer servicing to provide reasonable protection against harmful interference in cabinet. This symbol is connected. - CAUTION The use of uninsulated "dangerous voltage" within the product's enclosure that any changes or modification not expressly approved in a particular installation. INFORMATION This equipment has been tested and found to radio communications...
Operating Instructions (primary manual)
Page 3
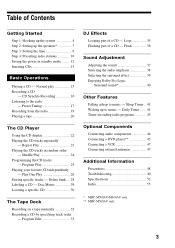
... - Shuffle Play 24 Programming the CD tracks - Flash 36 Sound Adjustment Adjusting the sound 37 Selecting the audio emphasis 38 Selecting the surround effect 39 Enjoying Dolby Pro Logic Surround sound 40 Other Features Falling asleep to the radio -- Sleep Timer .. 41 Waking up the speakers 7 Step 3: Setting the time 9 Step 4: Presetting radio stations 10 Saving the power in random order - Preset Tuning 17 Recording from the radio 19 Playing a tape 20 The CD Player Using the CD display 22 Playing the...
... - Shuffle Play 24 Programming the CD tracks - Flash 36 Sound Adjustment Adjusting the sound 37 Selecting the audio emphasis 38 Selecting the surround effect 39 Enjoying Dolby Pro Logic Surround sound 40 Other Features Falling asleep to the radio -- Sleep Timer .. 41 Waking up the speakers 7 Step 3: Setting the time 9 Step 4: Presetting radio stations 10 Saving the power in random order - Preset Tuning 17 Recording from the radio 19 Playing a tape 20 The CD Player Using the CD display 22 Playing the...

Operating Instructions (primary manual)
Page 6
...) batteries into the remote For MHC-M500AV/M300AV For MHC-M100 e E E e e EE e Tip With normal use the remote for a long period of time, remove the batteries to avoid possible damage from the plug (for about six months. When the remote no longer operates the system, replace both batteries with an adapter only). Step 1: Hooking up the system (continued) 6 Connect the power cord to place this...
...) batteries into the remote For MHC-M500AV/M300AV For MHC-M100 e E E e e EE e Tip With normal use the remote for a long period of time, remove the batteries to avoid possible damage from the plug (for about six months. When the remote no longer operates the system, replace both batteries with an adapter only). Step 1: Hooking up the system (continued) 6 Connect the power cord to place this...
Operating Instructions (primary manual)
Page 7
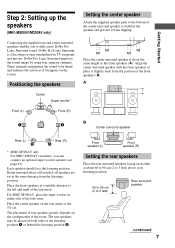
.... Dolby Pro Logic Surround is a decoding system standardized in TV programs and movies. Place the center speaker on the screen. Getting Started Step 2: Setting up the speakers (MHC-M500AV/M300AV only) Connecting the supplied rear and center surround speakers enables you can connect an optional super woofer speaker (see page 45). Front speaker (L) Front speaker (R) Setting the rear speakers Place the rear surround speakers facing each other at the same distance from slipping. Place the center surround speaker at...
.... Dolby Pro Logic Surround is a decoding system standardized in TV programs and movies. Place the center speaker on the screen. Getting Started Step 2: Setting up the speakers (MHC-M500AV/M300AV only) Connecting the supplied rear and center surround speakers enables you can connect an optional super woofer speaker (see page 45). Front speaker (L) Front speaker (R) Setting the rear speakers Place the rear surround speakers facing each other at the same distance from slipping. Place the center surround speaker at...

Operating Instructions (primary manual)
Page 8
... volume levels from the speakers in the following order. The test tone turns off. H hH hH 2,4 PRO LOGIC ON/OFF 3 Tip If you are done adjusting. "PRO LOGIC ON" appears. 8 Step 2: Setting up the speakers (continued) Adjusting the speaker volume To enjoy Dolby Pro Logic Surround sound, turn the Dolby Pro Logic mode on, then adjust the volume of the test tone. Note The test tone feature works only for Dolby Pro Logic Surround sound. 1 Press PRO LOGIC (or PRO LOGIC ON/OFF on the remote...
... volume levels from the speakers in the following order. The test tone turns off. H hH hH 2,4 PRO LOGIC ON/OFF 3 Tip If you are done adjusting. "PRO LOGIC ON" appears. 8 Step 2: Setting up the speakers (continued) Adjusting the speaker volume To enjoy Dolby Pro Logic Surround sound, turn the Dolby Pro Logic mode on, then adjust the volume of the test tone. Note The test tone feature works only for Dolby Pro Logic Surround sound. 1 Press PRO LOGIC (or PRO LOGIC ON/OFF on the remote...
Operating Instructions (primary manual)
Page 9
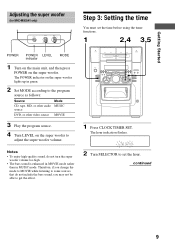
... include the bass sound, you may not be able to set the time before using the timer functions. 1 2,4 3,5 POWER POWER LEVEL indicator MODE 1 Turn on the main unit, and then press POWER on the super woofer to adjust the super woofer volume. ALL 1 DISC S TUNED DBFB PROGRAM MANUAL SHUFFLE AUTO SUR NEXT REPEAT 1 PRESET DELETE CD TEXT PLUS ONE FILE HI-LIGHT TEXT DISC GROUP SYNC TRACK ART MONO STEP STEREO kHz 1 2 REC SLEEP MHz VOLUME DOLBY NR...
... include the bass sound, you may not be able to set the time before using the timer functions. 1 2,4 3,5 POWER POWER LEVEL indicator MODE 1 Turn on the main unit, and then press POWER on the super woofer to adjust the super woofer volume. ALL 1 DISC S TUNED DBFB PROGRAM MANUAL SHUFFLE AUTO SUR NEXT REPEAT 1 PRESET DELETE CD TEXT PLUS ONE FILE HI-LIGHT TEXT DISC GROUP SYNC TRACK ART MONO STEP STEREO kHz 1 2 REC SLEEP MHz VOLUME DOLBY NR...
Operating Instructions (primary manual)
Page 10
... 1 DISC S TUNED DBFB PROGRAM MANUAL SHUFFLE AUTO SUR NEXT REPEAT 1 PRESET DELETE CD TEXT PLUS ONE FILE HI-LIGHT TEXT DISC GROUP SYNC TRACK ART MONO STEP STEREO kHz 1 2 REC SLEEP MHz VOLUME DOLBY NR RELAY GROUP FILE 1 2 3 4 5 4 Turn SELECTOR to display the demo mode, press DISPLAY when the power is off . The minute indication flashes. Step 3: Setting the time (continued) 3 Press ENTER. The clock starts working. Every time you want to set the time...
... 1 DISC S TUNED DBFB PROGRAM MANUAL SHUFFLE AUTO SUR NEXT REPEAT 1 PRESET DELETE CD TEXT PLUS ONE FILE HI-LIGHT TEXT DISC GROUP SYNC TRACK ART MONO STEP STEREO kHz 1 2 REC SLEEP MHz VOLUME DOLBY NR RELAY GROUP FILE 1 2 3 4 5 4 Turn SELECTOR to display the demo mode, press DISPLAY when the power is off . The minute indication flashes. Step 3: Setting the time (continued) 3 Press ENTER. The clock starts working. Every time you want to set the time...

Operating Instructions (primary manual)
Page 11
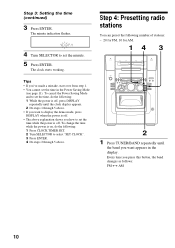
.... A preset number appears in a station. After step 3, turn the power back on the remote) repeatedly in step 2 to tune in any AM station first, then turn off the power. Scanning stops when the system tunes in the display. Preset number ALL 1 DISC S TUNED DBFB PROGRAM MANUAL SHUFFLE AUTO SUR NEXT REPEAT 1 PRESET DELETE CD TEXT PLUS ONE FILE HI-LIGHT TEXT DISC GROUP SYNC TRACK ART MONO STEP STEREO kHz 1 2 REC SLEEP MHz VOLUME DOLBY NR...
.... A preset number appears in a station. After step 3, turn the power back on the remote) repeatedly in step 2 to tune in any AM station first, then turn off the power. Scanning stops when the system tunes in the display. Preset number ALL 1 DISC S TUNED DBFB PROGRAM MANUAL SHUFFLE AUTO SUR NEXT REPEAT 1 PRESET DELETE CD TEXT PLUS ONE FILE HI-LIGHT TEXT DISC GROUP SYNC TRACK ART MONO STEP STEREO kHz 1 2 REC SLEEP MHz VOLUME DOLBY NR...
Operating Instructions (primary manual)
Page 18
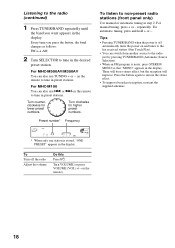
... the display. Preset number* Frequency ALL 1 DISC S TUNED DBFB PROGRAM MANUAL SHUFFLE AUTO SUR NEXT REPEAT 1 PRESET DELETE CD TEXT PLUS ONE FILE HI-LIGHT TEXT DISC GROUP SYNC TRACK ART MONO STEP STEREO kHz 1 2 REC SLEEP MHz VOLUME DOLBY NR RELAY GROUP FILE 1 2 3 4 5 * When only one station is stored, "ONE PRESET" appears in step 2. For automatic tuning, press and hold + or -. For MHC-M500AV/M300AV You can also use TUNING + or - Turn...
... the display. Preset number* Frequency ALL 1 DISC S TUNED DBFB PROGRAM MANUAL SHUFFLE AUTO SUR NEXT REPEAT 1 PRESET DELETE CD TEXT PLUS ONE FILE HI-LIGHT TEXT DISC GROUP SYNC TRACK ART MONO STEP STEREO kHz 1 2 REC SLEEP MHz VOLUME DOLBY NR RELAY GROUP FILE 1 2 3 4 5 * When only one station is stored, "ONE PRESET" appears in step 2. For automatic tuning, press and hold + or -. For MHC-M500AV/M300AV You can also use TUNING + or - Turn...

Operating Instructions (primary manual)
Page 19
.... 5 Press DIRECTION repeatedly to select "g" to reduce the noise. 19 Select "j" (or "RELAY") to record facing forward 4 Press z REC. Turn counterclockwise for higher preset numbers. Basic Operations Recording from the front side. Preset number Frequency ALL 1 DISC S TUNED DBFB PROGRAM MANUAL SHUFFLE AUTO SUR NEXT REPEAT 1 PRESET DELETE CD TEXT PLUS ONE FILE HI-LIGHT TEXT DISC GROUP SYNC TRACK ART MONO STEP STEREO kHz 1 2 REC SLEEP MHz VOLUME DOLBY NR RELAY...
.... 5 Press DIRECTION repeatedly to select "g" to reduce the noise. 19 Select "j" (or "RELAY") to record facing forward 4 Press z REC. Turn counterclockwise for higher preset numbers. Basic Operations Recording from the front side. Preset number Frequency ALL 1 DISC S TUNED DBFB PROGRAM MANUAL SHUFFLE AUTO SUR NEXT REPEAT 1 PRESET DELETE CD TEXT PLUS ONE FILE HI-LIGHT TEXT DISC GROUP SYNC TRACK ART MONO STEP STEREO kHz 1 2 REC SLEEP MHz VOLUME DOLBY NR RELAY...

Operating Instructions (primary manual)
Page 21
... five times. • The AMS function may not operate correctly under the following circumstances: - When there are continuous sections of extremely low level or low frequency sound (like those of the current track or the next one (AMS) During playback, press . Example: searching the next TUNED MANUAL song AUTO PRESET DELETE CD TEXT PLUS ONE FILE HI-LIGHT 1 2 REC SLEEP TEXT DISC GROUP SYNC TRACK...
... five times. • The AMS function may not operate correctly under the following circumstances: - When there are continuous sections of extremely low level or low frequency sound (like those of the current track or the next one (AMS) During playback, press . Example: searching the next TUNED MANUAL song AUTO PRESET DELETE CD TEXT PLUS ONE FILE HI-LIGHT 1 2 REC SLEEP TEXT DISC GROUP SYNC TRACK...
Operating Instructions (primary manual)
Page 40
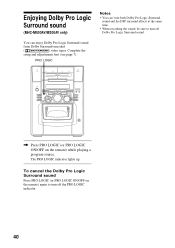
... setup and adjustments first (see page 7). PRO LOGIC Notes • You can enjoy Dolby Pro Logic Surround sound from Dolby Surround-encoded ( ) video tapes. To cancel the Dolby Pro Logic Surround sound Press PRO LOGIC (or PRO LOGIC ON/OFF on the remote) again to turn off Dolby Pro Logic Surround sound. , Press PRO LOGIC (or PRO LOGIC ON/OFF on the remote) while playing a program source. The PRO LOGIC indicator lights up. Enjoying Dolby Pro Logic Surround sound (MHC-M500AV/M300AV only) You can 't use both Dolby Pro...
... setup and adjustments first (see page 7). PRO LOGIC Notes • You can enjoy Dolby Pro Logic Surround sound from Dolby Surround-encoded ( ) video tapes. To cancel the Dolby Pro Logic Surround sound Press PRO LOGIC (or PRO LOGIC ON/OFF on the remote) again to turn off Dolby Pro Logic Surround sound. , Press PRO LOGIC (or PRO LOGIC ON/OFF on the remote) while playing a program source. The PRO LOGIC indicator lights up. Enjoying Dolby Pro Logic Surround sound (MHC-M500AV/M300AV only) You can 't use both Dolby Pro...
Operating Instructions (primary manual)
Page 41
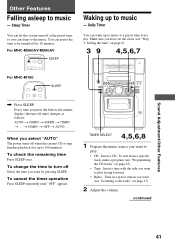
... a program (see "Programming the CD tracks" on page 17). 2 Adjust the volume. You can let the system turn off time) changes as follows: AUTO t 90MIN t 80MIN t 70MIN t ... Make sure you want to play facing forward. • Radio: Tune in a preset station you have set the clock (see "Listening to the radio" on page 25). • Tape: Insert a tape with the side you want to music - To change the time to music -
... a program (see "Programming the CD tracks" on page 17). 2 Adjust the volume. You can let the system turn off time) changes as follows: AUTO t 90MIN t 80MIN t 70MIN t ... Make sure you want to play facing forward. • Radio: Tune in a preset station you have set the clock (see "Listening to the radio" on page 25). • Tape: Insert a tape with the side you want to music - To change the time to music -

Operating Instructions (primary manual)
Page 42
...: t TUNER y CD PLAY T t TAPE PLAY T 8 Press ENTER. The indications change the setting, start playback. ALL 1 DISC S TUNED DBFB PROGRAM MANUAL SHUFFLE AUTO SUR NEXT REPEAT 1 PRESET DELETE CD TEXT PLUS ONE FILE HI-LIGHT TEXT DISC GROUP SYNC TRACK ART MONO STEP STEREO kHz 1 2 REC SLEEP MHz VOLUME DOLBY NR RELAY GROUP FILE 1 2 3 4 5 5 Set the time to select "TIMER OFF", then press ENTER. To cancel the timer operation Press TIMER SELECT and turn SELECTOR...
...: t TUNER y CD PLAY T t TAPE PLAY T 8 Press ENTER. The indications change the setting, start playback. ALL 1 DISC S TUNED DBFB PROGRAM MANUAL SHUFFLE AUTO SUR NEXT REPEAT 1 PRESET DELETE CD TEXT PLUS ONE FILE HI-LIGHT TEXT DISC GROUP SYNC TRACK ART MONO STEP STEREO kHz 1 2 REC SLEEP MHz VOLUME DOLBY NR RELAY GROUP FILE 1 2 3 4 5 5 Set the time to select "TIMER OFF", then press ENTER. To cancel the timer operation Press TIMER SELECT and turn SELECTOR...

Operating Instructions (primary manual)
Page 43
... the same time. 43 ALL 1 DISC S TUNED DBFB PROGRAM MANUAL SHUFFLE AUTO SUR NEXT REPEAT 1 PRESET DELETE CD TEXT PLUS ONE FILE HI-LIGHT TEXT DISC GROUP SYNC TRACK ART MONO STEP STEREO kHz 1 2 REC SLEEP MHz VOLUME DOLBY NR RELAY GROUP FILE 1 2 3 4 5 To check the setting Press TIMER SELECT and turn SELECTOR to select "TIMER OFF," then press ENTER. The starting time, the stopping time, and the preset radio station to...
... the same time. 43 ALL 1 DISC S TUNED DBFB PROGRAM MANUAL SHUFFLE AUTO SUR NEXT REPEAT 1 PRESET DELETE CD TEXT PLUS ONE FILE HI-LIGHT TEXT DISC GROUP SYNC TRACK ART MONO STEP STEREO kHz 1 2 REC SLEEP MHz VOLUME DOLBY NR RELAY GROUP FILE 1 2 3 4 5 To check the setting Press TIMER SELECT and turn SELECTOR to select "TIMER OFF," then press ENTER. The starting time, the stopping time, and the preset radio station to...

Operating Instructions (primary manual)
Page 49
... the instructions of the tape deck and become dirty; - Troubleshooting If you haven't turned on the power (demonstration mode). • Press DISPLAY when the power is a decrease in the parts of the demagnetizing cassette. Clock setting (see "Step 4: Presetting radio stations" on page 10) - the sound is no sound. • Turn VOLUME clockwise. • The headphones are connected correctly and firmly. the sound drops out - the tape does not erase completely - Use...
... the instructions of the tape deck and become dirty; - Troubleshooting If you haven't turned on the power (demonstration mode). • Press DISPLAY when the power is a decrease in the parts of the demagnetizing cassette. Clock setting (see "Step 4: Presetting radio stations" on page 10) - the sound is no sound. • Turn VOLUME clockwise. • The headphones are connected correctly and firmly. the sound drops out - the tape does not erase completely - Use...
Operating Instructions (primary manual)
Page 50
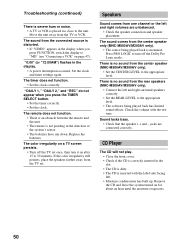
... built up. Speakers Sound comes from the TV set once, then turn it on after 15 to turn off the Dolby Pro Logic mode. jacks are unbalanced. • Check the speaker connection and speaker placement. The sound from the connected source is distorted. • If "VIDEO" appears in the display. • A power interruption occurred. "0:00" (or "12:00AM") flashes in the display when you press the TIMER SELECT button. • Set the timer...
... built up. Speakers Sound comes from the TV set once, then turn it on after 15 to turn off the Dolby Pro Logic mode. jacks are unbalanced. • Check the speaker connection and speaker placement. The sound from the connected source is distorted. • If "VIDEO" appears in the display. • A power interruption occurred. "0:00" (or "12:00AM") flashes in the display when you press the TIMER SELECT button. • Set the timer...

Operating Instructions (primary manual)
Page 51
... occur, reset the system as preset stations, clock, timer, and Disc Memo are magnetized. Press CONTINUE. Eject the tape and turn the power back on page 49). Demagnetize them (see "Demagnetizing the tape heads" on page 49). Connect the external antenna. A stereo FM program cannot be received in . 3 Press x, ENTER, and ?/1 at the same time. Additional Information 51 Noise increases or the high frequencies are...
... occur, reset the system as preset stations, clock, timer, and Disc Memo are magnetized. Press CONTINUE. Eject the tape and turn the power back on page 49). Demagnetize them (see "Demagnetizing the tape heads" on page 49). Connect the external antenna. A stereo FM program cannot be received in . 3 Press x, ENTER, and ?/1 at the same time. Additional Information 51 Noise increases or the high frequencies are...
Operating Instructions (primary manual)
Page 53
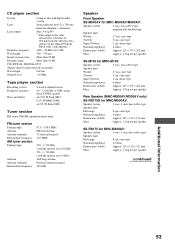
... optical connector jack, rear panel) Wavelength 660 nm Output Level -18 dBm Tape player section Recording system Frequency response Wow and flutter 4-track 2-channel stereo 40 - 13,000 Hz (±3 dB), using Sony TYPE I cassette ±0.15% W.Peak (IEC) 0.1% W.RMS (NAB) ±0.2% W.Peak (DIN) Tuner section FM stereo, FM/AM superheterodyne tuner FM tuner section Tuning range Antenna Antenna terminals Intermediate frequency AM tuner section Tuning range Antenna Antenna terminals Intermediate frequency 87.5 - 108.0 MHz FM lead antenna 75 ohm...
... optical connector jack, rear panel) Wavelength 660 nm Output Level -18 dBm Tape player section Recording system Frequency response Wow and flutter 4-track 2-channel stereo 40 - 13,000 Hz (±3 dB), using Sony TYPE I cassette ±0.15% W.Peak (IEC) 0.1% W.RMS (NAB) ±0.2% W.Peak (DIN) Tuner section FM stereo, FM/AM superheterodyne tuner FM tuner section Tuning range Antenna Antenna terminals Intermediate frequency AM tuner section Tuning range Antenna Antenna terminals Intermediate frequency 87.5 - 108.0 MHz FM lead antenna 75 ohm...

Operating Instructions (primary manual)
Page 55
... Power Saving Mode 11 Presetting radio stations 10 Preset tuning 17 Program Play 25 Protecting recordings 48 R Radio stations presetting 10 tuning in 17 Recording a CD 16 a radio program 19 timer recording 43 Repeat Play 23 Resetting the system 51 S Saving recordings 48 Selecting the audio emphasis 38 Setting the time 9 Shuffle Play 24 Sleep Timer 41 Sound adjustment 37 Speakers 4, 7, 45 Surround 39, 40 T, U, V, W, X, Y, Z Test tone 8 Timer falling asleep to music 41 timer recording 43 waking up to music 41 Troubleshooting...
... Power Saving Mode 11 Presetting radio stations 10 Preset tuning 17 Program Play 25 Protecting recordings 48 R Radio stations presetting 10 tuning in 17 Recording a CD 16 a radio program 19 timer recording 43 Repeat Play 23 Resetting the system 51 S Saving recordings 48 Selecting the audio emphasis 38 Setting the time 9 Shuffle Play 24 Sleep Timer 41 Sound adjustment 37 Speakers 4, 7, 45 Surround 39, 40 T, U, V, W, X, Y, Z Test tone 8 Timer falling asleep to music 41 timer recording 43 waking up to music 41 Troubleshooting...


