Operating Instructions
Page 2
... of electric shock to constitute a risk of the following measures: - Note to CATV system installer: This reminder is intended to alert the user to the presence of uninsulated "dangerous... instructions in the literature accompanying the appliance. As an ENERGY STAR® partner, Sony Corporation has determined that this equipment does cause harmful interference to radio or television reception... to which can radiate radio frequency energy and, if not installed and used in this manual could void your authority to the point of the FCC Rules. Increase the separation between the...
... of electric shock to constitute a risk of the following measures: - Note to CATV system installer: This reminder is intended to alert the user to the presence of uninsulated "dangerous... instructions in the literature accompanying the appliance. As an ENERGY STAR® partner, Sony Corporation has determined that this equipment does cause harmful interference to radio or television reception... to which can radiate radio frequency energy and, if not installed and used in this manual could void your authority to the point of the FCC Rules. Increase the separation between the...
Operating Instructions
Page 3
...system 6 Inserting two size AA (R6) batteries into the remote 8 Setting the clock 8 CD Loading a CD 9 Playing a CD - Table of Contents List of Button Locations and Reference Pages Main unit 4 Remote Control 5 Getting Started Hooking up to music - Program Play 11 Labeling a CD - Preset Tuning/ Manual... 14 Listening to a tape - Normal Play/Shuffle Play/ Repeat Play 10 Programing CD tracks - CD Synchro Recording/ Recording Manually/ Program Edit 18 Timer-recording radio programs ......... 19 Sound Adjustment Adjusting the sound - GROOVE/SURROUND .......... 20 Selecting the sound...
...system 6 Inserting two size AA (R6) batteries into the remote 8 Setting the clock 8 CD Loading a CD 9 Playing a CD - Table of Contents List of Button Locations and Reference Pages Main unit 4 Remote Control 5 Getting Started Hooking up to music - Program Play 11 Labeling a CD - Preset Tuning/ Manual... 14 Listening to a tape - Normal Play/Shuffle Play/ Repeat Play 10 Programing CD tracks - CD Synchro Recording/ Recording Manually/ Program Edit 18 Timer-recording radio programs ......... 19 Sound Adjustment Adjusting the sound - GROOVE/SURROUND .......... 20 Selecting the sound...
Operating Instructions
Page 14
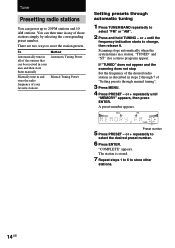
.... 14US The station is stored. 7 Repeat steps 1 to 6 to select the desired preset number. 6 Press ENTER. "TUNED" and "ST" (for a stereo program) appear. or + until "MEMORY" appears, then press ENTER. If "TUNED" does not appear and the scanning does not stop Set the frequency of the... in a station. Tuner Presetting radio stations You can preset up to store the station presets. Scanning stops automatically when the system tunes in your favorite stations Method Automatic Tuning Preset Manual Tuning Preset Setting presets through manual tuning". 3 Press MENU. 4 Press PRESET -
.... 14US The station is stored. 7 Repeat steps 1 to 6 to select the desired preset number. 6 Press ENTER. "TUNED" and "ST" (for a stereo program) appear. or + until "MEMORY" appears, then press ENTER. If "TUNED" does not appear and the scanning does not stop Set the frequency of the... in a station. Tuner Presetting radio stations You can preset up to store the station presets. Scanning stops automatically when the system tunes in your favorite stations Method Automatic Tuning Preset Manual Tuning Preset Setting presets through manual tuning". 3 Press MENU. 4 Press PRESET -

Operating Instructions
Page 15
... with a weak "Setting presets through manual tuning 1 Press TUNER/BAND repeatedly to 9 kHz (10 kHz in some areas). or + repeatedly to store other stations. Stop setting presets Press MENU. Note You cannot change the AM tuning interval, tune in any AM station first, then turn the system back on. A preset number appears...
... with a weak "Setting presets through manual tuning 1 Press TUNER/BAND repeatedly to 9 kHz (10 kHz in some areas). or + repeatedly to store other stations. Stop setting presets Press MENU. Note You cannot change the AM tuning interval, tune in any AM station first, then turn the system back on. A preset number appears...
Operating Instructions
Page 16
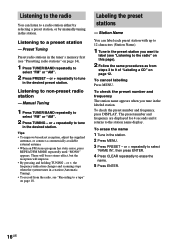
... Listening to a preset station - There will be no stereo effect, but the reception will improve. • By pressing and holding TUNING - To check the preset number and frequency, press DISPLAY. Listening to non-preset radio station - Manual Tuning 1 Press TUNER/BAND repeatedly to the station name ...Follow the same procedures as from the radio, see "Presetting radio stations" on page 12. or +, the frequency indication changes and scanning stops when the system tunes in a station (Automatic Tuning). • To record from steps 3 to 9 of "Labeling a CD" on page 14). 1 Press TUNER/...
... Listening to a preset station - There will be no stereo effect, but the reception will improve. • By pressing and holding TUNING - To check the preset number and frequency, press DISPLAY. Listening to non-preset radio station - Manual Tuning 1 Press TUNER/BAND repeatedly to the station name ...Follow the same procedures as from the radio, see "Presetting radio stations" on page 12. or +, the frequency indication changes and scanning stops when the system tunes in a station (Automatic Tuning). • To record from steps 3 to 9 of "Labeling a CD" on page 14). 1 Press TUNER/...
Operating Instructions
Page 18
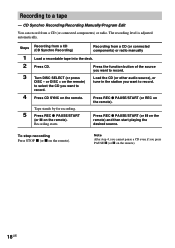
... desired source. Note After step 4, you cannot pause a CD even if you want to record. CD Synchro Recording/Recording Manually/Program Edit You can record from a CD (or connected components) or radio manually Load a recordable tape into the deck. Press REC z PAUSE/START (or X on the remote). The recording level is adjusted...
... desired source. Note After step 4, you cannot pause a CD even if you want to record. CD Synchro Recording/Recording Manually/Program Edit You can record from a CD (or connected components) or radio manually Load a recordable tape into the deck. Press REC z PAUSE/START (or X on the remote). The recording level is adjusted...

Operating Instructions
Page 25
...to VIDEO. • If you enable the MD function, just press VIDEO (MD). See "Hooking up optional components" on page 24. 2 Start recording manually. To switch the VIDEO function to MD When you listen to MD. See "Hooking up optional components" on page 18. The function switches to a ...connected MD deck, perform the following operation. 1 Turn off the system. 2 Press VIDEO (MD) while holding down STOP x. See "Recording to a tape" on page 24. 2 Press VIDEO (MD) to select "VIDEO" or "MD"....
...to VIDEO. • If you enable the MD function, just press VIDEO (MD). See "Hooking up optional components" on page 24. 2 Start recording manually. To switch the VIDEO function to MD When you listen to MD. See "Hooking up optional components" on page 18. The function switches to a ...connected MD deck, perform the following operation. 1 Turn off the system. 2 Press VIDEO (MD) while holding down STOP x. See "Recording to a tape" on page 24. 2 Press VIDEO (MD) to select "VIDEO" or "MD"....
Marketing Specifications
Page 2
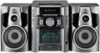
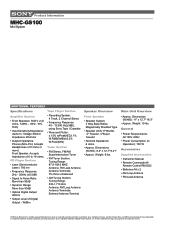
...trademark of their respective owners. Weight: 19 lbs. Product Information MHC-GS100 Mini System ADDITIONAL FEATURES Specifications Amplifier Section • Front Speakers: 50W x ...Tape Player Section • Recording System: 4 Track, 2 Channel Stereo • Frequency Response: 40 - 13,000 Hz(±3dB), using Sony Type I Cassette • ...Sony. All rights reserved. Sony, CineMotion, Hi-Scan, Jog Dial, Precision Drive, and WEGA are property of Digital Theater Systems, Inc. Reproduction in whole or in Operation): 100 W Accessories Supplied Accessories • Instruction Manual...
...trademark of their respective owners. Weight: 19 lbs. Product Information MHC-GS100 Mini System ADDITIONAL FEATURES Specifications Amplifier Section • Front Speakers: 50W x ...Tape Player Section • Recording System: 4 Track, 2 Channel Stereo • Frequency Response: 40 - 13,000 Hz(±3dB), using Sony Type I Cassette • ...Sony. All rights reserved. Sony, CineMotion, Hi-Scan, Jog Dial, Precision Drive, and WEGA are property of Digital Theater Systems, Inc. Reproduction in whole or in Operation): 100 W Accessories Supplied Accessories • Instruction Manual...

