
Primary User Manual
Page 1
Model No. Refer to them whenever you call upon your Sony dealer regarding this product. MHC-G101 Serial No f MHC-G101 ©1997 by Sony Corporation MHC-G101. 3-859-547-13. EN 3-859-547-13(1) Compact-Hi-Fi Stereo System Operating Instructions F Owner's Record The model and serial numbers are located on the rear panel. Record the serial number in the space provided below.
Model No. Refer to them whenever you call upon your Sony dealer regarding this product. MHC-G101 Serial No f MHC-G101 ©1997 by Sony Corporation MHC-G101. 3-859-547-13. EN 3-859-547-13(1) Compact-Hi-Fi Stereo System Operating Instructions F Owner's Record The model and serial numbers are located on the rear panel. Record the serial number in the space provided below.

Primary User Manual
Page 2
... not install the appliance in a confined space, such as practical. Consult the dealer or an experienced radio/TV technician for a Class B digital device, pursuant to Part 15 of optical instruments with the instructions, may be of sufficient magnitude to provide reasonable protection against harmful interference in cabinet. MHC-G101. 3-859-547-13. S. NO USER-SERVICEABLE PARTS INSIDE. Reorient or relocate the receiving antenna. - CAUTION...
... not install the appliance in a confined space, such as practical. Consult the dealer or an experienced radio/TV technician for a Class B digital device, pursuant to Part 15 of optical instruments with the instructions, may be of sufficient magnitude to provide reasonable protection against harmful interference in cabinet. MHC-G101. 3-859-547-13. S. NO USER-SERVICEABLE PARTS INSIDE. Reorient or relocate the receiving antenna. - CAUTION...

Primary User Manual
Page 3
... Contents Getting Started Step 1: Hooking up the system 4 Step 2: Setting the time 5 Step 3: Presetting radio stations .......... 6 Connecting optional outdoor antenna 7 Basic Operations Playing a CD 8 Recording a CD 9 Listening to the radio 10 Recording from the radio 11 Playing a tape 12 Recording from a tape 13 The CD Player Playing the CD tracks repeatedly ...... 14 Playing the CD tracks in random order 15 Programming the CD tracks 15 Playing only the beginning of each...
... Contents Getting Started Step 1: Hooking up the system 4 Step 2: Setting the time 5 Step 3: Presetting radio stations .......... 6 Connecting optional outdoor antenna 7 Basic Operations Playing a CD 8 Recording a CD 9 Listening to the radio 10 Recording from the radio 11 Playing a tape 12 Recording from a tape 13 The CD Player Playing the CD tracks repeatedly ...... 14 Playing the CD tracks in random order 15 Programming the CD tracks 15 Playing only the beginning of each...
Primary User Manual
Page 4
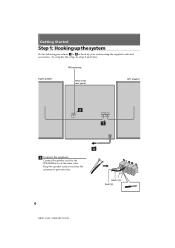
Getting Started Step 1: Hooking up your system using the supplied cords and accessories. To complete the setup, do steps 2 and 3 also. FM antenna Right speaker MHC-G101 rear panel Left speaker 1 Connect the speakers. Keep the speaker cords away from the antennas to hook up the system Do the following procedures 1 to 3 to prevent noise. 4 MHC-G101. 3-859-547-13. EN Black (') Red (') Connect the speaker cords to the SPEAKER jacks of the same color .
Getting Started Step 1: Hooking up your system using the supplied cords and accessories. To complete the setup, do steps 2 and 3 also. FM antenna Right speaker MHC-G101 rear panel Left speaker 1 Connect the speakers. Keep the speaker cords away from the antennas to hook up the system Do the following procedures 1 to 3 to prevent noise. 4 MHC-G101. 3-859-547-13. EN Black (') Red (') Connect the speaker cords to the SPEAKER jacks of the same color .
Primary User Manual
Page 5
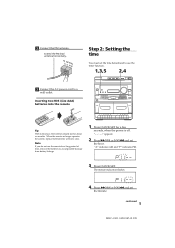
2 Connect the FM antenna. When the remote no longer operates the system, replace both batteries with new ones. The minute indication flashes. 4 Press )± or ≠0 and set the hour. EN Note If you do not use the timer function. 1,3,5 2,4 3 Connect the AC power cord to avoid possible damage from battery leakage. 1 Press CLOCK SET for about six months. continued 5 MHC-G101. 3-859-547-13. Extend the...
2 Connect the FM antenna. When the remote no longer operates the system, replace both batteries with new ones. The minute indication flashes. 4 Press )± or ≠0 and set the hour. EN Note If you do not use the timer function. 1,3,5 2,4 3 Connect the AC power cord to avoid possible damage from battery leakage. 1 Press CLOCK SET for about six months. continued 5 MHC-G101. 3-859-547-13. Extend the...

Primary User Manual
Page 6
... 12 1 Press TUNER/BAND repeatedly until the band you press the button, the band changes as follows: FM ˜AM 2 Press )± or ≠0 for a stereo program) appear. 3 Press MEMORY. The frequency indication changes and scanning stops when the system tunes in the display. To check the clock when the power is displayed for five seconds. To light up to 30 stations. 4 3,5 6 MHC-G101. 3-859-547...
... 12 1 Press TUNER/BAND repeatedly until the band you press the button, the band changes as follows: FM ˜AM 2 Press )± or ≠0 for a stereo program) appear. 3 Press MEMORY. The frequency indication changes and scanning stops when the system tunes in the display. To check the clock when the power is displayed for five seconds. To light up to 30 stations. 4 3,5 6 MHC-G101. 3-859-547...
Primary User Manual
Page 7
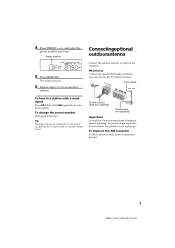
... AC power cord or if a power failure occurs. 75-ohm coaxial cable (not supplied) Ground wire (not supplied) Important Ground the external antenna from step 1. Preset number TUNED PRESET EQ FLAT ROCK POPS JAZZ MHz 5 Press MEMORY. You can also use the TV antenna instead. FM A7N5TE0NHNMA Screw clamp ANT GND To tune in the station. 4 Press PRESET + or - The station is weak, rotate or reposition the unit. 7 MHC-G101...
... AC power cord or if a power failure occurs. 75-ohm coaxial cable (not supplied) Ground wire (not supplied) Important Ground the external antenna from step 1. Preset number TUNED PRESET EQ FLAT ROCK POPS JAZZ MHz 5 Press MEMORY. You can also use the TV antenna instead. FM A7N5TE0NHNMA Screw clamp ANT GND To tune in the station. 4 Press PRESET + or - The station is weak, rotate or reposition the unit. 7 MHC-G101...

Primary User Manual
Page 8
Turn VOLUME (or press VOL + or - Track number 1 23 DISC PRESET EQ FLAT ROCK POPS JAZZ Disc tray number Playing time 8 MHC-G101. 3-859-547-13. Press )± or ≠0 (or + or = on the remote). Press DISC 1 - 3 or DISC SKIP. on the remote). Press §. To place the third disc, press DISC SKIP to rotate the disc tray. 2 Press ·P. EN Press ·P. To Stop play . Press again to resume...
Turn VOLUME (or press VOL + or - Track number 1 23 DISC PRESET EQ FLAT ROCK POPS JAZZ Disc tray number Playing time 8 MHC-G101. 3-859-547-13. Press )± or ≠0 (or + or = on the remote). Press DISC 1 - 3 or DISC SKIP. on the remote). Press §. To place the third disc, press DISC SKIP to rotate the disc tray. 2 Press ·P. EN Press ·P. To Stop play . Press again to resume...

Primary User Manual
Page 9
... a blank tape into deck A. Basic Operations 9 MHC-G101. 3-859-547-13. Recording a CD Use a TYPE I (normal) tape. 6p 4 2,3 2 Press § and insert a CD on the CD player. To stop recording Press p6 on deck A and p on the disc tray. EN Recording starts. 6 Press ·P. When you want to record on facing forward 3 Press §. Note You cannot listen to select a CD...
... a blank tape into deck A. Basic Operations 9 MHC-G101. 3-859-547-13. Recording a CD Use a TYPE I (normal) tape. 6p 4 2,3 2 Press § and insert a CD on the CD player. To stop recording Press p6 on deck A and p on the disc tray. EN Recording starts. 6 Press ·P. When you want to record on facing forward 3 Press §. Note You cannot listen to select a CD...
Primary User Manual
Page 10
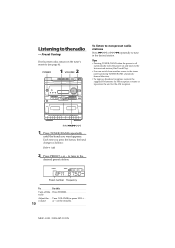
... press the button, the band changes as follows: FM˜ AM 2 Press PRESET + or - radio Adjust the volume 10 Turn VOLUME (or press VOL + or - EN on and tunes to the last received station (One Touch Play). • You can switch from another source to the radio -- PRESET TUNED PRESET EQ FLAT ROCK POPS JAZZ MHz Preset number Frequency To Do this Turn off automatically turns the power on the remote). Preset Tuning Firstly preset radio stations in the desired preset station.
... press the button, the band changes as follows: FM˜ AM 2 Press PRESET + or - radio Adjust the volume 10 Turn VOLUME (or press VOL + or - EN on and tunes to the last received station (One Touch Play). • You can switch from another source to the radio -- PRESET TUNED PRESET EQ FLAT ROCK POPS JAZZ MHz Preset number Frequency To Do this Turn off automatically turns the power on the remote). Preset Tuning Firstly preset radio stations in the desired preset station.

Primary User Manual
Page 11
... station. • If noise is heard while recording an AM radio, rotate or reposition the unit. Tips • To record non-preset stations, press )± or ≠0 repeatedly to select the band you want . 2 Press PRESET + or - Basic Operations 43 1 Press TUNER/BAND to tune in a preset station. 3 Press p6 and insert a blank tape into deck A. Recording from the radio You can record the radio program...
... station. • If noise is heard while recording an AM radio, rotate or reposition the unit. Tips • To record non-preset stations, press )± or ≠0 repeatedly to select the band you want . 2 Press PRESET + or - Basic Operations 43 1 Press TUNER/BAND to tune in a preset station. 3 Press p6 and insert a blank tape into deck A. Recording from the radio You can record the radio program...

Primary User Manual
Page 12
... same time, you want to one side of the tape ends. 12 MHC-G101. 3-859-547-13. Press p6 then press ). Playing a tape Use a TYPE I (normal) tape. 2 VOLUME 31 0) P 1 Press p6 and insert a recorded tape in the display. 3 Press ·. To Stop play ) You can listen to play facing forward To play both decks in succession. With the side you 'll hear the sound from deck B. 2 Press TAPE.
... same time, you want to one side of the tape ends. 12 MHC-G101. 3-859-547-13. Press p6 then press ). Playing a tape Use a TYPE I (normal) tape. 2 VOLUME 31 0) P 1 Press p6 and insert a recorded tape in the display. 3 Press ·. To Stop play ) You can listen to play facing forward To play both decks in succession. With the side you 'll hear the sound from deck B. 2 Press TAPE.
Primary User Manual
Page 13
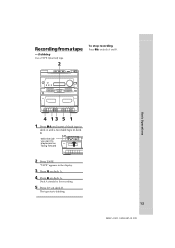
"TAPE" appears in deck B. EN Dubbing Use a TYPE I (normal) tape. 2 To stop recording Press p6 on deck A. With the side you want to play/record on deck B. Recording from a tape - Basic Operations 4 13 5 1 1 Press p6 and insert a blank tape in deck A and a recorded tape in the display. 3 Press P on deck A. 4 Press r on deck A and B. Deck A stands by for recording. 5 Press · on facing forward 2 Press TAPE. The tape starts dubbing. 13 MHC-G101. 3-859-547-13.
"TAPE" appears in deck B. EN Dubbing Use a TYPE I (normal) tape. 2 To stop recording Press p6 on deck A. With the side you want to play/record on deck B. Recording from a tape - Basic Operations 4 13 5 1 1 Press p6 and insert a blank tape in deck A and a recorded tape in the display. 3 Press P on deck A. 4 Press r on deck A and B. Deck A stands by for recording. 5 Press · on facing forward 2 Press TAPE. The tape starts dubbing. 13 MHC-G101. 3-859-547-13.

Primary User Manual
Page 15
..." disappears. continued 15 MHC-G101. 3-859-547-13. Shuffle Play You can play in random order -- "SHUFFLE" appears, then all the tracks play all CDs in the order you press DISC SKIP while shuffle play by displaying "SHUFFLE". • To skip a track, press )±. Note You cannot select a CD even if you want them to select a CD. EN "PROGRAM" appears. 3 Press...
..." disappears. continued 15 MHC-G101. 3-859-547-13. Shuffle Play You can play in random order -- "SHUFFLE" appears, then all the tracks play all CDs in the order you press DISC SKIP while shuffle play by displaying "SHUFFLE". • To skip a track, press )±. Note You cannot select a CD even if you want them to select a CD. EN "PROGRAM" appears. 3 Press...

Primary User Manual
Page 19
... function Press SLEEP repeatedly until "SLEEP" disappears. 4,5 1 Prepare the music source you can let the system turn off ) To check the remaining time Press SLEEP once. EN Make sure you want to start play . • CD: Place a CD. • Radio: Tune in a station (see page 5). Press )± or ≠0 to set the clock (see page 10). 2 Turn VOLUME to adjust the sound volume. 3 Press TIMER SET. 4 Set the time...
... function Press SLEEP repeatedly until "SLEEP" disappears. 4,5 1 Prepare the music source you can let the system turn off ) To check the remaining time Press SLEEP once. EN Make sure you want to start play . • CD: Place a CD. • Radio: Tune in a station (see page 5). Press )± or ≠0 to set the clock (see page 10). 2 Turn VOLUME to adjust the sound volume. 3 Press TIMER SET. 4 Set the time...

Primary User Manual
Page 21
... system. Very humid - If you have the component checked by the plug. These may get entangled in locations where it is; - Otherwise the tape may condense on the lens inside the CD player. continued 21 MHC-G101. 3-859-547-13. Never pull the cord itself has been turned off the cassette tab from the AC power source (mains) as long as play...
... system. Very humid - If you have the component checked by the plug. These may get entangled in locations where it is; - Otherwise the tape may condense on the lens inside the CD player. continued 21 MHC-G101. 3-859-547-13. Never pull the cord itself has been turned off the cassette tab from the AC power source (mains) as long as play...
Primary User Manual
Page 22
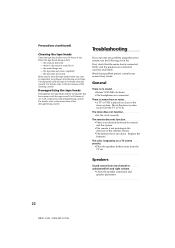
... instructions of use. Replace the batteries. Speakers Sound comes from the TV set. Troubleshooting If you start an important recording or after every 10 hours of the cleaning cassette. The color irregularity on a TV screen persists. •Place the speakers farther away from one channel or unbalanced left and right volume. •Check the speaker connection and speaker placement. 22 MHC-G101. 3-859-547-13. the sound...
... instructions of use. Replace the batteries. Speakers Sound comes from the TV set. Troubleshooting If you start an important recording or after every 10 hours of the cleaning cassette. The color irregularity on a TV screen persists. •Place the speakers farther away from one channel or unbalanced left and right volume. •Check the speaker connection and speaker placement. 22 MHC-G101. 3-859-547-13. the sound...

Primary User Manual
Page 23
... "STEREO" flashes in program or shuffle mode. Therefore there may be a case where the system does not operate properly if the condition of its performance by using built-in microcomputer chips. If the system still does not operate properly, consult your nearest Sony dealer. 23 MHC-G101. 3-859-547-13. Press SHUFFLE or PROGRAM so that "SHUFFLE" or "PROGRAM" disappears. In such a case, turn the system's power...
... "STEREO" flashes in program or shuffle mode. Therefore there may be a case where the system does not operate properly if the condition of its performance by using built-in microcomputer chips. If the system still does not operate properly, consult your nearest Sony dealer. 23 MHC-G101. 3-859-547-13. Press SHUFFLE or PROGRAM so that "SHUFFLE" or "PROGRAM" disappears. In such a case, turn the system's power...

Primary User Manual
Page 24
... parts and controls Approx. 2.5 kg (5 lb 8 oz) net per channel minimum RMS power, with 7 mm aperture. 40 Hz - 16 kHz (±0.5 dB) Tape player section Recording system Frequency response Wow and flutter 4-track 2-channel stereo 60 - 13,000 Hz (±3 dB), using Sony TYPE I cassette 0.1% WRMS ±0.3% (DIN) Tuner section FM stereo, FM/AM superheterodyne tuner FM tuner section Tuning range 87.5 - 108.0 MHz Antenna FM lead antenna Antenna terminals 75 ohm...
... parts and controls Approx. 2.5 kg (5 lb 8 oz) net per channel minimum RMS power, with 7 mm aperture. 40 Hz - 16 kHz (±0.5 dB) Tape player section Recording system Frequency response Wow and flutter 4-track 2-channel stereo 60 - 13,000 Hz (±3 dB), using Sony TYPE I cassette 0.1% WRMS ±0.3% (DIN) Tuner section FM stereo, FM/AM superheterodyne tuner FM tuner section Tuning range 87.5 - 108.0 MHz Antenna FM lead antenna Antenna terminals 75 ohm...

Primary User Manual
Page 25
... tracks in the desired order (Program Play) 15 tracks repeatedly (Repeat Play) 14 Preset equalizer menu 18 Presetting radio stations 6 Preset tuning 10 Program Play 15 Protecting recordings 21 R Radio stations presetting 6 tuning in 10 Recording a CD 9 a radio program 11 a tape 13 Repeat Play 14 S Saving recordings 21 Setting the time 5 Shuffle Play 15 Sleep Timer 19 Sound adjustment 18 Speakers 4 T, U, V Timer falling asleep to music 19 waking up to music 19 Troubleshooting 22 Tuner 6, 10, 11 W, X, Y, Z Wake-up the antenna 5, 7 the power 5 the system 4 M, N M.
... tracks in the desired order (Program Play) 15 tracks repeatedly (Repeat Play) 14 Preset equalizer menu 18 Presetting radio stations 6 Preset tuning 10 Program Play 15 Protecting recordings 21 R Radio stations presetting 6 tuning in 10 Recording a CD 9 a radio program 11 a tape 13 Repeat Play 14 S Saving recordings 21 Setting the time 5 Shuffle Play 15 Sleep Timer 19 Sound adjustment 18 Speakers 4 T, U, V Timer falling asleep to music 19 waking up to music 19 Troubleshooting 22 Tuner 6, 10, 11 W, X, Y, Z Wake-up the antenna 5, 7 the power 5 the system 4 M, N M.

