Operating Instructions
Page 5
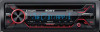
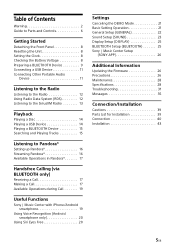
...19 Useful Functions Sony | Music Center with iPhone/Android smartphone 19 Using Voice Recognition (Android smartphone only 20 Using Siri Eyes Free 20 Settings Canceling the DEMO Mode 21 Basic Setting Operation 21 General Setup (GENERAL 22 Sound Setup (SOUND 23 Display Setup (DISPLAY 25 BLUETOOTH Setup (BLUETOOTH 25 Sony | Music Center Setup (SONY APP 26 Additional Information Updating the Firmware 26 Precautions 26 Maintenance 28 Specifications 28 Troubleshooting 31 Messages 35 Connection/Installation Cautions 39 Parts List for Installation 39 Connection 40 Installation 43...
...19 Useful Functions Sony | Music Center with iPhone/Android smartphone 19 Using Voice Recognition (Android smartphone only 20 Using Siri Eyes Free 20 Settings Canceling the DEMO Mode 21 Basic Setting Operation 21 General Setup (GENERAL 22 Sound Setup (SOUND 23 Display Setup (DISPLAY 25 BLUETOOTH Setup (BLUETOOTH 25 Sony | Music Center Setup (SONY APP 26 Additional Information Updating the Firmware 26 Precautions 26 Maintenance 28 Specifications 28 Troubleshooting 31 Messages 35 Connection/Installation Cautions 39 Parts List for Installation 39 Connection 40 Installation 43...

Operating Instructions
Page 6
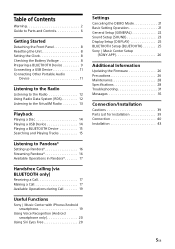
... mode or iPod is turned off the power and the display. Press and hold for more than 2 seconds to adjust the volume. Press and hold for 1 second to Parts and Controls Main unit Front panel removed (inner panel) Front panel release button SRC (source) Turn on the power. If the unit is connected.) CALL Enter the call . Receive/end a call menu. PUSH ENTER Enter the selected item. Change...
... mode or iPod is turned off the power and the display. Press and hold for more than 2 seconds to adjust the volume. Press and hold for 1 second to Parts and Controls Main unit Front panel removed (inner panel) Front panel release button SRC (source) Turn on the power. If the unit is connected.) CALL Enter the call . Receive/end a call menu. PUSH ENTER Enter the selected item. Change...
Operating Instructions
Page 7
... change the EXTRA BASS setting: [1], [2], [OFF]. AUX input jack DSPL (display) Change display items. SCRL (scroll) Press and hold to scroll a display item. USB port RESET (inner panel) (page 8) RM-X231 Remote commander The VOL (volume) + button has a tactile dot. CALL Enter the call . SOUND Open the SOUND menu directly. Press and hold to skip albums continuously. (Not available when a USB device in synchronization with the volume level...
... change the EXTRA BASS setting: [1], [2], [OFF]. AUX input jack DSPL (display) Change display items. SCRL (scroll) Press and hold to scroll a display item. USB port RESET (inner panel) (page 8) RM-X231 Remote commander The VOL (volume) + button has a tactile dot. CALL Enter the call . SOUND Open the SOUND menu directly. Press and hold to skip albums continuously. (Not available when a USB device in synchronization with the volume level...
Operating Instructions
Page 10
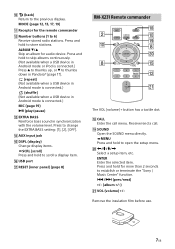
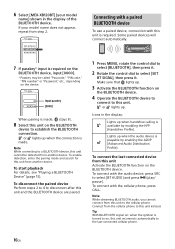
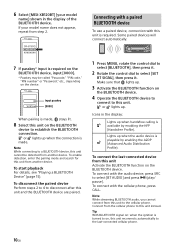
... With BLUETOOTH signal on: when the ignition is turned to on, this unit. Make sure that lights up. 3 Activate the BLUETOOTH function on the BLUETOOTH device. 4 Operate the BLUETOOTH device to connect to this unit cannot be called "Passcode," "PIN code," "PIN number" or "Password," etc., depending on the device. Connect from another device. or lights up. 6 Select [MEX-XB120BT] (your model name does...
... With BLUETOOTH signal on: when the ignition is turned to on, this unit. Make sure that lights up. 3 Activate the BLUETOOTH function on the BLUETOOTH device. 4 Operate the BLUETOOTH device to connect to this unit cannot be called "Passcode," "PIN code," "PIN number" or "Password," etc., depending on the device. Connect from another device. or lights up. 6 Select [MEX-XB120BT] (your model name does...
Operating Instructions
Page 11
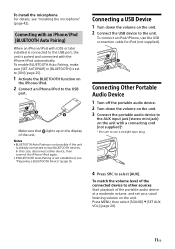
... connect an iPod/iPhone, use a straight type plug. 4 Press SRC to the unit. Connecting Other Portable Audio Device 1 Turn off the portable audio device. 2 Turn down the volume on the unit with a connecting cord (not supplied)*. * Be sure to use the USB connection cable for iPod (not supplied). Press MENU, then select [SOUND] [SET AUX VOL] (page 24). 11GB To enable BLUETOOTH Auto Pairing, make sure [SET AUTOPAIR] in [BLUETOOTH] is connected to the USB port. Connecting...
... connect an iPod/iPhone, use a straight type plug. 4 Press SRC to the unit. Connecting Other Portable Audio Device 1 Turn off the portable audio device. 2 Turn down the volume on the unit with a connecting cord (not supplied)*. * Be sure to use the USB connection cable for iPod (not supplied). Press MENU, then select [SOUND] [SET AUX VOL] (page 24). 11GB To enable BLUETOOTH Auto Pairing, make sure [SET AUTOPAIR] in [BLUETOOTH] is connected to the USB port. Connecting...

Operating Instructions
Page 22
... control) Selects the input mode of the connected remote control. CUSTOM (custom) Input mode for the steering wheel remote control PRESET (preset) Input mode for the wired remote control excluding the steering wheel remote control EDIT CUSTOM (edit custom) Registers the functions (SOURCE, ATT, VOL +/-, SEEK +/-, VOICE, ON HOOK, OFF HOOK) to the steering wheel remote control: Rotate the control dial to select the function you want to assign the function to [CUSTOM].) RESET CUSTOM (reset custom) Resets the setting of your car before use...
... control) Selects the input mode of the connected remote control. CUSTOM (custom) Input mode for the steering wheel remote control PRESET (preset) Input mode for the wired remote control excluding the steering wheel remote control EDIT CUSTOM (edit custom) Registers the functions (SOURCE, ATT, VOL +/-, SEEK +/-, VOICE, ON HOOK, OFF HOOK) to the steering wheel remote control: Rotate the control dial to select the function you want to assign the function to [CUSTOM].) RESET CUSTOM (reset custom) Resets the setting of your car before use...

Operating Instructions
Page 23
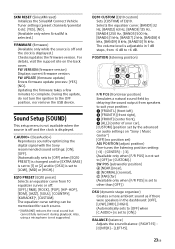
... not supported. FW VERSION (firmware version) Displays current firmware version. During the update, do not turn the ignition to complete. C.AUDIO+ (ClearAudio+) Reproduces sound by optimizing the digital signal with the Sony recommended sound settings: [ON], [OFF]. (Automatically sets to [OFF] when [EQ10 PRESET] is changed and/or [EXTRA BASS] is set to [1] or [2] and/or [DSO] is set to [LOW], [MID] or [HIGH].) EQ10 PRESET (EQ10 preset) Selects an equalizer curve from speakers to...
... not supported. FW VERSION (firmware version) Displays current firmware version. During the update, do not turn the ignition to complete. C.AUDIO+ (ClearAudio+) Reproduces sound by optimizing the digital signal with the Sony recommended sound settings: [ON], [OFF]. (Automatically sets to [OFF] when [EQ10 PRESET] is changed and/or [EXTRA BASS] is set to [1] or [2] and/or [DSO] is set to [LOW], [MID] or [HIGH].) EQ10 PRESET (EQ10 preset) Selects an equalizer curve from speakers to...
Operating Instructions
Page 24
... direct connection) Adjusts the settings for each source other rear speaker lead. SW MODE (subwoofer mode) Selects the subwoofer mode: [1], [2], [3], [OFF]. HPF SLOP (high pass filter slope) Selects the HPF slope (effective only when [HPF FREQ] is displayed at the lowest setting.) SW PHASE (subwoofer phase) Selects the subwoofer phase: [NORM], [REV]. DSEE (digital sound enhancement engine) Improves digitally compressed sound by applying a low pass filter setting to [OFF].) RBE MODE (rear bass enhancer mode) Selects the rear bass enhancer mode: [1], [2], [3], [OFF]. LPF FREQ (low pass...
... direct connection) Adjusts the settings for each source other rear speaker lead. SW MODE (subwoofer mode) Selects the subwoofer mode: [1], [2], [3], [OFF]. HPF SLOP (high pass filter slope) Selects the HPF slope (effective only when [HPF FREQ] is displayed at the lowest setting.) SW PHASE (subwoofer phase) Selects the subwoofer phase: [NORM], [REV]. DSEE (digital sound enhancement engine) Improves digitally compressed sound by applying a low pass filter setting to [OFF].) RBE MODE (rear bass enhancer mode) Selects the rear bass enhancer mode: [1], [2], [3], [OFF]. LPF FREQ (low pass...

Operating Instructions
Page 26
... selected, "Sony | Music Center" will not operate properly. When [ON] is displayed.) Sony | Music Center Setup (SONY APP) AUTO LAUNCH (auto launch) Activates the "Sony | Music Center" auto launch: [ON], [OFF]. During the update, do not turn the ignition to dry out; To maintain high sound quality Do not splash liquid onto the unit or discs. CONNECT (connect) (page 19) Establish and terminate "Sony | Music Center" function (connection). 26GB Additional Information Updating the Firmware To update the firmware, visit the support...
... selected, "Sony | Music Center" will not operate properly. When [ON] is displayed.) Sony | Music Center Setup (SONY APP) AUTO LAUNCH (auto launch) Activates the "Sony | Music Center" auto launch: [ON], [OFF]. During the update, do not turn the ignition to dry out; To maintain high sound quality Do not splash liquid onto the unit or discs. CONNECT (connect) (page 19) Establish and terminate "Sony | Music Center" function (connection). 26GB Additional Information Updating the Firmware To update the firmware, visit the support...

Operating Instructions
Page 29
Power amplifier section Output: Speaker outputs Speaker impedance: 4 Ω - 8 Ω Maximum power output: 100 W × 4 (at 4 Ω) General Outputs: Audio outputs terminal: FRONT, REAR, SUB Power antenna (aerial)/Power amplifier control terminal (REM OUT) Inputs: SiriusXM input terminal Remote controller input terminal Antenna (aerial) input terminal MIC input terminal AUX input jack (stereo mini jack) USB port Power requirements: 12 V DC car battery (negative ground (earth)) Rated current consumption: 10 A Dimensions: Approx. 178 mm × 50 mm × 178 mm (7 1/8 in × 2 in &#...
Power amplifier section Output: Speaker outputs Speaker impedance: 4 Ω - 8 Ω Maximum power output: 100 W × 4 (at 4 Ω) General Outputs: Audio outputs terminal: FRONT, REAR, SUB Power antenna (aerial)/Power amplifier control terminal (REM OUT) Inputs: SiriusXM input terminal Remote controller input terminal Antenna (aerial) input terminal MIC input terminal AUX input jack (stereo mini jack) USB port Power requirements: 12 V DC car battery (negative ground (earth)) Rated current consumption: 10 A Dimensions: Approx. 178 mm × 50 mm × 178 mm (7 1/8 in × 2 in &#...

Operating Instructions
Page 32
... longer to the operating instruction of the audio playback application on the Android smartphone. - bit-rate. DRM (Digital Rights Management) files may not perform properly depending on the back cover. Radio reception Stations cannot be performed when a USB device in Android mode or iPod is connected. - If your car has built-in radio antenna (aerial) in Multi Session. - MP3/WMA/AAC...
... longer to the operating instruction of the audio playback application on the Android smartphone. - bit-rate. DRM (Digital Rights Management) files may not perform properly depending on the back cover. Radio reception Stations cannot be performed when a USB device in Android mode or iPod is connected. - If your car has built-in radio antenna (aerial) in Multi Session. - MP3/WMA/AAC...
Operating Instructions 1
Page 5
...19 Useful Functions Sony | Music Center with iPhone/Android smartphone 19 Using Voice Recognition (Android smartphone only 20 Using Siri Eyes Free 20 Settings Canceling the DEMO Mode 21 Basic Setting Operation 21 General Setup (GENERAL 22 Sound Setup (SOUND 23 Display Setup (DISPLAY 25 BLUETOOTH Setup (BLUETOOTH 25 Sony | Music Center Setup (SONY APP 26 Additional Information Updating the Firmware 26 Precautions 26 Maintenance 28 Specifications 28 Troubleshooting 31 Messages 35 Connection/Installation Cautions 39 Parts List for Installation 39 Connection 40 Installation 43...
...19 Useful Functions Sony | Music Center with iPhone/Android smartphone 19 Using Voice Recognition (Android smartphone only 20 Using Siri Eyes Free 20 Settings Canceling the DEMO Mode 21 Basic Setting Operation 21 General Setup (GENERAL 22 Sound Setup (SOUND 23 Display Setup (DISPLAY 25 BLUETOOTH Setup (BLUETOOTH 25 Sony | Music Center Setup (SONY APP 26 Additional Information Updating the Firmware 26 Precautions 26 Maintenance 28 Specifications 28 Troubleshooting 31 Messages 35 Connection/Installation Cautions 39 Parts List for Installation 39 Connection 40 Installation 43...

Operating Instructions 1
Page 6
... Touch the control dial with Android smartphone to Parts and Controls Main unit Front panel removed (inner panel) Front panel release button SRC (source) Turn on the power. Guide to make BLUETOOTH connection. Disc slot Display window / (SEEK -/+) Tune in radio stations automatically. If the unit is not available. Control dial Rotate to switch the BLUETOOTH signal. PUSH ENTER Enter the selected item.
... Touch the control dial with Android smartphone to Parts and Controls Main unit Front panel removed (inner panel) Front panel release button SRC (source) Turn on the power. Guide to make BLUETOOTH connection. Disc slot Display window / (SEEK -/+) Tune in radio stations automatically. If the unit is not available. Control dial Rotate to switch the BLUETOOTH signal. PUSH ENTER Enter the selected item.
Operating Instructions 1
Page 10
..., press SRC to the cellular phone. Icons in the display of the BLUETOOTH device. Note While streaming BLUETOOTH audio, you cannot connect from this unit cannot be called "Passcode," "PIN code," "PIN number" or "Password," etc., depending on the device. 6 Select [MEX-XB120BT] (your model name does not appear, repeat from step 2. Input passkey [0000] When pairing is made . To start...
..., press SRC to the cellular phone. Icons in the display of the BLUETOOTH device. Note While streaming BLUETOOTH audio, you cannot connect from this unit cannot be called "Passcode," "PIN code," "PIN number" or "Password," etc., depending on the device. 6 Select [MEX-XB120BT] (your model name does not appear, repeat from step 2. Input passkey [0000] When pairing is made . To start...

Operating Instructions 1
Page 11
... USB port. To enable BLUETOOTH Auto Pairing, make sure [SET AUTOPAIR] in [BLUETOOTH] is not established, see "Installing the microphone" (page 42). Connecting a USB Device 1 Turn down the volume on the unit. 3 Connect the portable audio device to the AUX input jack (stereo mini jack) on the unit. Connecting Other Portable Audio Device 1 Turn off the portable audio device. 2 Turn down the volume on the display of the portable audio device at a moderate volume, and set your usual listening volume...
... USB port. To enable BLUETOOTH Auto Pairing, make sure [SET AUTOPAIR] in [BLUETOOTH] is not established, see "Installing the microphone" (page 42). Connecting a USB Device 1 Turn down the volume on the unit. 3 Connect the portable audio device to the AUX input jack (stereo mini jack) on the unit. Connecting Other Portable Audio Device 1 Turn off the portable audio device. 2 Turn down the volume on the display of the portable audio device at a moderate volume, and set your usual listening volume...

Operating Instructions 1
Page 22
... (auto off) Shuts off automatically after a certain time when the unit is turned off and the clock is displayed.) STR CONTROL (steering control) Selects the input mode of the connected remote control. When registration is complete, [REGISTERED] is displayed. To register other functions, repeat steps and . (Available only when [STR CONTROL] is set to [CUSTOM].) RESET CUSTOM (reset custom) Resets the setting of the SiriusXM signal strength: [NO SIGNAL] (signal level...
... (auto off) Shuts off automatically after a certain time when the unit is turned off and the clock is displayed.) STR CONTROL (steering control) Selects the input mode of the connected remote control. When registration is complete, [REGISTERED] is displayed. To register other functions, repeat steps and . (Available only when [STR CONTROL] is set to [CUSTOM].) RESET CUSTOM (reset custom) Resets the setting of the SiriusXM signal strength: [NO SIGNAL] (signal level...
Operating Instructions 1
Page 23
...].) EQ10 PRESET (EQ10 preset) Selects an equalizer curve from 10 equalizer curves or off and the clock is set to [ON].) BALANCE (balance) Adjusts the sound balance: [RIGHT-15] - [CENTER] - [LEFT-15]. 23GB FW VERSION (firmware version) Displays current firmware version. C.AUDIO+ (ClearAudio+) Reproduces sound by optimizing the digital signal with the Sony recommended sound settings: [ON], [OFF]. (Automatically sets to [OFF] when [EQ10 PRESET] is changed and/or [EXTRA BASS] is set to...
...].) EQ10 PRESET (EQ10 preset) Selects an equalizer curve from 10 equalizer curves or off and the clock is set to [ON].) BALANCE (balance) Adjusts the sound balance: [RIGHT-15] - [CENTER] - [LEFT-15]. 23GB FW VERSION (firmware version) Displays current firmware version. C.AUDIO+ (ClearAudio+) Reproduces sound by optimizing the digital signal with the Sony recommended sound settings: [ON], [OFF]. (Automatically sets to [OFF] when [EQ10 PRESET] is changed and/or [EXTRA BASS] is set to...

Operating Instructions 1
Page 24
... adjust the volume level between sources. (Available only when the AUX is set to [OFF].) Be sure to connect a 4 Ω - 8 Ω subwoofer to other than the tuner. LPF FREQ (low pass filter frequency) Selects the subwoofer cut -off frequency: [50Hz], [60Hz], [80Hz], [100Hz], [120Hz]. This function allows the rear speakers to work as a subwoofer if one is not connected. (Available only when [SW DIREC] is displayed at the lowest setting.) SW PHASE (subwoofer phase) Selects...
... adjust the volume level between sources. (Available only when the AUX is set to [OFF].) Be sure to connect a 4 Ω - 8 Ω subwoofer to other than the tuner. LPF FREQ (low pass filter frequency) Selects the subwoofer cut -off frequency: [50Hz], [60Hz], [80Hz], [100Hz], [120Hz]. This function allows the rear speakers to work as a subwoofer if one is not connected. (Available only when [SW DIREC] is displayed at the lowest setting.) SW PHASE (subwoofer phase) Selects...

Operating Instructions 1
Page 29
... purpose of BLUETOOTH communication between devices. Power amplifier section Output: Speaker outputs Speaker impedance: 4 Ω - 8 Ω Maximum power output: 100 W × 4 (at 4 Ω) General Outputs: Audio outputs terminal: FRONT, REAR, SUB Power antenna (aerial)/Power amplifier control terminal (REM OUT) Inputs: SiriusXM input terminal Remote controller input terminal Antenna (aerial) input terminal MIC input terminal AUX input jack (stereo mini jack) USB port Power requirements: 12 V DC car battery (negative ground (earth)) Rated current consumption: 10 A Dimensions: Approx. 178 mm...
... purpose of BLUETOOTH communication between devices. Power amplifier section Output: Speaker outputs Speaker impedance: 4 Ω - 8 Ω Maximum power output: 100 W × 4 (at 4 Ω) General Outputs: Audio outputs terminal: FRONT, REAR, SUB Power antenna (aerial)/Power amplifier control terminal (REM OUT) Inputs: SiriusXM input terminal Remote controller input terminal Antenna (aerial) input terminal MIC input terminal AUX input jack (stereo mini jack) USB port Power requirements: 12 V DC car battery (negative ground (earth)) Rated current consumption: 10 A Dimensions: Approx. 178 mm...

Operating Instructions 1
Page 32
.... Operations for audio use (page 27). The sound skips. Defective or dirty disc. Make sure that the USB mode of the device is in Multi Session. - Radio reception Stations cannot be played. The disc is intermittent. The sound may not perform properly depending on the Android smartphone. 32GB Check the connection of the power antenna (aerial) control lead. USB device playback You...
.... Operations for audio use (page 27). The sound skips. Defective or dirty disc. Make sure that the USB mode of the device is in Multi Session. - Radio reception Stations cannot be played. The disc is intermittent. The sound may not perform properly depending on the Android smartphone. 32GB Check the connection of the power antenna (aerial) control lead. USB device playback You...


