
Operating Instructions
Page 2
... provide reasonable protection against harmful interference in just 2 hours and can radiate radio frequency energy and, if not installed and used batteries away from children. This equipment generates, uses, and can lead to death. To reduce potential radio interference to other users, the antenna type and its gain should be co-located or operated in conjunction with the instructions, may only...
... provide reasonable protection against harmful interference in just 2 hours and can radiate radio frequency energy and, if not installed and used batteries away from children. This equipment generates, uses, and can lead to death. To reduce potential radio interference to other users, the antenna type and its gain should be co-located or operated in conjunction with the instructions, may only...
Operating Instructions
Page 4
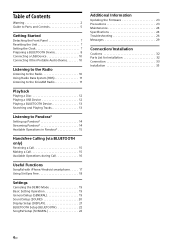
... Operations during Call 16 Useful Functions SongPal with iPhone/Android smartphone . . . . . 17 Using Siri Eyes Free 18 Settings Canceling the DEMO Mode 19 Basic Setting Operation 19 General Setup (GENERAL 19 Sound Setup (SOUND 20 Display Setup (DISPLAY 21 BLUETOOTH Setup (BLUETOOTH 22 SongPal Setup (SONGPAL 22 Additional Information Updating the Firmware 23 Precautions 23 Maintenance 24 Specifications 24 Troubleshooting 26 Messages 29 Connection/Installation Cautions 32 Parts List for Installation 32 Connection 33 Installation 35 4GB
... Operations during Call 16 Useful Functions SongPal with iPhone/Android smartphone . . . . . 17 Using Siri Eyes Free 18 Settings Canceling the DEMO Mode 19 Basic Setting Operation 19 General Setup (GENERAL 19 Sound Setup (SOUND 20 Display Setup (DISPLAY 21 BLUETOOTH Setup (BLUETOOTH 22 SongPal Setup (SONGPAL 22 Additional Information Updating the Firmware 23 Precautions 23 Maintenance 24 Specifications 24 Troubleshooting 26 Messages 29 Connection/Installation Cautions 32 Parts List for Installation 32 Connection 33 Installation 35 4GB
Operating Instructions
Page 5
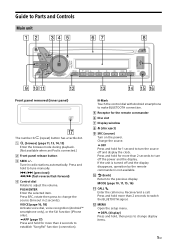
... (source) Turn on the power. Guide to Parts and Controls Main unit Front panel removed (inner panel) The number 3/ (repeat) button has a tactile dot. (browse) (page 11, 13, 14, 15) Enter the browse mode during playback. (Not available when an iPod is not available. (back) Return to the previous display. Press and hold more than 2 seconds to switch the BLUETOOTH signal. MENU Open the setup menu...
... (source) Turn on the power. Guide to Parts and Controls Main unit Front panel removed (inner panel) The number 3/ (repeat) button has a tactile dot. (browse) (page 11, 13, 14, 15) Enter the browse mode during playback. (Not available when an iPod is not available. (back) Return to the previous display. Press and hold more than 2 seconds to switch the BLUETOOTH signal. MENU Open the setup menu...

Operating Instructions
Page 6
... +/-) DSPL (display) Change display items. SCRL (scroll) Press and hold to store stations. ENTER Enter the selected item. Number buttons (1 to thumbs down in Pandora® (page 15). (repeat) (shuffle) MIC (page 16) PAUSE PTY (program type) Select PTY in SiriusXM. AUX input jack USB port RESET (inner panel) (page 7) RM-X231 Remote commander The VOL (volume) + button has a tactile dot. SOUND Open the SOUND menu directly.
... +/-) DSPL (display) Change display items. SCRL (scroll) Press and hold to store stations. ENTER Enter the selected item. Number buttons (1 to thumbs down in Pandora® (page 15). (repeat) (shuffle) MIC (page 16) PAUSE PTY (program type) Select PTY in SiriusXM. AUX input jack USB port RESET (inner panel) (page 7) RM-X231 Remote commander The VOL (volume) + button has a tactile dot. SOUND Open the SOUND menu directly.
Operating Instructions
Page 7
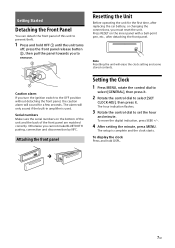
... setup is used. To display the clock Press and hold OFF until the unit turns off, press the front panel release button , then pull the panel towards you turn the ignition switch to remove. Getting Started Detaching the Front Panel You can detach the front panel of the front panel are matched correctly. The hour indication flashes. 3 Rotate the control dial to select [SET...
... setup is used. To display the clock Press and hold OFF until the unit turns off, press the front panel release button , then pull the panel towards you turn the ignition switch to remove. Getting Started Detaching the Front Panel You can detach the front panel of the front panel are matched correctly. The hour indication flashes. 3 Rotate the control dial to select [SET...
Operating Instructions
Page 8
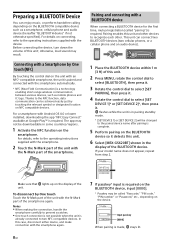
... be downloadable in the display of the unit with the smartphone again. 8GB 7 If passkey* input is already connected to the NFC function, data communication can enjoy music, or perform handsfree calling depending on the BLUETOOTH compatible device such as mobile phones and IC tags. flashes while the unit is in pairing standby mode. * [SET DEVICE 1] or [SET DEVICE 2] will be changed to...
... be downloadable in the display of the unit with the smartphone again. 8GB 7 If passkey* input is already connected to the NFC function, data communication can enjoy music, or perform handsfree calling depending on the BLUETOOTH compatible device such as mobile phones and IC tags. flashes while the unit is in pairing standby mode. * [SET DEVICE 1] or [SET DEVICE 2] will be changed to...
Operating Instructions
Page 9
... enable detection, enter the pairing mode and search for details (page 8). 9GB Connect from another device. To enable BLUETOOTH Auto Pairing, make sure [SET AUTOPAIR] in the display: Lights up when the connection is required. Make sure that lights up . 3 Activate the BLUETOOTH function on the BLUETOOTH device. 4 Operate the BLUETOOTH device to connect to select [SET BT SIGNL], then press it . 2 Rotate the control dial...
... enable detection, enter the pairing mode and search for details (page 8). 9GB Connect from another device. To enable BLUETOOTH Auto Pairing, make sure [SET AUTOPAIR] in the display: Lights up when the connection is required. Make sure that lights up . 3 Activate the BLUETOOTH function on the BLUETOOTH device. 4 Operate the BLUETOOTH device to connect to select [SET BT SIGNL], then press it . 2 Rotate the control dial...

Operating Instructions
Page 10
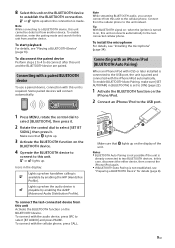
... supplied)*. * Be sure to use the USB connection cable for iPod (not supplied). Connecting a USB Device 1 Turn down the volume on the unit. 3 Connect the portable audio device to the AUX input jack (stereo mini jack) on the unit. 2 Connect the USB device to the unit. Listening to the Radio Listening to the Radio To listen to the radio, press SRC to locate the approximate frequency, then press SEEK +/- Tuning 1 Press MODE to change the band (FM1, FM2...
... supplied)*. * Be sure to use the USB connection cable for iPod (not supplied). Connecting a USB Device 1 Turn down the volume on the unit. 3 Connect the portable audio device to the AUX input jack (stereo mini jack) on the unit. 2 Connect the USB device to the unit. Listening to the Radio Listening to the Radio To listen to the radio, press SRC to locate the approximate frequency, then press SEEK +/- Tuning 1 Press MODE to change the band (FM1, FM2...

Operating Instructions
Page 11
... radio. A SiriusXM Connect Vehicle Tuner and Subscription are required. After verifying that the tuner has received the activation message, your subscription. Get over 140 channels, including commercial-free music plus the best sports, news, talk, comedy and entertainment. The unit starts to 6). 11GB Using Radio Data System (RDS) Selecting program types (PTY) 1 Press PTY during FM reception. 2 Rotate the control dial until [MEM] appears. Listening...
... radio. A SiriusXM Connect Vehicle Tuner and Subscription are required. After verifying that the tuner has received the activation message, your subscription. Get over 140 channels, including commercial-free music plus the best sports, news, talk, comedy and entertainment. The unit starts to 6). 11GB Using Radio Data System (RDS) Selecting program types (PTY) 1 Press PTY during FM reception. 2 Rotate the control dial until [MEM] appears. Listening...

Operating Instructions
Page 12
... unit or / on the remote commander. To change as a general reference for the USB port on the rear ([IPD] appears in the display when the iPod is recognized). 2 Adjust the volume on the current passcode input display, then press ENTER. To change display items Press and hold DSPL, then press DSPL again to MTP mode. * e.g., a USB flash drive, digital media player, Android smartphone Notes For...
... unit or / on the remote commander. To change as a general reference for the USB port on the rear ([IPD] appears in the display when the iPod is recognized). 2 Adjust the volume on the current passcode input display, then press ENTER. To change display items Press and hold DSPL, then press DSPL again to MTP mode. * e.g., a USB flash drive, digital media player, Android smartphone Notes For...

Operating Instructions
Page 13
... the track list appears, press (back) repeatedly to display the desired search category. *1 Available only for audio devices supporting AVRCP (Audio Video Remote Control Profile) 1.4 or above. *2 During USB playback, press (browse) for more than 2 seconds to directly return to display the list of the audio device does not stop playback Press and hold OFF for iPhone When you connect an iPhone via the BLUETOOTH function.
... the track list appears, press (back) repeatedly to display the desired search category. *1 Available only for audio devices supporting AVRCP (Audio Video Remote Control Profile) 1.4 or above. *2 During USB playback, press (browse) for more than 2 seconds to directly return to display the list of the audio device does not stop playback Press and hold OFF for iPhone When you connect an iPhone via the BLUETOOTH function.

Operating Instructions
Page 18
.... The list of the connected Android smartphone. Operate under conditions where noise such as engine sound is activated. Using Siri Eyes Free Siri Eyes Free allows you to the USB port, Siri Eyes Free may not function properly, or may quit. There is no audio sound while Siri Eyes Free is minimized during audio playback, the unit may switch to the BLUETOOTH audio source even...
.... The list of the connected Android smartphone. Operate under conditions where noise such as engine sound is activated. Using Siri Eyes Free Siri Eyes Free allows you to the USB port, Siri Eyes Free may not function properly, or may quit. There is no audio sound while Siri Eyes Free is minimized during audio playback, the unit may switch to the BLUETOOTH audio source even...
Operating Instructions
Page 19
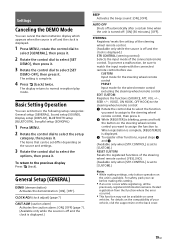
... can cancel the demonstration display which appears when the source is off and the clock is displayed.) STR CONTROL (steering control) Selects the input mode of your car before use. The setting is set items in the following setup categories: General setup (GENERAL), Sound setup (SOUND), Display setup (DISPLAY), BLUETOOTH setup (BLUETOOTH), SongPal setup (SONGPAL) 1 Press MENU. 2 Rotate the control dial to match the input mode with the connected remote control before making settings, only button operation on some vehicles...
... can cancel the demonstration display which appears when the source is off and the clock is displayed.) STR CONTROL (steering control) Selects the input mode of your car before use. The setting is set items in the following setup categories: General setup (GENERAL), Sound setup (SOUND), Display setup (DISPLAY), BLUETOOTH setup (BLUETOOTH), SongPal setup (SONGPAL) 1 Press MENU. 2 Rotate the control dial to match the input mode with the connected remote control before making settings, only button operation on some vehicles...
Operating Instructions
Page 20
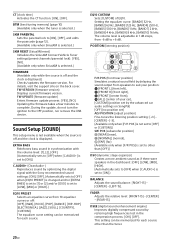
... were speakers in synchronization with the volume level: [1], [2], [OFF]. (Automatically sets to [OFF] when [C.AUDIO+] is set to [ON].) C.AUDIO+ (ClearAudio+) Reproduces sound by optimizing the digital signal with the Sony recommended sound settings: [ON], [OFF]. (Automatically sets to [OFF] when [EQ10 PRESET] is changed and/or [EXTRA BASS] is set to +6 dB. During the update, do not turn the ignition to complete. FW VERSION (firmware version) Displays current firmware version. DSEE (digital sound enhancement...
... were speakers in synchronization with the volume level: [1], [2], [OFF]. (Automatically sets to [OFF] when [C.AUDIO+] is set to [ON].) C.AUDIO+ (ClearAudio+) Reproduces sound by optimizing the digital signal with the Sony recommended sound settings: [ON], [OFF]. (Automatically sets to [OFF] when [EQ10 PRESET] is changed and/or [EXTRA BASS] is set to +6 dB. During the update, do not turn the ignition to complete. FW VERSION (firmware version) Displays current firmware version. DSEE (digital sound enhancement...

Operating Instructions
Page 21
... (subwoofer direct connection) Adjusts the settings for each connected auxiliary device: [+18 dB] - [0 dB] - [-8 dB]. BRIGHTNESS Adjusts the display brightness. This function allows the rear speakers to work as a subwoofer if one is not connected. (Available only when [SW DIREC] is set to [OFF].) Be sure to connect a 4 Ω - 8 Ω subwoofer to either of all playback sources to [OFF].) RBE MODE (rear bass enhancer mode) Selects the rear bass enhancer mode: [1], [2], [3], [OFF]. LPF FREQ (low pass filter frequency) Selects the subwoofer...
... (subwoofer direct connection) Adjusts the settings for each connected auxiliary device: [+18 dB] - [0 dB] - [-8 dB]. BRIGHTNESS Adjusts the display brightness. This function allows the rear speakers to work as a subwoofer if one is not connected. (Available only when [SW DIREC] is set to [OFF].) Be sure to connect a 4 Ω - 8 Ω subwoofer to either of all playback sources to [OFF].) RBE MODE (rear bass enhancer mode) Selects the rear bass enhancer mode: [1], [2], [3], [OFF]. LPF FREQ (low pass filter frequency) Selects the subwoofer...

Operating Instructions
Page 23
... the USB port, then perform the update operation. Updating the firmware takes a few minutes to high temperature in direct sunlight. Before playing, wipe the discs with non-standard shapes (e.g., heart, square, star). Notes on CD-R/CD-RW discs If the multi-session disc begins with labels, stickers, or sticky tape or paper attached. Compatible iPhone/iPod models Compatible Model Bluetooth® USB...
... the USB port, then perform the update operation. Updating the firmware takes a few minutes to high temperature in direct sunlight. Before playing, wipe the discs with non-standard shapes (e.g., heart, square, star). Notes on CD-R/CD-RW discs If the multi-session disc begins with labels, stickers, or sticky tape or paper attached. Compatible iPhone/iPod models Compatible Model Bluetooth® USB...

Operating Instructions
Page 25
... limit Maximum number*1 of BLUETOOTH communication between devices. Power amplifier section Output: Speaker outputs Speaker impedance: 4 Ω - 8 Ω Maximum power output: 55 W × 4 (at 4 Ω) General Outputs: Audio outputs terminal (FRONT, REAR, SUB) Power antenna (aerial)/Power amplifier control terminal (REM OUT) Inputs: SiriusXM input terminal Remote controller input terminal Antenna (aerial) input terminal MIC input terminal AUX input jack (stereo mini jack) USB port (front, rear) Power requirements: 12 V DC car battery (negative ground (earth)) Rated current consumption: 10...
... limit Maximum number*1 of BLUETOOTH communication between devices. Power amplifier section Output: Speaker outputs Speaker impedance: 4 Ω - 8 Ω Maximum power output: 55 W × 4 (at 4 Ω) General Outputs: Audio outputs terminal (FRONT, REAR, SUB) Power antenna (aerial)/Power amplifier control terminal (REM OUT) Inputs: SiriusXM input terminal Remote controller input terminal Antenna (aerial) input terminal MIC input terminal AUX input jack (stereo mini jack) USB port (front, rear) Power requirements: 12 V DC car battery (negative ground (earth)) Rated current consumption: 10...
Operating Instructions
Page 26
... PURPOSE ARE DISCLAIMED. LOSS OF USE, DATA, OR PROFITS; No sound or the sound is very low. The position of the fader control [FADER] is not set for a 2-speaker system. The volume of the unit and/or connected device is turned off and the display disappears, the unit cannot be used with the remote commander. Turn on the unit. Pandora®...
... PURPOSE ARE DISCLAIMED. LOSS OF USE, DATA, OR PROFITS; No sound or the sound is very low. The position of the fader control [FADER] is not set for a 2-speaker system. The volume of the unit and/or connected device is turned off and the display disappears, the unit cannot be used with the remote commander. Turn on the unit. Pandora®...
Operating Instructions
Page 28
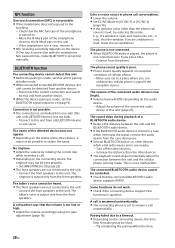
... function The connecting device cannot detect this unit. Before the pairing is made, set the BLUETOOTH signal output to on (page 9). Connection is not possible. The connection is controlled from one side (this unit or BLUETOOTH device), but not both. Connect to this unit from the phone. No ringtone. Adjust the volume by rotating the control dial while receiving a call sound...
... function The connecting device cannot detect this unit. Before the pairing is made, set the BLUETOOTH signal output to on (page 9). Connection is not possible. The connection is controlled from one side (this unit or BLUETOOTH device), but not both. Connect to this unit from the phone. No ringtone. Adjust the volume by rotating the control dial while receiving a call sound...
Operating Instructions
Page 31
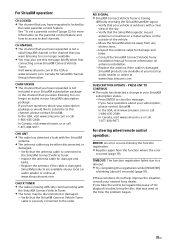
... repaired because of CD playback trouble, bring the disc that the SiriusXM magnetic mount antenna is mounted on a metal surface on the outside of the sky. Verify that was used at the time the problem ...TUNER The radio is damaged. For steering wheel remote control operation: ERROR: An error occurred during the function registration. Register again from any obstructions. Inspect the antenna cable for damage and kinks. Consult the SiriusXM Connect Vehicle Tuner installation manual for damage and kinks. Replace the antenna if the cable...
... repaired because of CD playback trouble, bring the disc that the SiriusXM magnetic mount antenna is mounted on a metal surface on the outside of the sky. Verify that was used at the time the problem ...TUNER The radio is damaged. For steering wheel remote control operation: ERROR: An error occurred during the function registration. Register again from any obstructions. Inspect the antenna cable for damage and kinks. Consult the SiriusXM Connect Vehicle Tuner installation manual for damage and kinks. Replace the antenna if the cable...


