
Operating Instructions
Page 2
... Canada. This equipment has been tested and found to comply with FCC/IC radiation exposure limits set forth for help. Operation is connected. - To reduce potential radio interference to other antenna or transmitter. Be sure to install this device must not be co-located or operated in conjunction with any other users, the antenna type and its gain should be...
... Canada. This equipment has been tested and found to comply with FCC/IC radiation exposure limits set forth for help. Operation is connected. - To reduce potential radio interference to other antenna or transmitter. Be sure to install this device must not be co-located or operated in conjunction with any other users, the antenna type and its gain should be...
Operating Instructions
Page 7
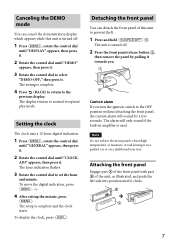
The display returns to set the hour and minute. Avoid leaving it in amplifier is used. The hour indication flashes. 3 Rotate the control dial to normal reception/ play mode. Canceling the DEMO mode You can detach the front panel of the unit, as illustrated, and push the left side into position until "CLOCK- Setting the clock The clock uses a 12-hour digital indication. 1 Press rotate...
The display returns to set the hour and minute. Avoid leaving it in amplifier is used. The hour indication flashes. 3 Rotate the control dial to normal reception/ play mode. Canceling the DEMO mode You can detach the front panel of the unit, as illustrated, and push the left side into position until "CLOCK- Setting the clock The clock uses a 12-hour digital indication. 1 Press rotate...
Operating Instructions
Page 8
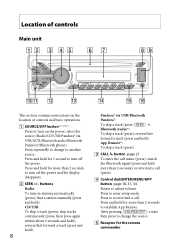
... to change to enter setup mode. Location of controls Main unit This section contains instructions on the location of controls and basic operations. SOURCE/OFF button*1*2*3*4 Press to turn off the power and the display disappears. SEEK +/- find a station manually (press and hold ); reverse/fast-forward a track (press and hold for the remote commander switch the Bluetooth signal (press and hold for 1 second to adjust volume. CD/USB: To...
... to change to enter setup mode. Location of controls Main unit This section contains instructions on the location of controls and basic operations. SOURCE/OFF button*1*2*3*4 Press to turn off the power and the display disappears. SEEK +/- find a station manually (press and hold ); reverse/fast-forward a track (press and hold for the remote commander switch the Bluetooth signal (press and hold for 1 second to adjust volume. CD/USB: To...

Operating Instructions
Page 9
... down ()/up ), playback starts. Display window (Eject) button To eject the disc. USB port page 13, 14, 16, 18 (BACK)/MODE button*1 page 11, 15, 17, 26, 30 Press to return to store a phone number as a preset (press and hold) (in RDS. Number buttons Radio: To receive stored stations (press); store stations (press and hold to resume playback...
... down ()/up ), playback starts. Display window (Eject) button To eject the disc. USB port page 13, 14, 16, 18 (BACK)/MODE button*1 page 11, 15, 17, 26, 30 Press to return to store a phone number as a preset (press and hold) (in RDS. Number buttons Radio: To receive stored stations (press); store stations (press and hold to resume playback...
Operating Instructions
Page 10
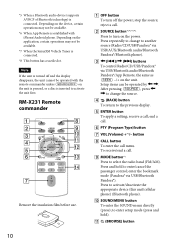
... use. OFF button To turn on the unit. stop the source; buttons To control Radio/CD/USB/Pandora® via USB/Bluetooth audio/Bluetooth Pandora®/App Remote, the same as on the power. Press repeatedly to change the source. (BACK) button To return to activate/deactivate the appropriate device (this unit/cellular phone) (Bluetooth phone). SOUND/MENU button To enter the SOUND menu directly (press); enter the bookmark mode...
... use. OFF button To turn on the unit. stop the source; buttons To control Radio/CD/USB/Pandora® via USB/Bluetooth audio/Bluetooth Pandora®/App Remote, the same as on the power. Press repeatedly to change the source. (BACK) button To return to activate/deactivate the appropriate device (this unit/cellular phone) (Bluetooth phone). SOUND/MENU button To enter the SOUND menu directly (press); enter the bookmark mode...
Operating Instructions
Page 12
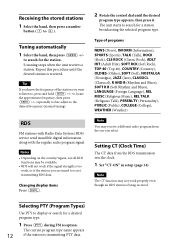
... display or search for a station broadcasting the selected program type. Note The CT function may not work if the signal strength is too weak, or if the station you want to listen to, press and hold to locate the approximate frequency, then press repeatedly to fine adjust to search for a desired program type. 1 Press during FM reception. Receiving the stored stations 1 Select the band, then press a number button...
... display or search for a station broadcasting the selected program type. Note The CT function may not work if the signal strength is too weak, or if the station you want to listen to, press and hold to locate the approximate frequency, then press repeatedly to fine adjust to search for a desired program type. 1 Press during FM reception. Receiving the stored stations 1 Select the band, then press a number button...

Operating Instructions
Page 13
... depending on the compatibility of data to start playback, press repeatedly until "USB" appears. Playback starts. Changing display items Press Displayed items may occur if it is required. • Backup of your USB device, visit the support site on the digital media player or Android phone, setting the USB connection mode to the USB port. Playing back a USB device 1 Open the USB cover, then connect the USB device to MSC...
... depending on the compatibility of data to start playback, press repeatedly until "USB" appears. Playback starts. Changing display items Press Displayed items may occur if it is required. • Backup of your USB device, visit the support site on the digital media player or Android phone, setting the USB connection mode to the USB port. Playing back a USB device 1 Open the USB cover, then connect the USB device to MSC...

Operating Instructions
Page 14
... iPod functions on the USB device, recording format and settings. To remove the iPod, stop playback, press and hold for 1 second. Notes • Do not use USB devices so large or heavy that they may fall down the volume of the unit. 1 Open the USB cover, then connect the iPod to the USB port with a USB connection cable for iPod (not supplied)*. * RC-100IP USB connection cable for iPod is not supported. - Changing display...
... iPod functions on the USB device, recording format and settings. To remove the iPod, stop playback, press and hold for 1 second. Notes • Do not use USB devices so large or heavy that they may fall down the volume of the unit. 1 Open the USB cover, then connect the iPod to the USB port with a USB connection cable for iPod (not supplied)*. * RC-100IP USB connection cable for iPod is not supported. - Changing display...
Operating Instructions
Page 21
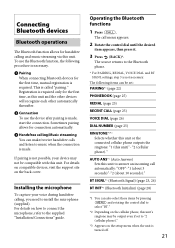
Sometimes pairing allows for connection automatically. Handsfree calling/Music streaming You can make/receive handsfree calls and listen to the supplied "Installation/Connections" guide. For details on the cellular phone, this unit's ringtone may not be compatible with this unit. "2 (cellular phone)." Connecting Bluetooth devices Bluetooth operations The Bluetooth function allows for handsfree calling and music streaming via this unit to...
Sometimes pairing allows for connection automatically. Handsfree calling/Music streaming You can make/receive handsfree calls and listen to the supplied "Installation/Connections" guide. For details on the cellular phone, this unit's ringtone may not be compatible with this unit. "2 (cellular phone)." Connecting Bluetooth devices Bluetooth operations The Bluetooth function allows for handsfree calling and music streaming via this unit to...

Operating Instructions
Page 22
... code," "PIN number" or "Password," etc., depending on the Bluetooth device to a Bluetooth device, this unit on the device. To enable detection, enter the pairing mode and search for this unit. If the device supports Bluetooth version 2.1, passkey input is made , stays lit. A list of detected devices appears in the display of the connection appears before use between each other via the Bluetooth function...
... code," "PIN number" or "Password," etc., depending on the Bluetooth device to a Bluetooth device, this unit on the device. To enable detection, enter the pairing mode and search for this unit. If the device supports Bluetooth version 2.1, passkey input is made , stays lit. A list of detected devices appears in the display of the connection appears before use between each other via the Bluetooth function...
Operating Instructions
Page 26
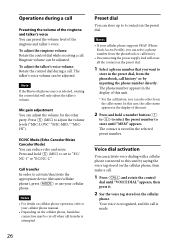
... the preset dial. 1 Select a phone number that you can be adjusted. Voice dial activation You can store up to adjust the volume levels ("MIC-LOW," "MIC-MID," "MICHI"). Your voice is selected, rotating the control dial will erase all the contacts in the display of this unit by inputting the phone number directly. Press and hold a number button ( to ) to select the preset number to...
... the preset dial. 1 Select a phone number that you can be adjusted. Voice dial activation You can store up to adjust the volume levels ("MIC-LOW," "MIC-MID," "MICHI"). Your voice is selected, rotating the control dial will erase all the contacts in the display of this unit by inputting the phone number directly. Press and hold a number button ( to ) to select the preset number to...

Operating Instructions
Page 27
... function. SMS indicator While connecting a cellular phone to music from an audio device on the back cover. Changing display items Press Adjusting the volume level The volume level is adjustable for any difference between the unit and the Bluetooth audio device. 1 Start playback of the SMS indicator may not work in some cases. • Voice dialing may depend on the cellular phone. 1 Turn down the volume...
... function. SMS indicator While connecting a cellular phone to music from an audio device on the back cover. Changing display items Press Adjusting the volume level The volume level is adjustable for any difference between the unit and the Bluetooth audio device. 1 Start playback of the SMS indicator may not work in some cases. • Voice dialing may depend on the cellular phone. 1 Turn down the volume...

Operating Instructions
Page 31
...," then press it . 4 Press (BACK) to return to establish the connection. Selecting the sound quality - Two-way Music Control with digital signal processing. Connection to select the source. EQ7 Preset You can be controlled by the mobile device. Tip You can be memorized for more than 2 seconds. When connection is connected, the device number may appear. To cancel the equalizer curve, select "OFF" in this unit and the...
...," then press it . 4 Press (BACK) to return to establish the connection. Selecting the sound quality - Two-way Music Control with digital signal processing. Connection to select the source. EQ7 Preset You can be controlled by the mobile device. Tip You can be memorized for more than 2 seconds. When connection is connected, the device number may appear. To cancel the equalizer curve, select "OFF" in this unit and the...

Operating Instructions
Page 33
... (BACK) to return to the previous display. This function allows the rear speakers to work as subwoofer - Subwoofer Direct Connection You can be memorized for each source other rear speaker cord. 33 Note Be sure to connect a 4 - 8 ohm subwoofer to the previous display. "CENTER" - Do not connect a speaker to the other than the tuner. To cancel listening position, select "OFF" in the compression process. 1 During playback, press rotate the control dial until "SOUND" appears, then...
... (BACK) to return to the previous display. This function allows the rear speakers to work as subwoofer - Subwoofer Direct Connection You can be memorized for each source other rear speaker cord. 33 Note Be sure to connect a 4 - 8 ohm subwoofer to the previous display. "CENTER" - Do not connect a speaker to the other than the tuner. To cancel listening position, select "OFF" in the compression process. 1 During playback, press rotate the control dial until "SOUND" appears, then...

Operating Instructions
Page 34
... Tuner is connected. AUX-A*1*2 (AUX Audio) Activates the AUX source display: "ON," "OFF" (page 37). AUTO OFF Shuts off : "NO," "30S (Seconds)," "30M (Minutes)," "60M (Minutes)." BTM*3 (page 11) ZAPPIN*4 ZAP TIME (Zappin Time) Selects the playback time for the subwoofer phase, position, low pass filter frequency and the low pass filter slope, see page 35. PARENTAL*5 Sets the parental lock to the previous display. Adjusting setup items 1 Press rotate the control...
... Tuner is connected. AUX-A*1*2 (AUX Audio) Activates the AUX source display: "ON," "OFF" (page 37). AUTO OFF Shuts off : "NO," "30S (Seconds)," "30M (Minutes)," "60M (Minutes)." BTM*3 (page 11) ZAPPIN*4 ZAP TIME (Zappin Time) Selects the playback time for the subwoofer phase, position, low pass filter frequency and the low pass filter slope, see page 35. PARENTAL*5 Sets the parental lock to the previous display. Adjusting setup items 1 Press rotate the control...

Operating Instructions
Page 35
... (Dynamic Loudness) Reinforces bass and treble for clear sound at the lowest setting.) SW PHASE (Subwoofer Phase) Selects the subwoofer phase: "NORM," "REV." " LPF FREQ (Low Pass Filter Frequency) Selects the subwoofer cut -off frequency: "50Hz," "60Hz," "80Hz," "100Hz," "120Hz." ALO (Automatic Level Optimizer) Adjust the playback volume level of all playback sources to other than "OFF"): "1," "2," "3." 35 LPF SLOP (Low Pass Filter Slope) Selects the LPF slope: "1," "2," "3." SW DIREC*5 (Subwoofer Direct Connection) SW MODE (Subwoofer Mode) Selects the subwoofer mode...
... (Dynamic Loudness) Reinforces bass and treble for clear sound at the lowest setting.) SW PHASE (Subwoofer Phase) Selects the subwoofer phase: "NORM," "REV." " LPF FREQ (Low Pass Filter Frequency) Selects the subwoofer cut -off frequency: "50Hz," "60Hz," "80Hz," "100Hz," "120Hz." ALO (Automatic Level Optimizer) Adjust the playback volume level of all playback sources to other than "OFF"): "1," "2," "3." 35 LPF SLOP (Low Pass Filter Slope) Selects the LPF slope: "1," "2," "3." SW DIREC*5 (Subwoofer Direct Connection) SW MODE (Subwoofer Mode) Selects the subwoofer mode...

Operating Instructions
Page 37
.... 5 Adjust the input level (page 36). Selecting channels from categories 1 Press to enter browse mode. 2 Rotate the control dial to SiriusXM Satellite Radio, a subscription is required. To listen to select the desired category, then press it . A SiriusXM Vehicle Tuner (sold separately) and Subscription are required. Connecting the portable audio device 1 Turn off the portable audio device. 2 Turn down the volume on the unit. 2 Press repeatedly until "AUX" appears...
.... 5 Adjust the input level (page 36). Selecting channels from categories 1 Press to enter browse mode. 2 Rotate the control dial to SiriusXM Satellite Radio, a subscription is required. To listen to select the desired category, then press it . A SiriusXM Vehicle Tuner (sold separately) and Subscription are required. Connecting the portable audio device 1 Turn off the portable audio device. 2 Turn down the volume on the unit. 2 Press repeatedly until "AUX" appears...
Operating Instructions
Page 42
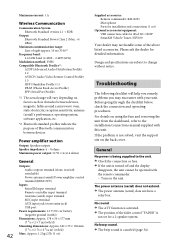
... ask the dealer for detailed information. Turn on the back cover. No beep sound. The beep sound is canceled (page 34). Power amplifier section Output: Speaker outputs Speaker impedance: 4 - 8 ohms Maximum power output: 52 W × 4 (at 4 ohms) General Outputs: Audio outputs terminal (front, rear/sub switchable) Power antenna (aerial)/Power amplifier control terminal (REM OUT) Inputs: SiriusXM input terminal Remote controller input terminal Antenna (aerial) input terminal MIC input terminal AUX input jack (stereo mini jack) USB port Power requirements: 12 V DC car battery (negative...
... ask the dealer for detailed information. Turn on the back cover. No beep sound. The beep sound is canceled (page 34). Power amplifier section Output: Speaker outputs Speaker impedance: 4 - 8 ohms Maximum power output: 52 W × 4 (at 4 ohms) General Outputs: Audio outputs terminal (front, rear/sub switchable) Power antenna (aerial)/Power amplifier control terminal (REM OUT) Inputs: SiriusXM input terminal Remote controller input terminal Antenna (aerial) input terminal MIC input terminal AUX input jack (stereo mini jack) USB port Power requirements: 12 V DC car battery (negative...
Operating Instructions
Page 43
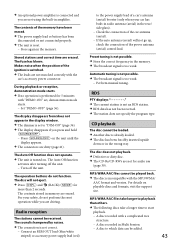
... structure. - The Auto Off function activates after turning off the unit. For your car has built-in radio antenna (aerial) in the display window. The dimmer is set , demonstration mode starts. - The sound is hampered by noises. The connection is turned on playable discs and formats, visit the support site. RDS PTY displays The current station is not an RDS station. RDS...
... structure. - The Auto Off function activates after turning off the unit. For your car has built-in radio antenna (aerial) in the display window. The dimmer is set , demonstration mode starts. - The sound is hampered by noises. The connection is turned on playable discs and formats, visit the support site. RDS PTY displays The current station is not an RDS station. RDS...

Operating Instructions
Page 45
... Bluetooth audio is played, the phone is low (high). Volume level will differ depending on the audio device. - The volume of a Bluetooth audio device. Reduce the distance between this unit. Some functions do not work. Check if the connecting device supports the functions in use . Several Bluetooth devices or other party does not appear when a call . If the sound is...
... Bluetooth audio is played, the phone is low (high). Volume level will differ depending on the audio device. - The volume of a Bluetooth audio device. Reduce the distance between this unit. Some functions do not work. Check if the connecting device supports the functions in use . Several Bluetooth devices or other party does not appear when a call . If the sound is...


