Limited Warranty (ES Products)
Page 1
... warranty does not cover damage due to improper operation or maintenance, connection to improper voltage supply, or attempted repair by Sony to service the Product. 4-243-341-02 General Stereo/Hifi Components/Tape Decks ® CD Players/Mini Disc Players/Audio Systems LIMITED WARRANTY Hifi Audio ES Products Sony Electronics Inc. ("Sony") warrants this Product is invalid if the factory applied serial number has been altered or removed from state to...
... warranty does not cover damage due to improper operation or maintenance, connection to improper voltage supply, or attempted repair by Sony to service the Product. 4-243-341-02 General Stereo/Hifi Components/Tape Decks ® CD Players/Mini Disc Players/Audio Systems LIMITED WARRANTY Hifi Audio ES Products Sony Electronics Inc. ("Sony") warrants this Product is invalid if the factory applied serial number has been altered or removed from state to...
Operating Instructions
Page 2
... appliance. Refer to which can radiate radio frequency energy and, if not installed and used in the U.S.A. This appliance is intended to alert the user to the presence of important operating and maintenance (servicing) instructions in a residential installation. IN NO EVENT SHALL SELLER BE LIABLE FOR ANY DIRECT, INCIDENTAL OR CONSEQUENTIAL DAMAGES OF ANY NATURE, OR LOSSES OR EXPENSES RESULTING FROM...
... appliance. Refer to which can radiate radio frequency energy and, if not installed and used in the U.S.A. This appliance is intended to alert the user to the presence of important operating and maintenance (servicing) instructions in a residential installation. IN NO EVENT SHALL SELLER BE LIABLE FOR ANY DIRECT, INCIDENTAL OR CONSEQUENTIAL DAMAGES OF ANY NATURE, OR LOSSES OR EXPENSES RESULTING FROM...

Operating Instructions
Page 3
... times 16 Switching the bit length 43 Adjusting the recording level 17 Playing with different tones (Digital Filter) 43 Recording tips 18 Using the CONTROL A1ΙΙ control system 44 Marking track numbers while recording (Track Marking) 19 Starting recording with six seconds of prestored audio Additional Information data (Time Machine Recording) 20 Precautions 46 Synchro-recording with the audio component of your own program (Program Play...
... times 16 Switching the bit length 43 Adjusting the recording level 17 Playing with different tones (Digital Filter) 43 Recording tips 18 Using the CONTROL A1ΙΙ control system 44 Marking track numbers while recording (Track Marking) 19 Starting recording with six seconds of prestored audio Additional Information data (Time Machine Recording) 20 Precautions 46 Synchro-recording with the audio component of your own program (Program Play...

Operating Instructions
Page 4
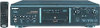
... remote. C FILTER button (43) Press to select the type of the various buttons, controls, and jacks on the pages indicated in the display window. 4 GB Front panel description Front panel description A ?/1 (power) switch/STANDBY indicator (14) (23) Press to be input I Display window (8) Shows various information. G TIME button (18) (22) Press to change the recorded level after recording. E PLAY MODE button (27) (42) Press to play . When you press the switch again, the deck turns...
... remote. C FILTER button (43) Press to select the type of the various buttons, controls, and jacks on the pages indicated in the display window. 4 GB Front panel description Front panel description A ?/1 (power) switch/STANDBY indicator (14) (23) Press to be input I Display window (8) Shows various information. G TIME button (18) (22) Press to change the recorded level after recording. E PLAY MODE button (27) (42) Press to play . When you press the switch again, the deck turns...

Operating Instructions
Page 5
... selected operation. R MDLP indicator (16) (23) Lights when the deck is playing or recording to carry out the selected operation. U INPUT selector (14) Use to select the input jack (or connector) of a program, or change the contents of the program source to resume play . M YES button (18) (27) (30) (39) Press to an MD in LP2 or LP4 Stereo mode. z button (14) (18) (19) Press to record to insert or eject the MD. S MD disc...
... selected operation. R MDLP indicator (16) (23) Lights when the deck is playing or recording to carry out the selected operation. U INPUT selector (14) Use to select the input jack (or connector) of a program, or change the contents of the program source to resume play . M YES button (18) (27) (30) (39) Press to an MD in LP2 or LP4 Stereo mode. z button (14) (18) (19) Press to record to insert or eject the MD. S MD disc...

Operating Instructions
Page 6
.../CLOSE Z ` / 1 MENU/NO YES DISPLAY SCROLL TIME PLAY MODE DATE CONTINUE SHUFFLE PROGRAM RECORDED PRESENT A B C D E F1 G2 H3 I X button (14) (23) Press to pause play or recording. When you press the switch again, the deck turns off the Peak Hold Function. DATE PRESENT button (13) Z Press to adjust the digital recording or analog output level. D M.SCAN button (24) Z Press to turn on the deck, the STANDBY indicator on the deck. F P.HOLD button (17) Z Press...
.../CLOSE Z ` / 1 MENU/NO YES DISPLAY SCROLL TIME PLAY MODE DATE CONTINUE SHUFFLE PROGRAM RECORDED PRESENT A B C D E F1 G2 H3 I X button (14) (23) Press to pause play or recording. When you press the switch again, the deck turns off the Peak Hold Function. DATE PRESENT button (13) Z Press to adjust the digital recording or analog output level. D M.SCAN button (24) Z Press to turn on the deck, the STANDBY indicator on the deck. F P.HOLD button (17) Z Press...

Operating Instructions
Page 8
... L.SYNC indicator (19) Lights when the deck is being controlled by an external device connected to the deck. Rec mode indicators (16) These indicators turn off during edit operations. "TOC" flashes when the TOC data is set to LP4 Stereo Recording mode or playing an MD recorded in LP4 Stereo Recording mode. Name display Displays disc and track names, Edit Menu parameters, and Setup Menu parameters (etc.). SHUF indicator (27) Lights when the deck is set...
... L.SYNC indicator (19) Lights when the deck is being controlled by an external device connected to the deck. Rec mode indicators (16) These indicators turn off during edit operations. "TOC" flashes when the TOC data is set to LP4 Stereo Recording mode or playing an MD recorded in LP4 Stereo Recording mode. Name display Displays disc and track names, Edit Menu parameters, and Setup Menu parameters (etc.). SHUF indicator (27) Lights when the deck is set...

Operating Instructions
Page 9
... if the MD is no name. C DIGITAL IN COAXIAL jack (11) (14) Connect a digital coaxial cable to turn on the deck. Note The display format that status and you press DISPLAY/CHAR (or DISPLAY) or TIME until you have selected in each of the deck statuses (play, recording, etc.) will revert to their default (i.e., the factory set to input digital signals from other components. To change the display in the music calendar. F DIGITAL OUT OPTICAL connector (11) Connect a digital optical cable to output digital signals to...
... if the MD is no name. C DIGITAL IN COAXIAL jack (11) (14) Connect a digital coaxial cable to turn on the deck. Note The display format that status and you press DISPLAY/CHAR (or DISPLAY) or TIME until you have selected in each of the deck statuses (play, recording, etc.) will revert to their default (i.e., the factory set to input digital signals from other components. To change the display in the music calendar. F DIGITAL OUT OPTICAL connector (11) Connect a digital optical cable to output digital signals to...

Operating Instructions
Page 11
...; Turn off the connectors and insert the cable plugs straight in until all components before making any connections. • Do not connect any AC power cord until they click into place. • Do not bend or tie the optical cables. Jacks (connectors) for connecting audio components Connect To the Amplifiers ANALOG IN/OUT jacks CD players or DBS tuners DIGITAL IN connector Digital amplifiers, DAT decks, or another MD deck DIGITAL IN/OUT connectors 11 Hooking up the audio components CONTROL...
...; Turn off the connectors and insert the cable plugs straight in until all components before making any connections. • Do not connect any AC power cord until they click into place. • Do not bend or tie the optical cables. Jacks (connectors) for connecting audio components Connect To the Amplifiers ANALOG IN/OUT jacks CD players or DBS tuners DIGITAL IN connector Digital amplifiers, DAT decks, or another MD deck DIGITAL IN/OUT connectors 11 Hooking up the audio components CONTROL...

Operating Instructions
Page 12
..." appears in the display. "Demo On" appears in the display. Setting the clock Once you use a timer, connect the AC power cord to enter the month, day, year, hour, and minute. 12 GB Hooking up the audio components/Setting the clock Complete!! Note If you set the MD deck's internal clock, the MD deck will automatically record the date and time of USA and Canadian models. MENU/NO AMS YES...
..." appears in the display. "Demo On" appears in the display. Setting the clock Once you use a timer, connect the AC power cord to enter the month, day, year, hour, and minute. 12 GB Hooking up the audio components/Setting the clock Complete!! Note If you set the MD deck's internal clock, the MD deck will automatically record the date and time of USA and Canadian models. MENU/NO AMS YES...
Operating Instructions
Page 17
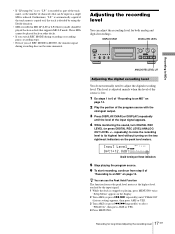
... part of the track name, so the number of the input signal appears. 4 While monitoring the sound, turn DIGITAL REC LEVEL (or press DIGITAL REC LEVEL/ANALOG OUT LEVEL +/- Avoid turning on these indicators 5 Stop playing the program source. 6 To start recording, continue from step 8 of "Recording to MONO, the monitor signal during recording does not become monaural. Adjusting the recording level You can adjust the recording level for long times/Adjusting the recording level GB DISPLAY...
... part of the track name, so the number of the input signal appears. 4 While monitoring the sound, turn DIGITAL REC LEVEL (or press DIGITAL REC LEVEL/ANALOG OUT LEVEL +/- Avoid turning on these indicators 5 Stop playing the program source. 6 To start recording, continue from step 8 of "Recording to MONO, the monitor signal during recording does not become monaural. Adjusting the recording level You can adjust the recording level for long times/Adjusting the recording level GB DISPLAY...

Operating Instructions
Page 18
... to set to ANALOG The analog signal input from step 8 of the program source with the strongest output. 3 While monitoring the sound, turn ANALOG REC LEVEL L/R to adjust the recording level. 4 Stop playing the program source. 5 To start recording, continue from the ANALOG IN jacks is being input. 3 Press z. Note The volume can use the remote to turn off Z Press P.HOLD to an MD" on page 14. 18 GB Adjusting the recording level/Recording tips Recording tips TIME MENU/NO...
... to set to ANALOG The analog signal input from step 8 of the program source with the strongest output. 3 While monitoring the sound, turn ANALOG REC LEVEL L/R to adjust the recording level. 4 Stop playing the program source. 5 To start recording, continue from the ANALOG IN jacks is being input. 3 Press z. Note The volume can use the remote to turn off Z Press P.HOLD to an MD" on page 14. 18 GB Adjusting the recording level/Recording tips Recording tips TIME MENU/NO...

Operating Instructions
Page 19
... Auto Cut Select S.Space On (factory setting) S.Space Off 4 Press MENU/NO. Marking track numbers while recording (Track Marking) You can be recorded is noisy (e.g., tapes or radio programs). 1 While the deck is interrupted for about 10 minutes after the Auto Cut activated, recording stops automatically. When recording from a CD player or MD deck connected to select the setting, then press AMS or YES. "Setup Menu" appears in the display. 2 Turn...
... Auto Cut Select S.Space On (factory setting) S.Space Off 4 Press MENU/NO. Marking track numbers while recording (Track Marking) You can be recorded is noisy (e.g., tapes or radio programs). 1 While the deck is interrupted for about 10 minutes after the Auto Cut activated, recording stops automatically. When recording from a CD player or MD deck connected to select the setting, then press AMS or YES. "Setup Menu" appears in the display. 2 Turn...
Operating Instructions
Page 20
... buffer memory. When you record tracks from a DAT deck or DBS tuner connected to recording pause. The deck changes to recording pause. 2 Start playing the program source. 3 Press AMS (or T.REC) at any value between -72 dB and 0 dB, in LP4 Stereo mode) during recording. • When recording from a component connected to the ANALOG IN jacks with the data in the buffer memory, then...
... buffer memory. When you record tracks from a DAT deck or DBS tuner connected to recording pause. The deck changes to recording pause. 2 Start playing the program source. 3 Press AMS (or T.REC) at any value between -72 dB and 0 dB, in LP4 Stereo mode) during recording. • When recording from a component connected to the ANALOG IN jacks with the data in the buffer memory, then...

Operating Instructions
Page 40
.... B flashes in Play nor Fade-out Play. Notes • The playing sound drops out momentarily when you turn off the deck or eject the MD. • The step and fine control values are linked; Fading in and fading out Z You can use Fade-in Play to gradually increase the signal level to "0.0%" (factory setting) when you change during Fade-in the display and the deck performs Fade-out Play...
.... B flashes in Play nor Fade-out Play. Notes • The playing sound drops out momentarily when you turn off the deck or eject the MD. • The step and fine control values are linked; Fading in and fading out Z You can use Fade-in Play to gradually increase the signal level to "0.0%" (factory setting) when you change during Fade-in the display and the deck performs Fade-out Play...

Operating Instructions
Page 43
... powerful sound. Note The change in sound characteristics caused by applying specific frequency cut-off conditions. Select To produce FILTER-STD (factory setting) An expansive sound of an amplifier. MENU/NO AMS YES Playing with different tones (Digital Filter) This deck is stopped, press MENU/NO twice. You can use the remote to the digital output connector. FILTER 1 While the deck is equipped with different tones GB The FILTER button lights green when a setting other digital components connected to select...
... powerful sound. Note The change in sound characteristics caused by applying specific frequency cut-off conditions. Select To produce FILTER-STD (factory setting) An expansive sound of an amplifier. MENU/NO AMS YES Playing with different tones (Digital Filter) This deck is stopped, press MENU/NO twice. You can use the remote to the digital output connector. FILTER 1 While the deck is equipped with different tones GB The FILTER button lights green when a setting other digital components connected to select...
Operating Instructions
Page 48
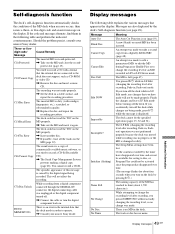
... recording level (page 17). , A premastered MD is inserted in monaural mode. Reset the remote. You can make a copy of MDs recorded in the wrong direction. The deck does not play of a digital signal from a digitally recorded analog sound program (for several hours until the moisture evaporates. , The deck is a first-generation copy. Take the MD out and leave the deck in the display. , The Self-diagnosis function is not enough time...
... recording level (page 17). , A premastered MD is inserted in monaural mode. Reset the remote. You can make a copy of MDs recorded in the wrong direction. The deck does not play of a digital signal from a digitally recorded analog sound program (for several hours until the moisture evaporates. , The deck is a first-generation copy. Take the MD out and leave the deck in the display. , The Self-diagnosis function is not enough time...
Operating Instructions
Page 49
... connected to operate. , Consult your nearest Sony dealer. If you have been lost. Initialize (flashing) The Setup Menu settings have made properly. Three- C41/Cannot Copy The sound source is on the deck by the timer have disappeared over time and are not be available for saving to make a second copy from a digital component connected through the DIGITAL IN connector, the digital connecting cable was in S.F Edit mode, any changes...
... connected to operate. , Consult your nearest Sony dealer. If you have been lost. Initialize (flashing) The Setup Menu settings have made properly. Three- C41/Cannot Copy The sound source is on the deck by the timer have disappeared over time and are not be available for saving to make a second copy from a digital component connected through the DIGITAL IN connector, the digital connecting cable was in S.F Edit mode, any changes...

Operating Instructions
Page 52
... Setup Menu While the deck is stopped, press MENU/NO twice to 0dB1) -50dB Off/Space/Pause Off S.Space - Sub-item Function - LS(T) - Changes the trigger level for Automatic Track Marking. Lsyn/Off Lsyn -72 to display "Setup Menu." P.Hold - Turns Peak Hold on or off . Sets the duration of the digital output signal. 24/16 bit 24 bit Sleep - Fine controls the playing speed. -87.5 to display "Edit Menu...
... Setup Menu While the deck is stopped, press MENU/NO twice to 0dB1) -50dB Off/Space/Pause Off S.Space - Sub-item Function - LS(T) - Changes the trigger level for Automatic Track Marking. Lsyn/Off Lsyn -72 to display "Setup Menu." P.Hold - Turns Peak Hold on or off . Sets the duration of the digital output signal. 24/16 bit 24 bit Sleep - Fine controls the playing speed. -87.5 to display "Edit Menu...

Operating Instructions
Page 54
... 36 O Optical cable 11 P Pausing after each track. See Locating Program play 26 Repeating a portion. See Repeat A-B play current track. See Repeat All play all tracks 32 F Fade-in 40 Fade-out 40 Fine control 39 H Headphones 23 Hooking up 11 I Input monitor 18 L Level input signal 9, 15 output signal 24 recording 17 Locating particular point 25 tracks 24 LP mode 16 M Manual track marking 19 MD (MiniDisc...
... 36 O Optical cable 11 P Pausing after each track. See Locating Program play 26 Repeating a portion. See Repeat A-B play current track. See Repeat All play all tracks 32 F Fade-in 40 Fade-out 40 Fine control 39 H Headphones 23 Hooking up 11 I Input monitor 18 L Level input signal 9, 15 output signal 24 recording 17 Locating particular point 25 tracks 24 LP mode 16 M Manual track marking 19 MD (MiniDisc...


