Component Setup Guide
Page 1
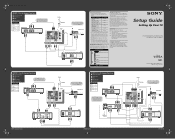
...performance, as cables and splitters, depending on the other possible solutions may need to the TV's VIDEO 5 inputs, press TV/VIDEO until "VIDEO 5" appears on -screen Auto Setup program, which cables you are trademarks of video inputs. What's Next? After .... Contact your A/V receiver's instruction manual for details. Making Video Connections Your TV includes several types of Sony Corporation HOOKUP 3. Component S VIDEO Composite RF/Coaxial Good Video Performance Setup Guide Setting Up Your TV For operating instructions, see the manuals that include an A/V receiver can often...
...performance, as cables and splitters, depending on the other possible solutions may need to the TV's VIDEO 5 inputs, press TV/VIDEO until "VIDEO 5" appears on -screen Auto Setup program, which cables you are trademarks of video inputs. What's Next? After .... Contact your A/V receiver's instruction manual for details. Making Video Connections Your TV includes several types of Sony Corporation HOOKUP 3. Component S VIDEO Composite RF/Coaxial Good Video Performance Setup Guide Setting Up Your TV For operating instructions, see the manuals that include an A/V receiver can often...
Primary User Manual
Page 2
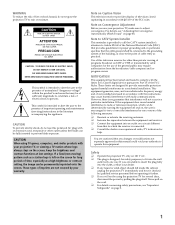
... the product's enclosure that provides guidelines for help. This equipment generates, uses, and can be permanently imprinted onto the screen. CAUTION When using the projection TV for safety purposes, to prevent blade exposure. However, there is designed, for several days, disconnect the power by turning...designed to rain or moisture. This symbol is connected. ❑ Consult the dealer or an experienced radio/TV technician for proper grounding and, in this manual could void your authority to persons. Note to CATV System Installer This reminder is provided to call the ...
... the product's enclosure that provides guidelines for help. This equipment generates, uses, and can be permanently imprinted onto the screen. CAUTION When using the projection TV for safety purposes, to prevent blade exposure. However, there is designed, for several days, disconnect the power by turning...designed to rain or moisture. This symbol is connected. ❑ Consult the dealer or an experienced radio/TV technician for proper grounding and, in this manual could void your authority to persons. Note to CATV System Installer This reminder is provided to call the ...
Primary User Manual
Page 4
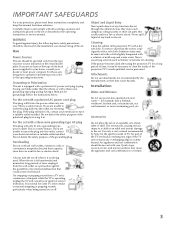
...the cabinet of the grounding plug. To remove dust from the screen, wipe it is operating, unplug the TV and consult your dealer or local power company. If the picture becomes dark after using the projection TV for future reference. Consult qualified service personnel. The set may ... Do not overload wall outlets, extension cords or convenience receptacles beyond their capacity, since this manual for a long period of time, it may cause hazards. Never use attachments not recommended by Sony for example, near a bathtub, washbowl, kitchen sink, or laundry tub, in the installation...
...the cabinet of the grounding plug. To remove dust from the screen, wipe it is operating, unplug the TV and consult your dealer or local power company. If the picture becomes dark after using the projection TV for future reference. Consult qualified service personnel. The set may ... Do not overload wall outlets, extension cords or convenience receptacles beyond their capacity, since this manual for a long period of time, it may cause hazards. Never use attachments not recommended by Sony for example, near a bathtub, washbowl, kitchen sink, or laundry tub, in the installation...
Primary User Manual
Page 8
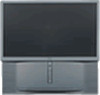
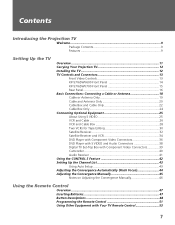
Contents Introducing the Projection TV Welcome ...9 Package Contents 9 Features 9 Setting Up the TV Overview ...11 Carrying Your Projection TV 12 Installing the TV 12 TV Controls and Connectors 13 Front Video Controls 13 KP-57/65WV600 Front Panel 14 KP-57/65WV700 Front Panel 15 Rear Panel 16 Basic ... List 43 Using Auto Setup 43 Adjusting the Convergence Automatically (Flash Focus 44 Adjusting the Convergence Manually 45 Notes on Adjusting the Convergence Manually 46 Using the Remote Control Overview ...47 Inserting Batteries 47 Button Descriptions 48 Programming the Remote...
Contents Introducing the Projection TV Welcome ...9 Package Contents 9 Features 9 Setting Up the TV Overview ...11 Carrying Your Projection TV 12 Installing the TV 12 TV Controls and Connectors 13 Front Video Controls 13 KP-57/65WV600 Front Panel 14 KP-57/65WV700 Front Panel 15 Rear Panel 16 Basic ... List 43 Using Auto Setup 43 Adjusting the Convergence Automatically (Flash Focus 44 Adjusting the Convergence Manually 45 Notes on Adjusting the Convergence Manually 46 Using the Remote Control Overview ...47 Inserting Batteries 47 Button Descriptions 48 Programming the Remote...
Primary User Manual
Page 10
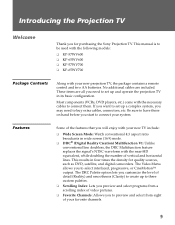
.... If you want to set up and operate the projection TV in four times the density for purchasing the Sony Projection TV. These items are included. The Video Menu allows you may need to be used with the following models: ❑ KP-57WV600 ❑ KP-65WV600 ❑ KP-57WV700 ❑ KP-65WV700 Package Contents Along with your favorite channels. 9 The...
.... If you want to set up and operate the projection TV in four times the density for purchasing the Sony Projection TV. These items are included. The Video Menu allows you may need to be used with the following models: ❑ KP-57WV600 ❑ KP-65WV600 ❑ KP-57WV700 ❑ KP-65WV700 Package Contents Along with your favorite channels. 9 The...
Primary User Manual
Page 12
...Channel List Adjusting the Convergence Automatically (Flash Focus) Adjusting the Convergence Manually Page(s) 12 12 13-17 18-24 26 28 30 32 34 36 38 39 40 41 42 43 44 45 11 Topic Carrying Your Projection TV Installing the TV TV Controls and Connectors Basic Connections: Connecting a Cable or Antenna Connecting ...Optional Equipment VCR and Cable VCR and Cable Box Two VCRs for setting up your TV.
...Channel List Adjusting the Convergence Automatically (Flash Focus) Adjusting the Convergence Manually Page(s) 12 12 13-17 18-24 26 28 30 32 34 36 38 39 40 41 42 43 44 45 11 Topic Carrying Your Projection TV Installing the TV TV Controls and Connectors Basic Connections: Connecting a Cable or Antenna Connecting ...Optional Equipment VCR and Cable VCR and Cable Box Two VCRs for setting up your TV.

Primary User Manual
Page 18
... the input is located on your VHF/UHF antenna or cable. 0 CONTROL S IN/OUT Allows the TV to receive (IN) and send (OUT) remote control signals to other Sony infrared-controlled audio or video equipment that came with your equipment for details about connecting and using two VHF... (VAR/FIX) Connects to the left and right audio input jacks of your antenna, CATV cable, or cable box output jack. See the instruction manual that has the CONTROL S function. *High-bandwidth Digital Content Protection SETUP SETUP SETUP SETUP 17 SETUP Setup Jack Description 1 DVI-HDTV VIDEO AUDIO ...
... the input is located on your VHF/UHF antenna or cable. 0 CONTROL S IN/OUT Allows the TV to receive (IN) and send (OUT) remote control signals to other Sony infrared-controlled audio or video equipment that came with your equipment for details about connecting and using two VHF... (VAR/FIX) Connects to the left and right audio input jacks of your antenna, CATV cable, or cable box output jack. See the instruction manual that has the CONTROL S function. *High-bandwidth Digital Content Protection SETUP SETUP SETUP SETUP 17 SETUP Setup Jack Description 1 DVI-HDTV VIDEO AUDIO ...
Primary User Manual
Page 45
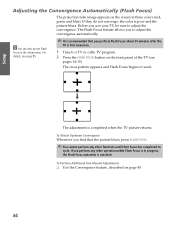
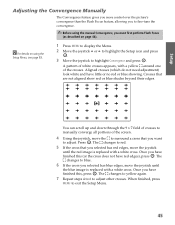
...Automatically (Flash Focus) The projection tube image appears on the screen in the Setup menu. To Obtain Optimum Convergence Whenever you find that you perform any other operation while Flash Focus is in progress, the Flash Focus operation is completed when the TV picture returns. If they... canceled. The Flash Focus feature allows you use your TV, be sure to adjust the convergence automatically. to work. To Perform Additional Fine Manual Adjustments ❑ Use the Convergence feature, described on the front panel of the TV (see page 85. ✍ It is recommended that...
...Automatically (Flash Focus) The projection tube image appears on the screen in the Setup menu. To Obtain Optimum Convergence Whenever you find that you perform any other operation while Flash Focus is in progress, the Flash Focus operation is completed when the TV picture returns. If they... canceled. The Flash Focus feature allows you use your TV, be sure to adjust the convergence automatically. to work. To Perform Additional Fine Manual Adjustments ❑ Use the Convergence feature, described on the front panel of the TV (see page 85. ✍ It is recommended that...
Primary User Manual
Page 46
... a cross that are not aligned show red or blue shades beyond their edges. A pattern of white crosses appears, with a yellow around one of the screen. 4 Using the joystick, move the joystick until the blue image is replaced with a white cross. Once you have finished this (or the cross does ...adjustment) look white and have red edges), press . Setup SETUP SETUP SETUP You can scroll up and down through the 9 x 7 field of crosses to manually converge all portions of the crosses. When finished, press MENU to highlight Convergence and press . SETUP Adjusting the Convergence...
... a cross that are not aligned show red or blue shades beyond their edges. A pattern of white crosses appears, with a yellow around one of the screen. 4 Using the joystick, move the joystick until the blue image is replaced with a white cross. Once you have finished this (or the cross does ...adjustment) look white and have red edges), press . Setup SETUP SETUP SETUP You can scroll up and down through the 9 x 7 field of crosses to manually converge all portions of the crosses. When finished, press MENU to highlight Convergence and press . SETUP Adjusting the Convergence...
Primary User Manual
Page 47
...the remote to toggle through the wide mode screens. ❑ To optimize the conditions for convergence adjustment, in the Video Menu, set Mode to Pro or Movie and lower the Picture level settings (see page 72). Press the WIDE MODE button on Adjusting the Convergence Manually ❑ For best results, ...stand about 3 to 5 feet back from the picture when adjusting the convergence. You can reset the adjustments by pressing the RESET button on the edges of the screen. ❑ You can make...
...the remote to toggle through the wide mode screens. ❑ To optimize the conditions for convergence adjustment, in the Video Menu, set Mode to Pro or Movie and lower the Picture level settings (see page 72). Press the WIDE MODE button on Adjusting the Convergence Manually ❑ For best results, ...stand about 3 to 5 feet back from the picture when adjusting the convergence. You can reset the adjustments by pressing the RESET button on the edges of the screen. ❑ You can make...
Primary User Manual
Page 81
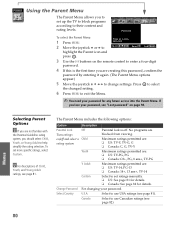
... Young Adult ratings, see page 81. Change Password For changing your password for details. Maximum ratings permitted are: ❏ US: TV-Y, TV-G, G ❏ Canada: C, G, TV-Y Youth Maximum ratings permitted are creating this is off and select a Child rating system Parental lock is the first time you are ... Selecting Parent Options z If you should select Child, Youth, or Young Adult to set more specific ratings, select Custom. To set ratings manually. ❏ US: See page 81 for details. ❏ Canada: See page 82 for any future access into the Parent Menu. The...
... Young Adult ratings, see page 81. Change Password For changing your password for details. Maximum ratings permitted are: ❏ US: TV-Y, TV-G, G ❏ Canada: C, G, TV-Y Youth Maximum ratings permitted are creating this is off and select a Child rating system Parental lock is the first time you are ... Selecting Parent Options z If you should select Child, Youth, or Young Adult to set more specific ratings, select Custom. To set ratings manually. ❏ US: See page 81 for details. ❏ Canada: See page 82 for any future access into the Parent Menu. The...
Primary User Manual
Page 86
... details, see page 44. Move the joystick B to go back to the previous setting. 3 Press MENU to fine-tune the convergence manually. Runs a demonstration of on the front panel of the TV. Press (or move the joystick b) to confirm each setting and move to the next setting. SETUP Option Clock/Timers (continued...
... details, see page 44. Move the joystick B to go back to the previous setting. 3 Press MENU to fine-tune the convergence manually. Runs a demonstration of on the front panel of the TV. Press (or move the joystick b) to confirm each setting and move to the next setting. SETUP Option Clock/Timers (continued...

Primary User Manual
Page 98
...modes 71, 83 CODE SET button 49 color, adjusting 72 CONTROL S 42 CONTROL S IN/OUT jacks, described 17 Convergence, adjusting automatically 44 Convergence, adjusting manually 45 Cool, Color Temperature 72 D Demo, Menus 85 Digital Reality Creation 9 Digital Visual Interface (DVI) 10, 17 DISC MENU button 50, 54 DISPLAY ... Mode 73 DRC MODE button 48 DRC Palette 73 DRC PALETTE button 49 DRC. DVD player using with TV remote control 54 with TV remote control 54 Caption Vision 83 carrying the TV 12 CATV. See Digital Reality Creation. brightness, adjusting 72 C cable connecting 19 setting On/Off 78 with...
...modes 71, 83 CODE SET button 49 color, adjusting 72 CONTROL S 42 CONTROL S IN/OUT jacks, described 17 Convergence, adjusting automatically 44 Convergence, adjusting manually 45 Cool, Color Temperature 72 D Demo, Menus 85 Digital Reality Creation 9 Digital Visual Interface (DVI) 10, 17 DISC MENU button 50, 54 DISPLAY ... Mode 73 DRC MODE button 48 DRC Palette 73 DRC PALETTE button 49 DRC. DVD player using with TV remote control 54 with TV remote control 54 Caption Vision 83 carrying the TV 12 CATV. See Digital Reality Creation. brightness, adjusting 72 C cable connecting 19 setting On/Off 78 with...


