
Limited Warranty (U.S. Only)
Page 1
... warranty gives you specific legal rights, and you . LABOR: For a period of one (1) year period for one (1) year (color picture tube - This warranty is invalid if the factory applied serial number has been altered or removed from state to state. In-home diagnostic ... or maintenance, connection to improper voltage supply, or attempted repair by Sony to service the Product. Proof of purchase in Japan 4-557-168-03 ® LIMITED WARRANTY HDTV Color TV XBR Projection TV Sony Electronics Inc. ("Sony") warrants this Product is determined to be presented to obtain warranty service...
... warranty gives you specific legal rights, and you . LABOR: For a period of one (1) year period for one (1) year (color picture tube - This warranty is invalid if the factory applied serial number has been altered or removed from state to state. In-home diagnostic ... or maintenance, connection to improper voltage supply, or attempted repair by Sony to service the Product. Proof of purchase in Japan 4-557-168-03 ® LIMITED WARRANTY HDTV Color TV XBR Projection TV Sony Electronics Inc. ("Sony") warrants this Product is determined to be presented to obtain warranty service...

Operating Instructions
Page 3
... 54) CODE SET (pages 53, 55) MTS (page 35) POWER MUTING SYSTEM DVD/ DBS TV OFF VTR CABLE VTR123DVD/MDP FUNCTION DVD/VTR DBSCABLE TV SLEEP TV/VTR CODE SET MTS REC DVD MENU TITLE DISPLAY TV/VIDEO ANT 123 456 789 MUTING (page 25) SYSTEM OFF* TV/DBS/ PICTURE MODE (page 34) GUIDE/[CC... the available functions. e.g. For a detailed explanation of the buttons on page 25. Green:Buttons relevant to power operations, like turning the projection TV, DBS/CABLE, or VTR (VCR)/MDP/DVD Player on your remote control. VTR (VCR)/MDP/DVD Player, DBS (Direct Broadcast Satellite)/CABLE, or...
... 54) CODE SET (pages 53, 55) MTS (page 35) POWER MUTING SYSTEM DVD/ DBS TV OFF VTR CABLE VTR123DVD/MDP FUNCTION DVD/VTR DBSCABLE TV SLEEP TV/VTR CODE SET MTS REC DVD MENU TITLE DISPLAY TV/VIDEO ANT 123 456 789 MUTING (page 25) SYSTEM OFF* TV/DBS/ PICTURE MODE (page 34) GUIDE/[CC... the available functions. e.g. For a detailed explanation of the buttons on page 25. Green:Buttons relevant to power operations, like turning the projection TV, DBS/CABLE, or VTR (VCR)/MDP/DVD Player on your remote control. VTR (VCR)/MDP/DVD Player, DBS (Direct Broadcast Satellite)/CABLE, or...

Operating Instructions
Page 5
...TV formats (except for DVD Player connection (480p format capability is for illustration purposes. in Canada 51 Additional Operations Operating Video Equipment 53 Setting the Manufacturer's Code . . . . 53...more detailed picture with zoom-in -Picture (PIP) - are trademarks of SRS Labs, Inc. TruSurround and SRS technology is used for models KP-53HS10 and KP-61HS10.... to block programs that are unsuitable for your projection TV easily. (not available for purchasing the Sony Color Rear Video Projection TV. Model KP-53HS10 is incorporated under license from the VIDEO 5 ...
...TV formats (except for DVD Player connection (480p format capability is for illustration purposes. in Canada 51 Additional Operations Operating Video Equipment 53 Setting the Manufacturer's Code . . . . 53...more detailed picture with zoom-in -Picture (PIP) - are trademarks of SRS Labs, Inc. TruSurround and SRS technology is used for models KP-53HS10 and KP-61HS10.... to block programs that are unsuitable for your projection TV easily. (not available for purchasing the Sony Color Rear Video Projection TV. Model KP-53HS10 is incorporated under license from the VIDEO 5 ...
Operating Instructions
Page 6
...for several days, disconnect the power by qualified service personnel before turning on the projection TV. • To obtain the best picture, do not block the ventilation openings. • Do not install the projection TV in a hot or humid place, or in the order provided to ensure that ...warm location, or if the room temperature changes suddenly, the picture may be blurred or show poor color. Never pull on page 3. If the picture becomes dark after using your new projection TV. 1 Installing and Connecting the Projection TV This section guides you how to let the moisture evaporate ...
...for several days, disconnect the power by qualified service personnel before turning on the projection TV. • To obtain the best picture, do not block the ventilation openings. • Do not install the projection TV in a hot or humid place, or in the order provided to ensure that ...warm location, or if the room temperature changes suddenly, the picture may be blurred or show poor color. Never pull on page 3. If the picture becomes dark after using your new projection TV. 1 Installing and Connecting the Projection TV This section guides you how to let the moisture evaporate ...

Operating Instructions
Page 9
... during a lightning storm, or when it is damaged or frayed. - Antenna Grounding According to qualified service personnel. Replacement Parts When replacement parts are specified in a picture tube implosion. Refer to section 54-300 of time, unplug it from the wall outlet and refer servicing to so certify. Ground clamp Antenna lead...
... during a lightning storm, or when it is damaged or frayed. - Antenna Grounding According to qualified service personnel. Replacement Parts When replacement parts are specified in a picture tube implosion. Refer to section 54-300 of time, unplug it from the wall outlet and refer servicing to so certify. Ground clamp Antenna lead...

Operating Instructions
Page 10
... casters for enhanced picture quality Align guides and push into connection. Installing and Connecting the Projection TV Carrying Your Projection TV Carrying the projection TV requires three or more people. Please move your projection TV using the casters. Screw-on a hard surface. Red The projection TV has been equipped...during set up. Recommended viewing area (Vertical) min.m2i.n1.m2.(4amp5p(3r6a"o1px"p.r7ofxt..)8ft.) 20˚ 20˚ Installing the Projection TV Recommended viewing area (Horizontal) min. 60˚ 2.1m5m3("ainp.p2r.o4xm. 6(a1p"prox. 7 ft.) 8 ft.) 60˚...
... casters for enhanced picture quality Align guides and push into connection. Installing and Connecting the Projection TV Carrying Your Projection TV Carrying the projection TV requires three or more people. Please move your projection TV using the casters. Screw-on a hard surface. Red The projection TV has been equipped...during set up. Recommended viewing area (Vertical) min.m2i.n1.m2.(4amp5p(3r6a"o1px"p.r7ofxt..)8ft.) 20˚ 20˚ Installing the Projection TV Recommended viewing area (Horizontal) min. 60˚ 2.1m5m3("ainp.p2r.o4xm. 6(a1p"prox. 7 ft.) 8 ft.) 60˚...
Operating Instructions
Page 12
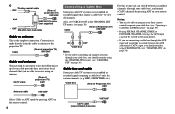
Connection is the simplest connection. Also, set CABLE to ON in the main picture. • If you are able to receive using the CHANNEL FIX feature. (see "CHANNEL FIX" on page 38) Select Cable or ANT mode by pressing ... use the following set up if your cable box, you will be able to program your Sony remote control to operate your remote control. HBO, SHOWTIME, etc.) *cable box (Rear of Projection TV) AUX For this set up , you can only be viewed in the CHANNEL SET UP menu. (see page 38) (Rear...
Connection is the simplest connection. Also, set CABLE to ON in the main picture. • If you are able to receive using the CHANNEL FIX feature. (see "CHANNEL FIX" on page 38) Select Cable or ANT mode by pressing ... use the following set up if your cable box, you will be able to program your Sony remote control to operate your remote control. HBO, SHOWTIME, etc.) *cable box (Rear of Projection TV) AUX For this set up , you can only be viewed in the CHANNEL SET UP menu. (see page 38) (Rear...

Operating Instructions
Page 19
...-R VMC-810S/820S (not supplied) 1 Audio/video outputs YC-15V/30V (not supplied) 1 Camcorder 15 Installing and Connecting the Projection TV Disconnect all power sources before making any connections. (Front of the S VIDEO cable. **If you are connecting a monaural camcorder, connect...Connecting a Camcorder Use this connection to view a picture directly from a camcorder. * If your camcorder is not equipped with S VIDEO, use a VIDEO cable (yellow) instead of projection TV) S VIDEO Push to the left (MONO) input on the projection TV (WhiteAUDIO Left, Red-AUDIO Right**). 2 Press VIDEO...
...-R VMC-810S/820S (not supplied) 1 Audio/video outputs YC-15V/30V (not supplied) 1 Camcorder 15 Installing and Connecting the Projection TV Disconnect all power sources before making any connections. (Front of the S VIDEO cable. **If you are connecting a monaural camcorder, connect...Connecting a Camcorder Use this connection to view a picture directly from a camcorder. * If your camcorder is not equipped with S VIDEO, use a VIDEO cable (yellow) instead of projection TV) S VIDEO Push to the left (MONO) input on the projection TV (WhiteAUDIO Left, Red-AUDIO Right**). 2 Press VIDEO...

Operating Instructions
Page 21
Note: • Since the high quality pictures on a DVD disc contain a lot of projection TV) CONTROL S IN OUT AUX IN OUT VIDEO 4 VIDEO 5 (DTV) SELECT IN VIDEO 1 VIDEO 3 HD VD S VIDEO VIDEO L (MONO) AUDIO R Y Y/G L PB PB/B (MONO) PR PR/R R COMPONENT ... NR in the VIDEO menu. (see "NR" on the DVD Player (White-AUDIO Left, Red-AUDIO Right). S VIDEO (Rear of information, picture noise may appear. Installing and Connecting the Projection TV Connecting a DVD Player With S Video or Composite Video Output Connectors Using an AUDIO and S VIDEO cables, connect AUDIO and S VIDEO IN on...
Note: • Since the high quality pictures on a DVD disc contain a lot of projection TV) CONTROL S IN OUT AUX IN OUT VIDEO 4 VIDEO 5 (DTV) SELECT IN VIDEO 1 VIDEO 3 HD VD S VIDEO VIDEO L (MONO) AUDIO R Y Y/G L PB PB/B (MONO) PR PR/R R COMPONENT ... NR in the VIDEO menu. (see "NR" on the DVD Player (White-AUDIO Left, Red-AUDIO Right). S VIDEO (Rear of information, picture noise may appear. Installing and Connecting the Projection TV Connecting a DVD Player With S Video or Composite Video Output Connectors Using an AUDIO and S VIDEO cables, connect AUDIO and S VIDEO IN on...

Operating Instructions
Page 22
... any connections. In this case, adjust NR in the VIDEO menu. (see "NR" on a DVD disc contain a lot of information, picture noise may be labeled differently. PR PB (Rear of projection TV) Y CONTROL S IN OUT IN OUT VIDEO 4 VIDEO 5 (DTV) SELECT VMC-10HG (not supplied) AUX IN VIDEO 1 VIDEO 3 ...to Y. Notes: • If your DVD Player has 480p format capability, connect it to the Y, PB and PR of VIDEO 5 (DTV) IN on the projection TV. Connect PB (blue) to CB, Cb or B-Y. Connecting a DVD Player With Component Video Output Connectors 1 Using an AUDIO cable, connect AUDIO R and L...
... any connections. In this case, adjust NR in the VIDEO menu. (see "NR" on a DVD disc contain a lot of information, picture noise may be labeled differently. PR PB (Rear of projection TV) Y CONTROL S IN OUT IN OUT VIDEO 4 VIDEO 5 (DTV) SELECT VMC-10HG (not supplied) AUX IN VIDEO 1 VIDEO 3 ...to Y. Notes: • If your DVD Player has 480p format capability, connect it to the Y, PB and PR of VIDEO 5 (DTV) IN on the projection TV. Connect PB (blue) to CB, Cb or B-Y. Connecting a DVD Player With Component Video Output Connectors 1 Using an AUDIO cable, connect AUDIO R and L...
Operating Instructions
Page 28
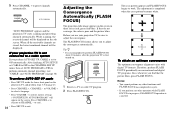
...To perform AUTO SET UP again • Press SET UP inside the lower front panel on the projection TV, and perform steps 3-5 on the screen in progress, FLASH FOCUS operation is poor and the picture blurs. to execute or CHANNEL - Press CHANNEL + to restore factory settings ("CONTINUE TO AUTO ...PROGRAM?" Before you use your projection TV is not connected to a cable system If you perform any other operation while ...
...To perform AUTO SET UP again • Press SET UP inside the lower front panel on the projection TV, and perform steps 3-5 on the screen in progress, FLASH FOCUS operation is poor and the picture blurs. to execute or CHANNEL - Press CHANNEL + to restore factory settings ("CONTINUE TO AUTO ...PROGRAM?" Before you use your projection TV is not connected to a cable system If you perform any other operation while ...

Operating Instructions
Page 29
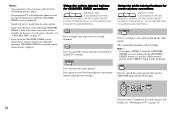
... it on the left while viewing the normal picture on the right. (see "Cable and antenna" or "Cable box and cable" on your remote control. JUMP Press to select channel 10, press 1 and 0). Using the white labeled buttons for projection TV operations REFER TO THE ILLUSTRATION OF THE REMOTE ...FREEZE MODE" on the screen, press TV/VIDEO until a channel number appears. 0 - 9 and ENTER Use for example, to alternate or jump back and forth between the VHF/UHF input and the AUX input. (for use with the projection TV. ANT - (AUX input) Press to freeze the picture. "MUTING" will appear on and off...
... it on the left while viewing the normal picture on the right. (see "Cable and antenna" or "Cable box and cable" on your remote control. JUMP Press to select channel 10, press 1 and 0). Using the white labeled buttons for projection TV operations REFER TO THE ILLUSTRATION OF THE REMOTE ...FREEZE MODE" on the screen, press TV/VIDEO until a channel number appears. 0 - 9 and ENTER Use for example, to alternate or jump back and forth between the VHF/UHF input and the AUX input. (for use with the projection TV. ANT - (AUX input) Press to freeze the picture. "MUTING" will appear on and off...

Operating Instructions
Page 30
...offers this service. When you select each mode, you can also adjust the picture quality (such as a video game. VIVID: Select for normal viewing environments. Cancel by pressing until the projection TV displays the approximate time in the SET UP menu, your taste. Caption ...Vision Displayed on page 35) PICTURE MODE Press PICTURE MODE repeatedly to display a picture with the picture from VIDEO 5 (DTV) IN. • If the frozen picture mode is not canceled ...
...offers this service. When you select each mode, you can also adjust the picture quality (such as a video game. VIVID: Select for normal viewing environments. Cancel by pressing until the projection TV displays the approximate time in the SET UP menu, your taste. Caption ...Vision Displayed on page 35) PICTURE MODE Press PICTURE MODE repeatedly to display a picture with the picture from VIDEO 5 (DTV) IN. • If the frozen picture mode is not canceled ...

Operating Instructions
Page 31
...to VIDEO 5 (DTV) IN on the projection TV. (for details, see the Operating Instructions of receiving the 1080i, 480p and 480i digital TV formats. Note: • This projection TV is not suitable for three seconds. When a 720p format signal is received, the picture will dim and "This signal is not ...see pages 11 and 12) 2 Press TV/VIDEO to select VIDEO 5. Using Your New Projection TV Watching Digital TV When you have connected the DTV receiver, you find that the picture blurs, press FLASH FOCUS. (for details, see page 24) If the picture appears stretched vertically Select the SET UP menu...
...to VIDEO 5 (DTV) IN on the projection TV. (for details, see the Operating Instructions of receiving the 1080i, 480p and 480i digital TV formats. Note: • This projection TV is not suitable for three seconds. When a 720p format signal is received, the picture will dim and "This signal is not ...see pages 11 and 12) 2 Press TV/VIDEO to select VIDEO 5. Using Your New Projection TV Watching Digital TV When you have connected the DTV receiver, you find that the picture blurs, press FLASH FOCUS. (for details, see page 24) If the picture appears stretched vertically Select the SET UP menu...

Operating Instructions
Page 32
...the available video inputs for the picture on which picture's TV channel or input source can move the window picture to any location on page 25) ANT - (white labeled button) Press to change the location of the window picture (counterclockwise) around the main picture. - (white labeled button)... changed . POSITION Press to change the location of the window picture, move to select the TV channel on which the symbol "b" (or "B") is being received. Main picture The symbol "9" indicates which picture's sound is displayed. (for details, see "TV/VIDEO" on page 26) CH JUMP or 0 - 9 or...
...the available video inputs for the picture on which picture's TV channel or input source can move the window picture to any location on page 25) ANT - (white labeled button) Press to change the location of the window picture (counterclockwise) around the main picture. - (white labeled button)... changed . POSITION Press to change the location of the window picture, move to select the TV channel on which the symbol "b" (or "B") is being received. Main picture The symbol "9" indicates which picture's sound is displayed. (for details, see "TV/VIDEO" on page 26) CH JUMP or 0 - 9 or...

Operating Instructions
Page 33
... "B" indicates or input- Using Your New Projection TV AUDIO Press to cancel and resume normal TV viewing. FREEZE This is useful when you cannot view the picture from VIDEO 5 (DTV) IN. Press (OFF) to alternate sound between the main picture and the window picture. P&P (Twin View™) The Picture-and-Picture (P&P) feature allows you to view two channels...
... "B" indicates or input- Using Your New Projection TV AUDIO Press to cancel and resume normal TV viewing. FREEZE This is useful when you cannot view the picture from VIDEO 5 (DTV) IN. Press (OFF) to alternate sound between the main picture and the window picture. P&P (Twin View™) The Picture-and-Picture (P&P) feature allows you to view two channels...
Operating Instructions
Page 34
...is being received. Press to freeze both the right and left pictures. TV/VIDEO - (white labeled button) Press repeatedly to scroll through the available video inputs for the picture on which picture's sound is displayed. (see "Watching the TV" on page 25) RIGHT ANT - (white labeled button)... Press to change the TV channel or video source using the white labeled buttons below. Press...
...is being received. Press to freeze both the right and left pictures. TV/VIDEO - (white labeled button) Press repeatedly to scroll through the available video inputs for the picture on which picture's sound is displayed. (see "Watching the TV" on page 25) RIGHT ANT - (white labeled button)... Press to change the TV channel or video source using the white labeled buttons below. Press...

Operating Instructions
Page 35
... any direction to move to the center, and the sound of the pictures received through the CHANNEL SET UP menu). These small pictures are updated in normal motion picture format. Using Your New Projection TV SWAP Press to view another , clockwise, around the center picture. Reciipe flour - - - - 2 sugar - - - 1/2 salt - - - - -1/2 butter - - -1 The selected channel will appear one...
... any direction to move to the center, and the sound of the pictures received through the CHANNEL SET UP menu). These small pictures are updated in normal motion picture format. Using Your New Projection TV SWAP Press to view another , clockwise, around the center picture. Reciipe flour - - - - 2 sugar - - - 1/2 salt - - - - -1/2 butter - - -1 The selected channel will appear one...
Operating Instructions
Page 36
... details, see "CHANNEL SKIP" on page 25) 32 FREEZE Press to normal TV viewing. Notes: • You cannot move the cyan frame until all of the surrounding pictures appear. • The projection TV will continually update each of the surrounding pictures while the CHANNEL INDEX screen is displayed. • Sound will only be displayed. OFF...
... details, see "CHANNEL SKIP" on page 25) 32 FREEZE Press to normal TV viewing. Notes: • You cannot move the cyan frame until all of the surrounding pictures appear. • The projection TV will continually update each of the surrounding pictures while the CHANNEL INDEX screen is displayed. • Sound will only be displayed. OFF...

Operating Instructions
Page 37
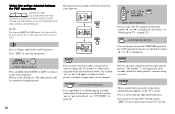
... the MENU button. The main menu appears. Use the following example to learn how to alter the settings. MENU VIDEO MODE : PICTURE BRIGHTNESS COLOR HUE SHARPNESS TRINITONE : NR : DYNAMIC PICTURE : VIVID HIGH OFF OFF Move Select Exit MENU 2 Move the joystick up or down to make your selection (Pop-up or down...
... the MENU button. The main menu appears. Use the following example to learn how to alter the settings. MENU VIDEO MODE : PICTURE BRIGHTNESS COLOR HUE SHARPNESS TRINITONE : NR : DYNAMIC PICTURE : VIVID HIGH OFF OFF Move Select Exit MENU 2 Move the joystick up or down to make your selection (Pop-up or down...


