Instructions (SU-WL31 Wall-Mount Bracket)
Page 7
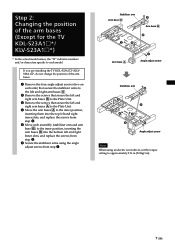
... the TV KDL-S23A1s*/KLVS23A1s*, do not change the position of the arm bases (Except for the TV KDL-S23A1s*/ KLV-S23A1s*) * In the actual model names, the "s" indicates numbers and/or characters specific to each assembly (stabilizer arm and arm base B) to approximately 2 N·m {20 Kgf·cm}. 7 (GB) Stabilizer ... screws from step 2. 6 Secure the stabilizer arms using the angle adjust screws from step 3. 5 Move each model. Step 2: Changing the position of the arm bases. 1 Remove the four angle adjust screws (two on each side) that secure the stabilizer arms to the left and right arm...
... the TV KDL-S23A1s*/KLVS23A1s*, do not change the position of the arm bases (Except for the TV KDL-S23A1s*/ KLV-S23A1s*) * In the actual model names, the "s" indicates numbers and/or characters specific to each assembly (stabilizer arm and arm base B) to approximately 2 N·m {20 Kgf·cm}. 7 (GB) Stabilizer ... screws from step 2. 6 Secure the stabilizer arms using the angle adjust screws from step 3. 5 Move each model. Step 2: Changing the position of the arm bases. 1 Remove the four angle adjust screws (two on each side) that secure the stabilizer arms to the left and right arm...
Instructions (SU-WL31 Wall-Mount Bracket)
Page 10
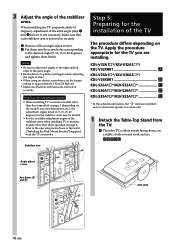
... etc.), the adjustment angles listed (0, 5, 10, 15, 20 degrees) for the TV you are screwed in securely. 1 Remove all four angle adjust screws. 2 Put them into the screw holes corresponding to pinch your fingers when adjusting the angle of...KLV-V26A1s*/ KDL-V26XBR1 B KDL-S32A1s*/KLV-S32A1s C KDL-S26A1s*/KLV-S26A1s D KDL-S23A1s*/KLV-S23A1s E * In the actual model names, the "s" indicates numbers and/or characters specific to the operating instructions or the leaflet ("Installing the Wall-Mount Bracket") supplied with its screen facing down, on the TV. Make sure that four arm bases...
... etc.), the adjustment angles listed (0, 5, 10, 15, 20 degrees) for the TV you are screwed in securely. 1 Remove all four angle adjust screws. 2 Put them into the screw holes corresponding to pinch your fingers when adjusting the angle of...KLV-V26A1s*/ KDL-V26XBR1 B KDL-S32A1s*/KLV-S32A1s C KDL-S26A1s*/KLV-S26A1s D KDL-S23A1s*/KLV-S23A1s E * In the actual model names, the "s" indicates numbers and/or characters specific to the operating instructions or the leaflet ("Installing the Wall-Mount Bracket") supplied with its screen facing down, on the TV. Make sure that four arm bases...

Instructions (SU-WL31 Wall-Mount Bracket)
Page 14
When removing the TV To Sony Dealers 1 Unplug the AC power cord from the wall outlet. 2 Remove the two securing screws on the arm bases are securely tightened. WARNING • Be sure that two or more persons hold the TV and slide it . • Be careful not to allow the ...cords and cables to get hung up when removing...
When removing the TV To Sony Dealers 1 Unplug the AC power cord from the wall outlet. 2 Remove the two securing screws on the arm bases are securely tightened. WARNING • Be sure that two or more persons hold the TV and slide it . • Be careful not to allow the ...cords and cables to get hung up when removing...


