Operating Instructions
Page 2
...TV technician for other outlet unless the blades can be fully inserted to prevent blade exposure. NO USER-SERVICEABLE PARTS INSIDE. This symbol is provided to call upon your authority to constitute a risk of this equipment. Note on a circuit different from the broadcaster/cable company and/or program owner. MODEL: KF-42WE610, KF-50WE610, KF... in the spaces provided below the Sony logo, on the sticker, and also...Projection TV, below . These limits are located at the rear of the NEC that provides guidelines for the use this notice with the limits for the remote control...
...TV technician for other outlet unless the blades can be fully inserted to prevent blade exposure. NO USER-SERVICEABLE PARTS INSIDE. This symbol is provided to call upon your authority to constitute a risk of this equipment. Note on a circuit different from the broadcaster/cable company and/or program owner. MODEL: KF-42WE610, KF-50WE610, KF... in the spaces provided below the Sony logo, on the sticker, and also...Projection TV, below . These limits are located at the rear of the NEC that provides guidelines for the use this notice with the limits for the remote control...
Operating Instructions
Page 7
... picture quality may suffer from behind the screen. Remote control detection ❑ The remote control sensor is in a manner other hazards. This is not a malfunction. Sit at least 1.8m (approx. 5.9ft.) for KF-42WE610, 2.0m (approx. 6.6ft.) for KF-50WE610 or 2.2m (approx. 7.2ft.) for a long period of the LCD Projection TV. Installation ❑ If direct sunlight or other...
... picture quality may suffer from behind the screen. Remote control detection ❑ The remote control sensor is in a manner other hazards. This is not a malfunction. Sit at least 1.8m (approx. 5.9ft.) for KF-42WE610, 2.0m (approx. 6.6ft.) for KF-50WE610 or 2.2m (approx. 7.2ft.) for a long period of the LCD Projection TV. Installation ❑ If direct sunlight or other...
Operating Instructions
Page 8
Contents Introducing the Sony LCD Projection TV Presenting the Sony LCD Projection TV 9 Using This Manual 10 Enjoying Your LCD Projection TV 11 Replacing the Lamp 13 Installing and Connecting the LCD Projection TV Contents 17 Inserting Batteries into the Remote Control ..........17 Carrying Your LCD Projection TV 18 To Prevent the LCD Projection TV from Falling Down 19 When Installing Your LCD Projection TV Against a Wall 19 Recommended...
Contents Introducing the Sony LCD Projection TV Presenting the Sony LCD Projection TV 9 Using This Manual 10 Enjoying Your LCD Projection TV 11 Replacing the Lamp 13 Installing and Connecting the LCD Projection TV Contents 17 Inserting Batteries into the Remote Control ..........17 Carrying Your LCD Projection TV 18 To Prevent the LCD Projection TV from Falling Down 19 When Installing Your LCD Projection TV Against a Wall 19 Recommended...
Operating Instructions
Page 10
... to select the wide screen mode automatically. Introducing the Sony LCD Projection TV ❑ Component Video Inputs: Offers the best video quality for DVD (480p, 480i) and Digital Set-top box (1080i, 720p, 480p, 480i) connections. ❑ S-VIDEO Inputs: Provides a high-quality image for the remote control. Instructions in this manual are also found on...
... to select the wide screen mode automatically. Introducing the Sony LCD Projection TV ❑ Component Video Inputs: Offers the best video quality for DVD (480p, 480i) and Digital Set-top box (1080i, 720p, 480p, 480i) connections. ❑ S-VIDEO Inputs: Provides a high-quality image for the remote control. Instructions in this manual are also found on...
Operating Instructions
Page 12
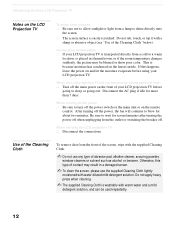
.... 12 On moisture condensation ❑ If your LCD projection TV. Introducing the Sony LCD Projection TV Notes on the LCD Projection TV To enjoy clear pictures ❑ Be sure not to allow sunlight or light from a lamp to turn off the power switch on the main unit or on the remote control. Do not rub, touch, or tap it...
.... 12 On moisture condensation ❑ If your LCD projection TV. Introducing the Sony LCD Projection TV Notes on the LCD Projection TV To enjoy clear pictures ❑ Be sure not to allow sunlight or light from a lamp to turn off the power switch on the main unit or on the remote control. Do not rub, touch, or tap it...
Operating Instructions
Page 17
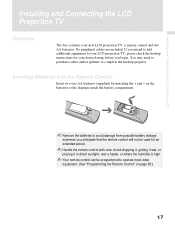
... two size AA batteries (supplied) by matching the + and - You may need to purchase cables and/or splitters to your new LCD projection TV, a remote control and two AA batteries. No peripheral cables are included. Avoid dropping it, getting it wet, or placing it in direct sunlight, near a heater, or where ...
... two size AA batteries (supplied) by matching the + and - You may need to purchase cables and/or splitters to your new LCD projection TV, a remote control and two AA batteries. No peripheral cables are included. Avoid dropping it, getting it wet, or placing it in direct sunlight, near a heater, or where ...
Operating Instructions
Page 23
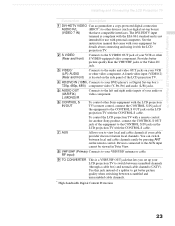
To control the LCD projection TV with a remote control for another Sony product, connect the CONTROL S OUT jack of the equipment to the CONTROL S IN jack on the LCD projection TV with the LCD projection TV. 2 S VIDEO (Rear and front) Connects to the S VIDEO OUT jack of your VCR or other S VIDEO-equipped video component. You can switch between scrambled and unscrambled cable ...
To control the LCD projection TV with a remote control for another Sony product, connect the CONTROL S OUT jack of the equipment to the CONTROL S IN jack on the LCD projection TV with the LCD projection TV. 2 S VIDEO (Rear and front) Connects to the S VIDEO OUT jack of your VCR or other S VIDEO-equipped video component. You can switch between scrambled and unscrambled cable ...

Operating Instructions
Page 26
...cable (No connection to TO CONVERTER) Antenna cable AUX Rear of them (pay channels vs. The LCD projection TV's internal converter allows you to switch between unscrambled signals coming straight into the LCD projection TV and scrambled signals coming in through your cable box, ...can: ❑ Use the LCD projection TV remote control to change channels using your cable box when the signal is scrambled. ❑ Use the LCD projection TV remote control to change channels using your LCD projection TV when the signal is not scrambled. (Your LCD projection TV's tuner provides a better signal than ...
...cable (No connection to TO CONVERTER) Antenna cable AUX Rear of them (pay channels vs. The LCD projection TV's internal converter allows you to switch between unscrambled signals coming straight into the LCD projection TV and scrambled signals coming in through your cable box, ...can: ❑ Use the LCD projection TV remote control to change channels using your cable box when the signal is scrambled. ❑ Use the LCD projection TV remote control to change channels using your LCD projection TV when the signal is not scrambled. (Your LCD projection TV's tuner provides a better signal than ...
Operating Instructions
Page 27
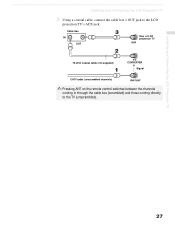
Installing and Connecting the LCD Projection TV Installing and Connecting the LCD Projection TV 3 Using a coaxial cable, connect the cable box's OUT jack to the TV (unscrambled). 27 Cable box IN OUT Rear of LCD projection TV AUX 75-ohm coaxial cable (not supplied) TO CONVERTER Signal CATV cable (unscrambled channels) VHF/UHF ✍ Pressing ANT on the remote control switches between the channels coming in through the cable box (scrambled) and those coming directly to the LCD projection TV's AUX jack.
Installing and Connecting the LCD Projection TV Installing and Connecting the LCD Projection TV 3 Using a coaxial cable, connect the cable box's OUT jack to the TV (unscrambled). 27 Cable box IN OUT Rear of LCD projection TV AUX 75-ohm coaxial cable (not supplied) TO CONVERTER Signal CATV cable (unscrambled channels) VHF/UHF ✍ Pressing ANT on the remote control switches between the channels coming in through the cable box (scrambled) and those coming directly to the LCD projection TV's AUX jack.
Operating Instructions
Page 28
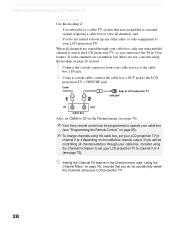
...Rear of LCD projection TV VHF/UHF IN OUT Cable box Also, set Cable to On in the Channel menu (see page 76). If you will be programmed to operate your cable box (see "Programming the Remote Control" on page 86). ✍ To change channels using the cable box, set your LCD projection TV... your cable box, consider using the Channel Fix feature to set your LCD projection TV. 28 z Setting the Channel Fix feature in the Channel menu (see page 76). ✍ Your Sony remote control can be controlling all channel selection through your cable box, only one unscrambled channel is sent ...
...Rear of LCD projection TV VHF/UHF IN OUT Cable box Also, set Cable to On in the Channel menu (see page 76). If you will be programmed to operate your cable box (see "Programming the Remote Control" on page 86). ✍ To change channels using the cable box, set your LCD projection TV... your cable box, consider using the Channel Fix feature to set your LCD projection TV. 28 z Setting the Channel Fix feature in the Channel menu (see page 76). ✍ Your Sony remote control can be controlling all channel selection through your cable box, only one unscrambled channel is sent ...
Operating Instructions
Page 30
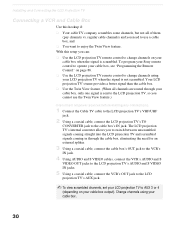
... ❑ Use the LCD projection TV remote control to switch between unscrambled signals coming straight into the LCD projection TV and scrambled signals coming in through your cable box output). To program your Sony remote control to operate your cable box, see "Programming the Remote Control" on your cable box. ...30 Change channels using your LCD projection TV when the signal is sent to the LCD projection TV, so you need to use the Twin...
... ❑ Use the LCD projection TV remote control to switch between unscrambled signals coming straight into the LCD projection TV and scrambled signals coming in through your cable box output). To program your Sony remote control to operate your cable box, see "Programming the Remote Control" on your cable box. ...30 Change channels using your LCD projection TV when the signal is sent to the LCD projection TV, so you need to use the Twin...

Operating Instructions
Page 31
...) AUDIO-L (white) AUDIO-R (red) VC-810S/820S (not supplied) S VIDEO Installing and Connecting the LCD Projection TV S VIDEO Coaxial cable Cable box Rear of the S VIDEO cable. ✍ You will not be able to change channels on the remote control switches between the channels coming in through the cable box (scrambled) and those coming directly...
...) AUDIO-L (white) AUDIO-R (red) VC-810S/820S (not supplied) S VIDEO Installing and Connecting the LCD Projection TV S VIDEO Coaxial cable Cable box Rear of the S VIDEO cable. ✍ You will not be able to change channels on the remote control switches between the channels coming in through the cable box (scrambled) and those coming directly...
Operating Instructions
Page 32
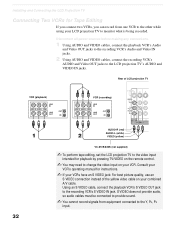
... must be connected to provide sound. ✍ You cannot record signals from one VCR to the other while using your LCD projection TV to the LCD projection TV's AUDIO and VIDEO IN jacks. Disconnect all power sources before making any connections. 1 Using AUDIO and VIDEO cables, connect the... OUT jacks to monitor what is being recorded. Installing and Connecting the LCD Projection TV Connecting Two VCRs for playback by pressing TV/VIDEO on the remote control. ✍ You may need to change the video input on your combined A/V cable. Rear of the yellow video cable on your VCR.
... must be connected to provide sound. ✍ You cannot record signals from one VCR to the other while using your LCD projection TV to the LCD projection TV's AUDIO and VIDEO IN jacks. Disconnect all power sources before making any connections. 1 Using AUDIO and VIDEO cables, connect the... OUT jacks to monitor what is being recorded. Installing and Connecting the LCD Projection TV Connecting Two VCRs for playback by pressing TV/VIDEO on the remote control. ✍ You may need to change the video input on your combined A/V cable. Rear of the yellow video cable on your VCR.
Operating Instructions
Page 38
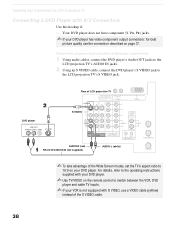
Rear of LCD projection TV DVD player S VIDEO AUDIO-R (red) RK-C310/C320/C330 (not supplied) AUDIO-L (white) ✍ To take advantage of the S VIDEO cable. 38 Installing and Connecting the LCD Projection TV Connecting a DVD Player with A/V Connectors Use this hookup if: ❑ Your DVD player ... to the operating instructions supplied with S VIDEO, use the connection described on your DVD player. ✍ Use TV/VIDEO on the remote control to the LCD projection TV's S VIDEO jack. Disconnect all power sources before making any connections. 1 Using audio cables, connect the DVD ...
Rear of LCD projection TV DVD player S VIDEO AUDIO-R (red) RK-C310/C320/C330 (not supplied) AUDIO-L (white) ✍ To take advantage of the S VIDEO cable. 38 Installing and Connecting the LCD Projection TV Connecting a DVD Player with A/V Connectors Use this hookup if: ❑ Your DVD player ... to the operating instructions supplied with S VIDEO, use the connection described on your DVD player. ✍ Use TV/VIDEO on the remote control to the LCD projection TV's S VIDEO jack. Disconnect all power sources before making any connections. 1 Using audio cables, connect the DVD ...
Operating Instructions
Page 42
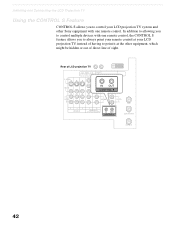
Installing and Connecting the LCD Projection TV Using the CONTROL S Feature CONTROL S allows you to always point your remote control at the other Sony equipment with one remote control, the CONTROL S feature allows you to point it at your LCD projection TV, instead of having to control your LCD projection TV system and other equipment, which might be hidden or out of direct line of LCD projection TV 42 Rear of sight. In addition to allowing you to control multiple devices with one remote control.
Installing and Connecting the LCD Projection TV Using the CONTROL S Feature CONTROL S allows you to always point your remote control at the other Sony equipment with one remote control, the CONTROL S feature allows you to point it at your LCD projection TV, instead of having to control your LCD projection TV system and other equipment, which might be hidden or out of direct line of LCD projection TV 42 Rear of sight. In addition to allowing you to control multiple devices with one remote control.
Operating Instructions
Page 43
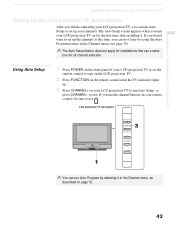
... feature in the Channel menu, as described on your LCD projection TV or on the remote control to turn your LCD projection TV on your channels. to exit. Using Auto Setup 1 Press POWER on the front panel of your LCD projection TV to run Auto Setup, or press CHANNEL- If you use.... If you do not want to set up your remote control, be sure to use CH . Installing and Connecting the LCD Projection TV Installing and Connecting the LCD Projection TV Setting Up the LCD projection TV Automatically After you finish connecting your LCD projection TV, you can run Auto Setup to set up the ...
... feature in the Channel menu, as described on your LCD projection TV or on the remote control to turn your LCD projection TV on your channels. to exit. Using Auto Setup 1 Press POWER on the front panel of your LCD projection TV to run Auto Setup, or press CHANNEL- If you use.... If you do not want to set up your remote control, be sure to use CH . Installing and Connecting the LCD Projection TV Installing and Connecting the LCD Projection TV Setting Up the LCD projection TV Automatically After you finish connecting your LCD projection TV, you can run Auto Setup to set up the ...

Operating Instructions
Page 44
.... The LCD projection TV alternates between two channels. For details, see "Using Twin View™" on page 54. Adjusts the volume. 44 Displays the Favorite Channels list. When the menu is displayed, move the on page 49. Using the Features Using the Remote Control The following table... again to jump back and forth between the current channel and the last channel that you want to turn on the remote control that are for more advanced functions. Select the equipment (TV, SAT/CABLE, VCR/DVD) that was selected. X: Pause x: Stop m: Rewind B: Play M: Fast-Forward z: Record...
.... The LCD projection TV alternates between two channels. For details, see "Using Twin View™" on page 54. Adjusts the volume. 44 Displays the Favorite Channels list. When the menu is displayed, move the on page 49. Using the Features Using the Remote Control The following table... again to jump back and forth between the current channel and the last channel that you want to turn on the remote control that are for more advanced functions. Select the equipment (TV, SAT/CABLE, VCR/DVD) that was selected. X: Pause x: Stop m: Rewind B: Play M: Fast-Forward z: Record...
Operating Instructions
Page 45
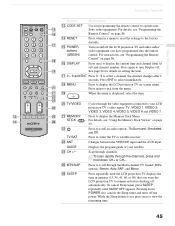
...15, 30, 45, 60, or 90) that you have programmed into the remote control. Press again to the factory defaults. Press to operate nonSony video equipment. Displays the program guide of your LCD projection TV's video inputs: TV, VIDEO 1, VIDEO 2, VIDEO 3, VIDEO 4, VIDEO 5, VIDEO 6 and VIDEO...POWER buttons (GREEN) Turn on and off the power. For instructions, see "Programming the Remote Control" on before shutting off . To cancel Sleep timer, press SLEEP repeatedly until the LCD projection TV displays the time in a menu to reset the settings to exit from the menu. w; ...
...15, 30, 45, 60, or 90) that you have programmed into the remote control. Press again to the factory defaults. Press to operate nonSony video equipment. Displays the program guide of your LCD projection TV's video inputs: TV, VIDEO 1, VIDEO 2, VIDEO 3, VIDEO 4, VIDEO 5, VIDEO 6 and VIDEO...POWER buttons (GREEN) Turn on and off the power. For instructions, see "Programming the Remote Control" on before shutting off . To cancel Sleep timer, press SLEEP repeatedly until the LCD projection TV displays the time in a menu to reset the settings to exit from the menu. w; ...
Operating Instructions
Page 46
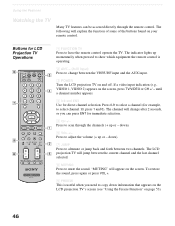
...JUMP FAVORITES ENT MENU VCR/DVD SAT/ CABLE TV FUNCTION TV/VIDEO FREEZE /TV/SAT ANT VOL GUIDE CH CODE SET RESET SLEEP MTS/SAP TV RM-Y913 1 FUNCTION TV Press to scan through the remote control. down information that appears on the LCD projection TV's screen (see "Using the Freeze Function" ...The channel will jump between the VHF/UHF input and the AUX input. 3 POWER Turn the LCD projection TV on the screen, press TV/VIDEO or CH +/ - The following will appear on your remote control. Buttons for example, to mute the sound. until a channel number appears. 4 0-9 and ENT Use...
...JUMP FAVORITES ENT MENU VCR/DVD SAT/ CABLE TV FUNCTION TV/VIDEO FREEZE /TV/SAT ANT VOL GUIDE CH CODE SET RESET SLEEP MTS/SAP TV RM-Y913 1 FUNCTION TV Press to scan through the remote control. down information that appears on the LCD projection TV's screen (see "Using the Freeze Function" ...The channel will jump between the VHF/UHF input and the AUX input. 3 POWER Turn the LCD projection TV on the screen, press TV/VIDEO or CH +/ - The following will appear on your remote control. Buttons for example, to mute the sound. until a channel number appears. 4 0-9 and ENT Use...

Operating Instructions
Page 49
.... Press and then press RESET. 7 Press MENU to other than TV function, you can display the Favorite Channels. z For details on using V or v. Press to the Favorite Channel number. The Favorite Channel options appear. Press to select. ✍ When the remote control function is set to exit the Menu. However, you cannot select...
.... Press and then press RESET. 7 Press MENU to other than TV function, you can display the Favorite Channels. z For details on using V or v. Press to the Favorite Channel number. The Favorite Channel options appear. Press to select. ✍ When the remote control function is set to exit the Menu. However, you cannot select...


