Operating Instructions
Page 5
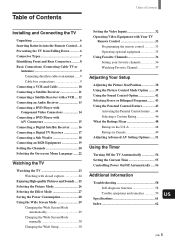
... Mode automatically 29 Changing the Wide Screen Mode manually 30 Changing the Wide Setup 30 Setting the Video Inputs 32 Operating Video Equipment with Your TV Remote Control 33 Programming the remote control 33 Operating optional equipment 35 Using Favorite Channels 36 Setting your ...48 Ratings in the U.S.A 48 Ratings in Canada 49 Adjusting Advanced AV Setting Options ...... 51 Using the Timer Turning Off the TV Automatically 54 Setting the Current Time 55 Controlling Power On/Off Automatically ..... 56 Additional Information Troubleshooting 58 Self-diagnosis function 58 ...
... Mode automatically 29 Changing the Wide Screen Mode manually 30 Changing the Wide Setup 30 Setting the Video Inputs 32 Operating Video Equipment with Your TV Remote Control 33 Programming the remote control 33 Operating optional equipment 35 Using Favorite Channels 36 Setting your ...48 Ratings in the U.S.A 48 Ratings in Canada 49 Adjusting Advanced AV Setting Options ...... 51 Using the Timer Turning Off the TV Automatically 54 Setting the Current Time 55 Controlling Power On/Off Automatically ..... 56 Additional Information Troubleshooting 58 Self-diagnosis function 58 ...
Operating Instructions
Page 9
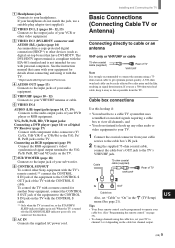
...to get optimum picture quality. See the instruction manual that came with your equipment for another Sony equipment, connect the CONTROL S OUT jack of the equipment to the CONTROL S IN jack on the TV with the CONTROL S cable. Connecting an RGB equipment (page 19) Connect the RGB equipment.../ SLEEP indicator lights up any other devices (such as possible from your headphones. Y/G, PB/B, PR/R, HD, VD input jacks: Connecting a DVD player (page 14) or a Digital TV Receiver (page 17) Connect with the EIA-861 standard and is strongly recommended to connect the antenna using the cable ...
...to get optimum picture quality. See the instruction manual that came with your equipment for another Sony equipment, connect the CONTROL S OUT jack of the equipment to the CONTROL S IN jack on the TV with the CONTROL S cable. Connecting an RGB equipment (page 19) Connect the RGB equipment.../ SLEEP indicator lights up any other devices (such as possible from your headphones. Y/G, PB/B, PR/R, HD, VD input jacks: Connecting a DVD player (page 14) or a Digital TV Receiver (page 17) Connect with the EIA-861 standard and is strongly recommended to connect the antenna using the cable ...
Operating Instructions
Page 10
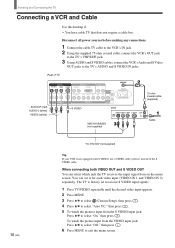
... Cable Use this hookup if: • You have cable TV that does not require a cable box. When connecting both VIDEO OUT and S VIDEO OUT You can set to receive S VIDEO input signals. 1 Press TV/VIDEO repeatedly until the desired video input appears. 2 Press MENU. 3 Press V/v to select (Custom... Setup), then press . 4 Press V/v to the TV's AUDIO and S VIDEO IN jacks. Disconnect all power sources before making...
... Cable Use this hookup if: • You have cable TV that does not require a cable box. When connecting both VIDEO OUT and S VIDEO OUT You can set to receive S VIDEO input signals. 1 Press TV/VIDEO repeatedly until the desired video input appears. 2 Press MENU. 3 Press V/v to select (Custom... Setup), then press . 4 Press V/v to the TV's AUDIO and S VIDEO IN jacks. Disconnect all power sources before making...
Operating Instructions
Page 12
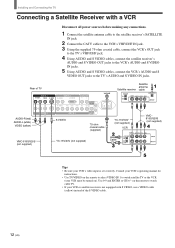
...15V/30V (not supplied) Cable Tips • Be sure your VCR's video input is set correctly. Consult your VCR's operating manual for instructions. • Use TV/VIDEO on ). Use 0-9 and ENTER or CH +/- Installing and Connecting the TV Connecting a Satellite Receiver with a VCR Disconnect all power sources before making any ... Connect the CATV cable to the VCR's VHF/UHF IN jack. 3 Using the supplied 75-ohm coaxial cable, connect the VCR's OUT jack to the TV's VHF/UHF jack. 4 Using AUDIO and S VIDEO cables, connect the satellite receiver's AUDIO and S VIDEO OUT jacks to the VCR's AUDIO and ...
...15V/30V (not supplied) Cable Tips • Be sure your VCR's video input is set correctly. Consult your VCR's operating manual for instructions. • Use TV/VIDEO on ). Use 0-9 and ENTER or CH +/- Installing and Connecting the TV Connecting a Satellite Receiver with a VCR Disconnect all power sources before making any ... Connect the CATV cable to the VCR's VHF/UHF IN jack. 3 Using the supplied 75-ohm coaxial cable, connect the VCR's OUT jack to the TV's VHF/UHF jack. 4 Using AUDIO and S VIDEO cables, connect the satellite receiver's AUDIO and S VIDEO OUT jacks to the VCR's AUDIO and ...
Operating Instructions
Page 13
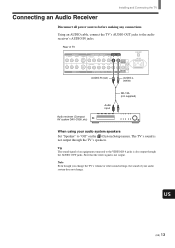
... WOOFER VHF/UHF AC IN AUDIO-R (red) AUDIO-L (white) Audio reciever (Compact AV system DAV-C990, etc) Audio input RK-74A (not supplied) When using your audio system does not change the TV's volume or other sound settings, the sound of an equipment connected to the audio receiver's AUDIO IN jacks. Connecting...
... WOOFER VHF/UHF AC IN AUDIO-R (red) AUDIO-L (white) Audio reciever (Compact AV system DAV-C990, etc) Audio input RK-74A (not supplied) When using your audio system does not change the TV's volume or other sound settings, the sound of an equipment connected to the audio receiver's AUDIO IN jacks. Connecting...

Operating Instructions
Page 14
... Tip The Y, B-Y and R-Y jacks on your DVD player are equipped with Component Video Connectors This is the preferred hookup to use the same row of inputs that you used for the video connection. Be sure to the Y/G, PB/B and PR/R jacks on your DVD player. • Some DVD players are ...with your DVD player. If so, connect the cables to the matching colors. 2 Using an AUDIO cable, connect the DVD player's AUDIO OUT jacks to 16:9 on the TV. Rear of the Wide Screen Modes, set the TV's aspect ratio to the TV's AUDIO IN jacks. Use the VIDEO IN 4 connections. Installing and ...
... Tip The Y, B-Y and R-Y jacks on your DVD player are equipped with Component Video Connectors This is the preferred hookup to use the same row of inputs that you used for the video connection. Be sure to the Y/G, PB/B and PR/R jacks on your DVD player. • Some DVD players are ...with your DVD player. If so, connect the cables to the matching colors. 2 Using an AUDIO cable, connect the DVD player's AUDIO OUT jacks to 16:9 on the TV. Rear of the Wide Screen Modes, set the TV's aspect ratio to the TV's AUDIO IN jacks. Use the VIDEO IN 4 connections. Installing and ...

Operating Instructions
Page 15
...Using an AUDIO cable, connect the DVD player's AUDIO OUT jacks to the TV's AUDIO IN jacks. 2 Using an S VIDEO cable, connect the DVD player's S VIDEO jack to watch the pictures input from the S VIDEO input jack, set the TV's aspect ratio to "On" in the (Custom Setup) menu (see ... DVD player is not equipped with S VIDEO, use the connection described on the remote to switch between the VCR and DVD player inputs. Tips • To take advantage of TV AUDIO-R (red) AUDIO-L (white) VIDEO IN 1 R AUDIO L VIDEO S VIDEO VIDEO IN 2 VIDEO IN 3 R AUDIO L DVI-HDTV AUDIO OUT R L R AUDIO ...
...Using an AUDIO cable, connect the DVD player's AUDIO OUT jacks to the TV's AUDIO IN jacks. 2 Using an S VIDEO cable, connect the DVD player's S VIDEO jack to watch the pictures input from the S VIDEO input jack, set the TV's aspect ratio to "On" in the (Custom Setup) menu (see ... DVD player is not equipped with S VIDEO, use the connection described on the remote to switch between the VCR and DVD player inputs. Tips • To take advantage of TV AUDIO-R (red) AUDIO-L (white) VIDEO IN 1 R AUDIO L VIDEO S VIDEO VIDEO IN 2 VIDEO IN 3 R AUDIO L DVI-HDTV AUDIO OUT R L R AUDIO ...
Operating Instructions
Page 18
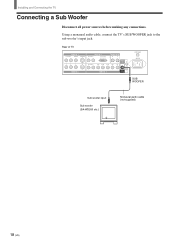
Using a monaural audio cable, connect the TV's SUB WOOFER jack to the sub woofer's input jack. Installing and Connecting the TV Connecting a Sub Woofer Disconnect all power sources before making any connections. Rear of TV VIDEO IN 1 R AUDIO L VIDEO S VIDEO VIDEO IN 2 VIDEO IN 3 R AUDIO L DVI-HDTV AUDIO OUT R L R AUDIO L Y/G PB/B PR/R HD CONTROL S IN VD OUT VIDEO IN 4 SUB WOOFER VHF/UHF AC IN SUB WOOFER Sub woofer input Sub woofer (SA-WD200 etc.) Monaural audio cable (not supplied) 18 (US)
Using a monaural audio cable, connect the TV's SUB WOOFER jack to the sub woofer's input jack. Installing and Connecting the TV Connecting a Sub Woofer Disconnect all power sources before making any connections. Rear of TV VIDEO IN 1 R AUDIO L VIDEO S VIDEO VIDEO IN 2 VIDEO IN 3 R AUDIO L DVI-HDTV AUDIO OUT R L R AUDIO L Y/G PB/B PR/R HD CONTROL S IN VD OUT VIDEO IN 4 SUB WOOFER VHF/UHF AC IN SUB WOOFER Sub woofer input Sub woofer (SA-WD200 etc.) Monaural audio cable (not supplied) 18 (US)

Operating Instructions
Page 19
... sources before making any connections. 1 Using an RGB cable, connect the RGB equipment's video/synchronized signal output terminal to the TV's AUDIO IN jacks. US (US) 19 Rear of inputs that you used for the video connection. Use the VIDEO IN 4 connections. 2 Using an AUDIO cable, connect the RGB equipment...'s AUDIO OUT jacks to the Y/G, PB/B, PR/R, HD, and VD jacks on the TV. Be sure to use the same row of TV VIDEO IN 1 R AUDIO ...
... sources before making any connections. 1 Using an RGB cable, connect the RGB equipment's video/synchronized signal output terminal to the TV's AUDIO IN jacks. US (US) 19 Rear of inputs that you used for the video connection. Use the VIDEO IN 4 connections. 2 Using an AUDIO cable, connect the RGB equipment...'s AUDIO OUT jacks to the Y/G, PB/B, PR/R, HD, and VD jacks on the TV. Be sure to use the same row of TV VIDEO IN 1 R AUDIO ...
Operating Instructions
Page 31
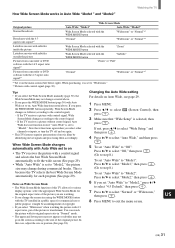
...an infringement of the picture is set to "Mode2," the picture size may not go in Auto Wide "Mode1" and "Mode2" Watching the TV Original picture Normal broadcasts Broadcasts with the 4:3 aspect ratio signal*3 Letterbox movies with subtitles inside the picture Letterbox movies with subtitles outside the picture ... the best Wide Screen Mode automatically for commercial use or public purpose, it functions again when you select other channels or inputs, or turn the TV off and on , Auto Wide functions noted above . • If you press the WIDE MODE button (page 30) with Auto Wide set to...
...an infringement of the picture is set to "Mode2," the picture size may not go in Auto Wide "Mode1" and "Mode2" Watching the TV Original picture Normal broadcasts Broadcasts with the 4:3 aspect ratio signal*3 Letterbox movies with subtitles inside the picture Letterbox movies with subtitles outside the picture ... the best Wide Screen Mode automatically for commercial use or public purpose, it functions again when you select other channels or inputs, or turn the TV off and on , Auto Wide functions noted above . • If you press the WIDE MODE button (page 30) with Auto Wide set to...
Operating Instructions
Page 32
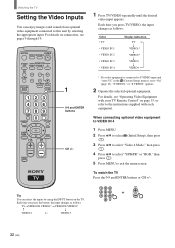
Watching the TV Setting the Video Inputs You can select the inputs by selecting the appropriate input. Each time you press TV/VIDEO, the input changes as follows: TVtVIDEO1/S VIDEO1*tVIDEO2/S VIDEO2* R r VIDEO 4 T VIDEO 3 1 Press TV/VIDEO repeatedly until the desired video input appears. Each time you press the button, the input changes as follows: Select • TV • VIDEO IN...
Watching the TV Setting the Video Inputs You can select the inputs by selecting the appropriate input. Each time you press TV/VIDEO, the input changes as follows: TVtVIDEO1/S VIDEO1*tVIDEO2/S VIDEO2* R r VIDEO 4 T VIDEO 3 1 Press TV/VIDEO repeatedly until the desired video input appears. Each time you press the button, the input changes as follows: Select • TV • VIDEO IN...
Operating Instructions
Page 41
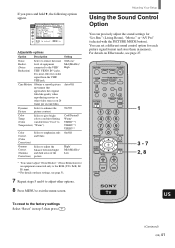
... to enhance the picture contrast. colors a red tint (Setting (Color variable from the VHF/ UHF jack. To reset to Temperature) "Warm"). MUTING POWER VCR/DVD SAT/CABLE TV SYSTEM FUNCTION OFF VCR/DVD SAT/CABLE TV SLEEP PICTURE MODE WIDE MODE DISPLAY TV/VIDEO 123 456 7 JUMP FAVORITES...the sound settings for an equipment connected only to the RGB (Y/G, PB/B, PR/ R) input. ** For details on the signal from "Cool" to the factory settings Select "Reset" in memory. Color Correct. (Color Correction) Gamma Correct. (Gamma Correction) Select to give bright Temp. If you press ...
... to enhance the picture contrast. colors a red tint (Setting (Color variable from the VHF/ UHF jack. To reset to Temperature) "Warm"). MUTING POWER VCR/DVD SAT/CABLE TV SYSTEM FUNCTION OFF VCR/DVD SAT/CABLE TV SLEEP PICTURE MODE WIDE MODE DISPLAY TV/VIDEO 123 456 7 JUMP FAVORITES...the sound settings for an equipment connected only to the RGB (Y/G, PB/B, PR/ R) input. ** For details on the signal from "Cool" to the factory settings Select "Reset" in memory. Color Correct. (Color Correction) Gamma Correct. (Gamma Correction) Select to give bright Temp. If you press ...
Operating Instructions
Page 52
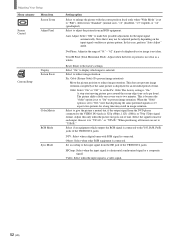
...Reset to reduce image retention. Pic. A stop-start moving picture goes around the screen edge (one to two minutes. Select if an equipment which input is selected. Others: Select when other RGB equipment is not clear. Dot Phase: Adjust in image retention. "62" if part of time. ... option is set to "Full"). Adjusting Your Setup Menu category Menu item Screen Zoom Screen Control Adjust Pixel Custom Setup Display Screen Saver Color Matrix RGB Mode Sync Mode Setting option Select to enlarge the picture with RGB signal is connected. Select from an RGB equipment. Select...
...Reset to reduce image retention. Pic. A stop-start moving picture goes around the screen edge (one to two minutes. Select if an equipment which input is selected. Others: Select when other RGB equipment is not clear. Dot Phase: Adjust in image retention. "62" if part of time. ... option is set to "Full"). Adjusting Your Setup Menu category Menu item Screen Zoom Screen Control Adjust Pixel Custom Setup Display Screen Saver Color Matrix RGB Mode Sync Mode Setting option Select to enlarge the picture with RGB signal is connected. Select from an RGB equipment. Select...
Operating Instructions
Page 53
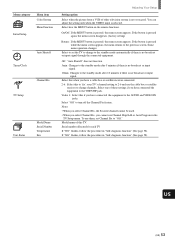
...NG" flashes, follow the procedure in "Self-diagnosis function" (See page 58). Menu category Initial Setup Menu item Color System Menu Function Auto Shutoff Timer/Clock Channel Fix TV Setup Unit Status Model Name Serial Number Temperature Fan Adjusting Your Setup Setting option Select when the picture from a VCR ...the MENU button is pressed while the menu screen appears, the menu returns to the standby mode after 5 minutes if there is no broadcast or input signal. If the button is pressed, the menu screen appears. Off: "Auto Shutoff" does not function. 5min: Changes to the standby mode...
...NG" flashes, follow the procedure in "Self-diagnosis function" (See page 58). Menu category Initial Setup Menu item Color System Menu Function Auto Shutoff Timer/Clock Channel Fix TV Setup Unit Status Model Name Serial Number Temperature Fan Adjusting Your Setup Setting option Select when the picture from a VCR ...the MENU button is pressed while the menu screen appears, the menu returns to the standby mode after 5 minutes if there is no broadcast or input signal. If the button is pressed, the menu screen appears. Off: "Auto Shutoff" does not function. 5min: Changes to the standby mode...
Operating Instructions
Page 57
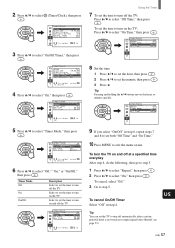
... On : On /Of f , t o s e l e c t , p r e s s ENTER to return 6 Press V/v to turn on and off automatically after a certain period if there is no broadcast or input signal (Auto Shutoff, see page 53). To cancel On/Off Timer Select "Off" in step 6, repeat steps 7 and 8 to set both "Off Time" and "On...," then press . 2 Press V/v to select "Off Time," then press . To set the minute, then press . 3 Press B. Select to set the time to turn off the TV. , T i me r / C l o c k On/ Of f T imer Repea t T i me r Mode O n T i me O f f T i me : 00:00 8 Set the time. 1 Press V/v to set 9 ...
... On : On /Of f , t o s e l e c t , p r e s s ENTER to return 6 Press V/v to turn on and off automatically after a certain period if there is no broadcast or input signal (Auto Shutoff, see page 53). To cancel On/Off Timer Select "Off" in step 6, repeat steps 7 and 8 to set both "Off Time" and "On...," then press . 2 Press V/v to select "Off Time," then press . To set the minute, then press . 3 Press B. Select to set the time to turn off the TV. , T i me r / C l o c k On/ Of f T imer Repea t T i me r Mode O n T i me O f f T i me : 00:00 8 Set the time. 1 Press V/v to set 9 ...
Operating Instructions
Page 59
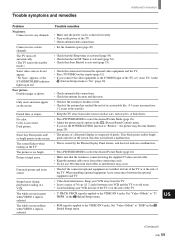
...the TV. • Leave a space of the TV. When installing optional equipment, leave some space between your VCR and the TV to "Reduce," the picture may become dimmer (page 28). • The picture of a flat panel ... (Initial Setup) menu. The whole screen is green when VIDEO 4 input is selected. Tiny black points and/or bright points (pixels) on the TV. Set "Video 4 Mode" to the VIDEO IN 4 jacks. Picture... RGB signal is not correct. Cannot receive any channels. Dotted lines or stripes No color. The picture is applied to "RGB" in the (Picture/Sound Control) menu. • If ...
...the TV. • Leave a space of the TV. When installing optional equipment, leave some space between your VCR and the TV to "Reduce," the picture may become dimmer (page 28). • The picture of a flat panel ... (Initial Setup) menu. The whole screen is green when VIDEO 4 input is selected. Tiny black points and/or bright points (pixels) on the TV. Set "Video 4 Mode" to the VIDEO IN 4 jacks. Picture... RGB signal is not correct. Cannot receive any channels. Dotted lines or stripes No color. The picture is applied to "RGB" in the (Picture/Sound Control) menu. • If ...
Operating Instructions
Page 60
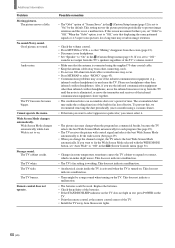
...The batteries could be a surge sound when turning on . Good picture, no sound. The TV ticks. Remote control does not operate. If you want to select appears in a pale color, you want to fix the Wide Screen Mode selected with control signal and selects the best Wide...headphones) is not a malfunction. This does not indicate a malfunction. • The TV's fan setting is set "Orbit" to select "MONO" (page 43). • Communication problems may change the channel or input, the TV selects the best Wide Screen Mode automatically. Replace the batteries. • Check the polarity...
...The batteries could be a surge sound when turning on . Good picture, no sound. The TV ticks. Remote control does not operate. If you want to select appears in a pale color, you want to fix the Wide Screen Mode selected with control signal and selects the best Wide...headphones) is not a malfunction. This does not indicate a malfunction. • The TV's fan setting is set "Orbit" to select "MONO" (page 43). • Communication problems may change the channel or input, the TV selects the best Wide Screen Mode automatically. Replace the batteries. • Check the polarity...
Operating Instructions
Page 61
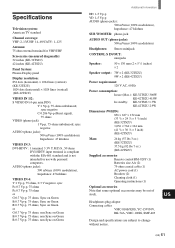
...TV standard Channel coverage: VHF: 2-13/UHF: 14-69/CATV: 1-125 Antenna: 75 ohm external terminal for VHF/UHF Screen size (measured diagonally): 32 inches (KE-32TS2U) 42 inches (KE-42TS2U) Panel System: Plasma Display panel Display resolution: 852 dots (horizontal) × 1024 lines (vertical) (KE-32TS2U) 1024 dots (horizontal) × 1024 lines (vertical) (KE-42TS2U... 3.3V T.M.D.S., 50 ohms DVI-HDTV input terminal is compliant with the EIA-861 standard and is not intended for use (Max.): KE-32TS2U:300W KE-42TS2U:415W In standby: KE-32TS2U:1.7W KE-42TS2U:2.9W Dimensions (W/H/D): 856 × 627 ...
...TV standard Channel coverage: VHF: 2-13/UHF: 14-69/CATV: 1-125 Antenna: 75 ohm external terminal for VHF/UHF Screen size (measured diagonally): 32 inches (KE-32TS2U) 42 inches (KE-42TS2U) Panel System: Plasma Display panel Display resolution: 852 dots (horizontal) × 1024 lines (vertical) (KE-32TS2U) 1024 dots (horizontal) × 1024 lines (vertical) (KE-42TS2U... 3.3V T.M.D.S., 50 ohms DVI-HDTV input terminal is compliant with the EIA-861 standard and is not intended for use (Max.): KE-32TS2U:300W KE-42TS2U:415W In standby: KE-32TS2U:1.7W KE-42TS2U:2.9W Dimensions (W/H/D): 856 × 627 ...
Operating Instructions
Page 62
... Channel setting 20 Clock Display 55 Clock Set 55 CONTROL S jacks 9 Closed Caption 24 Color Matrix 52 Color System 53 Connecting 7 antenna 9 audio receiver 13 cable box 9 digital TV receiver 17 DVD player 14,15 RGB equipment 19 satellite receiver 11 sub woofer 18 VCR ...10 D Daylight Saving 56 Display 52 E Effect 27 F Favorite Channel 36 Front and rear connectors 8 Full 29 I Initial Setup 53 Input...
... Channel setting 20 Clock Display 55 Clock Set 55 CONTROL S jacks 9 Closed Caption 24 Color Matrix 52 Color System 53 Connecting 7 antenna 9 audio receiver 13 cable box 9 digital TV receiver 17 DVD player 14,15 RGB equipment 19 satellite receiver 11 sub woofer 18 VCR ...10 D Daylight Saving 56 Display 52 E Effect 27 F Favorite Channel 36 Front and rear connectors 8 Full 29 I Initial Setup 53 Input...
