Operating Instructions
Page 4
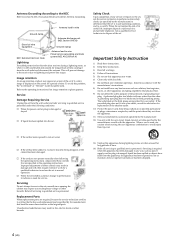
... to excessive shock by being walked on or pinched particularly at plugs, convenience receptacles, and the point where they exit from tip-over. Install in a picture tube implosion. A grounding type plug has two blades and a third grounding prong. If the provided plug does not fit into the apparatus, the apparatus has...
... to excessive shock by being walked on or pinched particularly at plugs, convenience receptacles, and the point where they exit from tip-over. Install in a picture tube implosion. A grounding type plug has two blades and a third grounding prong. If the provided plug does not fit into the apparatus, the apparatus has...
Operating Instructions
Page 5
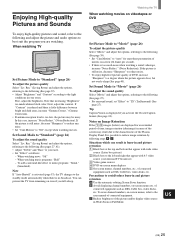
... the Channels 20 Selecting the On-screen Menu Language ...... 22 Watching the TV Watching the TV 23 Watching with closed caption 24 Enjoying High-quality Pictures and Sounds .... 25 Selecting the Picture Mode 26 Selecting the Effect Mode 27 Saving the Power Consumption 28 Using ...Video Equipment with Your TV Remote Control 33 Programming the remote control 33 Operating optional equipment 35 Using Favorite Channels 36 Setting your favorite channels 36 Watching Favorite Channel 37 Adjusting Your Setup Adjusting the Picture Size/Position 38 Using the Picture Control Mode Option ...
... the Channels 20 Selecting the On-screen Menu Language ...... 22 Watching the TV Watching the TV 23 Watching with closed caption 24 Enjoying High-quality Pictures and Sounds .... 25 Selecting the Picture Mode 26 Selecting the Effect Mode 27 Saving the Power Consumption 28 Using ...Video Equipment with Your TV Remote Control 33 Programming the remote control 33 Operating optional equipment 35 Using Favorite Channels 36 Setting your favorite channels 36 Watching Favorite Channel 37 Adjusting Your Setup Adjusting the Picture Size/Position 38 Using the Picture Control Mode Option ...
Operating Instructions
Page 7
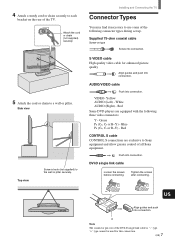
... cable Push into connection. Blue PR (CR, Cr or R-Y) - Push into connection. Installing and Connecting the TV Connector Types You may find it necessary to Sony equipment and allow greater control of the following three video connectors: Y - Red Some DVD players are exclusive to...the TV. Attach the cord or chain (not supplied) securely. 5 Attach the cord or chain to each bracket on type Screw into connection. S VIDEO cable High quality video cable for this connection. 7 (US) White AUDIO (Right) - VIDEO- "+" type cannot be used for enhanced picture quality...
... cable Push into connection. Blue PR (CR, Cr or R-Y) - Push into connection. Installing and Connecting the TV Connector Types You may find it necessary to Sony equipment and allow greater control of the following three video connectors: Y - Red Some DVD players are exclusive to...the TV. Attach the cord or chain (not supplied) securely. 5 Attach the cord or chain to each bracket on type Screw into connection. S VIDEO cable High quality video cable for this connection. 7 (US) White AUDIO (Right) - VIDEO- "+" type cannot be used for enhanced picture quality...
Operating Instructions
Page 9
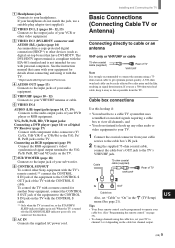
... or Y/PB/PR) to the Y/G, PB/ B, PR/R jacks on the TV. 1 Headphones jack Connects to your TV to channel 3 or 4 depending on the cable box channel output. To control the TV with a remote control for another Sony equipment, connect the CONTROL S OUT jack of your VCR or other video equipment...the instruction manual that have DVI-HDTV. Installing and Connecting the TV Basic Connections (Connecting Cable TV or Antenna) Connecting directly to get optimum picture quality. Cable 75-ohm coaxial cable (supplied) VHF/UHF Rear of TV VHF/UHF Note It is turned off (the STANDBY/SLEEP ...
... or Y/PB/PR) to the Y/G, PB/ B, PR/R jacks on the TV. 1 Headphones jack Connects to your TV to channel 3 or 4 depending on the cable box channel output. To control the TV with a remote control for another Sony equipment, connect the CONTROL S OUT jack of your VCR or other video equipment...the instruction manual that have DVI-HDTV. Installing and Connecting the TV Basic Connections (Connecting Cable TV or Antenna) Connecting directly to get optimum picture quality. Cable 75-ohm coaxial cable (supplied) VHF/UHF Rear of TV VHF/UHF Note It is turned off (the STANDBY/SLEEP ...
Operating Instructions
Page 10
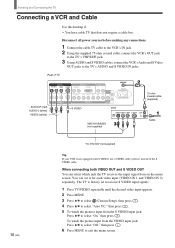
... it for each video input (VIDEO IN 1 and VIDEO IN 2) separately. To watch the pictures input from on the menu screen. Disconnect all power sources before making any connections. 1 Connect the cable TV cable to the VCR's IN jack. 2 Using the supplied 75-ohm coaxial cable, connect the...S VIDEO IN jacks. Rear of the S VIDEO cable. When connecting both VIDEO OUT and S VIDEO OUT You can set to receive S VIDEO input signals. 1 Press TV/VIDEO repeatedly until the desired video input appears. 2 Press MENU. 3 Press V/v to select (Custom Setup), then press . 4 Press V/v to select "Auto YC," ...
... it for each video input (VIDEO IN 1 and VIDEO IN 2) separately. To watch the pictures input from on the menu screen. Disconnect all power sources before making any connections. 1 Connect the cable TV cable to the VCR's IN jack. 2 Using the supplied 75-ohm coaxial cable, connect the...S VIDEO IN jacks. Rear of the S VIDEO cable. When connecting both VIDEO OUT and S VIDEO OUT You can set to receive S VIDEO input signals. 1 Press TV/VIDEO repeatedly until the desired video input appears. 2 Press MENU. 3 Press V/v to select (Custom Setup), then press . 4 Press V/v to select "Auto YC," ...

Operating Instructions
Page 15
...an AUDIO cable, connect the DVD player's AUDIO OUT jacks to the TV's AUDIO IN jacks. 2 Using an S VIDEO cable, connect the DVD player's S VIDEO jack to watch the pictures input from the S VIDEO input jack, set the TV's aspect ratio to "On" in the (Custom Setup) menu (see... the remote to switch between the VCR and DVD player inputs. Installing and Connecting the TV Connecting a DVD Player with your DVD player has video component output connectors, for best picture quality, use a VIDEO cable (yellow) instead of TV AUDIO-R (red) AUDIO-L (white) VIDEO IN 1 R AUDIO L VIDEO S VIDEO VIDEO IN...
...an AUDIO cable, connect the DVD player's AUDIO OUT jacks to the TV's AUDIO IN jacks. 2 Using an S VIDEO cable, connect the DVD player's S VIDEO jack to watch the pictures input from the S VIDEO input jack, set the TV's aspect ratio to "On" in the (Custom Setup) menu (see... the remote to switch between the VCR and DVD player inputs. Installing and Connecting the TV Connecting a DVD Player with your DVD player has video component output connectors, for best picture quality, use a VIDEO cable (yellow) instead of TV AUDIO-R (red) AUDIO-L (white) VIDEO IN 1 R AUDIO L VIDEO S VIDEO VIDEO IN...
Operating Instructions
Page 16
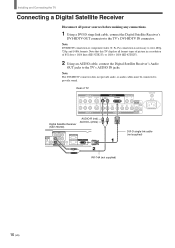
... a Digital Satellite Receiver Disconnect all format types of picture in a resolution of TV VIDEO IN 1 R AUDIO L VIDEO S VIDEO VIDEO IN 2 VIDEO IN 3 R AUDIO L DVI-HDTV AUDIO OUT R...-HDTV connection or component video (Y, PB, PR) connection is necessary to provide sound. Note that this TV displays all power sources before making any connections. 1 Using a DVI-D singe link cable, connect the Digital... supplied) 16 (US) Rear of 852 dots × 1024 lines (KE-32TS2U), or 1024 × 1024 (KE-42TS2U). 2 Using an AUDIO cable, connect the Digital Satellite Receiver's Audio OUT jacks to the...
... a Digital Satellite Receiver Disconnect all format types of picture in a resolution of TV VIDEO IN 1 R AUDIO L VIDEO S VIDEO VIDEO IN 2 VIDEO IN 3 R AUDIO L DVI-HDTV AUDIO OUT R...-HDTV connection or component video (Y, PB, PR) connection is necessary to provide sound. Note that this TV displays all power sources before making any connections. 1 Using a DVI-D singe link cable, connect the Digital... supplied) 16 (US) Rear of 852 dots × 1024 lines (KE-32TS2U), or 1024 × 1024 (KE-42TS2U). 2 Using an AUDIO cable, connect the Digital Satellite Receiver's Audio OUT jacks to the...
Operating Instructions
Page 17
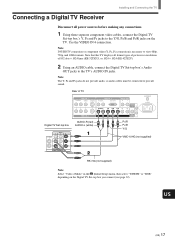
... Installing and Connecting the TV Disconnect all format types of picture in a resolution of TV Digital TV Set-top box VIDEO IN 1 R AUDIO L VIDEO S VIDEO VIDEO IN 3 R AUDIO L DVI-HDTV AUDIO OUT R L R AUDIO L Y/G PB/B PR/R HD CONTROL S IN VD OUT VIDEO IN 2 ... cables must be connected to view 480p, 720p, and 1080i formats. Use the VIDEO IN 4 connection. Rear of 852 dots × 1024 lines (KE-32TS2U), or 1024 × 1024 (KE-42TS2U). 2 Using an AUDIO cable, connect the Digital TV Set-top box's Audio OUT jacks to the Y/G, PB/B and PR/R jacks on the Digital...
... Installing and Connecting the TV Disconnect all format types of picture in a resolution of TV Digital TV Set-top box VIDEO IN 1 R AUDIO L VIDEO S VIDEO VIDEO IN 3 R AUDIO L DVI-HDTV AUDIO OUT R L R AUDIO L Y/G PB/B PR/R HD CONTROL S IN VD OUT VIDEO IN 2 ... cables must be connected to view 480p, 720p, and 1080i formats. Use the VIDEO IN 4 connection. Rear of 852 dots × 1024 lines (KE-32TS2U), or 1024 × 1024 (KE-42TS2U). 2 Using an AUDIO cable, connect the Digital TV Set-top box's Audio OUT jacks to the Y/G, PB/B and PR/R jacks on the Digital...
Operating Instructions
Page 20
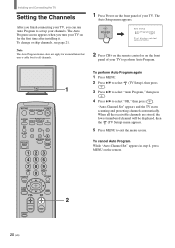
...the front panel of your channels. CODE SET 20 (US) The Auto Program screen appears when you can run Auto Program to set up your TV to perform Auto Program. 1 MUTING POWER VCR/DVD SAT/CABLE TV SYSTEM FUNCTION OFF VCR/DVD SAT/CABLE TV SLEEP PICTURE MODE WIDE MODE DISPLAY TV/VIDEO 123... 456 7 JUMP FAVORITES 89 ENTER 0 MTS/SAP TV/SAT GUIDE POWER SAVING MENU VOL CH 2 ...
...the front panel of your channels. CODE SET 20 (US) The Auto Program screen appears when you can run Auto Program to set up your TV to perform Auto Program. 1 MUTING POWER VCR/DVD SAT/CABLE TV SYSTEM FUNCTION OFF VCR/DVD SAT/CABLE TV SLEEP PICTURE MODE WIDE MODE DISPLAY TV/VIDEO 123... 456 7 JUMP FAVORITES 89 ENTER 0 MTS/SAP TV/SAT GUIDE POWER SAVING MENU VOL CH 2 ...
Operating Instructions
Page 22
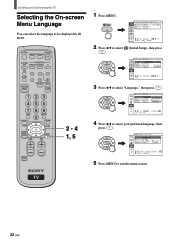
... o u l e u r : F o n c t i o n MENU : M a r / a r r . Mode V i d éo 4 : Y/PB/PR , p o u r s é l e c t i o n n e r , ENTER pour régler 5 Press MENU to be displayed in all menu. Installing and Connecting the TV Selecting the On-screen Menu Language You can select the language to exit the menu screen. 22 (US) Rm. MUTING POWER VCR/DVD SAT/CABLE... TV SYSTEM FUNCTION OFF VCR/DVD SAT/CABLE TV SLEEP PICTURE MODE WIDE MODE DISPLAY TV/VIDEO 123 456 7 JUMP FAVORITES 89 ENTER 0 MTS/SAP TV/SAT GUIDE POWER SAVING VOL MENU CH 2 - ...
... o u l e u r : F o n c t i o n MENU : M a r / a r r . Mode V i d éo 4 : Y/PB/PR , p o u r s é l e c t i o n n e r , ENTER pour régler 5 Press MENU to be displayed in all menu. Installing and Connecting the TV Selecting the On-screen Menu Language You can select the language to exit the menu screen. 22 (US) Rm. MUTING POWER VCR/DVD SAT/CABLE... TV SYSTEM FUNCTION OFF VCR/DVD SAT/CABLE TV SLEEP PICTURE MODE WIDE MODE DISPLAY TV/VIDEO 123 456 7 JUMP FAVORITES 89 ENTER 0 MTS/SAP TV/SAT GUIDE POWER SAVING VOL MENU CH 2 - ...
Operating Instructions
Page 23
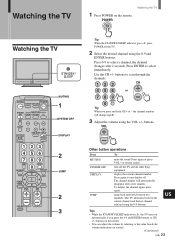
...last channel selected using the VOL +/- US Tips • While the STANDBY/SLEEP indicator is lit, the TV turns on screen). (Continued) (US) 23 Press 0-9 to turn off the TV and all other Sony equipment. Press again or press VOL + to select immediately. buttons on the remote. • You ...press and hold CH + or - Watching the TV Watching the TV STANDBY/ SLEEP MUTING POWER VCR/DVD SAT/CABLE TV SYSTEM FUNCTION OFF VCR/DVD SAT/CABLE TV SLEEP PICTURE MODE WIDE MODE DISPLAY TV/VIDEO 123 456 7 JUMP FAVORITES 89 ENTER 0 MTS/SAP TV/SAT GUIDE POWER SAVING VOL MENU CH CODE ...
...last channel selected using the VOL +/- US Tips • While the STANDBY/SLEEP indicator is lit, the TV turns on screen). (Continued) (US) 23 Press 0-9 to turn off the TV and all other Sony equipment. Press again or press VOL + to select immediately. buttons on the remote. • You ...press and hold CH + or - Watching the TV Watching the TV STANDBY/ SLEEP MUTING POWER VCR/DVD SAT/CABLE TV SYSTEM FUNCTION OFF VCR/DVD SAT/CABLE TV SLEEP PICTURE MODE WIDE MODE DISPLAY TV/VIDEO 123 456 7 JUMP FAVORITES 89 ENTER 0 MTS/SAP TV/SAT GUIDE POWER SAVING VOL MENU CH CODE ...
Operating Instructions
Page 24
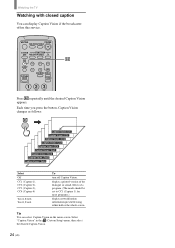
... 2), CC3 (Capture 3), CC4 (Capture 4) Text1, Text2, Text3, Text4 To turn off Caption Vision. MUTING POWER VCR/DVD SAT/CABLE TV SYSTEM FUNCTION OFF VCR/DVD SAT/CABLE TV SLEEP PICTURE MODE WIDE MODE DISPLAY TV/VIDEO 123 Press repeatedly until the desired Caption Vision appears. display a printed version of the dialogue or sound effects... using either half or the whole screen. Select "Caption Vision" in the (Custom Setup) menu, then select the desired Caption Vision. 24 (US) Watching the TV Watching with closed caption You can select Caption Vision on the menu screen.
... 2), CC3 (Capture 3), CC4 (Capture 4) Text1, Text2, Text3, Text4 To turn off Caption Vision. MUTING POWER VCR/DVD SAT/CABLE TV SYSTEM FUNCTION OFF VCR/DVD SAT/CABLE TV SLEEP PICTURE MODE WIDE MODE DISPLAY TV/VIDEO 123 Press repeatedly until the desired Caption Vision appears. display a printed version of the dialogue or sound effects... using either half or the whole screen. Select "Caption Vision" in the (Custom Setup) menu, then select the desired Caption Vision. 24 (US) Watching the TV Watching with closed caption You can select Caption Vision on the menu screen.
Operating Instructions
Page 25
...Auto" for an extended period of the Plasma Display Panel. Rm." (Living Room) and adjust the options, referring to the following steps A-C. If the picture is too much whitens black color. Situations which can prevent the TV from remaining on -screen menus, refer to the ...characteristics of time, image retention (afterimage) in and picture retention A Use the automatic orbiting Screen Saver function...
...Auto" for an extended period of the Plasma Display Panel. Rm." (Living Room) and adjust the options, referring to the following steps A-C. If the picture is too much whitens black color. Situations which can prevent the TV from remaining on -screen menus, refer to the ...characteristics of time, image retention (afterimage) in and picture retention A Use the automatic orbiting Screen Saver function...
Operating Instructions
Page 26
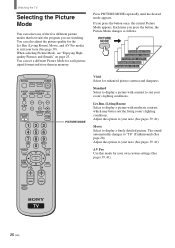
... set a different Picture Mode for enhanced picture contrast and sharpness. PICTURE , MODE Picture Mode : Vivid Picture Mode : Standard Picture Mode : Liv.Rm. Picture Mode : Movie Picture Mode : AV Pro MUTING POWER VCR/DVD SAT/CABLE TV SYSTEM FUNCTION OFF VCR/DVD SAT/CABLE TV SLEEP PICTURE MODE WIDE MODE DISPLAY TV/VIDEO 123 456 7 JUMP FAVORITES 89 ENTER 0 MTS/SAP TV/SAT GUIDE...
... set a different Picture Mode for enhanced picture contrast and sharpness. PICTURE , MODE Picture Mode : Vivid Picture Mode : Standard Picture Mode : Liv.Rm. Picture Mode : Movie Picture Mode : AV Pro MUTING POWER VCR/DVD SAT/CABLE TV SYSTEM FUNCTION OFF VCR/DVD SAT/CABLE TV SLEEP PICTURE MODE WIDE MODE DISPLAY TV/VIDEO 123 456 7 JUMP FAVORITES 89 ENTER 0 MTS/SAP TV/SAT GUIDE...
Operating Instructions
Page 27
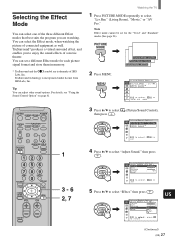
... other sound options. TruSurround* produces a virtual surround effect, and enables you are trademarks of SRS Labs, Inc. Watching the TV 1 Press PICTURE MODE repeatedly to select "Adjust Sound," then press . , P i c t u r e /Sound Cont r o l A d j u s t S o u n d ( L i v . PICTURE MODE , Picture Mode : Liv.Rm. MENU , P i c t u r e /Sound Cont r o l P i c t u r e Mode : L i v . Rm. Rm. ) Tr e bl e Bass Ba l ance Effect : Of f Reset , t o s e l e c t , ENTER , t o set...
... other sound options. TruSurround* produces a virtual surround effect, and enables you are trademarks of SRS Labs, Inc. Watching the TV 1 Press PICTURE MODE repeatedly to select "Adjust Sound," then press . , P i c t u r e /Sound Cont r o l A d j u s t S o u n d ( L i v . PICTURE MODE , Picture Mode : Liv.Rm. MENU , P i c t u r e /Sound Cont r o l P i c t u r e Mode : L i v . Rm. Rm. ) Tr e bl e Bass Ba l ance Effect : Of f Reset , t o s e l e c t , ENTER , t o set...
Operating Instructions
Page 28
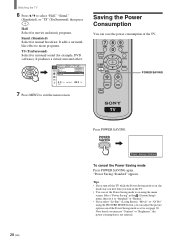
...l Reset , t o s e l e c t , ENTER , t o set to on using the PICTURE MODE button, you can save the power consumption of the TV. 7 JUMP FAVORITES 89 ENTER 0 MTS/SAP TV/SAT GUIDE POWER SAVING VOL MENU CH POWER SAVING CODE SET 28 (US) Press POWER SAVING. Saving the Power ...Consumption You can adjust the picture option even if the Power Saving mode is set 7 Press MENU to select "Hall," "Simul." (Simulated), or "TS" (TruSurround), then press . Watching the TV 6 Press V/v to exit the menu screen. It produces a virtual...
...l Reset , t o s e l e c t , ENTER , t o set to on using the PICTURE MODE button, you can save the power consumption of the TV. 7 JUMP FAVORITES 89 ENTER 0 MTS/SAP TV/SAT GUIDE POWER SAVING VOL MENU CH POWER SAVING CODE SET 28 (US) Press POWER SAVING. Saving the Power ...Consumption You can adjust the picture option even if the Power Saving mode is set 7 Press MENU to select "Hall," "Simul." (Simulated), or "TS" (TruSurround), then press . Watching the TV 6 Press V/v to exit the menu screen. It produces a virtual...
Operating Instructions
Page 29
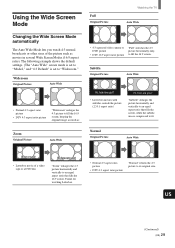
...Picture Auto Wide Full Original Picture Watching the TV Auto Wide • 4:3 squeezed video camera or DVD picture • DTV 16:9 aspect ratio picture "Full" stretches the 4:3 picture horizontally only, to its original size. Subtitle Original Picture Auto Wide • Normal 4:3 aspect ratio picture • DTV 4:3 aspect ratio picture "Widezoom" enlarges the 4:3 picture...ratio). Useful for watching Letterbox • Normal 4:3 aspect ratio picture • DTV 4:3 aspect ratio picture "Normal" returns the 4:3 picture to fill the 16:9 screen. The following example shows the ...
...Picture Auto Wide Full Original Picture Watching the TV Auto Wide • 4:3 squeezed video camera or DVD picture • DTV 16:9 aspect ratio picture "Full" stretches the 4:3 picture horizontally only, to its original size. Subtitle Original Picture Auto Wide • Normal 4:3 aspect ratio picture • DTV 4:3 aspect ratio picture "Widezoom" enlarges the 4:3 picture...ratio). Useful for watching Letterbox • Normal 4:3 aspect ratio picture • DTV 4:3 aspect ratio picture "Normal" returns the 4:3 picture to fill the 16:9 screen. The following example shows the ...

Operating Instructions
Page 30
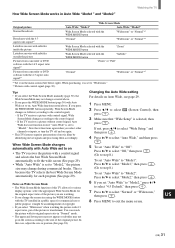
... setting of this case, set the Wide Screen Mode manually. Tip Set "Auto Wide" to fit the wide screen, regardless of the picture may not work properly. In this TV is: "Auto Wide" is set to "Mode2," and "4:3 Default" is set to its original aspect ratio. WIDE MODE , Wide Mode : ..." when changing the Wide Screen Mode manually (See page 31). 30 (US) MUTING POWER VCR/DVD SAT/CABLE TV SYSTEM FUNCTION OFF VCR/DVD SAT/CABLE TV SLEEP PICTURE MODE WIDE MODE DISPLAY TV/VIDEO 123 456 WIDE MODE Press WIDE MODE repeatedly until the desired Wide Screen Mode appears. Auto Wide: "Mode1...
... setting of this case, set the Wide Screen Mode manually. Tip Set "Auto Wide" to fit the wide screen, regardless of the picture may not work properly. In this TV is: "Auto Wide" is set to "Mode2," and "4:3 Default" is set to its original aspect ratio. WIDE MODE , Wide Mode : ..." when changing the Wide Screen Mode manually (See page 31). 30 (US) MUTING POWER VCR/DVD SAT/CABLE TV SYSTEM FUNCTION OFF VCR/DVD SAT/CABLE TV SLEEP PICTURE MODE WIDE MODE DISPLAY TV/VIDEO 123 456 WIDE MODE Press WIDE MODE repeatedly until the desired Wide Screen Mode appears. Auto Wide: "Mode1...
Operating Instructions
Page 31
... during commercial breaks. Tips • If you press the WIDE MODE button (page 30) with Auto Wide set to on • The TV receives the picture with a control signal and selects the best Wide Screen Mode automatically to fit the wide screen (See page 29). • While "Auto Wide..., Auto Wide does not function even if "Auto Wide" is set to "Mode2," the picture size may not go in the screen according to "Widezoom." *3 Pictures with control signal (page 30). If the TV receives a picture with control signal, Wide Screen Mode changes according to "Mode2." Note that "Wide Setup" ...
... during commercial breaks. Tips • If you press the WIDE MODE button (page 30) with Auto Wide set to on • The TV receives the picture with a control signal and selects the best Wide Screen Mode automatically to fit the wide screen (See page 29). • While "Auto Wide..., Auto Wide does not function even if "Auto Wide" is set to "Mode2," the picture size may not go in the screen according to "Widezoom." *3 Pictures with control signal (page 30). If the TV receives a picture with control signal, Wide Screen Mode changes according to "Mode2." Note that "Wide Setup" ...
Operating Instructions
Page 32
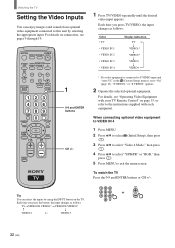
... and ENTER buttons or CH +/-. 123 CH 456 or 789 ENTER 0 32 (US) For details on connection, see "Operating Video Equipment with your TV Remote Control" on the TV. When connecting optional video equipment to VIDEO IN 4 1 Press MENU. 2 Press V/v to select (Initial Setup), then press . 3 Press V/v... the instructions supplied with each equipment. MUTING POWER VCR/DVD SAT/CABLE TV SYSTEM FUNCTION OFF VCR/DVD SAT/CABLE TV SLEEP PICTURE MODE WIDE MODE DISPLAY TV/VIDEO 123 456 7 JUMP FAVORITES 89 ENTER 0 MTS/SAP TV/SAT GUIDE POWER SAVING VOL MENU CH CODE SET 1 0-9 and ENTER...
... and ENTER buttons or CH +/-. 123 CH 456 or 789 ENTER 0 32 (US) For details on connection, see "Operating Video Equipment with your TV Remote Control" on the TV. When connecting optional video equipment to VIDEO IN 4 1 Press MENU. 2 Press V/v to select (Initial Setup), then press . 3 Press V/v... the instructions supplied with each equipment. MUTING POWER VCR/DVD SAT/CABLE TV SYSTEM FUNCTION OFF VCR/DVD SAT/CABLE TV SLEEP PICTURE MODE WIDE MODE DISPLAY TV/VIDEO 123 456 7 JUMP FAVORITES 89 ENTER 0 MTS/SAP TV/SAT GUIDE POWER SAVING VOL MENU CH CODE SET 1 0-9 and ENTER...


