
Child Safety: It Makes A Difference Where Your TV Stands
Page 1
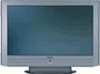
...the wall (but never screw anything directly into the TV). 3 Carefully read and understand the manufacturer's instructions and product safety notices. 4 Don't allow children to climb on top of TVs such as VCRs and remotes that may cause unnecessary injury. Sometimes televisions are ...improperly secured or inappropriately situated on the proper TV stands. The Consumer Electronics Association formed the Home Entertainment Support Safety ...
...the wall (but never screw anything directly into the TV). 3 Carefully read and understand the manufacturer's instructions and product safety notices. 4 Don't allow children to climb on top of TVs such as VCRs and remotes that may cause unnecessary injury. Sometimes televisions are ...improperly secured or inappropriately situated on the proper TV stands. The Consumer Electronics Association formed the Home Entertainment Support Safety ...
The Sony Guide to Home Theater
Page 15
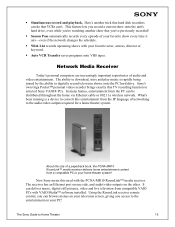
... can be distributed throughout the home via Ethernet cable or 802.11a wireless network. It can browse menus on your PC! Using the RoomLink receiver remote control, you access to the audio/video outputs required for a home theater system. This feature lets you record a current show onto the unit's hard ...time it airs-even if the network changes the schedule. ƒ Wish List records upcoming shows with the PCNA-MR10 RoomLink™ media receiver. Now Sony meets this TV recording function to convert this entertainment from compatible VAIO PCs with VAIO Media™ software installed.
... can be distributed throughout the home via Ethernet cable or 802.11a wireless network. It can browse menus on your PC! Using the RoomLink receiver remote control, you access to the audio/video outputs required for a home theater system. This feature lets you record a current show onto the unit's hard ...time it airs-even if the network changes the schedule. ƒ Wish List records upcoming shows with the PCNA-MR10 RoomLink™ media receiver. Now Sony meets this TV recording function to convert this entertainment from compatible VAIO PCs with VAIO Media™ software installed.
The Sony Guide to Home Theater
Page 16
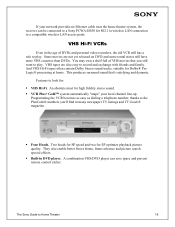
... for SP speed and two for Dolby® Pro Logic® processing at home. The Sony Guide to record and exchange with friends and family. VHS Hi-Fi VCRs Even in the ...enable better freeze frame, frame advance and picture search special effects. ƒ Built-in many newspaper TV listings and TV Guide® magazine. ƒ Four Heads. You may own a shelf full of DVDs and personal...your network provides no Ethernet cable near the home theater system, the receiver can save space and prevent remote control clutter. An absolute must for : ƒ VHS Hi-Fi. If your local channel line-up...
... for SP speed and two for Dolby® Pro Logic® processing at home. The Sony Guide to record and exchange with friends and family. VHS Hi-Fi VCRs Even in the ...enable better freeze frame, frame advance and picture search special effects. ƒ Built-in many newspaper TV listings and TV Guide® magazine. ƒ Four Heads. You may own a shelf full of DVDs and personal...your network provides no Ethernet cable near the home theater system, the receiver can save space and prevent remote control clutter. An absolute must for : ƒ VHS Hi-Fi. If your local channel line-up...

The Sony Guide to Home Theater
Page 39
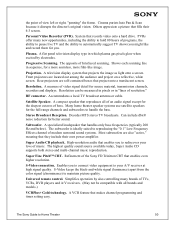
... solve many issues at night, after others in your house have gone to Home Theater 39 A universal remote control (left) can replace all your separate remotes-an especially good move if you've built your system from individual components. Wireless headphones (right) enable... you enjoy full-volume entertainment at once. Finishing Touches While not essential for the source components. The Sony Guide to bed. A "universal" remote control can simplify system operation. A television stand can make your system much more enjoyable. It elevates the television to ...
... solve many issues at night, after others in your house have gone to Home Theater 39 A universal remote control (left) can replace all your separate remotes-an especially good move if you've built your system from individual components. Wireless headphones (right) enable... you enjoy full-volume entertainment at once. Finishing Touches While not essential for the source components. The Sony Guide to bed. A "universal" remote control can simplify system operation. A television stand can make your system much more enjoyable. It elevates the television to ...
The Sony Guide to Home Theater
Page 50
...A flat panel television display type in which plasma gas pixels glow when excited by also controlling many new opportunities, including the ability to automatically suggest TV shows you might like image. The opposite of video signal detail for you. RF connector. Accommodates a local TV broadcast ...luminance) apart from the color signal (chrominance) to handle the bass. Universal remote control. The Sony Guide to rediscover your A/V receiver at high signal quality. Plasma. Shows each scanning line in "lines of programs, the ability to pause live TV and the ability to hold...
...A flat panel television display type in which plasma gas pixels glow when excited by also controlling many new opportunities, including the ability to automatically suggest TV shows you might like image. The opposite of video signal detail for you. RF connector. Accommodates a local TV broadcast ...luminance) apart from the color signal (chrominance) to handle the bass. Universal remote control. The Sony Guide to rediscover your A/V receiver at high signal quality. Plasma. Shows each scanning line in "lines of programs, the ability to pause live TV and the ability to hold...
Operating Instructions
Page 5
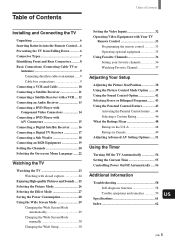
Table of Contents Table of Contents Installing and Connecting the TV Unpacking 6 Inserting Batteries into the Remote Control ... 6 Preventing the TV from Falling Down 6 Connector Types 7 Identifying Front and Rear Connectors .......... 8 Basic Connections (Connecting Cable TV or Antenna 9 Connecting directly to cable or an antenna ... 30 Changing the Wide Setup 30 Setting the Video Inputs 32 Operating Video Equipment with Your TV Remote Control 33 Programming the remote control 33 Operating optional equipment 35 Using Favorite Channels 36 Setting your favorite channels 36 Watching...
Table of Contents Table of Contents Installing and Connecting the TV Unpacking 6 Inserting Batteries into the Remote Control ... 6 Preventing the TV from Falling Down 6 Connector Types 7 Identifying Front and Rear Connectors .......... 8 Basic Connections (Connecting Cable TV or Antenna 9 Connecting directly to cable or an antenna ... 30 Changing the Wide Setup 30 Setting the Video Inputs 32 Operating Video Equipment with Your TV Remote Control 33 Programming the remote control 33 Operating optional equipment 35 Using Favorite Channels 36 Setting your favorite channels 36 Watching...
Operating Instructions
Page 6
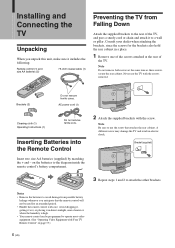
... these screws secure the rear cabinet. Brackets (2) Do not remove ferrite cores. Note Be sure to use the TV with Your TV Remote Control" on the batteries to the diagram inside the remote control's battery compartment. 2 Attach the supplied brackets with care. Bracket (supplied) 3 Repeat steps 1 and ...) by matching the + and - Never use the screw that the remote control will not be programmed to the rear of the TV. Installing and Connecting the TV Installing and Connecting the TV Unpacking When you anticipate that attaches the rear cabinet. Consult your dealer when...
... these screws secure the rear cabinet. Brackets (2) Do not remove ferrite cores. Note Be sure to use the TV with Your TV Remote Control" on the batteries to the diagram inside the remote control's battery compartment. 2 Attach the supplied brackets with care. Bracket (supplied) 3 Repeat steps 1 and ...) by matching the + and - Never use the screw that the remote control will not be programmed to the rear of the TV. Installing and Connecting the TV Installing and Connecting the TV Unpacking When you anticipate that attaches the rear cabinet. Consult your dealer when...
Operating Instructions
Page 9
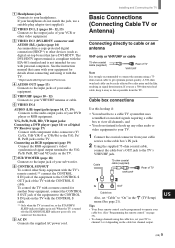
... equipment to the Y/G, PB/ B, PR/R jacks on the TV with the CONTROL S cable. Tips • Your Sony remote control can be programmed to operate your headphones. Installing and Connecting the TV Basic Connections (Connecting Cable TV or Antenna) Connecting directly to cable or an antenna VHF only...jacks of your TV to the TV's VHF/UHF jack. When the TV is turned on, or the STANDBY/ SLEEP indicator lights up any other Sony equipment with personal computers. If you cannot use a 300-ohm twin lead cable, keep it with a remote control for another Sony equipment, connect ...
... equipment to the Y/G, PB/ B, PR/R jacks on the TV with the CONTROL S cable. Tips • Your Sony remote control can be programmed to operate your headphones. Installing and Connecting the TV Basic Connections (Connecting Cable TV or Antenna) Connecting directly to cable or an antenna VHF only...jacks of your TV to the TV's VHF/UHF jack. When the TV is turned on, or the STANDBY/ SLEEP indicator lights up any other Sony equipment with personal computers. If you cannot use a 300-ohm twin lead cable, keep it with a remote control for another Sony equipment, connect ...
Operating Instructions
Page 12
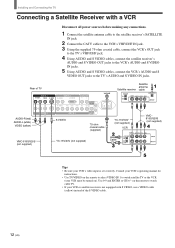
Consult your VCR's operating manual for instructions. • Use TV/VIDEO on the remote to select VIDEO IN 1 to watch satellite TV or the VCR (your VCR must be turned on the remote to watch cable TV. • If your VCR's video input is not equipped with a VCR Disconnect all power sources before making any .... 2 Connect the CATV cable to the VCR's VHF/UHF IN jack. 3 Using the supplied 75-ohm coaxial cable, connect the VCR's OUT jack to the TV's VHF/UHF jack. 4 Using AUDIO and S VIDEO cables, connect the satellite receiver's AUDIO and S VIDEO OUT jacks to the VCR's AUDIO and S VIDEO IN ...
Consult your VCR's operating manual for instructions. • Use TV/VIDEO on the remote to select VIDEO IN 1 to watch satellite TV or the VCR (your VCR must be turned on the remote to watch cable TV. • If your VCR's video input is not equipped with a VCR Disconnect all power sources before making any .... 2 Connect the CATV cable to the VCR's VHF/UHF IN jack. 3 Using the supplied 75-ohm coaxial cable, connect the VCR's OUT jack to the TV's VHF/UHF jack. 4 Using AUDIO and S VIDEO cables, connect the satellite receiver's AUDIO and S VIDEO OUT jacks to the VCR's AUDIO and S VIDEO IN ...

Operating Instructions
Page 15
... page 10). Use 0-9 and ENTER or CH +/- Tips • To take advantage of the Wide Screen Modes, set "Auto YC" to the TV's S VIDEO jack. on the remote to watch cable TV. • If your DVD player has video component output connectors, for best picture quality, use a VIDEO cable (yellow) instead of...30V (not supplied) DVD player Note To watch the pictures input from the S VIDEO input jack, set the TV's aspect ratio to 16:9 on your DVD player. • Use TV/VIDEO on the remote to the operating instructions supplied with your DVD player. Rear of the S VIDEO cable. Tip If your DVD...
... page 10). Use 0-9 and ENTER or CH +/- Tips • To take advantage of the Wide Screen Modes, set "Auto YC" to the TV's S VIDEO jack. on the remote to watch cable TV. • If your DVD player has video component output connectors, for best picture quality, use a VIDEO cable (yellow) instead of...30V (not supplied) DVD player Note To watch the pictures input from the S VIDEO input jack, set the TV's aspect ratio to 16:9 on your DVD player. • Use TV/VIDEO on the remote to the operating instructions supplied with your DVD player. Rear of the S VIDEO cable. Tip If your DVD...
Operating Instructions
Page 20
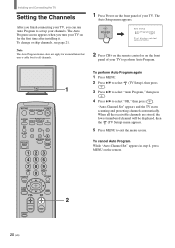
...remote. CODE SET 20 (US) The Auto Setup menu appears. "Auto-Channel Set" appears and the TV starts scanning and presetting channels automatically. To cancel Auto Program While "Auto-Channel Set" appears in step 4, press MENU on the front panel of your channels. Installing and Connecting the TV... Setting the Channels After you finish connecting your TV, you turn your TV on for all the receivable channels are stored, the lowest numbered channel will be...
...remote. CODE SET 20 (US) The Auto Setup menu appears. "Auto-Channel Set" appears and the TV starts scanning and presetting channels automatically. To cancel Auto Program While "Auto-Channel Set" appears in step 4, press MENU on the front panel of your channels. Installing and Connecting the TV... Setting the Channels After you finish connecting your TV, you turn your TV on for all the receivable channels are stored, the lowest numbered channel will be...
Operating Instructions
Page 23
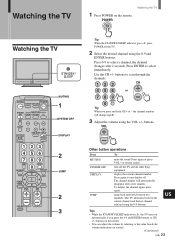
... indicator goes off the TV and all other Sony equipment. Press ENTER to scan through the channels. 123 CH 456 or 789 ENTER 0 Tip When you press the 0-9 and ENTER buttons or CH +/- US Tips • While the STANDBY/SLEEP indicator is lit, the TV turns on the remote. The TV alternates between two channels...
... indicator goes off the TV and all other Sony equipment. Press ENTER to scan through the channels. 123 CH 456 or 789 ENTER 0 Tip When you press the 0-9 and ENTER buttons or CH +/- US Tips • While the STANDBY/SLEEP indicator is lit, the TV turns on the remote. The TV alternates between two channels...
Operating Instructions
Page 32
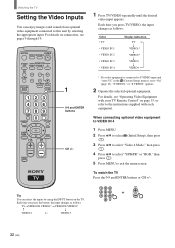
... Setup) menu is set to "On" (page 10), "S VIDEO1," or "S VIDEO2" appears. 2 Operate the selected optional equipment. To watch the TV Press the 0-9 and ENTER buttons or CH +/-. 123 CH 456 or 789 ENTER 0 32 (US) When connecting optional video equipment to VIDEO IN 4...equipment. For details on connection, see "Operating Video Equipment with your TV Remote Control" on the TV. Each time you press TV/VIDEO, the input changes as follows: TVtVIDEO1/S VIDEO1*tVIDEO2/S VIDEO2* R r VIDEO 4 T VIDEO 3 1 Press TV/VIDEO repeatedly until the desired video input appears. For details, see ...
... Setup) menu is set to "On" (page 10), "S VIDEO1," or "S VIDEO2" appears. 2 Operate the selected optional equipment. To watch the TV Press the 0-9 and ENTER buttons or CH +/-. 123 CH 456 or 789 ENTER 0 32 (US) When connecting optional video equipment to VIDEO IN 4...equipment. For details on connection, see "Operating Video Equipment with your TV Remote Control" on the TV. Each time you press TV/VIDEO, the input changes as follows: TVtVIDEO1/S VIDEO1*tVIDEO2/S VIDEO2* R r VIDEO 4 T VIDEO 3 1 Press TV/VIDEO repeatedly until the desired video input appears. For details, see ...
Operating Instructions
Page 33
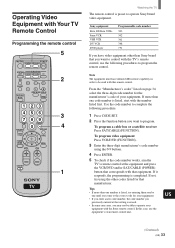
... is listed, try using the 0-9 buttons. 4 Press ENTER. 5 To check if the code number works, aim the TV's remote control at that manufacturer. US (Continued) (US) 33 Sony equipment Beta, ED Beta VCRs 8mm VCR VHS VCR DV VCR DVD player Programmable code number 303 302 301 348 751... If you may not be used with Your TV Remote Control Programming the remote control 5 MUTING POWER VCR/DVD SAT/CABLE TV SYSTEM FUNCTION OFF VCR/DVD...
... is listed, try using the 0-9 buttons. 4 Press ENTER. 5 To check if the code number works, aim the TV's remote control at that manufacturer. US (Continued) (US) 33 Sony equipment Beta, ED Beta VCRs 8mm VCR VHS VCR DV VCR DVD player Programmable code number 303 302 301 348 751... If you may not be used with Your TV Remote Control Programming the remote control 5 MUTING POWER VCR/DVD SAT/CABLE TV SYSTEM FUNCTION OFF VCR/DVD...
Operating Instructions
Page 53
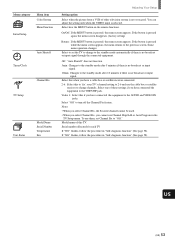
...equipment to the AUDIO and VIDEO IN jacks. Select how the MENU button on the remote functions. US (US) 53 If the button is pressed, the menu screen appears. To use them, set the TV to the standby mode after 10 minutes if there is no broadcast or input signal...you have connected the equipment to the standby mode automatically if there is selected. Menu category Initial Setup Menu item Color System Menu Function Auto Shutoff Timer/Clock Channel Fix TV Setup Unit Status Model Name Serial Number Temperature Fan Adjusting Your Setup Setting option Select when the picture from a...
...equipment to the AUDIO and VIDEO IN jacks. Select how the MENU button on the remote functions. US (US) 53 If the button is pressed, the menu screen appears. To use them, set the TV to the standby mode after 10 minutes if there is no broadcast or input signal...you have connected the equipment to the standby mode automatically if there is selected. Menu category Initial Setup Menu item Color System Menu Function Auto Shutoff Timer/Clock Channel Fix TV Setup Unit Status Model Name Serial Number Temperature Fan Adjusting Your Setup Setting option Select when the picture from a...
Operating Instructions
Page 58
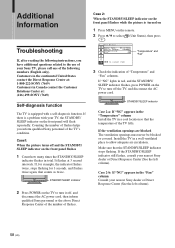
... the picture is turned on 1 Press MENU on the front panel will flash repeatedly. If the STANDBY/SLEEP indicator still flashes, consult your TV, the STANDBY/ SLEEP indicator on the remote. 2 Press V/v to the use of your Sony TV, please call one of flashes. If "NG" lights in ...a well ventilated place to allow adequate air circulation. Install the TV in red, and the STANDBY/ SLEEP...
... the picture is turned on 1 Press MENU on the front panel will flash repeatedly. If the STANDBY/SLEEP indicator still flashes, consult your TV, the STANDBY/ SLEEP indicator on the remote. 2 Press V/v to the use of your Sony TV, please call one of flashes. If "NG" lights in ...a well ventilated place to allow adequate air circulation. Install the TV in red, and the STANDBY/ SLEEP...
Operating Instructions
Page 59
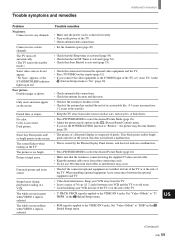
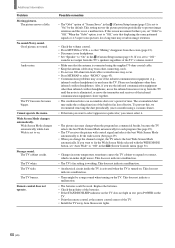
..."RGB" in red. Keep your VCR away from noise sources such as interference may become dimmer (page 28). • The picture of a flat panel display is connected using the supplied 75-ohm coaxial cable. • Keep the antenna cable away from other connecting cords. • Do not use... and noise appear on the remote (page 32). • If you set the POWER SAVING function to the VIDEO IN 4 jacks. Picture (stripe) noise. Color is selected. When installing optional equipment, leave some space between the optional video equipment and the TV. • Press TV/VIDEO on the screen. The...
..."RGB" in red. Keep your VCR away from noise sources such as interference may become dimmer (page 28). • The picture of a flat panel display is connected using the supplied 75-ohm coaxial cable. • Keep the antenna cable away from other connecting cords. • Do not use... and noise appear on the remote (page 32). • If you set the POWER SAVING function to the VIDEO IN 4 jacks. Picture (stripe) noise. Color is selected. When installing optional equipment, leave some space between the optional video equipment and the TV. • Press TV/VIDEO on the screen. The...
Operating Instructions
Page 60
... the volume control. • Press MUTING or VOL + so that the antenna is turned on the TV. • Point the remote control at the remote control sensor of the TV. • Install the TV away from other than infrared cordless headphones, move the infrared transceiver away from the screen (page 23). ...• If the STANDBY/SLEEP indicator on the TV does not light in a pale color, you , set to select appears in red, press POWER on . This does not indicate a malfunction. • An electrical circuit inside the TV is activated when the TV is connected using a vacuum cleaner. • ...
... the volume control. • Press MUTING or VOL + so that the antenna is turned on the TV. • Point the remote control at the remote control sensor of the TV. • Install the TV away from other than infrared cordless headphones, move the infrared transceiver away from the screen (page 23). ...• If the STANDBY/SLEEP indicator on the TV does not light in a pale color, you , set to select appears in red, press POWER on . This does not indicate a malfunction. • An electrical circuit inside the TV is activated when the TV is connected using a vacuum cleaner. • ...
Operating Instructions
Page 61
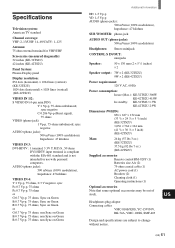
...3/4 × 24 3/4 × 5 1/4 inch) (KE-32TS2U) 1,056 × 764 × 124 mm (41 5/8 × 30 1/8 × 5 inch) (KE-42TS2U) Mass: 26 kg (57 lbs 3 oz.) (KE-32TS2U) 37.5 kg (82 lbs 7 oz.) (KE-42TS2U) Supplied accessories Remote control RM-928Y (1) Batteries size AA (2) 75-ohm coaxial...for VHF/UHF Screen size (measured diagonally): 32 inches (KE-32TS2U) 42 inches (KE-42TS2U) Panel System: Plasma Display panel Display resolution: 852 dots (horizontal) × 1024 lines (vertical) (KE-32TS2U) 1024 dots (horizontal) × 1024 lines (vertical) (KE-42TS2U) VIDEO IN 1/2: S VIDEO IN (4-pin mini...
...3/4 × 24 3/4 × 5 1/4 inch) (KE-32TS2U) 1,056 × 764 × 124 mm (41 5/8 × 30 1/8 × 5 inch) (KE-42TS2U) Mass: 26 kg (57 lbs 3 oz.) (KE-32TS2U) 37.5 kg (82 lbs 7 oz.) (KE-42TS2U) Supplied accessories Remote control RM-928Y (1) Batteries size AA (2) 75-ohm coaxial...for VHF/UHF Screen size (measured diagonally): 32 inches (KE-32TS2U) 42 inches (KE-42TS2U) Panel System: Plasma Display panel Display resolution: 852 dots (horizontal) × 1024 lines (vertical) (KE-32TS2U) 1024 dots (horizontal) × 1024 lines (vertical) (KE-42TS2U) VIDEO IN 1/2: S VIDEO IN (4-pin mini...
Operating Instructions
Page 62
... 30 C Channel setting 20 Clock Display 55 Clock Set 55 CONTROL S jacks 9 Closed Caption 24 Color Matrix 52 Color System 53 Connecting 7 antenna 9 audio receiver 13 cable box 9 digital TV receiver 17 DVD player 14,15 RGB equipment 19 satellite receiver 11 sub woofer 18 VCR 10 D ... On/Off Timer 56 Optional equipment 33 P Parental Control 43 password 45 ratings 48 Picture Mode 26 Power Saving 28 R RGB Mode 52 Remote control 6 battery installation 6 operating optional equipment 35 programming 33 S Screen Saver 52 Screen Shift 38 Screen Size 38 Screen Zoom 52 Self-...
... 30 C Channel setting 20 Clock Display 55 Clock Set 55 CONTROL S jacks 9 Closed Caption 24 Color Matrix 52 Color System 53 Connecting 7 antenna 9 audio receiver 13 cable box 9 digital TV receiver 17 DVD player 14,15 RGB equipment 19 satellite receiver 11 sub woofer 18 VCR 10 D ... On/Off Timer 56 Optional equipment 33 P Parental Control 43 password 45 ratings 48 Picture Mode 26 Power Saving 28 R RGB Mode 52 Remote control 6 battery installation 6 operating optional equipment 35 programming 33 S Screen Saver 52 Screen Shift 38 Screen Size 38 Screen Zoom 52 Self-...


