
Operating Instructions
Page 5
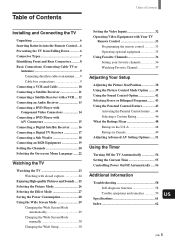
...Mode automatically 29 Changing the Wide Screen Mode manually 30 Changing the Wide Setup 30 Setting the Video Inputs 32 Operating Video Equipment with Your TV Remote Control 33 Programming the remote control 33 Operating optional equipment 35 Using Favorite Channels 36 Setting your ...48 Ratings in the U.S.A 48 Ratings in Canada 49 Adjusting Advanced AV Setting Options ...... 51 Using the Timer Turning Off the TV Automatically 54 Setting the Current Time 55 Controlling Power On/Off Automatically ..... 56 Additional Information Troubleshooting 58 Self-diagnosis function 58 ...
...Mode automatically 29 Changing the Wide Screen Mode manually 30 Changing the Wide Setup 30 Setting the Video Inputs 32 Operating Video Equipment with Your TV Remote Control 33 Programming the remote control 33 Operating optional equipment 35 Using Favorite Channels 36 Setting your ...48 Ratings in the U.S.A 48 Ratings in Canada 49 Adjusting Advanced AV Setting Options ...... 51 Using the Timer Turning Off the TV Automatically 54 Setting the Current Time 55 Controlling Power On/Off Automatically ..... 56 Additional Information Troubleshooting 58 Self-diagnosis function 58 ...

Operating Instructions
Page 14
... as Y, CB and CR, or Y, PB and PR. If so, connect the cables to the matching colors. 2 Using an AUDIO cable, connect the DVD player's AUDIO OUT jacks to use if: • Your... is the preferred hookup to "Y/PB/ PR" in the (Initial Setup) menu (see page 32). Tips • To take advantage of inputs that you used for the video connection. Disconnect... connections. 1 Using three separate component video cables, connect the DVD player's Y, B-Y and R-Y jacks to 16:9 on the TV. Rear of TV VIDEO IN 1 R AUDIO L VIDEO S VIDEO VIDEO IN 3 R AUDIO L DVI-HDTV AUDIO OUT R L R AUDIO ...
... as Y, CB and CR, or Y, PB and PR. If so, connect the cables to the matching colors. 2 Using an AUDIO cable, connect the DVD player's AUDIO OUT jacks to use if: • Your... is the preferred hookup to "Y/PB/ PR" in the (Initial Setup) menu (see page 32). Tips • To take advantage of inputs that you used for the video connection. Disconnect... connections. 1 Using three separate component video cables, connect the DVD player's Y, B-Y and R-Y jacks to 16:9 on the TV. Rear of TV VIDEO IN 1 R AUDIO L VIDEO S VIDEO VIDEO IN 3 R AUDIO L DVI-HDTV AUDIO OUT R L R AUDIO ...
Operating Instructions
Page 17
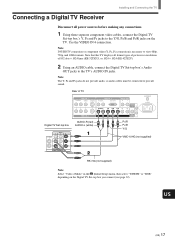
...three separate component video cables, connect the Digital TV Set-top box's Y, PB and PR jacks to the Y/G, PB/B and PR/R jacks on the Digital TV Set-top box you connect (see page 32). Rear of 852 dots × 1024 lines (KE-32TS2U), or 1024 × 1024 (KE-42TS2U). 2 Using an AUDIO cable, connect the... Digital TV Set-top box's Audio OUT jacks to the TV's AUDIO IN jacks.
...three separate component video cables, connect the Digital TV Set-top box's Y, PB and PR jacks to the Y/G, PB/B and PR/R jacks on the Digital TV Set-top box you connect (see page 32). Rear of 852 dots × 1024 lines (KE-32TS2U), or 1024 × 1024 (KE-42TS2U). 2 Using an AUDIO cable, connect the... Digital TV Set-top box's Audio OUT jacks to the TV's AUDIO IN jacks.

Operating Instructions
Page 19
...OUT VIDEO IN 4 SUB WOOFER RGB equipment VHF/UHF AC IN Note Set "Video 4 Mode" to "RGB" in the (Initial Setup) menu (see page 32). Use the VIDEO IN 4 connections. 2 Using an AUDIO cable, connect the RGB equipment's AUDIO OUT jacks to the Y/G, PB/B, PR/R, HD, and VD... jacks on the TV. Connecting an RGB Equipment Installing and Connecting the TV Disconnect all power sources before making any connections. 1 Using an RGB cable, connect the RGB equipment's video/synchronized signal output terminal...
...OUT VIDEO IN 4 SUB WOOFER RGB equipment VHF/UHF AC IN Note Set "Video 4 Mode" to "RGB" in the (Initial Setup) menu (see page 32). Use the VIDEO IN 4 connections. 2 Using an AUDIO cable, connect the RGB equipment's AUDIO OUT jacks to the Y/G, PB/B, PR/R, HD, and VD... jacks on the TV. Connecting an RGB Equipment Installing and Connecting the TV Disconnect all power sources before making any connections. 1 Using an RGB cable, connect the RGB equipment's video/synchronized signal output terminal...
Operating Instructions
Page 32
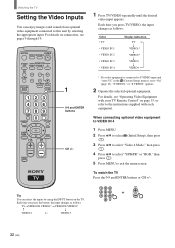
...TVtVIDEO1/S VIDEO1*tVIDEO2/S VIDEO2* R r VIDEO 4 T VIDEO 3 1 Press TV/VIDEO repeatedly until the desired video input appears. To watch the TV Press the 0-9 and ENTER buttons or CH +/-. 123 CH 456 or 789 ENTER 0 32 (US) Each time you press the button, the input changes as follows:... Select • TV • VIDEO IN 1 • VIDEO IN 2 • VIDEO IN 3 • VIDEO IN 4 Display indication TV T r VIDEO1* r VIDEO2* r VIDEO3 r VIDEO4 * If ...
...TVtVIDEO1/S VIDEO1*tVIDEO2/S VIDEO2* R r VIDEO 4 T VIDEO 3 1 Press TV/VIDEO repeatedly until the desired video input appears. To watch the TV Press the 0-9 and ENTER buttons or CH +/-. 123 CH 456 or 789 ENTER 0 32 (US) Each time you press the button, the input changes as follows:... Select • TV • VIDEO IN 1 • VIDEO IN 2 • VIDEO IN 3 • VIDEO IN 4 Display indication TV T r VIDEO1* r VIDEO2* r VIDEO3 r VIDEO4 * If ...
Operating Instructions
Page 59
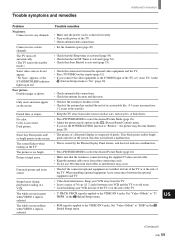
...any channels. Dotted lines or stripes No color. The picture is connected using the supplied 75-ohm coaxial cable. • Keep the antenna cable away from noise sources such as interference may become dimmer (page 28). • The picture of a flat panel display is applied to "Reduce," the picture... • Make sure that Auto Shutoff is activated (page 53). • Check the connection between the optional video equipment and the TV. • Press TV/VIDEO on the remote (page 32). • If you set "Auto YC" in the (Custom Setup) menu to "On" (page 10). • Check antenna...
...any channels. Dotted lines or stripes No color. The picture is connected using the supplied 75-ohm coaxial cable. • Keep the antenna cable away from noise sources such as interference may become dimmer (page 28). • The picture of a flat panel display is applied to "Reduce," the picture... • Make sure that Auto Shutoff is activated (page 53). • Check the connection between the optional video equipment and the TV. • Press TV/VIDEO on the remote (page 32). • If you set "Auto YC" in the (Custom Setup) menu to "On" (page 10). • Check antenna...
Operating Instructions
Page 61
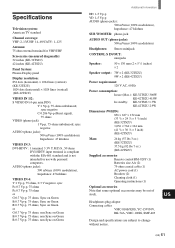
... (US) 61 Specifications Television system: American TV standard Channel coverage: VHF: 2-13/UHF: 14-69/CATV: 1-125 Antenna: 75 ohm external terminal for VHF/UHF Screen size (measured diagonally): 32 inches (KE-32TS2U) 42 inches (KE-42TS2U) Panel System: Plasma Display panel Display resolution: 852 dots (horizontal) × 1024 lines (vertical) (KE-32TS2U) 1024 dots (horizontal) × 1024 lines...
... (US) 61 Specifications Television system: American TV standard Channel coverage: VHF: 2-13/UHF: 14-69/CATV: 1-125 Antenna: 75 ohm external terminal for VHF/UHF Screen size (measured diagonally): 32 inches (KE-32TS2U) 42 inches (KE-42TS2U) Panel System: Plasma Display panel Display resolution: 852 dots (horizontal) × 1024 lines (vertical) (KE-32TS2U) 1024 dots (horizontal) × 1024 lines...
Operating Instructions
Page 62
... setting 20 Clock Display 55 Clock Set 55 CONTROL S jacks 9 Closed Caption 24 Color Matrix 52 Color System 53 Connecting 7 antenna 9 audio receiver 13 cable box 9 digital TV receiver 17 DVD player 14,15 RGB equipment 19 satellite receiver 11 sub woofer 18 VCR... 10 D Daylight Saving 56 Display 52 E Effect 27 F Favorite Channel 36 Front and rear connectors 8 Full 29 I Initial Setup 53 Input select 32...
... setting 20 Clock Display 55 Clock Set 55 CONTROL S jacks 9 Closed Caption 24 Color Matrix 52 Color System 53 Connecting 7 antenna 9 audio receiver 13 cable box 9 digital TV receiver 17 DVD player 14,15 RGB equipment 19 satellite receiver 11 sub woofer 18 VCR... 10 D Daylight Saving 56 Display 52 E Effect 27 F Favorite Channel 36 Front and rear connectors 8 Full 29 I Initial Setup 53 Input select 32...