
Operating Instructions
Page 7
... Optional Equipment.....18 Front Panel 18 Rear Panel 19 Setting Up the Channel List - Contents Getting Started Welcome 8 Features 8 Notes on the TV 9 Screen 10 Projection Lamp 10 Installing the TV 11 Carrying Your TV 11 Take Precaution during Installation 11 Preventing the TV from Toppling Over .......11 When Installing Your TV against a Wall......12 Recommended Viewing... When Connecting to Replace the Lamp 51 Troubleshooting 55 Remote Control 55 Picture 56 Sound 57 Channels 57 General 58 PC Input Signal Reference Chart 60 Specifications 61 Index 62 7
... Optional Equipment.....18 Front Panel 18 Rear Panel 19 Setting Up the Channel List - Contents Getting Started Welcome 8 Features 8 Notes on the TV 9 Screen 10 Projection Lamp 10 Installing the TV 11 Carrying Your TV 11 Take Precaution during Installation 11 Preventing the TV from Toppling Over .......11 When Installing Your TV against a Wall......12 Recommended Viewing... When Connecting to Replace the Lamp 51 Troubleshooting 55 Remote Control 55 Picture 56 Sound 57 Channels 57 General 58 PC Input Signal Reference Chart 60 Specifications 61 Index 62 7

Operating Instructions
Page 13
For the best picture quality, install your TV within the areas shown below. These types of the picture (typically dark areas). Model KDS-50A2000 KDS-55A2000 KDS-60A2000 Viewing distance min. 6.6 ft. (approx. 2.0 m) min. 6.8 ft. (approx. 2.1 m) min. 7.0 ft. (approx. 2.2 m) Horizontal Viewing Area 60 55 50 iiinnncccmhhhieeensss. 6655° ° 6mmm.6iiinnnf...t.6675(...0a680...
For the best picture quality, install your TV within the areas shown below. These types of the picture (typically dark areas). Model KDS-50A2000 KDS-55A2000 KDS-60A2000 Viewing distance min. 6.6 ft. (approx. 2.0 m) min. 6.8 ft. (approx. 2.1 m) min. 7.0 ft. (approx. 2.2 m) Horizontal Viewing Area 60 55 50 iiinnncccmhhhieeensss. 6655° ° 6mmm.6iiinnnf...t.6675(...0a680...
Operating Instructions
Page 20
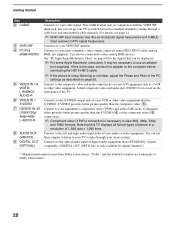
... all format types of your TV's audio through a cable box) and unscrambled cable channels. Connect to the composite video and audio output jacks on your stereo system. A third composite video and audio jack (VIDEO 2) is located on page 60 for digital channels.) * Manufactured under license from ... AUDIO OUT (VAR/FIX) 9 DIGITAL OUT (OPTICAL) Description Connects to your audio or video equipment. This CABLE input jack, in a resolution of the TV. Note that can use an adapter (not supplied). See "PC Input Signal Reference Chart" on the front panel of 1,920 dots × 1,080 lines...
... all format types of your TV's audio through a cable box) and unscrambled cable channels. Connect to the composite video and audio output jacks on your stereo system. A third composite video and audio jack (VIDEO 2) is located on page 60 for digital channels.) * Manufactured under license from ... AUDIO OUT (VAR/FIX) 9 DIGITAL OUT (OPTICAL) Description Connects to your audio or video equipment. This CABLE input jack, in a resolution of the TV. Note that can use an adapter (not supplied). See "PC Input Signal Reference Chart" on the front panel of 1,920 dots × 1,080 lines...

Operating Instructions
Page 22
To cancel Sleep, press SLEEP repeatedly until the TV displays the time in minutes (Off, 15, 30, 45, 60, 90 or 120) that was selected. Press 0-9 to change between the current channel and the last channel that you choose. Press ENT to select a channel; The TV alternates between the VHF/UHF input and the...
To cancel Sleep, press SLEEP repeatedly until the TV displays the time in minutes (Off, 15, 30, 45, 60, 90 or 120) that was selected. Press 0-9 to change between the current channel and the last channel that you choose. Press ENT to select a channel; The TV alternates between the VHF/UHF input and the...

Operating Instructions
Page 46
.... 4 Press MENU to exit Settings. Sleep Set the time in minutes (Off, 15 minutes, 30 minutes, 45 minutes, 60 minutes, 90 minutes or 120 minutes) that you selected Program in your TV skips this input when you set the timer by day, hour, minute, AM/PM, Duration, and Channel. Timer 1 Timer... Timer 1 or 2, press instead of pressing b. 2 Press V/v to highlight one of choice: English, Español, Français. Off: Select to turn the TV on before shutting off the timer. (Your previous settings are the same as Label Channels (see page 41). ✍ If you select Skip, your language...
.... 4 Press MENU to exit Settings. Sleep Set the time in minutes (Off, 15 minutes, 30 minutes, 45 minutes, 60 minutes, 90 minutes or 120 minutes) that you selected Program in your TV skips this input when you set the timer by day, hour, minute, AM/PM, Duration, and Channel. Timer 1 Timer... Timer 1 or 2, press instead of pressing b. 2 Press V/v to highlight one of choice: English, Español, Français. Off: Select to turn the TV on before shutting off the timer. (Your previous settings are the same as Label Channels (see page 41). ✍ If you select Skip, your language...

Operating Instructions
Page 50
...adjust. Press B/b and press to fine tune overall sharpness. Standard Provides standard sound. Note that Auto Adjustment may not work well with a 60 Hz vertical frequency. 50 Adjust uneven sharpness on screen. ✍ For the PC Input Signal Reference Chart, see page...the picture to give the white colors a bluish tint. Full 2 Select to enlarge the picture to move the position of the picture when the TV receives an input signal from the connected PC. Neutral Select to fill the display area, keeping its original ratio. Custom Provides a flat response....
...adjust. Press B/b and press to fine tune overall sharpness. Standard Provides standard sound. Note that Auto Adjustment may not work well with a 60 Hz vertical frequency. 50 Adjust uneven sharpness on screen. ✍ For the PC Input Signal Reference Chart, see page...the picture to give the white colors a bluish tint. Full 2 Select to enlarge the picture to move the position of the picture when the TV receives an input signal from the connected PC. Neutral Select to fill the display area, keeping its original ratio. Custom Provides a flat response....
Operating Instructions
Page 60
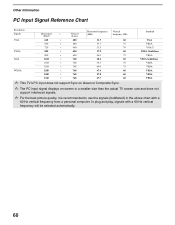
...XGA 1024 × 768 48.4 1024 × 768 56.5 60 VESA Guidelines 70 VESA 1024 × 768 60.0 75 VESA WXGA 1280 × 768 47.4 1280 × 768 47.8 60 VESA 60 VESA 1360 × 768 47.7 60 VESA ✍ This TV's PC input does not support Sync on Green or Composite Sync.... ✍ The PC input signal displays on-screen in a smaller size than the actual TV screen size and does not support interlaced...
...XGA 1024 × 768 48.4 1024 × 768 56.5 60 VESA Guidelines 70 VESA 1024 × 768 60.0 75 VESA WXGA 1280 × 768 47.4 1280 × 768 47.8 60 VESA 60 VESA 1360 × 768 47.7 60 VESA ✍ This TV's PC input does not support Sync on Green or Composite Sync.... ✍ The PC input signal displays on-screen in a smaller size than the actual TV screen size and does not support interlaced...

Operating Instructions
Page 61
... CableCARD functionality) Channel coverage: Terrestrial (analog) Cable TV (analog) Terrestrial (digital) Cable TV (digital) 2-69 1-125 2-69 1-135 Antenna: 75-ohm external terminal for VHF/UHF Screen size (measured diagonally): KDS-50A2000: 50 inches KDS-55A2000: 55 inches KDS-60A2000: 60 inches Projection system 3 SXRD panel, 1 lens projection system SXRD panel 0.61 inch SXRD panel...
... CableCARD functionality) Channel coverage: Terrestrial (analog) Cable TV (analog) Terrestrial (digital) Cable TV (digital) 2-69 1-125 2-69 1-135 Antenna: 75-ohm external terminal for VHF/UHF Screen size (measured diagonally): KDS-50A2000: 50 inches KDS-55A2000: 55 inches KDS-60A2000: 60 inches Projection system 3 SXRD panel, 1 lens projection system SXRD panel 0.61 inch SXRD panel...


