Operating Instructions
Page 6
...) Grounding conductors (NEC section 810-21) Ground clamps Power service grounding electrode system (NEC Art 250 Part H) Cleaning s Clean the rear cover area of abrasive pad, alkaline cleaner, acid cleaner, scouring powder, chemical cloth, or solvent such as alcohol, benzene or thinner... your viewing position. It is nearing end of the TV set. Projection Lamp s Your TV uses a projection lamp as follows: s Clean the screen with a new one (not supplied) when: • the message, "Projection lamp is time to section 54-300 of lamp. Antenna lead-in this unit. To prevent screen damage...
...) Grounding conductors (NEC section 810-21) Ground clamps Power service grounding electrode system (NEC Art 250 Part H) Cleaning s Clean the rear cover area of abrasive pad, alkaline cleaner, acid cleaner, scouring powder, chemical cloth, or solvent such as alcohol, benzene or thinner... your viewing position. It is nearing end of the TV set. Projection Lamp s Your TV uses a projection lamp as follows: s Clean the screen with a new one (not supplied) when: • the message, "Projection lamp is time to section 54-300 of lamp. Antenna lead-in this unit. To prevent screen damage...
Operating Instructions
Page 7
... 8 Notes on the TV 9 Screen 10 Projection Lamp 10 Installing the TV 11 Carrying Your TV 11 Take Precaution during Installation 11 Preventing the TV from Toppling Over .......11 When Installing Your TV against a Wall......12 Recommended Viewing Area 13 Connecting the TV 14 Cable System and VHF...TV Controls 31 Using the Menus Overview of MENU 32 Picture Settings 34 Sound Settings 37 Screen Settings 39 Channel Settings 41 Parental Lock Settings 42 Setup Settings 45 PC Settings 49 Other Information Replacing the Lamp 51 How to Optional Equipment.....18 Front Panel 18 Rear...
... 8 Notes on the TV 9 Screen 10 Projection Lamp 10 Installing the TV 11 Carrying Your TV 11 Take Precaution during Installation 11 Preventing the TV from Toppling Over .......11 When Installing Your TV against a Wall......12 Recommended Viewing Area 13 Connecting the TV 14 Cable System and VHF...TV Controls 31 Using the Menus Overview of MENU 32 Picture Settings 34 Sound Settings 37 Screen Settings 39 Channel Settings 41 Parental Lock Settings 42 Setup Settings 45 PC Settings 49 Other Information Replacing the Lamp 51 How to Optional Equipment.....18 Front Panel 18 Rear...
Operating Instructions
Page 10
... only a temporary condition. This is on your TV. ✍ The light emitted from the lamp is quite bright when your TV, it has a lifespan and needs to display a message "Projection lamp is required. As with a new Sony XL-5200 replacement lamp (not supplied). ❑ After the lamp is replaced, set the Lamp Replacement option in the Setup settings (see...
... only a temporary condition. This is on your TV. ✍ The light emitted from the lamp is quite bright when your TV, it has a lifespan and needs to display a message "Projection lamp is required. As with a new Sony XL-5200 replacement lamp (not supplied). ❑ After the lamp is replaced, set the Lamp Replacement option in the Setup settings (see...
Operating Instructions
Page 18
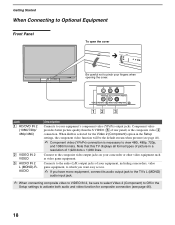
...connection is necessary to view 480i, 480p, 720p, and 1080i formats. Note that this TV displays all format types of picture in the Setup settings, the component video function will ...Getting Started When Connecting to Optional Equipment Front Panel To open the cover OPEN TIMER LAMP POWER POWER Be careful not to pinch your equipment, including camcorders, video game ...settings to activate both audio and video function for the Video 2 (Component) option in a resolution of rear panel) or the composite video 2 connection. Component video provides better picture quality than the S VIDEO ...
...connection is necessary to view 480i, 480p, 720p, and 1080i formats. Note that this TV displays all format types of picture in the Setup settings, the component video function will ...Getting Started When Connecting to Optional Equipment Front Panel To open the cover OPEN TIMER LAMP POWER POWER Be careful not to pinch your equipment, including camcorders, video game ...settings to activate both audio and video function for the Video 2 (Component) option in a resolution of rear panel) or the composite video 2 connection. Component video provides better picture quality than the S VIDEO ...
Operating Instructions
Page 31
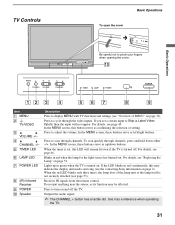
... IR signals from the remote control. Use it as left/right buttons. OPEN TIMER LAMP POWER POWER 0 MENU TV/VIDEO VOLUME CHANNEL TIMER LAMP POWER POWER 12 3 4 567 8 9 Item 1 MENU 2 TV/VIDEO 3 VOLUME +/- 4 CHANNEL +/- 5 TIMER LED 6 LAMP LED 7 POWER LED 8 (IR) Infrared Receiver 9 POWER q; To scan quickly ... MENU screen, these buttons serve as a reference when operating the TV. 31 For details, see the contacting Sony information on page 51. Lights up /down either -/+. When the red LED blinks only three times, the lamp door of MENU" on and off . Outputs the audio signal...
... IR signals from the remote control. Use it as left/right buttons. OPEN TIMER LAMP POWER POWER 0 MENU TV/VIDEO VOLUME CHANNEL TIMER LAMP POWER POWER 12 3 4 567 8 9 Item 1 MENU 2 TV/VIDEO 3 VOLUME +/- 4 CHANNEL +/- 5 TIMER LED 6 LAMP LED 7 POWER LED 8 (IR) Infrared Receiver 9 POWER q; To scan quickly ... MENU screen, these buttons serve as a reference when operating the TV. 31 For details, see the contacting Sony information on page 51. Lights up /down either -/+. When the red LED blinks only three times, the lamp door of MENU" on and off . Outputs the audio signal...
Operating Instructions
Page 47
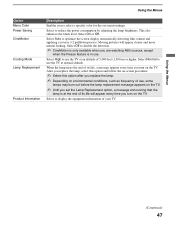
...Select to select a specific color for the on-screen settings. Moving pictures will appear every time you set the Lamp Replacement option, a message announcing that the lamp is in use the TV at an altitude of 5,000 feet (1,500 m) or higher. Using the Menus (Continued) 47 Using the Menus...power consumption by adjusting the lamp brightness. When the lamp nears the end of use the TV at normal altitude. Select to use , some lamps may burn out before the lamp replacement message appears on the TV. ✍ Until you turn on the TV. After you replace the lamp, select this option and...
...Select to select a specific color for the on-screen settings. Moving pictures will appear every time you set the Lamp Replacement option, a message announcing that the lamp is in use the TV at an altitude of 5,000 feet (1,500 m) or higher. Using the Menus (Continued) 47 Using the Menus...power consumption by adjusting the lamp brightness. When the lamp nears the end of use the TV at normal altitude. Select to use , some lamps may burn out before the lamp replacement message appears on the TV. ✍ Until you turn on the TV. After you replace the lamp, select this option and...
Operating Instructions
Page 51
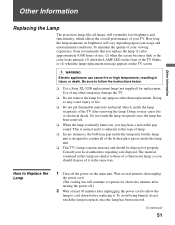
... follow the instructions below. ❑ Use a Sony XL-5200 replacement lamp (not supplied) for replacement. Doing so may cause injury or fire. ❑ Do not put flammable materials and metal objects inside the lamp receptacle of the TV blinks; This is normal and it is designed to...To avoid being burned, do not touch the lamp receptacle once the lamp has been removed. (Continued) 51 Other Information Other Information Replacing the Lamp The projection lamp, like all of the broken glass pieces inside the lamp unit. ❑ This TV's lamp contains mercury and should dispose of it . ...
... follow the instructions below. ❑ Use a Sony XL-5200 replacement lamp (not supplied) for replacement. Doing so may cause injury or fire. ❑ Do not put flammable materials and metal objects inside the lamp receptacle of the TV blinks; This is normal and it is designed to...To avoid being burned, do not touch the lamp receptacle once the lamp has been removed. (Continued) 51 Other Information Other Information Replacing the Lamp The projection lamp, like all of the broken glass pieces inside the lamp unit. ❑ This TV's lamp contains mercury and should dispose of it . ...
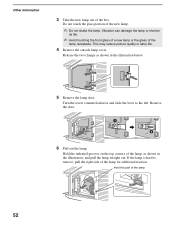
Operating Instructions
Page 52
...shown in the illustration below. 5 Remove the lamp door. Hold this part of the lamp receptacle. This may reduce picture quality or lamp life. 4 Remove the outside lamp cover. Turn the screw counterclockwise and slide the lever to remove, pull the right side of the lamp, as shown in the illustration, and pull... shorten its life. ✍ Avoid touching the front glass of a new lamp or the glass of the lamp 52 Other Information 3 Take the new lamp out of the new lamp. ✍ Do not shake the lamp. Do not touch the glass portion of the box. Hold the indented grooves on the top ...
...shown in the illustration below. 5 Remove the lamp door. Hold this part of the lamp receptacle. This may reduce picture quality or lamp life. 4 Remove the outside lamp cover. Turn the screw counterclockwise and slide the lever to remove, pull the right side of the lamp, as shown in the illustration, and pull... shorten its life. ✍ Avoid touching the front glass of a new lamp or the glass of the lamp 52 Other Information 3 Take the new lamp out of the new lamp. ✍ Do not shake the lamp. Do not touch the glass portion of the box. Hold the indented grooves on the top ...

Operating Instructions
Page 53
...place. Never touch the glass portion of the lamp or the surrounding parts. ✍ After the used lamp into a plastic bag. 7 Put the new lamp into the empty box of the lamp compartment. ✍ The lamp is very hot immediately after use. Insert the new lamp by inserting the two tabs in the illustration.... Slide the lever to the right and then turn the screw clockwise to go dark. ✍ The lamp compartment is tilted, as shown in the following illustration. ✍ If the lamp is securely mounted into place as shown in the slot from the left side. Make sure the...
...place. Never touch the glass portion of the lamp or the surrounding parts. ✍ After the used lamp into a plastic bag. 7 Put the new lamp into the empty box of the lamp compartment. ✍ The lamp is very hot immediately after use. Insert the new lamp by inserting the two tabs in the illustration.... Slide the lever to the right and then turn the screw clockwise to go dark. ✍ The lamp compartment is tilted, as shown in the following illustration. ✍ If the lamp is securely mounted into place as shown in the slot from the left side. Make sure the...
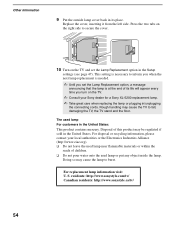
Operating Instructions
Page 54
... its place. For disposal or recycling information, please contact your Sony dealer for a Sony XL-5200 replacement lamp. ✍ Take great care when replacing the lamp or plugging in/unplugging the connecting cords. Disposal of this product may cause the lamp to fall, damaging the TV, the TV stand and the floor. Other Information 9 Put the outside...
... its place. For disposal or recycling information, please contact your Sony dealer for a Sony XL-5200 replacement lamp. ✍ Take great care when replacing the lamp or plugging in/unplugging the connecting cords. Disposal of this product may cause the lamp to fall, damaging the TV, the TV stand and the floor. Other Information 9 Put the outside...
Operating Instructions
Page 55
...the following numbers: http://www.sony.com/tvsupport 1-800-222-SONY(7669) for US 1-877-899-SONY(7669) for Canada Remote Control Condition Remote control does not operate Cannot change channels with remote control operation; try turning off the TV and wait until the TV's projection lamp cools down (approximately 5 minutes... is high." If the remote control still does not work, make sure to dust the ventilation slots on the rear of the batteries. ❏ Press TV (FUNCTION) once, and the TV indicator lights up . ❏ If you are using another device to change channels, first press...
...the following numbers: http://www.sony.com/tvsupport 1-800-222-SONY(7669) for US 1-877-899-SONY(7669) for Canada Remote Control Condition Remote control does not operate Cannot change channels with remote control operation; try turning off the TV and wait until the TV's projection lamp cools down (approximately 5 minutes... is high." If the remote control still does not work, make sure to dust the ventilation slots on the rear of the batteries. ❏ Press TV (FUNCTION) once, and the TV indicator lights up . ❏ If you are using another device to change channels, first press...

Operating Instructions
Page 58
...page 51). The TV will clear all of the TV natural creaking noise occurs due to factory ❏ Turn on page 17, you are connecting a VCR and digital cable box using a splitter, as described on the TV. Repeat the steps on again with your previous password; LAMP LED blinks in... red ❏ If the LED blinks three times, the lamp door or the lamp might not be securely attached (see page 45).
...page 51). The TV will clear all of the TV natural creaking noise occurs due to factory ❏ Turn on page 17, you are connecting a VCR and digital cable box using a splitter, as described on the TV. Repeat the steps on again with your previous password; LAMP LED blinks in... red ❏ If the LED blinks three times, the lamp door or the lamp might not be securely attached (see page 45).
Operating Instructions
Page 59
... no obstacles in your TV away from the ventilation slots on the rear and both sides of the screen powered off may appear white even when TV is turned off the TV for your local Sony Service Center. The TV does not turn on ❏ The TV cools down its projection lamp when the power is... power off. Please view the screen at the recommended viewing distances. This is time for you to Replace the Lamp" and follow ...
... no obstacles in your TV away from the ventilation slots on the rear and both sides of the screen powered off may appear white even when TV is turned off the TV for your local Sony Service Center. The TV does not turn on ❏ The TV cools down its projection lamp when the power is... power off. Please view the screen at the recommended viewing distances. This is time for you to Replace the Lamp" and follow ...
Operating Instructions
Page 61
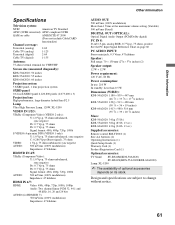
... TV (digital) 2-69 1-125 2-69 1-135 Antenna: 75-ohm external terminal for VHF/UHF Screen size (measured diagonally): KDS-50A2020: 50 inches KDS-55A2020: 55 inches KDS-60A2020: 60 inches Projection system 3 SXRD panel, 1 lens projection system SXRD panel 0.61 inch SXRD panel 6,220,800 pixels (2,073,600 × 3) Projection lens High performance, large diameter hybrid lens F2.5 Lamp Ultra...
... TV (digital) 2-69 1-125 2-69 1-135 Antenna: 75-ohm external terminal for VHF/UHF Screen size (measured diagonally): KDS-50A2020: 50 inches KDS-55A2020: 55 inches KDS-60A2020: 60 inches Projection system 3 SXRD panel, 1 lens projection system SXRD panel 0.61 inch SXRD panel 6,220,800 pixels (2,073,600 × 3) Projection lens High performance, large diameter hybrid lens F2.5 Lamp Ultra...
Operating Instructions
Page 62
... CH +/- button 31 Channels creating labels 41 CineMotion 8, 47 Clear White 36 Clock/Timers 46 Color 34 Color Matrix 45 Color Temp. 35, 50 Connecting Satellite receiver 15 VCR 16 Cooling Mode 47 D Detail Enhancer 36 Diagnostics 41 Digital Channels 41 DIGITAL OUT (OPTICAL) 20 Digital Rating 43... jack, described 19 High-Definition Multimedia Interface (HDMI) 9 Horizontal Center 40, 50 Hue 34 I Info Banner 45 Infrared Receiver (IR) 31 J JUMP button 22 L Label Channels 41 Label Video Inputs 45 LAMP LED 31 Lamp Replacement 47 Lamp, replacing 51-54 Language 46 Live Color 36 M MENU Antenna 33 Cable 33...
... CH +/- button 31 Channels creating labels 41 CineMotion 8, 47 Clear White 36 Clock/Timers 46 Color 34 Color Matrix 45 Color Temp. 35, 50 Connecting Satellite receiver 15 VCR 16 Cooling Mode 47 D Detail Enhancer 36 Diagnostics 41 Digital Channels 41 DIGITAL OUT (OPTICAL) 20 Digital Rating 43... jack, described 19 High-Definition Multimedia Interface (HDMI) 9 Horizontal Center 40, 50 Hue 34 I Info Banner 45 Infrared Receiver (IR) 31 J JUMP button 22 L Label Channels 41 Label Video Inputs 45 LAMP LED 31 Lamp Replacement 47 Lamp, replacing 51-54 Language 46 Live Color 36 M MENU Antenna 33 Cable 33...


