Operating Instructions
Page 3
Setting Up the Channel List - Contents Welcome to the World of optional equipment connection diagrams. Customer Support United States http://www.sony.com/tvsupport Canada http://www.sony.ca/support On-line Registration United States http://productregistration.sony.com Canada http://www.SonyStyle.ca/registration 3 Initial Setup 16 Operating the TV Inserting Batteries into the Remote...
Setting Up the Channel List - Contents Welcome to the World of optional equipment connection diagrams. Customer Support United States http://www.sony.com/tvsupport Canada http://www.sony.ca/support On-line Registration United States http://productregistration.sony.com Canada http://www.SonyStyle.ca/registration 3 Initial Setup 16 Operating the TV Inserting Batteries into the Remote...
Operating Instructions
Page 4
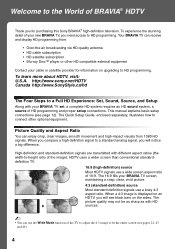
Welcome to the World of HD programming and proper setup connections. http://www.sony.com/HDTV Canada http://www.SonyStyle.ca/hd The Four Steps to a Full HD Experience: Set, Sound, Source, and Setup Along with your BRAVIA TV set, a complete HD system requires an HD sound system, a source of BRAVIA...optional equipment. This manual explains basic setup connections (see black bars on upgrading to fit the entire screen (see pages 22, 45 and 46). 4 Picture Quality and Aspect Ratio You can receive and display HD programming from 1080 HD signals. High-definition and standard-definition signals ...
Welcome to the World of HD programming and proper setup connections. http://www.sony.com/HDTV Canada http://www.SonyStyle.ca/hd The Four Steps to a Full HD Experience: Set, Sound, Source, and Setup Along with your BRAVIA TV set, a complete HD system requires an HD sound system, a source of BRAVIA...optional equipment. This manual explains basic setup connections (see black bars on upgrading to fit the entire screen (see pages 22, 45 and 46). 4 Picture Quality and Aspect Ratio You can receive and display HD programming from 1080 HD signals. High-definition and standard-definition signals ...
Operating Instructions
Page 5
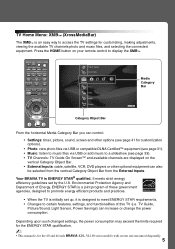
Depending upon such changed settings, the power consumption may exceed the limits required for the 40 and 46 inch BRAVIA KDL-VL160 series models with screen size measured diagonally. 5 Press the HOME button on the vertical Category Object Bar. • External ... Energy. ENERGY STAR is a joint program of these government agencies, designed to promote energy efficient products and practices. • When the TV is initially set by the U.S. TV Guide, Picture/Sound, Light Sensor, Power Savings) can also be selected from the vertical Category Object Bar from the External Inputs. Your ...
Depending upon such changed settings, the power consumption may exceed the limits required for the 40 and 46 inch BRAVIA KDL-VL160 series models with screen size measured diagonally. 5 Press the HOME button on the vertical Category Object Bar. • External ... Energy. ENERGY STAR is a joint program of these government agencies, designed to promote energy efficient products and practices. • When the TV is initially set by the U.S. TV Guide, Picture/Sound, Light Sensor, Power Savings) can also be selected from the vertical Category Object Bar from the External Inputs. Your ...
Operating Instructions
Page 7
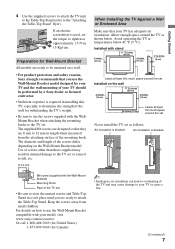
...supplied with the Wall-Mount Bracket) Mounting Hook Rear of the TV set • Be sure to store the unused screws and Table-Top Stand in a safe place until you use the Wall-Mount Bracket compatible with your model, visit www.sony.com/accessories Or call 1-800-488-7669 (for United States...measured from small children. Never install the TV set or cause it to attach the Table-Top Stand. For details on a wall. • For product protection and safety reasons, Sony strongly recommends that they are ready to fall, etc. 8-12 mm When Installing the TV Against a Wall or Enclosed Area Make...
...supplied with the Wall-Mount Bracket) Mounting Hook Rear of the TV set • Be sure to store the unused screws and Table-Top Stand in a safe place until you use the Wall-Mount Bracket compatible with your model, visit www.sony.com/accessories Or call 1-800-488-7669 (for United States...measured from small children. Never install the TV set or cause it to attach the Table-Top Stand. For details on a wall. • For product protection and safety reasons, Sony strongly recommends that they are ready to fall, etc. 8-12 mm When Installing the TV Against a Wall or Enclosed Area Make...
Operating Instructions
Page 8
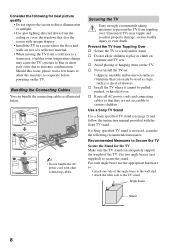
...not allow the moisture to evaporate before powering on furniture and TV sets. Recommended Measures to play or climb on the TV. Angle brace Stand 8 s Install the TV where it cannot be used , consider the following for the TV Make sure the TV stand can adequately support the weight of a reflective material....braces (not supplied) to curious children. s Route all AC power cords and connecting cables so that face the screen with the Sony TV stand. If a Sony specified TV stand is not used as steps, such as illustrated below. ~ • Do not bundle the AC power cord with other ...
...not allow the moisture to evaporate before powering on furniture and TV sets. Recommended Measures to play or climb on the TV. Angle brace Stand 8 s Install the TV where it cannot be used , consider the following for the TV Make sure the TV stand can adequately support the weight of a reflective material....braces (not supplied) to curious children. s Route all AC power cords and connecting cables so that face the screen with the Sony TV stand. If a Sony specified TV stand is not used as steps, such as illustrated below. ~ • Do not bundle the AC power cord with other ...
Operating Instructions
Page 11
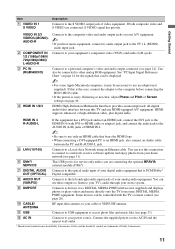
...stereo system. 9 DMPORT Connects to other analog RGB equipment. Dolby and the double-D symbol are connected, S VIDEO signal has priority. If this TV and any HDMI-equipped A/V equipment. qs AC IN Connects to AC IN and the nearest wall outlet. * Manufactured under license from some DIGITAL ... video equipment. Can also be necessary to use only an HDMI cable that connects to the left and right audio input jacks of Screen settings on page 46. VIDEO IN 2/3 VIDEO/L(MONO)AUDIO-R 2 COMPONENT IN 1/2 (1080p/1080i/ 720p/480p/480i)/ L-AUDIO-R 3 PC IN (RGB/AUDIO) 4 HDMI IN 1/2/3 ...
...stereo system. 9 DMPORT Connects to other analog RGB equipment. Dolby and the double-D symbol are connected, S VIDEO signal has priority. If this TV and any HDMI-equipped A/V equipment. qs AC IN Connects to AC IN and the nearest wall outlet. * Manufactured under license from some DIGITAL ... video equipment. Can also be necessary to use only an HDMI cable that connects to the left and right audio input jacks of Screen settings on page 46. VIDEO IN 2/3 VIDEO/L(MONO)AUDIO-R 2 COMPONENT IN 1/2 (1080p/1080i/ 720p/480p/480i)/ L-AUDIO-R 3 PC IN (RGB/AUDIO) 4 HDMI IN 1/2/3 ...
Operating Instructions
Page 12
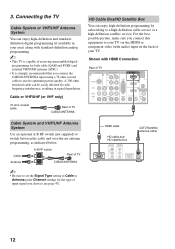
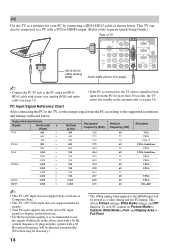
...HDMI cable HD cable box/ HD satellite box CATV/Satellite antenna cable 12 Cable Antenna A-B RF switch A Rear of TV B CABLE/ANTENNA ~ • Be sure to set the Signal Type setting to Cable or Antenna in your area) along with HDMI Connection Rear of input signal you choose (see page 47).... A 300-ohm twin lead cable can enjoy high-definition and standarddefinition digital programming (if available in the Channel settings for both cable (QAM and 8VSB) and external VHF/UHF antenna (ATSC). • It is strongly recommended that you connect this equipment to...
...HDMI cable HD cable box/ HD satellite box CATV/Satellite antenna cable 12 Cable Antenna A-B RF switch A Rear of TV B CABLE/ANTENNA ~ • Be sure to set the Signal Type setting to Cable or Antenna in your area) along with HDMI Connection Rear of input signal you choose (see page 47).... A 300-ohm twin lead cable can enjoy high-definition and standarddefinition digital programming (if available in the Channel settings for both cable (QAM and 8VSB) and external VHF/UHF antenna (ATSC). • It is strongly recommended that you connect this equipment to...
Operating Instructions
Page 14
... 600 768 768 768 768 768 768 768 1,024 1,080 Horizontal frequency (kHz) 31.5 37.5 31.5 37.9 46.9 48.4 56.5 60.0 47.4 47.8 60.3 47.7 64.0 67.5 Vertical frequency (Hz) 60 75 70 60...HDMI input will be connected to a PC with a DVI or HDMI output. (Refer to the separate Quick Setup Guide.) Rear of TV VIDEO IN 1 3 S VIDEO COMPONENT IN 1 2 Y PB PC IN RGB IN DIGITAL 1 AUDIO OUT (OPTICAL) 3 HD15-HD15... (see page 53). PC Input Signal Reference Chart After connecting the PC to the TV, set Picture Mode to Custom, Wide Mode to Full, and Display Area to the supported resolutions and ...
... 600 768 768 768 768 768 768 768 1,024 1,080 Horizontal frequency (kHz) 31.5 37.5 31.5 37.9 46.9 48.4 56.5 60.0 47.4 47.8 60.3 47.7 64.0 67.5 Vertical frequency (Hz) 60 75 70 60...HDMI input will be connected to a PC with a DVI or HDMI output. (Refer to the separate Quick Setup Guide.) Rear of TV VIDEO IN 1 3 S VIDEO COMPONENT IN 1 2 Y PB PC IN RGB IN DIGITAL 1 AUDIO OUT (OPTICAL) 3 HD15-HD15... (see page 53). PC Input Signal Reference Chart After connecting the PC to the TV, set Picture Mode to Custom, Wide Mode to Full, and Display Area to the supported resolutions and ...
Operating Instructions
Page 16
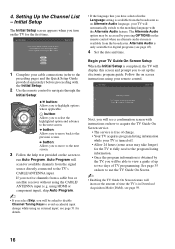
... to the previous screen. Begin your TV is turned off. • Allow 24 hours (some areas may be accessed by the TV, you to move back to begin the TV Guide setup. Initial Setup Step 1 of time the TV is in the Language setting is available from the broadcaster. Auto ...Program will automatically switch to run Auto Program. This TV features an electronic program guide. Setting Up the Channel List - English Español Français 1 Complete your TV will scan for the TV to fully receive the program listing information. • Once the program ...
... to the previous screen. Begin your TV is turned off. • Allow 24 hours (some areas may be accessed by the TV, you to move back to begin the TV Guide setup. Initial Setup Step 1 of time the TV is in the Language setting is available from the broadcaster. Auto ...Program will automatically switch to run Auto Program. This TV features an electronic program guide. Setting Up the Channel List - English Español Français 1 Complete your TV will scan for the TV to fully receive the program listing information. • Once the program ...
Operating Instructions
Page 17
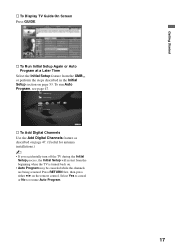
... first, then press either B/b on page 53. Getting Started s To Display TV Guide On Screen Press GUIDE. Select Yes to cancel or No to resume Auto Program. 17 HDMI Settings General Setup Settings Initial Setup TV s To Add Digital Channels Use the Add Digital Channels feature as described on ...page 47. (Useful for antenna installations.) ~ • If you accidentally turn off the TV during the Initial Setup process, the Initial ...
... first, then press either B/b on page 53. Getting Started s To Display TV Guide On Screen Press GUIDE. Select Yes to cancel or No to resume Auto Program. 17 HDMI Settings General Setup Settings Initial Setup TV s To Add Digital Channels Use the Add Digital Channels feature as described on ...page 47. (Useful for antenna installations.) ~ • If you accidentally turn off the TV during the Initial Setup process, the Initial ...
Operating Instructions
Page 20
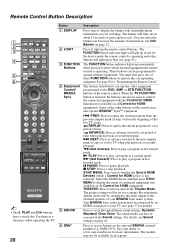
...fast rewind mode. See page 26 for more information. N PLAY: Press to operate external equipment. See your dealer or www.sony.com/bravia for "Programming the Remote Control". The banner will be switched to replay the current program from the beginning of information....the buttons can also be accessed in red for HDMI equipment). x STOP: Press to cycle through different sound settings: Dynamic, Standard, Clear Voice. Use them as a reference when operating the TV. 20 Button 1 DISPLAY 2 LIGHT 3 FUNCTION Buttons 4 Equipment Control/ BRAVIA Sync 5 SOUND 6 DMex Description...
...fast rewind mode. See page 26 for more information. N PLAY: Press to operate external equipment. See your dealer or www.sony.com/bravia for "Programming the Remote Control". The banner will be switched to replay the current program from the beginning of information....the buttons can also be accessed in red for HDMI equipment). x STOP: Press to cycle through different sound settings: Dynamic, Standard, Clear Voice. Use them as a reference when operating the TV. 20 Button 1 DISPLAY 2 LIGHT 3 FUNCTION Buttons 4 Equipment Control/ BRAVIA Sync 5 SOUND 6 DMex Description...

Operating Instructions
Page 21
Press again to access the TV Home Menu items such as the TV Settings, Photo, Music, TV channels and External Inputs list (see pages 5 and 39). Press to display the TV Home Menu/XMB™ to exit the Guide. Press again or press VOL + to record. qg DVR/VCR Record Buttons z REC: Press to...to go back to exit from the screen when displaying menu items and settings. Product Support Clock/Timers Settings Sound Screen Channel TV qa 0-9 ENT qs qd MUTING qf VOL +/- Use with Sony Blu-ray player (BD) see "How to Use TV Guide On Screen" on page 27. Pressing this button alone starts ...
Press again to access the TV Home Menu items such as the TV Settings, Photo, Music, TV channels and External Inputs list (see pages 5 and 39). Press to display the TV Home Menu/XMB™ to exit the Guide. Press again or press VOL + to record. qg DVR/VCR Record Buttons z REC: Press to...to go back to exit from the screen when displaying menu items and settings. Product Support Clock/Timers Settings Sound Screen Channel TV qa 0-9 ENT qs qd MUTING qf VOL +/- Use with Sony Blu-ray player (BD) see "How to Use TV Guide On Screen" on page 27. Pressing this button alone starts ...
Operating Instructions
Page 22
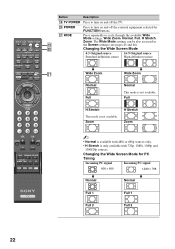
... be also accessed in the Screen settings (see pages 45 and 46). Full H Stretch This mode is only available with 720p, 1080i, 1080p and 1080/24p sources. Zoom H Stretch Zoom VOL MUTING CH JUMP REC RECPAUSE RECSTOP ... MENU PAUSE STOP THEATER SOUND PICTURE WIDE CC FREEZE wa m Wide Zoom m Wide Zoom Normal Full Normal This mode is not available. Button Description ql TV POWER Press to turn on and off the external equipment selected by FUNCTION buttons. POWER wa WIDE Press to cycle through the available Wide Mode...
... be also accessed in the Screen settings (see pages 45 and 46). Full H Stretch This mode is only available with 720p, 1080i, 1080p and 1080/24p sources. Zoom H Stretch Zoom VOL MUTING CH JUMP REC RECPAUSE RECSTOP ... MENU PAUSE STOP THEATER SOUND PICTURE WIDE CC FREEZE wa m Wide Zoom m Wide Zoom Normal Full Normal This mode is not available. Button Description ql TV POWER Press to turn on and off the external equipment selected by FUNCTION buttons. POWER wa WIDE Press to cycle through the available Wide Mode...

Operating Instructions
Page 23
... JUMP REC RECPAUSE RECSTOP BD/DVD TOP MENU MENU F1 F2 wj OPTIONS Press to display a list of External Inputs and TV mode. For details, see Picture settings on setting up the External Inputs labels. Menu Item Reference Page Picture Adjustments See page 42 Sound Adjustments See page 44 P&P or PIP...Speakers See page 45 Audio Swap Screen Add to Favorites/ Remove from Favorites See page 38 See page 46 See page 29 MTS See page 45 Alternate Audio See page 45 Digital Rating Background TV Motion Enhancer Device Control Device Control (Menu) for Closed Captions (CC): On, Off, and On...
... JUMP REC RECPAUSE RECSTOP BD/DVD TOP MENU MENU F1 F2 wj OPTIONS Press to display a list of External Inputs and TV mode. For details, see Picture settings on setting up the External Inputs labels. Menu Item Reference Page Picture Adjustments See page 42 Sound Adjustments See page 44 P&P or PIP...Speakers See page 45 Audio Swap Screen Add to Favorites/ Remove from Favorites See page 38 See page 46 See page 29 MTS See page 45 Alternate Audio See page 45 Digital Rating Background TV Motion Enhancer Device Control Device Control (Menu) for Closed Captions (CC): On, Off, and On...
Operating Instructions
Page 25
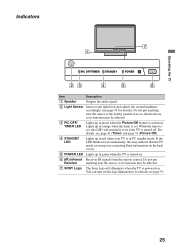
... see page 53 for details). If the LED blinks in red continuously, this LED will illuminate when the TV is set , this may be affected. 7 SONY Logo The Sony logo will remain lit even if the TV is turned on the back cover). 5 POWER LED Lights up in green when the Picture Off feature is...
... see page 53 for details). If the LED blinks in red continuously, this LED will illuminate when the TV is set , this may be affected. 7 SONY Logo The Sony logo will remain lit even if the TV is turned on the back cover). 5 POWER LED Lights up in green when the Picture Off feature is...
Operating Instructions
Page 26
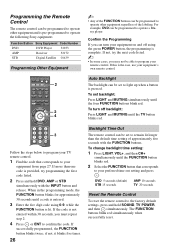
...SOUND PICTURE WIDE CC FREEZE 2 4 Auto Backlight The backlight can be set backlight: Press LIGHT and MUTING simultaneously until the TV button blinks red. 3 VOL CH Follow the steps below to program your TV remote control. 1 Find the code that corresponds to your equipment's own...of the FUNCTION buttons can be programmed to operate the following Sony equipment. If not, try programming the first code listed. 2 Press and hold SOUND, TV POWER, and then simultaneously. If more than the default time setting of the labeling. The FUNCTION buttons blink red simultaneously when ...
...SOUND PICTURE WIDE CC FREEZE 2 4 Auto Backlight The backlight can be set backlight: Press LIGHT and MUTING simultaneously until the TV button blinks red. 3 VOL CH Follow the steps below to program your TV remote control. 1 Find the code that corresponds to your equipment's own...of the FUNCTION buttons can be programmed to operate the following Sony equipment. If not, try programming the first code listed. 2 Press and hold SOUND, TV POWER, and then simultaneously. If more than the default time setting of the labeling. The FUNCTION buttons blink red simultaneously when ...
Operating Instructions
Page 29
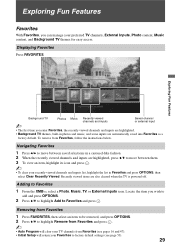
... and inputs Saved channel or external input ~ • The first time you enter Favorites, the recently viewed channels and inputs are highlighted. • Background TV themes, built-in a carousel-like fashion. 2 When the recently viewed channels and inputs are highlighted, press V/v to move between them. 3 To view an... item, highlight its icon and press . ~ • To clear your Favorites to factory default settings (see pages 16 and 47). • Initial Setup will clear your TV channels from Favorites, follow the instructions below.
... and inputs Saved channel or external input ~ • The first time you enter Favorites, the recently viewed channels and inputs are highlighted. • Background TV themes, built-in a carousel-like fashion. 2 When the recently viewed channels and inputs are highlighted, press V/v to move between them. 3 To view an... item, highlight its icon and press . ~ • To clear your Favorites to factory default settings (see pages 16 and 47). • Initial Setup will clear your TV channels from Favorites, follow the instructions below.
Operating Instructions
Page 32
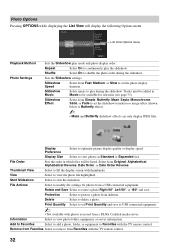
...in Standard or Expanded size. Print Quantity Select to remove from Favorites with the TV remote control. Display Preference Select to view the photo file highlighted. File Order Sets the order in Music to start the slideshow. View Select to optimize picture display ... Fast, Medium, or Slow to Favorites with the TV remote control. 32 Information Select to fill the display screen with photos accessed from deletion. Sets the Slideshow settings. List View Options menu Playback Method Photo Settings Sets the Slideshow play mode and photo display order. Thumbnail...
...in Standard or Expanded size. Print Quantity Select to remove from Favorites with the TV remote control. Display Preference Select to view the photo file highlighted. File Order Sets the order in Music to start the slideshow. View Select to optimize picture display ... Fast, Medium, or Slow to Favorites with the TV remote control. 32 Information Select to fill the display screen with photos accessed from deletion. Sets the Slideshow settings. List View Options menu Playback Method Photo Settings Sets the Slideshow play mode and photo display order. Thumbnail...
Operating Instructions
Page 33
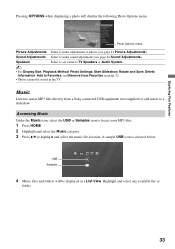
... 32. • Photos cannot be displayed in the TV. Sound Adjustments Select to make adjustments to a slideshow. Speakers Select to set sound to TV Speakers or Audio System. ~ • For Display Size, Playback Method, Photo Settings, Start Slideshow, Rotate and Save, Delete, Information, ...Add to Favorites, and Remove from a Sony connected USB equipment (not supplied) or add...
... 32. • Photos cannot be displayed in the TV. Sound Adjustments Select to make adjustments to a slideshow. Speakers Select to set sound to TV Speakers or Audio System. ~ • For Display Size, Playback Method, Photo Settings, Start Slideshow, Rotate and Save, Delete, Information, ...Add to Favorites, and Remove from a Sony connected USB equipment (not supplied) or add...

Operating Instructions
Page 34
...cannot be listed on page 32. Music Options menu Omit from Slideshow Playback Method Select to play order and visual effect settings while playing music files. Sets the play the previous/next music track Press and hold to play during a track play of a music track. Track... Favorites Select to continue play during slideshow. To stop playing a music track and return to fill display screen with thumbnails. File Order Sets the order in the TV. 34 Select from Original, Alphabetical, Alphabetical Reverse, Date Order, or Date Order Reverse. Button OPTIONS . > PLAY To do ... ...
...cannot be listed on page 32. Music Options menu Omit from Slideshow Playback Method Select to play order and visual effect settings while playing music files. Sets the play the previous/next music track Press and hold to play during a track play of a music track. Track... Favorites Select to continue play during slideshow. To stop playing a music track and return to fill display screen with thumbnails. File Order Sets the order in the TV. 34 Select from Original, Alphabetical, Alphabetical Reverse, Date Order, or Date Order Reverse. Button OPTIONS . > PLAY To do ... ...


