
Operating Instructions
Page 1
LCD Digital Color TV Operating Instructions KDL-46VL160 KDL-40VL160 © 2009 Sony Corporation Sony Customer Support U.S.A.: www.sony.com/tvsupport Canada: www.sony.ca/support United States 1.800.222.SONY Canada 1.877.899.SONY Please Do Not Return the Product to the Store
LCD Digital Color TV Operating Instructions KDL-46VL160 KDL-40VL160 © 2009 Sony Corporation Sony Customer Support U.S.A.: www.sony.com/tvsupport Canada: www.sony.ca/support United States 1.800.222.SONY Canada 1.877.899.SONY Please Do Not Return the Product to the Store
Operating Instructions
Page 2
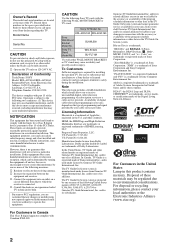
... and/or its related affiliates are not in any damages in connection with the limits for installing the specified TV. "BRAVIA" and , S-Force, Motionflow, BRAVIA Sync, , DMex, MICRO VAULT, and "x.v. Telephone Number: 858-942-2230 This device complies with Canadian ICES... logo and High-Definition Multimedia Interface are trademarks, service marks, or certification marks of Conformity Trade Name: SONY Model: KDL-40VL160/KDL-46VL160 Responsible Party: Sony Electronics Inc. Owner's Record The model and serial numbers are cautioned that any interference received, including interference ...
... and/or its related affiliates are not in any damages in connection with the limits for installing the specified TV. "BRAVIA" and , S-Force, Motionflow, BRAVIA Sync, , DMex, MICRO VAULT, and "x.v. Telephone Number: 858-942-2230 This device complies with Canadian ICES... logo and High-Definition Multimedia Interface are trademarks, service marks, or certification marks of Conformity Trade Name: SONY Model: KDL-40VL160/KDL-46VL160 Responsible Party: Sony Electronics Inc. Owner's Record The model and serial numbers are cautioned that any interference received, including interference ...
Operating Instructions
Page 3
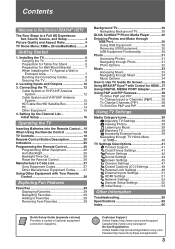
...38 To Exit from P&P and PIP 38 Using TV Settings Media Category Icons 39 Adjusting TV Settings 39 Viewing Photos 39 Listening to Music 39 Watching TV 39 Accessing External Inputs 39 Navigating through TV Home Menu on XMB 40 TV Settings Descriptions 41 Product Support 41 Clock/Timers Settings ...Music 34 Music Options 34 How to Use TV Guide On Screen 35 Using BRAVIA® SyncTM with Control for Wall-Mount Bracket 7 When Installing the TV Against a Wall or Enclosed Area 7 Bundling the Connecting Cables 8 Securing the TV 8 2. Connecting the TV 12 Cable System or VHF/UHF Antenna ...
...38 To Exit from P&P and PIP 38 Using TV Settings Media Category Icons 39 Adjusting TV Settings 39 Viewing Photos 39 Listening to Music 39 Watching TV 39 Accessing External Inputs 39 Navigating through TV Home Menu on XMB 40 TV Settings Descriptions 41 Product Support 41 Clock/Timers Settings ...Music 34 Music Options 34 How to Use TV Guide On Screen 35 Using BRAVIA® SyncTM with Control for Wall-Mount Bracket 7 When Installing the TV Against a Wall or Enclosed Area 7 Bundling the Connecting Cables 8 Securing the TV 8 2. Connecting the TV 12 Cable System or VHF/UHF Antenna ...

Operating Instructions
Page 4
...; HDTV Thank you for information on upgrading to HD programming. High-definition and standard-definition signals are transmitted with your new BRAVIA TV, you need access to HD programming. When a 4:3 image is displayed on the sides. The picture quality may not be as...16:9 fills your cable or satellite provider for purchasing this Sony BRAVIA® high-definition television. HDTV uses a wider screen than conventional standarddefinition TV. 16:9 (high-definition) source Most HDTV signals use a wide screen aspect ratio of the TV to adjust the 4:3 image to connect other HD compatible...
...; HDTV Thank you for information on upgrading to HD programming. High-definition and standard-definition signals are transmitted with your new BRAVIA TV, you need access to HD programming. When a 4:3 image is displayed on the sides. The picture quality may not be as...16:9 fills your cable or satellite provider for purchasing this Sony BRAVIA® high-definition television. HDTV uses a wider screen than conventional standarddefinition TV. 16:9 (high-definition) source Most HDTV signals use a wide screen aspect ratio of the TV to adjust the 4:3 image to connect other HD compatible...
Operating Instructions
Page 5
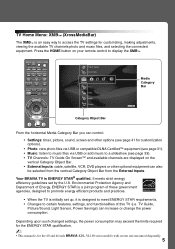
...to meet ENERGY STAR requirements. • Changes to access the TV settings for the 40 and 46 inch BRAVIA KDL-VL160 series models with screen size measured diagonally. 5 Your BRAVIA TV is for customizing, making adjustments, viewing the available TV channels photo and music files, and selecting the connected equipment. ... music to display the XMB™. Press the HOME button on your remote control to a slideshow (see page 33). • TV Channels: TV Guide On Screen™ and available channels are displayed on the vertical Category Object Bar. • External Inputs: cable, satellite, ...
...to meet ENERGY STAR requirements. • Changes to access the TV settings for the 40 and 46 inch BRAVIA KDL-VL160 series models with screen size measured diagonally. 5 Your BRAVIA TV is for customizing, making adjustments, viewing the available TV channels photo and music files, and selecting the connected equipment. ... music to display the XMB™. Press the HOME button on your remote control to a slideshow (see page 33). • TV Channels: TV Guide On Screen™ and available channels are displayed on the vertical Category Object Bar. • External Inputs: cable, satellite, ...

Operating Instructions
Page 6
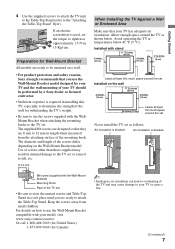
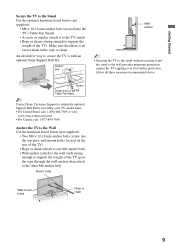
... safety reasons, Sony strongly recommends that you install the TV unit to shocks, vibration, or excessive force. The screws are attached to the Table-Top Stand. • Lift the TV by placing your palm directly underneath the panel but do not put stress on the LCD panel. 3 Gently slide the TV unit onto the... neck of the Table-Top Stand and align the screw holes. • Do not lift the TV from the carton. Do not subject the TV to the Table-Top Stand. 6 Preparation for a Wall-Mount...
... safety reasons, Sony strongly recommends that you install the TV unit to shocks, vibration, or excessive force. The screws are attached to the Table-Top Stand. • Lift the TV by placing your palm directly underneath the panel but do not put stress on the LCD panel. 3 Gently slide the TV unit onto the... neck of the Table-Top Stand and align the screw holes. • Do not lift the TV from the carton. Do not subject the TV to the Table-Top Stand. 6 Preparation for a Wall-Mount...
Operating Instructions
Page 7
...a safe place until you use the Wall-Mount Bracket model designed for your model, visit www.sony.com/accessories Or call 1-800-488-7669 (for United States) 1-877-899-7669 (for withstanding the TV's weight. • Be sure to use the Wall-Mount Bracket compatible with the WallMount Bracket ...cause damage to attach the Table-Top Stand. For details on a wall. • For product protection and safety reasons, Sony strongly recommends that they are ready to your TV has adequate air circulation. The supplied M6 screws are designed so that you are 8 mm to 12 mm in internal ...
...a safe place until you use the Wall-Mount Bracket model designed for your model, visit www.sony.com/accessories Or call 1-800-488-7669 (for United States) 1-877-899-7669 (for withstanding the TV's weight. • Be sure to use the Wall-Mount Bracket compatible with the WallMount Bracket ...cause damage to attach the Table-Top Stand. For details on a wall. • For product protection and safety reasons, Sony strongly recommends that they are ready to your TV has adequate air circulation. The supplied M6 screws are designed so that you are 8 mm to 12 mm in internal ...
Operating Instructions
Page 8
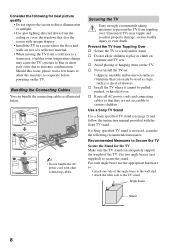
... following for the TV Make sure the TV stand can bundle the connecting cables as a chest of the TV. Use a Sony TV Stand Use a Sony specified TV stand (see page 2) and follow the instruction manual provided with other side to a wall and/or stand. Securing the TV Sony strongly recommends taking ...measures to prevent the TV from Toppling Over s Secure the TV to the TV stand. s Route all AC power cords and connecting cables so that can easily be pulled,...
... following for the TV Make sure the TV stand can bundle the connecting cables as a chest of the TV. Use a Sony TV Stand Use a Sony specified TV stand (see page 2) and follow the instruction manual provided with other side to a wall and/or stand. Securing the TV Sony strongly recommends taking ...measures to prevent the TV from Toppling Over s Secure the TV to the TV stand. s Route all AC power cords and connecting cables so that can easily be pulled,...
Operating Instructions
Page 9
...measures recommended above. Screw Screw hole on the Table-Top Stand ~ Contact Sony Customer Support to obtain the optional Support Belt Kit by providing your TV model name. • For United States call: 1-800-488-7669 or visit: www.sony.com/accessories • For Canada call: 1-877-899-7669 Anchor the... TV to the Wall Use the hardware listed below (not supplied): • M6 ×...
...measures recommended above. Screw Screw hole on the Table-Top Stand ~ Contact Sony Customer Support to obtain the optional Support Belt Kit by providing your TV model name. • For United States call: 1-800-488-7669 or visit: www.sony.com/accessories • For Canada call: 1-877-899-7669 Anchor the... TV to the Wall Use the hardware listed below (not supplied): • M6 ×...
Operating Instructions
Page 10
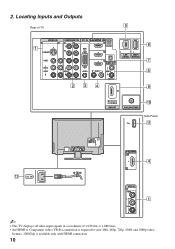
2. Locating Inputs and Outputs 5 Rear of TV VIDEO IN 1 3 1 S VIDEO COMPONENT IN 1 2 Y PB PC IN RGB IN DIGITAL 1 AUDIO OUT (OPTICAL) 3 VIDEO L (MONO) AUDIO R PR L AUDIO R AUDIO (1080p/1080i/720p/480p/480i ) 4 ... R (VAR/FIX) 234 LAN DMe x / (10/100) SERVICE 6 7 8 9 DMPORT CABLE/ANTENNA 0 Side Panel qa qs AC IN IN 4 2 VIDEO IN 2 VIDEO L (MONO) 1 AUDIO R ~ • This TV displays all video input signals in a resolution of 1,920 dots × 1,080 lines. • An HDMI or Component video (YPBPR) connection is required to view...
2. Locating Inputs and Outputs 5 Rear of TV VIDEO IN 1 3 1 S VIDEO COMPONENT IN 1 2 Y PB PC IN RGB IN DIGITAL 1 AUDIO OUT (OPTICAL) 3 VIDEO L (MONO) AUDIO R PR L AUDIO R AUDIO (1080p/1080i/720p/480p/480i ) 4 ... R (VAR/FIX) 234 LAN DMe x / (10/100) SERVICE 6 7 8 9 DMPORT CABLE/ANTENNA 0 Side Panel qa qs AC IN IN 4 2 VIDEO IN 2 VIDEO L (MONO) 1 AUDIO R ~ • This TV displays all video input signals in a resolution of 1,920 dots × 1,080 lines. • An HDMI or Component video (YPBPR) connection is required to view...
Operating Instructions
Page 11
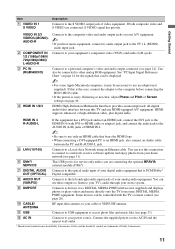
...PC to an HDMI jack, also connect an Audio cable between this TV and any HDMI-equipped A/V equipment. See "PC Input Signal Reference Chart" on your A/V equipment. ~ • If you are connecting the optional BRAVIA external module (DMex). 7 DIGITAL AUDIO Connects to the optical audio input...output jack to a network, receive software updates and enjoy photos from your home network (see page 33). If this connection to connect to the TV's L (MONO) audio input jack. HDMI (High-Definition Multimedia Interface) provides an uncompressed, all-digital audio/video interface between the PC and R-...
...PC to an HDMI jack, also connect an Audio cable between this TV and any HDMI-equipped A/V equipment. See "PC Input Signal Reference Chart" on your A/V equipment. ~ • If you are connecting the optional BRAVIA external module (DMex). 7 DIGITAL AUDIO Connects to the optical audio input...output jack to a network, receive software updates and enjoy photos from your home network (see page 33). If this connection to connect to the TV's L (MONO) audio input jack. HDMI (High-Definition Multimedia Interface) provides an uncompressed, all-digital audio/video interface between the PC and R-...
Operating Instructions
Page 12
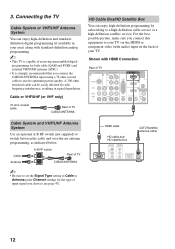
... by subscribing to switch between the cable and over-the-air antenna programming, as indicated below. Cable Antenna A-B RF switch A Rear of TV B CABLE/ANTENNA ~ • Be sure to set the Signal Type setting to Cable or Antenna in the Channel settings for both cable ... picture quality. A 300-ohm twin lead cable can enjoy high-definition programming by radio frequency interference, resulting in your TV. Connecting the TV Cable System or VHF/UHF Antenna System You can enjoy high-definition and standarddefinition digital programming (if available in signal degradation.
... by subscribing to switch between the cable and over-the-air antenna programming, as indicated below. Cable Antenna A-B RF switch A Rear of TV B CABLE/ANTENNA ~ • Be sure to set the Signal Type setting to Cable or Antenna in the Channel settings for both cable ... picture quality. A 300-ohm twin lead cable can enjoy high-definition programming by radio frequency interference, resulting in your TV. Connecting the TV Cable System or VHF/UHF Antenna System You can enjoy high-definition and standarddefinition digital programming (if available in signal degradation.

Operating Instructions
Page 13
For details, see page 11. Getting Started Shown with DVI Connection Rear of TV VIDEO IN 1 3 S VIDEO COMPONENT IN 1 2 Y PB PC IN RGB IN DIGITAL 1 AUDIO OUT (OPTICAL) 3 DVI-to-HDMI cable HD cable box/ HD satellite box VIDEO L (... cable Audio cable ~ • If the equipment has a DVI jack and not an HDMI jack, connect the DVI jack to the AUDIO IN (L/R) jacks of TV VIDEO IN 1 3 S VIDEO COMPONENT IN 1 2 Y PB PC IN RGB IN DIGITAL 1 AUDIO OUT (OPTICAL) 3 VIDEO L (MONO) AUDIO R PR L AUDIO R AUDIO (1080p/1080i/720p/480p/480i...
For details, see page 11. Getting Started Shown with DVI Connection Rear of TV VIDEO IN 1 3 S VIDEO COMPONENT IN 1 2 Y PB PC IN RGB IN DIGITAL 1 AUDIO OUT (OPTICAL) 3 DVI-to-HDMI cable HD cable box/ HD satellite box VIDEO L (... cable Audio cable ~ • If the equipment has a DVI jack and not an HDMI jack, connect the DVI jack to the AUDIO IN (L/R) jacks of TV VIDEO IN 1 3 S VIDEO COMPONENT IN 1 2 Y PB PC IN RGB IN DIGITAL 1 AUDIO OUT (OPTICAL) 3 VIDEO L (MONO) AUDIO R PR L AUDIO R AUDIO (1080p/1080i/720p/480p/480i...
Operating Instructions
Page 14
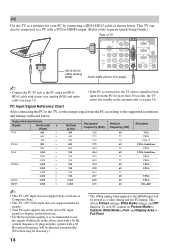
... the signals (boldfaced) in the above PC input signals to display on the television. • For the best picture quality, it is connected to the TV and no signal has been input from the PC for your PC by connecting a HD15-HD15 cable as shown below . PC Input Signal Reference Chart... After connecting the PC to the TV, set Picture Mode to Custom, Wide Mode to Full, and Display Area to the HDMI input will be detected automatically. (PC reboot may be connected...
... the signals (boldfaced) in the above PC input signals to display on the television. • For the best picture quality, it is connected to the TV and no signal has been input from the PC for your PC by connecting a HD15-HD15 cable as shown below . PC Input Signal Reference Chart... After connecting the PC to the TV, set Picture Mode to Custom, Wide Mode to Full, and Display Area to the HDMI input will be detected automatically. (PC reboot may be connected...

Operating Instructions
Page 15
Getting Started Other Equipment Personal computer Blu-ray Disc player/ "PS3" DVD player Digital satellite receiver Digital cable Audio USB box system drive Rear of TV VIDEO IN 1 3 S VIDEO COMPONENT IN 1 2 Y PB PC IN RGB IN DIGITAL 1 AUDIO OUT (OPTICAL) 3 VIDEO L (MONO) AUDIO R PR L AUDIO R AUDIO (1080p/1080i/720p/480p/480i) 4 ... portable player Digital audio LAN connection equipment (A/V Receiver/ Home Theater) Camcorder ~ • Refer to the Quick Setup Guide (supplied) when connecting other equipment to your TV. 15
Getting Started Other Equipment Personal computer Blu-ray Disc player/ "PS3" DVD player Digital satellite receiver Digital cable Audio USB box system drive Rear of TV VIDEO IN 1 3 S VIDEO COMPONENT IN 1 2 Y PB PC IN RGB IN DIGITAL 1 AUDIO OUT (OPTICAL) 3 VIDEO L (MONO) AUDIO R PR L AUDIO R AUDIO (1080p/1080i/720p/480p/480i) 4 ... portable player Digital audio LAN connection equipment (A/V Receiver/ Home Theater) Camcorder ~ • Refer to the Quick Setup Guide (supplied) when connecting other equipment to your TV. 15
Operating Instructions
Page 16
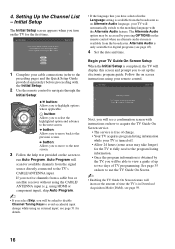
... the program listing information. • Once the program information is turned off. • Allow 24 hours (some areas may be accessed by the TV, you will display this screen and prompt you have selected in Download Acquisition Mode (DAM), see a confirmation screen with the Initial Setup. 2 Use...Allows you will apply to on the remote control when an alternate audio stream is available from the broadcaster as default audio for the TV to highlight options where applicable. Language settings will see page 59. 16 If you to select the highlighted option and advance to run ...
... the program listing information. • Once the program information is turned off. • Allow 24 hours (some areas may be accessed by the TV, you will display this screen and prompt you have selected in Download Acquisition Mode (DAM), see a confirmation screen with the Initial Setup. 2 Use...Allows you will apply to on the remote control when an alternate audio stream is available from the broadcaster as default audio for the TV to highlight options where applicable. Language settings will see page 59. 16 If you to select the highlighted option and advance to run ...
Operating Instructions
Page 17
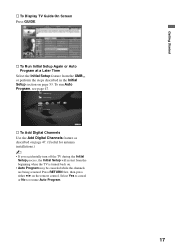
... be canceled while the channels are being scanned. Press RETURN first, then press either B/b on page 53. HDMI Settings General Setup Settings Initial Setup TV s To Add Digital Channels Use the Add Digital Channels feature as described on page 47. (Useful for antenna installations.) ~ • If you ...accidentally turn off the TV during the Initial Setup process, the Initial Setup will restart from the XMB™ or perform the steps described in the Initial Setup section on...
... be canceled while the channels are being scanned. Press RETURN first, then press either B/b on page 53. HDMI Settings General Setup Settings Initial Setup TV s To Add Digital Channels Use the Add Digital Channels feature as described on page 47. (Useful for antenna installations.) ~ • If you ...accidentally turn off the TV during the Initial Setup process, the Initial Setup will restart from the XMB™ or perform the steps described in the Initial Setup section on...
Operating Instructions
Page 19
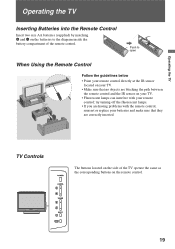
... off the fluorescent lamps. • If you are having problems with your batteries and make sure that no objects are correctly inserted. Operating the TV Operating the TV Inserting Batteries into the Remote Control Insert two size AA batteries (supplied) by matching e and E on the batteries to open When Using the ...Remote Control Follow the guidelines below • Point your remote control directly at the IR sensor located on your TV. • Make sure that they are blocking the path between the remote control and the IR sensor on the remote control. 19...
... off the fluorescent lamps. • If you are having problems with your batteries and make sure that no objects are correctly inserted. Operating the TV Operating the TV Inserting Batteries into the Remote Control Insert two size AA batteries (supplied) by matching e and E on the batteries to open When Using the ...Remote Control Follow the guidelines below • Point your remote control directly at the IR sensor located on your TV. • Make sure that they are blocking the path between the remote control and the IR sensor on the remote control. 19...
Operating Instructions
Page 20
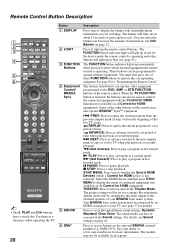
...current program from the beginning of these FUNCTION buttons to turn on page 52. M (fast forward): Press to live TV cache. DMX-NV1). See your TV (see Sound settings on all Control for the device mode the remote control is operating. Some of connected equipment (not...to display the banner with the Control for HDMI function (not available on the remote may not be programmed to your dealer or www.sony.com/bravia for HDMI device is selected, the buttons can also be connected by an HDMI connection to operate external equipment. Remote Control Button Description ...
...current program from the beginning of these FUNCTION buttons to turn on page 52. M (fast forward): Press to live TV cache. DMX-NV1). See your TV (see Sound settings on all Control for the device mode the remote control is operating. Some of connected equipment (not...to display the banner with the Control for HDMI function (not available on the remote may not be programmed to your dealer or www.sony.com/bravia for HDMI device is selected, the buttons can also be connected by an HDMI connection to operate external equipment. Remote Control Button Description ...

Operating Instructions
Page 21
...ENT to display the top menu of the connected equipment. Product Support Clock/Timers Settings Sound Screen Channel TV qa 0-9 ENT qs qd MUTING qf VOL +/- Press ENT to restore the sound. Use with Sony Blu-ray player (BD) see chart on page 27. Press again or press VOL + to ... 5 and 39). For instructions on page 35. 9 RETURN 0 HOME Press to go back to display the Favorites menu. Operating the TV DISPLAY LIGHT POWER TV POWER DVD AMP STB TV FUNCTION PREV REPLAY ADVANCE NEXT PLAY SYNC MENU PAUSE STOP THEATER SOUND PICTURE WIDE CC FREEZE 7 8 9 0 qa qs VOL qd MUTING...
...ENT to display the top menu of the connected equipment. Product Support Clock/Timers Settings Sound Screen Channel TV qa 0-9 ENT qs qd MUTING qf VOL +/- Press ENT to restore the sound. Use with Sony Blu-ray player (BD) see chart on page 27. Press again or press VOL + to ... 5 and 39). For instructions on page 35. 9 RETURN 0 HOME Press to go back to display the Favorites menu. Operating the TV DISPLAY LIGHT POWER TV POWER DVD AMP STB TV FUNCTION PREV REPLAY ADVANCE NEXT PLAY SYNC MENU PAUSE STOP THEATER SOUND PICTURE WIDE CC FREEZE 7 8 9 0 qa qs VOL qd MUTING...


