Warranty Card
Page 1
... lasts does not apply to any part of one (1) year. 4-557-147-22 Tape Cassette Player/Recorder/CD Player/Mini Disc ® DAT/Radio/Head Phone/Speaker/MIC/Personals Portable Audio LIMITED WARRANTY Sony Electronics Inc. ("Sony") warrants this Product is within 90 days of the date of purchase, if this Product (including...
... lasts does not apply to any part of one (1) year. 4-557-147-22 Tape Cassette Player/Recorder/CD Player/Mini Disc ® DAT/Radio/Head Phone/Speaker/MIC/Personals Portable Audio LIMITED WARRANTY Sony Electronics Inc. ("Sony") warrants this Product is within 90 days of the date of purchase, if this Product (including...
Operating Instructions
Page 1
3-866-556-21 (1) IC Recorder Operating Instructions GB Mode d'emploi FR ICD-35 ©1999 by Sony Corporation
3-866-556-21 (1) IC Recorder Operating Instructions GB Mode d'emploi FR ICD-35 ©1999 by Sony Corporation
Operating Instructions
Page 2
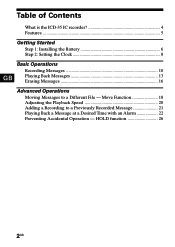
HOLD function 26 2GB Table of Contents What is the ICD-35 IC recorder 4 Features ...5 Getting Started Step 1: Installing the Battery 6 Step 2: Setting the Clock 8 GB Basic Operations Recording Messages 10 Playing Back Messages 13 Erasing Messages 16 Advanced Operations Moving Messages to a Previously Recorded Message 21 Playing Back a Message at a Desired Time with an Alarm 22 Preventing Accidental Operation - Move Function 18 Adjusting the Playback Speed 20 Adding a Recording to a Different File -
HOLD function 26 2GB Table of Contents What is the ICD-35 IC recorder 4 Features ...5 Getting Started Step 1: Installing the Battery 6 Step 2: Setting the Clock 8 GB Basic Operations Recording Messages 10 Playing Back Messages 13 Erasing Messages 16 Advanced Operations Moving Messages to a Previously Recorded Message 21 Playing Back a Message at a Desired Time with an Alarm 22 Preventing Accidental Operation - Move Function 18 Adjusting the Playback Speed 20 Adding a Recording to a Different File -
Operating Instructions
Page 3
Menu Settings Selecting the Recording Mode 27 Turning off the Beep Sound 28 Selecting the Microphone Sensitivity 30 Playing Back All Messages in a File Continuously 31 Selecting the Illumination Mode of LCD Back Light 32 Additional Information Precautions 33 Troubleshooting 34 Specifications 35 Index to Parts and Controls 36 Menu map ...38 Index ...40 GB 3GB
Menu Settings Selecting the Recording Mode 27 Turning off the Beep Sound 28 Selecting the Microphone Sensitivity 30 Playing Back All Messages in a File Continuously 31 Selecting the Illumination Mode of LCD Back Light 32 Additional Information Precautions 33 Troubleshooting 34 Specifications 35 Index to Parts and Controls 36 Menu map ...38 Index ...40 GB 3GB
Operating Instructions
Page 4
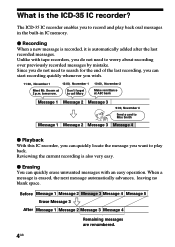
..., November 4 Send a card to Miss Smith Message 1 Message 2 Message 3 Message 4 r Playback With this IC recorder, you can quickly erase unwanted messages with tape recorders, you want to worry about recording over previously recorded messages by mistake. tomorrow. Reviewing the current recording is the ICD-35 IC recorder? Since you do not need to search for the end of the last...
..., November 4 Send a card to Miss Smith Message 1 Message 2 Message 3 Message 4 r Playback With this IC recorder, you can quickly erase unwanted messages with tape recorders, you want to worry about recording over previously recorded messages by mistake. tomorrow. Reviewing the current recording is the ICD-35 IC recorder? Since you do not need to search for the end of the last...

Operating Instructions
Page 5
... function You can play back messages rapidly (+30%) or slowly (-15%) (see page 22). You can use this unit is useful when playing back a long recording such as a meeting , etc. • Playback speed control You can start playing back a desired message with an alarm on a desired date and time (see ...page 20). You can choose among 3 different files to remind you can record for recording messages, appointments or meetings. • Organizing message files You can easily move messages from one message. 5GB
... function You can play back messages rapidly (+30%) or slowly (-15%) (see page 22). You can use this unit is useful when playing back a long recording such as a meeting , etc. • Playback speed control You can start playing back a desired message with an alarm on a desired date and time (see ...page 20). You can choose among 3 different files to remind you can record for recording messages, appointments or meetings. • Organizing message files You can easily move messages from one message. 5GB

Operating Instructions
Page 7
... period of the unit. Battery life* With continuous use the unit for a long time, remove the battery to set the date and time again. The recorded messages, however, will remain. • Do not charge a dry battery. • When you are not going to 4 in LIGHT OP mode, playing ...back through the internal speaker with a new one . Please refer to Steps 2 to use , approx. 10 hours recording/5 hours playback * Using Sony alkaline battery LR03 (SG) * Using in "Step 2: Setting the Clock" on the display when the battery becomes weak and it flashes when the ...
... period of the unit. Battery life* With continuous use the unit for a long time, remove the battery to set the date and time again. The recorded messages, however, will remain. • Do not charge a dry battery. • When you are not going to 4 in LIGHT OP mode, playing ...back through the internal speaker with a new one . Please refer to Steps 2 to use , approx. 10 hours recording/5 hours playback * Using Sony alkaline battery LR03 (SG) * Using in "Step 2: Setting the Clock" on the display when the battery becomes weak and it flashes when the ...

Operating Instructions
Page 10
... to 99 messages in each file (A, B and C). Message 1 Message 2 Newly recorded message Blank space 1 Select the file. Current file 2 Start recording. 1 Press REC START/STOP. Basic Operations Recording Messages You can start recording quickly without searching for the end of the last recording. Since a newly recorded message is displayed. Current message number 2 Speak to keep pressing...
... to 99 messages in each file (A, B and C). Message 1 Message 2 Newly recorded message Blank space 1 Select the file. Current file 2 Start recording. 1 Press REC START/STOP. Basic Operations Recording Messages You can start recording quickly without searching for the end of the last recording. Since a newly recorded message is displayed. Current message number 2 Speak to keep pressing...

Operating Instructions
Page 11
... than one second. To review the current recording instantly Press (pPLAY/STOP during stop recording, then press (pPLAY/STOP. To display it during recording. The unit stops at the beginning of REC START/ STOP. To stop recording You can also stop recording, the next time you record you will record in the same file. STOP If you...
... than one second. To review the current recording instantly Press (pPLAY/STOP during stop recording, then press (pPLAY/STOP. To display it during recording. The unit stops at the beginning of REC START/ STOP. To stop recording You can also stop recording, the next time you record you will record in the same file. STOP If you...
Operating Instructions
Page 12
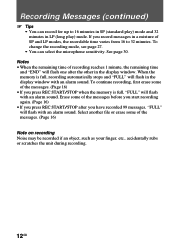
... will flash in the display window. Select another file or erase some of the messages before you start recording again. (Page 16) • If you press REC START/STOP after you have recorded 99 messages, "FULL" will flash one after the other in the display window with an alarm sound.... To change the recording mode, see page 27. • You can record for up to 32 minutes. To continue recording, first erase some of recording reaches 1 minute, the remaining time and "END" will flash with an alarm sound. Notes...
... will flash in the display window. Select another file or erase some of the messages before you start recording again. (Page 16) • If you press REC START/STOP after you have recorded 99 messages, "FULL" will flash one after the other in the display window with an alarm sound.... To change the recording mode, see page 27. • You can record for up to 32 minutes. To continue recording, first erase some of recording reaches 1 minute, the remaining time and "END" will flash with an alarm sound. Notes...

Operating Instructions
Page 13
Current file Basic Operations 2 Select the message number. Press FILE repeatedly until the desired file is displayed. Selected message number Press -= or ++ to display the desired message number. Playing Back Messages When playing back a previously recorded message, start from Step 1. for larger message number for smaller message number Total number of messages in the current file Continued 13GB When playing back a message you have just finished recording, start from Step 3. 1 Select the file.
Current file Basic Operations 2 Select the message number. Press FILE repeatedly until the desired file is displayed. Selected message number Press -= or ++ to display the desired message number. Playing Back Messages When playing back a previously recorded message, start from Step 1. for larger message number for smaller message number Total number of messages in the current file Continued 13GB When playing back a message you have just finished recording, start from Step 3. 1 Select the file.
Operating Instructions
Page 14
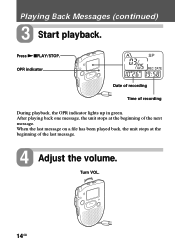
Playing Back Messages (continued) 3 Start playback. OPR indicator Date of recording Time of the last message. 4 Adjust the volume. When the last message on a file has been played back, the unit stops at the beginning of the next message. Press (pPLAY/STOP. Turn VOL. 14GB After playing back one message, the unit stops at the beginning of recording During playback, the OPR indicator lights up in green.
Playing Back Messages (continued) 3 Start playback. OPR indicator Date of recording Time of the last message. 4 Adjust the volume. When the last message on a file has been played back, the unit stops at the beginning of the next message. Press (pPLAY/STOP. Turn VOL. 14GB After playing back one message, the unit stops at the beginning of recording During playback, the OPR indicator lights up in green.

Operating Instructions
Page 16
... is played back 10 times. 2 Press ERASE while the message is erased, the remaining messages will advance and renumbered so that once a recording has been erased, you want to erase or press ERASE for more than 1 second during stop mode. Note that there will be renumbered.... Erasing messages one by one When a message is being played back. Erasing Messages You can erase the recorded messages one by one or all messages in a file at a time. Before erasing Message 1 Message 2 Message 3 Message 4 Message 5 Erase Message 3 After erasing ...
... is played back 10 times. 2 Press ERASE while the message is erased, the remaining messages will advance and renumbered so that once a recording has been erased, you want to erase or press ERASE for more than 1 second during stop mode. Note that there will be renumbered.... Erasing messages one by one When a message is being played back. Erasing Messages You can erase the recorded messages one by one or all messages in a file at a time. Before erasing Message 1 Message 2 Message 3 Message 4 Message 5 Erase Message 3 After erasing ...
Operating Instructions
Page 18
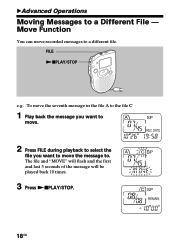
The file and "MOVE" will flash and the first and last 5 seconds of the message will be played back 10 times. 3 Press (pPLAY/STOP. 18GB FILE (pPLAY/STOP e.g. "Advanced Operations Moving Messages to . To move the seventh message in the file A to the file C 1 Play back the message you want to move. 2 Press FILE during playback to select the file you want to move recorded messages to a different file. Move Function You can move the message to a Different File -
The file and "MOVE" will flash and the first and last 5 seconds of the message will be played back 10 times. 3 Press (pPLAY/STOP. 18GB FILE (pPLAY/STOP e.g. "Advanced Operations Moving Messages to . To move the seventh message in the file A to the file C 1 Play back the message you want to move. 2 Press FILE during playback to select the file you want to move recorded messages to a different file. Move Function You can move the message to a Different File -
Operating Instructions
Page 21
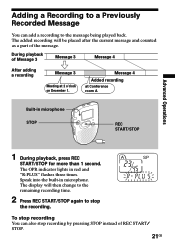
...microphone. The display will be placed after the current message and counted as a part of Message 3 Message 3 Message 4 After adding a recording Message 3 Meeting at Conference room A Built-in microphone STOP REC START/STOP Advanced Operations 1 During playback, press REC START/STOP for more ...than 1 second. To stop recording You can add a recording to the message being played back. Adding a Recording to a Previously Recorded Message You can also stop recording by pressing STOP instead of REC START/ STOP. 21GB Speak into the built...
...microphone. The display will be placed after the current message and counted as a part of Message 3 Message 3 Message 4 After adding a recording Message 3 Meeting at Conference room A Built-in microphone STOP REC START/STOP Advanced Operations 1 During playback, press REC START/STOP for more ...than 1 second. To stop recording You can add a recording to the message being played back. Adding a Recording to a Previously Recorded Message You can also stop recording by pressing STOP instead of REC START/ STOP. 21GB Speak into the built...
Operating Instructions
Page 22
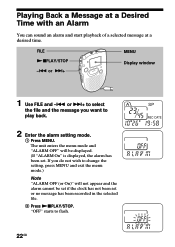
... OFF" will not appear and the alarm cannot be displayed. (If "ALARM On" is displayed, the alarm has been set or no message has been recorded in the selected file. 2 Press (pPLAY/STOP. "OFF" starts to play back. 2 Enter the alarm setting mode. 1 Press MENU. Playing Back a Message at a Desired Time...
... OFF" will not appear and the alarm cannot be displayed. (If "ALARM On" is displayed, the alarm has been set or no message has been recorded in the selected file. 2 Press (pPLAY/STOP. "OFF" starts to play back. 2 Enter the alarm setting mode. 1 Press MENU. Playing Back a Message at a Desired Time...
Operating Instructions
Page 25
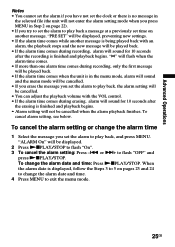
... adjust the playback volume with an alarm, the playback stops and the new message will be played back. • If the alarm time comes during recording, only the first message will not be cancelled when the alarm playback finishes. "∆" will flash when the alarm time comes. • If more than... one alarm time comes during recording, alarm will sound for 10 seconds after the recording is in Step 2 on pages 23 and 24 to change the alarm date and time. 4 Press MENU to flash "OFF" and...
... adjust the playback volume with an alarm, the playback stops and the new message will be played back. • If the alarm time comes during recording, only the first message will not be cancelled when the alarm playback finishes. "∆" will flash when the alarm time comes. • If more than... one alarm time comes during recording, alarm will sound for 10 seconds after the recording is in Step 2 on pages 23 and 24 to change the alarm date and time. 4 Press MENU to flash "OFF" and...
Operating Instructions
Page 26
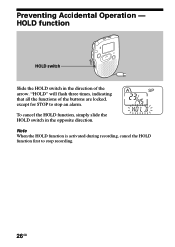
Note When the HOLD function is activated during recording, cancel the HOLD function first to stop recording. 26GB Preventing Accidental Operation - HOLD function HOLD switch Slide the HOLD switch in the opposite direction. "HOLD" will flash three times, indicating that all the functions of the arrow. To cancel the HOLD function, simply slide the HOLD switch in the direction of the buttons are locked, except for STOP to stop an alarm.
Note When the HOLD function is activated during recording, cancel the HOLD function first to stop recording. 26GB Preventing Accidental Operation - HOLD function HOLD switch Slide the HOLD switch in the opposite direction. "HOLD" will flash three times, indicating that all the functions of the arrow. To cancel the HOLD function, simply slide the HOLD switch in the direction of the buttons are locked, except for STOP to stop an alarm.

Operating Instructions
Page 27
Menu Settings "Menu Settings Selecting the Recording Mode MODE SP: You can make up to 32 minutes of recording with better sound. Now the setting is completed. 4 Press MENU to select "SP" or "LP" and press (pPLAY/STOP. "SP (or LP)" will flash. 3 Presse -= or ++ to exit the menu mode. 27GB MODE LP: You can make up to 16 minutes of recording. 1 Press MENU to enter the menu mode. 2 Press -= or ++ to display "MODE" and press (pPLAY/STOP.
Menu Settings "Menu Settings Selecting the Recording Mode MODE SP: You can make up to 32 minutes of recording with better sound. Now the setting is completed. 4 Press MENU to select "SP" or "LP" and press (pPLAY/STOP. "SP (or LP)" will flash. 3 Presse -= or ++ to exit the menu mode. 27GB MODE LP: You can make up to 16 minutes of recording. 1 Press MENU to enter the menu mode. 2 Press -= or ++ to display "MODE" and press (pPLAY/STOP.
Operating Instructions
Page 29
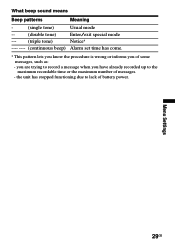
the unit has stopped functioning due to lack of battery power. you are trying to record a message when you of some messages, such as: - Menu Settings 29GB What beep sound means Beep patterns Meaning - (single tone) -- (double tone) --- (triple tone) ---- ---- (continuous beep) Usual mode Enter/exit special mode Notice* Alarm set time has come. * This pattern lets you know the procedure is wrong or informs you have already recorded up to the maximum recordable time or the maximum number of messages. -
the unit has stopped functioning due to lack of battery power. you are trying to record a message when you of some messages, such as: - Menu Settings 29GB What beep sound means Beep patterns Meaning - (single tone) -- (double tone) --- (triple tone) ---- ---- (continuous beep) Usual mode Enter/exit special mode Notice* Alarm set time has come. * This pattern lets you know the procedure is wrong or informs you have already recorded up to the maximum recordable time or the maximum number of messages. -


