Operating Instructions
Page 3
...a malfunction of recordings cannot be contrary to radio communications. Unauthorized recording of recording in accordance with the HDV format. CAUTION You are operational for the contents of the camcorder, storage media, etc. • TV color systems differ depending on use mini DVCAM cassettes. When ...HDV1080i specification, which can radiate radio frequency energy and, if not installed and used with the equipment in this manual could void your Sony dealer regarding this equipment. b Note: • This equipment has been tested and found to comply with the limits for a ...
...a malfunction of recordings cannot be contrary to radio communications. Unauthorized recording of recording in accordance with the HDV format. CAUTION You are operational for the contents of the camcorder, storage media, etc. • TV color systems differ depending on use mini DVCAM cassettes. When ...HDV1080i specification, which can radiate radio frequency energy and, if not installed and used with the equipment in this manual could void your Sony dealer regarding this equipment. b Note: • This equipment has been tested and found to comply with the limits for a ...
Operating Instructions
Page 4
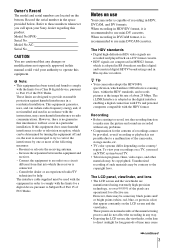
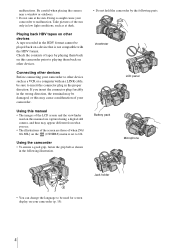
.... Check the contents of tapes by the following illustration. • Do not hold the camcorder by playing them back on the (OTHERS) menu is not compatible with the HDV format. Viewfinder LCD panel Battery pack Microphone Jack holder • You can change the language...as a VCR or a computer with an i.LINK cable, be used on this manual are those of your camcorder to other devices. Playing back HDV tapes on other devices Before connecting your camcorder (p. 19). 4 malfunctions. Connecting other devices A tape recorded in the following parts. If you see. &#...
.... Check the contents of tapes by the following illustration. • Do not hold the camcorder by playing them back on the (OTHERS) menu is not compatible with the HDV format. Viewfinder LCD panel Battery pack Microphone Jack holder • You can change the language...as a VCR or a computer with an i.LINK cable, be used on this manual are those of your camcorder to other devices. Playing back HDV tapes on other devices Before connecting your camcorder (p. 19). 4 malfunctions. Connecting other devices A tape recorded in the following parts. If you see. &#...
Operating Instructions
Page 7
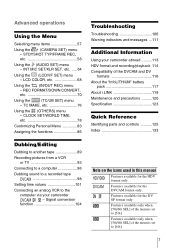
... 7 Signal conversion function 104 Note on the icons used in this manual Features available for the DV SP format only. Features available for the HDV format only. STDYSHOT TYP/FRAME REC, etc 58 Using the (AUDIO SET) menu - Features available for the DVCAM format only. LCD COLOR,... a computer 96 Dubbing sound to a recorded tape 98 Setting time values 101 Connecting an analog VCR to the computer via your camcorder abroad ..........113 HDV format and recording/playback 114 Compatibility of the menu is set to [50i]. Advanced operations Using the Menu Selecting menu items 57...
... 7 Signal conversion function 104 Note on the icons used in this manual Features available for the DV SP format only. Features available for the HDV format only. STDYSHOT TYP/FRAME REC, etc 58 Using the (AUDIO SET) menu - Features available for the DVCAM format only. LCD COLOR,... a computer 96 Dubbing sound to a recorded tape 98 Setting time values 101 Connecting an analog VCR to the computer via your camcorder abroad ..........113 HDV format and recording/playback 114 Compatibility of the menu is set to [50i]. Advanced operations Using the Menu Selecting menu items 57...
Operating Instructions
Page 9
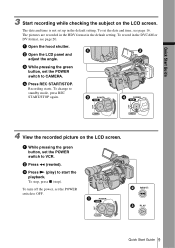
... to VCR. d Press REC START/STOP. Quick Start Guide 3 Start recording while checking the subject on the LCD screen. The pictures are recorded in the HDV format in the DVCAM or DV format, see page 16. To record in the default setting. b Open the LCD panel and adjust the angle. Quick...
... to VCR. d Press REC START/STOP. Quick Start Guide 3 Start recording while checking the subject on the LCD screen. The pictures are recorded in the HDV format in the DVCAM or DV format, see page 16. To record in the default setting. b Open the LCD panel and adjust the angle. Quick...
Operating Instructions
Page 12
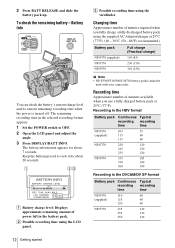
...Practical charge) 145 (85) 230 (170) 310 (250) b Note • NP-F330/F530/500/510/710 battery packs cannot be used with your camcorder. To check the remaining battery - C Possible recording time using the supplied AC Adaptor/charger at 25°C (77°F). 2 Press BATT RELEASE and slide... recording time in the selected recording format appears. 1 Set the POWER switch to view it for about 20 seconds. Recording in the HDV format Battery pack Continuous Typical recording recording time time NP-F570 105 55 (supplied) 115 60 115 60 NP-F770 220 120 245 120...
...Practical charge) 145 (85) 230 (170) 310 (250) b Note • NP-F330/F530/500/510/710 battery packs cannot be used with your camcorder. To check the remaining battery - C Possible recording time using the supplied AC Adaptor/charger at 25°C (77°F). 2 Press BATT RELEASE and slide... recording time in the selected recording format appears. 1 Set the POWER switch to view it for about 20 seconds. Recording in the HDV format Battery pack Continuous Typical recording recording time time NP-F570 105 55 (supplied) 115 60 115 60 NP-F770 220 120 245 120...
Operating Instructions
Page 13
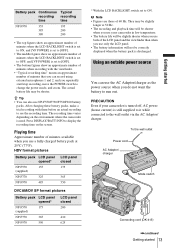
... figures show an approximate number of minutes when recording with them before an actual recording to display the recording time on the environment where the camcorder is discharged. To the wall outlet Power cord AC Adaptor/ charger Mode switch Connecting cord (DK-415) ,continued Getting started 13 Getting started... battery pack at 50 Hz. • The recording and playback time will be shorter. Press DISPLAY/BATT INFO to see the recording time. HDV format pictures Battery pack LCD panel opened* NP-F570 155 (supplied) NP-F770 325 NP-F970 485 LCD panel closed 175 365 550 DVCAM/...
... figures show an approximate number of minutes when recording with them before an actual recording to display the recording time on the environment where the camcorder is discharged. To the wall outlet Power cord AC Adaptor/ charger Mode switch Connecting cord (DK-415) ,continued Getting started 13 Getting started... battery pack at 50 Hz. • The recording and playback time will be shorter. Press DISPLAY/BATT INFO to see the recording time. HDV format pictures Battery pack LCD panel opened* NP-F570 155 (supplied) NP-F770 325 NP-F970 485 LCD panel closed 175 365 550 DVCAM/...
Operating Instructions
Page 20
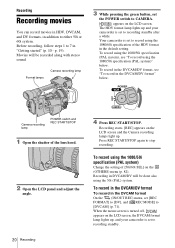
..., appears on the LCD screen and the Camera recording lamps light up and your camcorder is set to CAMERA. The HDV format lamp lights up . Before recording, follow steps 1 to either 50i or 60i system. Your camcorder is set to record using the 1080/50i specification (PAL system), see "To ... of [50i/60i SEL] on the LCD screen. Recording starts. [REC] appears on the LCD screen, the DVCAM format lamp lights up, and your camcorder is set to recording standby. Format lamps Camera recording lamp 3 While pressing the green button, set [REC FORMAT] to [DV], and [ REC MODE]...
..., appears on the LCD screen and the Camera recording lamps light up and your camcorder is set to CAMERA. The HDV format lamp lights up . Before recording, follow steps 1 to either 50i or 60i system. Your camcorder is set to record using the 1080/50i specification (PAL system), see "To ... of [50i/60i SEL] on the LCD screen. Recording starts. [REC] appears on the LCD screen, the DVCAM format lamp lights up, and your camcorder is set to recording standby. Format lamps Camera recording lamp 3 While pressing the green button, set [REC FORMAT] to [DV], and [ REC MODE]...
Operating Instructions
Page 21
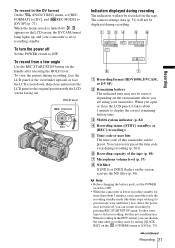
... recording, face the LCD panel or the viewfinder upward, or face the LCD screen down, then close the LCD panel, it takes about 3 minutes, your camcorder is turned off, appears on the environment where you can reset or preset the time code even during recording. 6 0min HDV1080i ND 1 REC 0 0 : 0 0 : 0 0 : 0... left in recording standby for more than about 1 minute to display the correct remaining battery time. When recording in the HDV format, you are using your camcorder. To record from a low-angle Use the REC START/STOP button on the screen, activate the ND filter (p. 30). When you ...
... recording, face the LCD panel or the viewfinder upward, or face the LCD screen down, then close the LCD panel, it takes about 3 minutes, your camcorder is turned off, appears on the environment where you can reset or preset the time code even during recording. 6 0min HDV1080i ND 1 REC 0 0 : 0 0 : 0 0 : 0... left in recording standby for more than about 1 minute to display the correct remaining battery time. When recording in the HDV format, you are using your camcorder. To record from a low-angle Use the REC START/STOP button on the screen, activate the ND filter (p. 30). When you ...
Operating Instructions
Page 22
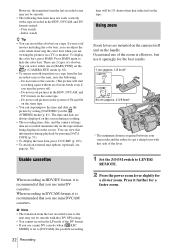
... pictures in DVCAM format, it sparingly for the best results. 1 cm (approx. 1/2 inch)* 80 cm (approx. 2 5/8 feet)* * The minimum distance required between your camcorder and the subject to hide the color bars. Usable cassettes When recording in the LP mode of 50i and 60i on the same tape. •... remove the cassette. (The picture will be smooth. • The following . - You can record the color bars on the screen. When recording in the HDV, DVCAM, and DV formats on the handle. Using zoom Zoom levers are 2 types of the lever. 1 Set the ZOOM switch to [DVCAM], the possible...
... pictures in DVCAM format, it sparingly for the best results. 1 cm (approx. 1/2 inch)* 80 cm (approx. 2 5/8 feet)* * The minimum distance required between your camcorder and the subject to hide the color bars. Usable cassettes When recording in the LP mode of 50i and 60i on the same tape. •... remove the cassette. (The picture will be smooth. • The following . - You can record the color bars on the screen. When recording in the HDV, DVCAM, and DV formats on the handle. Using zoom Zoom levers are 2 types of the lever. 1 Set the ZOOM switch to [DVCAM], the possible...
Operating Instructions
Page 34
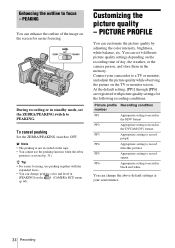
... activated (p. 31). You can change peaking color and level in black and white You can change the above default settings at your camcorder to a TV or monitor, and adjust the picture quality while observing the picture on the recording time of the image on the screen...PP5 Appropriate setting to record sunset PP6 Appropriate setting to PEAKING. Picture profile Recording condition number PP1 Appropriate setting to record in the HDV format PP2 Appropriate setting to record in the memory. To cancel peaking Set the ZEBRA/PEAKING switch to focus - Connect your convenience....
... activated (p. 31). You can change peaking color and level in black and white You can change the above default settings at your camcorder to a TV or monitor, and adjust the picture quality while observing the picture on the recording time of the image on the screen...PP5 Appropriate setting to record sunset PP6 Appropriate setting to PEAKING. Picture profile Recording condition number PP1 Appropriate setting to record in the HDV format PP2 Appropriate setting to record in the memory. To cancel peaking Set the ZEBRA/PEAKING switch to focus - Connect your convenience....
Operating Instructions
Page 38
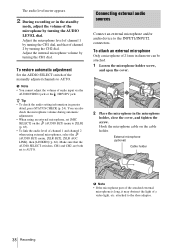
... the (AUDIO SET) menu, [XLR SET], [XLR AGC LINK], then [LINKED] (p. 66). Make sure that of audio input via the AUDIO/VIDEO jack or the HDV/DV jack. You can be attached. 1 Loosen the microphone holder screw, and open the cover. 2 Place the microphone in the microphone holder, close the cover...
... the (AUDIO SET) menu, [XLR SET], [XLR AGC LINK], then [LINKED] (p. 66). Make sure that of audio input via the AUDIO/VIDEO jack or the HDV/DV jack. You can be attached. 1 Loosen the microphone holder screw, and open the cover. 2 Place the microphone in the microphone holder, close the cover...
Operating Instructions
Page 45
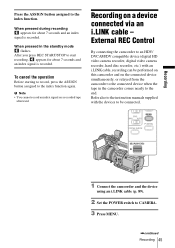
... recording appears for about 7 seconds and an index signal is recorded. Recording 1 Connect the camcorder and the device using an i.LINK cable (p. 89). 2 Set the POWER switch to an HDV/ DVCAM/DV compatible device (digital HD video camera recorder, digital video camera recorder, hard disc... recorder, etc.) with the devices to be performed on this camcorder and on the connected device simultaneously, or relayed from the camcorder to the connected device when...
... recording appears for about 7 seconds and an index signal is recorded. Recording 1 Connect the camcorder and the device using an i.LINK cable (p. 89). 2 Set the POWER switch to an HDV/ DVCAM/DV compatible device (digital HD video camera recorder, digital video camera recorder, hard disc... recorder, etc.) with the devices to be performed on this camcorder and on the connected device simultaneously, or relayed from the camcorder to the connected device when...

Operating Instructions
Page 48
... page 52. To fast forward or rewind Press M (fast forward) or m (rewind) in stop ). To review movies on your camcorder. When playing back the tape, select the (IN/OUT REC) menu, [VCR HDV/DV], then [AUTO] (the default setting). Press N (play) or X (pause) again to play ) to VCR. 6 0min HDV1080i 00:00...
... page 52. To fast forward or rewind Press M (fast forward) or m (rewind) in stop ). To review movies on your camcorder. When playing back the tape, select the (IN/OUT REC) menu, [VCR HDV/DV], then [AUTO] (the default setting). Press N (play) or X (pause) again to play ) to VCR. 6 0min HDV1080i 00:00...
Operating Instructions
Page 49
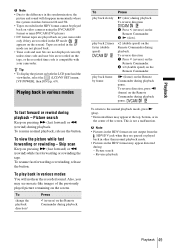
..., press c (frame) on the Remote Commander during playback. b Note • Pictures in the HDV format are not output from the HDV/DV jack when they are played back on your camcorder. Tapes recorded in various modes To fast forward or rewind during playback pause. To resume normal playback,...back in other than normal playback mode. • Pictures in the HDV format may appear distorted during playback. To view the picture while fast forwarding or rewinding - Picture search - This is compatible with your camcorder only if they are recorded on the tape, or the recorded time...
..., press c (frame) on the Remote Commander during playback. b Note • Pictures in the HDV format are not output from the HDV/DV jack when they are played back on your camcorder. Tapes recorded in various modes To fast forward or rewind during playback pause. To resume normal playback,...back in other than normal playback mode. • Pictures in the HDV format may appear distorted during playback. To view the picture while fast forwarding or rewinding - Picture search - This is compatible with your camcorder only if they are recorded on the tape, or the recorded time...

Operating Instructions
Page 50
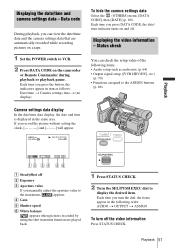
...the cassette after you have played back the tape, for the last scene of 50i, this item is [1080i/576i]. 50 Playback Displaying the screen indicators You can display the time code and other information together with the ... 80). Various playback functions You can display the screen indicators during playback on the (IN/OUT REC) menu is set to [1080i/480i]*. * When [50i/60i SEL] is set to 60i. b Note • The END SEARCH function will not work correctly... only playback mode indicators and tape counter appear when playing back a tape recorded in the HDV format, and [COMPONENT] on a TV.
...the cassette after you have played back the tape, for the last scene of 50i, this item is [1080i/576i]. 50 Playback Displaying the screen indicators You can display the time code and other information together with the ... 80). Various playback functions You can display the screen indicators during playback on the (IN/OUT REC) menu is set to [1080i/480i]*. * When [50i/60i SEL] is set to 60i. b Note • The END SEARCH function will not work correctly... only playback mode indicators and tape counter appear when playing back a tape recorded in the HDV format, and [COMPONENT] on a TV.
Operating Instructions
Page 51
...time you turn the dial, the items appear in turn off . Each time you press DATA CODE, the date/ time indicator turns on the camcorder or Remote Commander during playback or playback pause. Playback 51 Each time you press the button, the indicators appear in the following items. •...you can check the setup value of the following order: AUIDO t OUTPUT t ASSIGN To turn as audio mix (p. 64) • Output signal setup ([VCR HDV/DV], etc.) (p. 70) • Functions assigned to VCR. 2 Press DATA CODE on and off the video information Press STATUS CHECK. Status check You ...
...time you turn the dial, the items appear in turn off . Each time you press DATA CODE, the date/ time indicator turns on the camcorder or Remote Commander during playback or playback pause. Playback 51 Each time you press the button, the indicators appear in the following items. •...you can check the setup value of the following order: AUIDO t OUTPUT t ASSIGN To turn as audio mix (p. 64) • Output signal setup ([VCR HDV/DV], etc.) (p. 70) • Functions assigned to VCR. 2 Press DATA CODE on and off the video information Press STATUS CHECK. Status check You ...
Operating Instructions
Page 52
...to another tape, see page 89. To connect the TV using either cables described below. When the picture recorded in the HDV format, set so that it recognizes that the camcorder is connected. Playing the picture on a TV TV connections differ depending on the (IN/ OUT REC) menu according to be... connected. To copy to the operating manual supplied with the devices to your TV is compatible with HDV/DV and has an i.LINK jack...
...to another tape, see page 89. To connect the TV using either cables described below. When the picture recorded in the HDV format, set so that it recognizes that the camcorder is connected. Playing the picture on a TV TV connections differ depending on the (IN/ OUT REC) menu according to be... connected. To copy to the operating manual supplied with the devices to your TV is compatible with HDV/DV and has an i.LINK jack...
Operating Instructions
Page 53
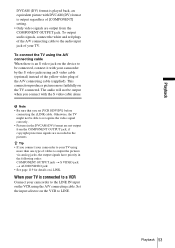
To connect the TV using the A/V connecting cable When there is an S video jack on i.LINK. z Tip • If you connect your camcorder to your TV using more faithfully on the VCR using an S video cable (optional) instead of the yellow video plug of the A/V connecting cable (supplied). .... b Note • Be sure that you connect with the S video cable alone. Playback 53 Playback The audio will not be output when you set [VCR HDV/DV] before connecting the i.LINK cable. When your TV is output regardless of cables to output the pictures via analog jacks, the output signals have...
To connect the TV using the A/V connecting cable When there is an S video jack on i.LINK. z Tip • If you connect your camcorder to your TV using more faithfully on the VCR using an S video cable (optional) instead of the yellow video plug of the A/V connecting cable (supplied). .... b Note • Be sure that you connect with the S video cable alone. Playback 53 Playback The audio will not be output when you set [VCR HDV/DV] before connecting the i.LINK cable. When your TV is output regardless of cables to output the pictures via analog jacks, the output signals have...
Operating Instructions
Page 54
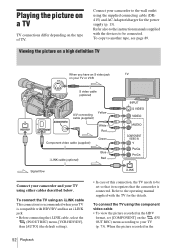
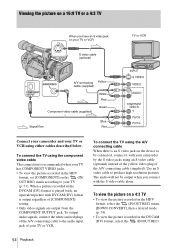
...[DOWN CONVERT], then a desired mode (p. 74). • To view the picture recorded in the HDV format, set [COMPONENT] on the (IN/ OUT REC) menu according to the audio input jack of your camcorder by the S video jacks using the A/V connecting cable When there is output regardless of the A/V ...S video cable (optional) TV or VCR A/V connecting Yellow cable (supplied) Component video cable (supplied) White Red Green Signal flow Blue Red Connect your camcorder and your TV (p. 73). Use an S video cable to be connected, connect it with your TV or VCR. Viewing the picture on a 16...
...[DOWN CONVERT], then a desired mode (p. 74). • To view the picture recorded in the HDV format, set [COMPONENT] on the (IN/ OUT REC) menu according to the audio input jack of your camcorder by the S video jacks using the A/V connecting cable When there is output regardless of the A/V ...S video cable (optional) TV or VCR A/V connecting Yellow cable (supplied) Component video cable (supplied) White Red Green Signal flow Blue Red Connect your camcorder and your TV (p. 73). Use an S video cable to be connected, connect it with your TV or VCR. Viewing the picture on a 16...

Operating Instructions
Page 65
LOCK MODE Select to use the audio limiter function that of scenes. b Note • This item is selected automatically in the HDV format. XLR Select to record the sampling clock of audio and that prevents the sound from the microphone. You cannot add sound on a...-bit mode (2 stereo sounds) in DVCAM format. FS48K ( ) Select to record in 16-bit mode (1 stereo sound with high quality) in the DVCAM/HDV format. b Note • This setting is valid when the AUDIO SELECT switch is adopted by the DV format for making smooth transition of video synchronized...
LOCK MODE Select to use the audio limiter function that of scenes. b Note • This item is selected automatically in the HDV format. XLR Select to record the sampling clock of audio and that prevents the sound from the microphone. You cannot add sound on a...-bit mode (2 stereo sounds) in DVCAM format. FS48K ( ) Select to record in 16-bit mode (1 stereo sound with high quality) in the DVCAM/HDV format. b Note • This setting is valid when the AUDIO SELECT switch is adopted by the DV format for making smooth transition of video synchronized...

