Operation Guide
Page 6
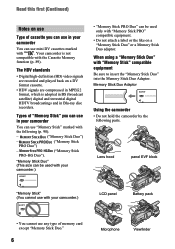
... Stick Duo" (This size can be used with your camcorder.) • "Memory Stick PRO Duo" can be used only with "Memory Stick PRO" compatible equipment. • Do not attach a label or the like on a DV format cassette. • HDV signals are compressed in MPEG2 format, which is not compatible... with the Cassette Memory function (p. 89). Types of "Memory Stick" you can use in your camcorder You can use mini DV cassettes marked with . Lens hood panel EVF ...
... Stick Duo" (This size can be used with your camcorder.) • "Memory Stick PRO Duo" can be used only with "Memory Stick PRO" compatible equipment. • Do not attach a label or the like on a DV format cassette. • HDV signals are compressed in MPEG2 format, which is not compatible... with the Cassette Memory function (p. 89). Types of "Memory Stick" you can use in your camcorder You can use mini DV cassettes marked with . Lens hood panel EVF ...
Operation Guide
Page 7
...back on the icons used in this manual Features available for the HDV format only. About menu items, LCD panel, viewfinder, and lens • A menu item that appear constantly on the LCD screen and the viewfinder. To view your camcorder if necessary (p. 18). About this manual • The images ... points and/or bright points (white, red, blue, or green in low light conditions, such as at the sun. On playing back HDV tapes on the country/region. Take pictures of the camcorder, storage media, etc. • TV color systems differ depending on other materials may result in this...
...back on the icons used in this manual Features available for the HDV format only. About menu items, LCD panel, viewfinder, and lens • A menu item that appear constantly on the LCD screen and the viewfinder. To view your camcorder if necessary (p. 18). About this manual • The images ... points and/or bright points (white, red, blue, or green in low light conditions, such as at the sun. On playing back HDV tapes on the country/region. Take pictures of the camcorder, storage media, etc. • TV color systems differ depending on other materials may result in this...
Operation Guide
Page 17
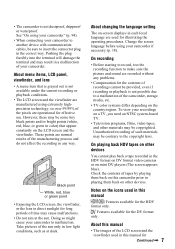
...86 °F) is damaged. - On the charging/recording/playback time • Times measured with the camcorder at 25 °C (77 °F) (10 to 30 °C (50 °F to the ... a wall and furniture. • Do not short-circuit the DC plug of your camcorder. The battery pack is worn-out (for Battery Info only). • The power will...HDV DV 260 280 295 315 540 570 605 650 780 830 890 950 On the battery pack • Before changing the battery pack, slide the POWER switch to the wall outlet via the AC Adaptor. 17 Getting Started This may cause a malfunction. • Even if your camcorder...
...86 °F) is damaged. - On the charging/recording/playback time • Times measured with the camcorder at 25 °C (77 °F) (10 to 30 °C (50 °F to the ... a wall and furniture. • Do not short-circuit the DC plug of your camcorder. The battery pack is worn-out (for Battery Info only). • The power will...HDV DV 260 280 295 315 540 570 605 650 780 830 890 950 On the battery pack • Before changing the battery pack, slide the POWER switch to the wall outlet via the AC Adaptor. 17 Getting Started This may cause a malfunction. • Even if your camcorder...

Operation Guide
Page 31
... the jack cover in the direction of the arrow. Some settings may not recognize the video signal properly if the [VCR HDV/DV] or [i.LINK CONV] setting is connected and connectors used. Playing the picture on a TV Connection methods and image quality differ depending on what type ...of TV is changed after the TV and your camcorder were connected with the device to be adjusted on the TV when playing back. Recording/Playback Lift up the bottom of the jack cover, then...
... the jack cover in the direction of the arrow. Some settings may not recognize the video signal properly if the [VCR HDV/DV] or [i.LINK CONV] setting is connected and connectors used. Playing the picture on a TV Connection methods and image quality differ depending on what type ...of TV is changed after the TV and your camcorder were connected with the device to be adjusted on the TV when playing back. Recording/Playback Lift up the bottom of the jack cover, then...

Operation Guide
Page 32
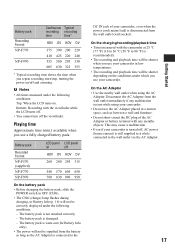
COMPONENT IN AUDIO HDMI i.LINK (for HDV1080i) A B C Type Camcorder Cable A Component video cable (optional) (Green) Y (Blue) PB/CB (Red) PR/CR A/V connecting cable (supplied) (White) (Red) : Signal flow, ( ): Reference pages TV Menu Setting (STANDARD SET) [VCR HDV/DV] t [AUTO] (53) [COMPONENT] t [1080i/480i] (56) (Yellow) • An A/V connecting cable is (SD image quality). Connect...
COMPONENT IN AUDIO HDMI i.LINK (for HDV1080i) A B C Type Camcorder Cable A Component video cable (optional) (Green) Y (Blue) PB/CB (Red) PR/CR A/V connecting cable (supplied) (White) (Red) : Signal flow, ( ): Reference pages TV Menu Setting (STANDARD SET) [VCR HDV/DV] t [AUTO] (53) [COMPONENT] t [1080i/480i] (56) (Yellow) • An A/V connecting cable is (SD image quality). Connect...

Operation Guide
Page 33
...HDV1080i specification. C i.LINK cable (optional) (STANDARD SET) [VCR HDV/DV] t [AUTO] (53) [DOWN CONVERT] t [i.LINK CONV] t [OFF] (56) • Your TV needs to have an i.LINK jack compatible with your camcorder and TV with the optional component video cable and supplied A/V connecting ... IN AUDIO i.LINK S VIDEO VIDEO/AUDIO VIDEO/AUDIO D E F G Continued , 33 Type Camcorder B Cable HDMI cable (optional) : Signal flow, ( ): Reference pages TV Menu Setting HDMI IN (STANDARD SET) [VCR HDV/DV] t [AUTO] (53) Recording/Playback • Use an HDMI cable with the HDMI logo...
...HDV1080i specification. C i.LINK cable (optional) (STANDARD SET) [VCR HDV/DV] t [AUTO] (53) [DOWN CONVERT] t [i.LINK CONV] t [OFF] (56) • Your TV needs to have an i.LINK jack compatible with your camcorder and TV with the optional component video cable and supplied A/V connecting ... IN AUDIO i.LINK S VIDEO VIDEO/AUDIO VIDEO/AUDIO D E F G Continued , 33 Type Camcorder B Cable HDMI cable (optional) : Signal flow, ( ): Reference pages TV Menu Setting HDMI IN (STANDARD SET) [VCR HDV/DV] t [AUTO] (53) Recording/Playback • Use an HDMI cable with the HDMI logo...

Operation Guide
Page 34
... with the 16:9 signal, set [ WIDE SELECT] to [4:3] on a 4:3 TV not compatible with your camcorder when recording a picture (p. 54). : Signal flow, ( ): Reference pages Type Camcorder Cable TV Menu Setting D Component video cable (optional) (Green) Y (Blue) PB/CB (Red) PR.../CR A/V connecting cable (supplied) (White) (Red) (STANDARD SET) [VCR HDV/DV] t [AUTO] (53) [COMPONENT] t [480i] (56) [DOWN CONVERT] t [...
... with the 16:9 signal, set [ WIDE SELECT] to [4:3] on a 4:3 TV not compatible with your camcorder when recording a picture (p. 54). : Signal flow, ( ): Reference pages Type Camcorder Cable TV Menu Setting D Component video cable (optional) (Green) Y (Blue) PB/CB (Red) PR.../CR A/V connecting cable (supplied) (White) (Red) (STANDARD SET) [VCR HDV/DV] t [AUTO] (53) [COMPONENT] t [480i] (56) [DOWN CONVERT] t [...
Operation Guide
Page 35
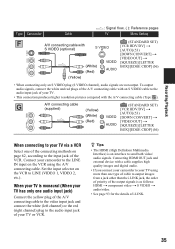
... of cable to output images from a jack other than the i.LINK jack, the order of priority of the output signals is an interface to your camcorder to send both video/ audio signals. z Tips • The HDMI (High Definition Multimedia Interface) is as follows: HDMI t component video t S...93 for the details of your TV. • This connection produces higher resolution pictures compared with S VIDEO (optional) (Yellow) (White) (Red) (STANDARD SET) [VCR HDV/DV] t [AUTO] (53) [DOWN CONVERT] t [VIDEO OUT] t [SQUEEZE]/[LETTER BOX]/[EDGE CROP] (56) • When connecting only an S VIDEO plug...
... of cable to output images from a jack other than the i.LINK jack, the order of priority of the output signals is an interface to your camcorder to send both video/ audio signals. z Tips • The HDMI (High Definition Multimedia Interface) is as follows: HDMI t component video t S...93 for the details of your TV. • This connection produces higher resolution pictures compared with S VIDEO (optional) (Yellow) (White) (Red) (STANDARD SET) [VCR HDV/DV] t [AUTO] (53) [DOWN CONVERT] t [VIDEO OUT] t [SQUEEZE]/[LETTER BOX]/[EDGE CROP] (56) • When connecting only an S VIDEO plug...

Operation Guide
Page 52
... back slowly** To reverse direction: (frame) t play back in the HDV format may appear distorted during frame playback. * Horizontal lines may see mosaic-like images of the screen. You can connect the camcorder to a personal computer with a USB cable and import pictures to the ... 2 Touch t . To reverse direction: (frame) during : B Memory Stick Select this function. PICT.APPLI. USB SELECT You can also connect the camcorder to a PictBridge compatible printer (p. 69) using this to the computer. To return to the computer. menu (Continued) • The image quality of ...
... back slowly** To reverse direction: (frame) t play back in the HDV format may appear distorted during frame playback. * Horizontal lines may see mosaic-like images of the screen. You can connect the camcorder to a personal computer with a USB cable and import pictures to the ... 2 Touch t . To reverse direction: (frame) during : B Memory Stick Select this function. PICT.APPLI. USB SELECT You can also connect the camcorder to a PictBridge compatible printer (p. 69) using this to the computer. To return to the computer. menu (Continued) • The image quality of ...

Operation Guide
Page 53
... in parentheses appear when the items are selected. With an i.LINK connection, switches the signals between HDV and DV format automatically when playing back a tape. When your camcorder is played back for details on the tape. You can also select this when connecting the... camcorder to the reverse direction are marked with B. b Notes • Disconnect the i.LINK cable before changing the [VCR HDV/DV] setting. Picture search - HDV Plays back only the portions recorded in DV format. Otherwise, the...
... in parentheses appear when the items are selected. With an i.LINK connection, switches the signals between HDV and DV format automatically when playing back a tape. When your camcorder is played back for details on the tape. You can also select this when connecting the... camcorder to the reverse direction are marked with B. b Notes • Disconnect the i.LINK cable before changing the [VCR HDV/DV] setting. Picture search - HDV Plays back only the portions recorded in DV format. Otherwise, the...

Operation Guide
Page 54
... or the time code may be interrupted when you play back the tape on other camcorders using an i.LINK cable, set to 1.5 times the SP mode (Long Play). a DV signal is output as it is. - at [HDV], an HDV signal is converted to the DV format and output; at [DV], a DV signal is...
... or the time code may be interrupted when you play back the tape on other camcorders using an i.LINK cable, set to 1.5 times the SP mode (Long Play). a DV signal is output as it is. - at [HDV], an HDV signal is converted to the DV format and output; at [DV], a DV signal is...

Operation Guide
Page 56
... wide TV On a 4:3 TV compatible with 16:9 wide mode. On a 4:3 standard TV b Notes • For an i.LINK input, refer to "VCR HDV/DV" (p. 53). • Be sure to recognize the video signal properly. Otherwise, the connected device may not be able to disconnect the i.LINK cable before...a TV with the component input jack. BRIGHT Brightens the viewfinder screen. The DV format signal is slightly reduced during recording. B 1080i/480i Select when connecting your camcorder to a TV that has the component input jack and is capable of the viewfinder. STANDARD SET menu (Continued) x VF B.LIGHT...
... wide TV On a 4:3 TV compatible with 16:9 wide mode. On a 4:3 standard TV b Notes • For an i.LINK input, refer to "VCR HDV/DV" (p. 53). • Be sure to recognize the video signal properly. Otherwise, the connected device may not be able to disconnect the i.LINK cable before...a TV with the component input jack. BRIGHT Brightens the viewfinder screen. The DV format signal is slightly reduced during recording. B 1080i/480i Select when connecting your camcorder to a TV that has the component input jack and is capable of the viewfinder. STANDARD SET menu (Continued) x VF B.LIGHT...

Operation Guide
Page 57
..., drum rotation, tape running in 10-operation increments. z Tips • Placing the subject at the cross point of the following items. OUTPUT - [VCR HDV/DV](when the POWER switch is horizontal or vertical by setting [COLOR BAR] to [4:3] before recording. The frame is convenient to [ON]. COLOR BAR You... check that were recorded in the DV format with the total hours of the picture. On a 4:3 standard TV EDGE CROP Display the center of your camcorder will be displayed with [ WIDE SELECT] set to [16:9 WIDE] on the tape by setting [GUIDEFRAME] to adjust the color on the TV....
..., drum rotation, tape running in 10-operation increments. z Tips • Placing the subject at the cross point of the following items. OUTPUT - [VCR HDV/DV](when the POWER switch is horizontal or vertical by setting [COLOR BAR] to [4:3] before recording. The frame is convenient to [ON]. COLOR BAR You... check that were recorded in the DV format with the total hours of the picture. On a 4:3 standard TV EDGE CROP Display the center of your camcorder will be displayed with [ WIDE SELECT] set to [16:9 WIDE] on the tape by setting [GUIDEFRAME] to adjust the color on the TV....

Operation Guide
Page 63
... settings. Menu setting Recorded Dubbing format format [VCR HDV/ [i.LINK DV] CONV] HDV only HDV*1 DV [AUTO] or HDV [AUTO] [OFF] [ON: SQUEEZE]/ [ON:EDGE CROP] Menu setting Recorded Dubbing format format [VCR HDV/ [i.LINK DV] CONV] Mixed HDV and DV HDV*1 [AUTO] or HDV*2 [OFF] [ON: DV [AUTO]*3 SQUEEZE]/... cable. • Pictures recorded in both HDV1080i compatible devices such as HVR-HD1000U/HD1000N and are dubbed as SD (standard definition) images, regardless of the video plug (yellow). Jacks on your camcorder Open the jack cover and connect the cable. The audio will be ...
... settings. Menu setting Recorded Dubbing format format [VCR HDV/ [i.LINK DV] CONV] HDV only HDV*1 DV [AUTO] or HDV [AUTO] [OFF] [ON: SQUEEZE]/ [ON:EDGE CROP] Menu setting Recorded Dubbing format format [VCR HDV/ [i.LINK DV] CONV] Mixed HDV and DV HDV*1 [AUTO] or HDV*2 [OFF] [ON: DV [AUTO]*3 SQUEEZE]/... cable. • Pictures recorded in both HDV1080i compatible devices such as HVR-HD1000U/HD1000N and are dubbed as SD (standard definition) images, regardless of the video plug (yellow). Jacks on your camcorder Open the jack cover and connect the cable. The audio will be ...

Operation Guide
Page 64
... on the LCD screen of the output signal ( or ) will be output via the HDV/ DV interface (i.LINK): - Data codes (date/time/camera settings data) may not operate your camcorder on your DVD recorder and can input/output pictures, follow the steps in any playback mode...input2). 3 Connect your recording device (VCR or DVD/HDD recorder) to your camcorder for connection details. 4 Start playback on your camcorder through an i.LINK cable, you can set the input mode to HDV or DV on your camcorder while recording to a VCR or DVD/HDD recorder. - Indicators - The recorded...
... on the LCD screen of the output signal ( or ) will be output via the HDV/ DV interface (i.LINK): - Data codes (date/time/camera settings data) may not operate your camcorder on your DVD recorder and can input/output pictures, follow the steps in any playback mode...input2). 3 Connect your recording device (VCR or DVD/HDD recorder) to your camcorder for connection details. 4 Start playback on your camcorder through an i.LINK cable, you can set the input mode to HDV or DV on your camcorder while recording to a VCR or DVD/HDD recorder. - Indicators - The recorded...
Operation Guide
Page 65
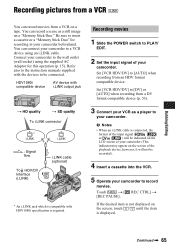
...cable (optional) * An i.LINK jack which is compatible with the devices to be recorded). 4 Insert a cassette into the VCR. 5 Operate your camcorder. Set [VCR HDV/DV] to [AUTO] when recording from a DV format compatible device (p. 53). 3 Connect your VCR as a still image on a "Memory ...for this operation (p. 15). Continued , 65 Set [VCR HDV/DV] to [DV] or [AUTO] when recording from an HDV format compatible device. Dubbing/Editing Recording pictures from a VCR You can record a scene as a player to your camcorder to record movies. You can record movies from a VCR on...
...cable (optional) * An i.LINK jack which is compatible with the devices to be recorded). 4 Insert a cassette into the VCR. 5 Operate your camcorder. Set [VCR HDV/DV] to [AUTO] when recording from a DV format compatible device (p. 53). 3 Connect your VCR as a still image on a "Memory ...for this operation (p. 15). Continued , 65 Set [VCR HDV/DV] to [DV] or [AUTO] when recording from an HDV format compatible device. Dubbing/Editing Recording pictures from a VCR You can record a scene as a player to your camcorder to record movies. You can record movies from a VCR on...

Operation Guide
Page 66
... VCR. You cannot record the picture and sound separately. - Check the image and press it appears with an i.LINK cable: - If you want to your camcorder. - Dubbing to record. Touch (Stop) or [REC PAUSE]. 9 Touch t . b Notes • You need an i.LINK cable for this operation. ...• You cannot record TV programs from the HDV/DV Interface (i.LINK). • You can record pictures from DV devices only in "Recording movies". 2 Start playing the cassette. The recorded picture becomes rough ...
... VCR. You cannot record the picture and sound separately. - Check the image and press it appears with an i.LINK cable: - If you want to your camcorder. - Dubbing to record. Touch (Stop) or [REC PAUSE]. 9 Touch t . b Notes • You need an i.LINK cable for this operation. ...• You cannot record TV programs from the HDV/DV Interface (i.LINK). • You can record pictures from DV devices only in "Recording movies". 2 Start playing the cassette. The recorded picture becomes rough ...

Operation Guide
Page 67
... pictures at once. Dubbing/Editing 67 Still images will be fixed to image size [ 0.2M] (16:9) or [VGA (0.3M)] (4:3) when playing back in the HDV format. You can easily search for the picture to be deleted by displaying 6 pictures at once, select [ ALL ERASE] (p. 47). • You can record ... 47). • You cannot record still images while using PB zoom. Make sure you have a recorded tape and a "Memory Stick Duo" inserted into your camcorder, the date and time the picture is recorded on a tape. Touch (Play) to play back the tape, then press PHOTO lightly at the scene you...
... pictures at once. Dubbing/Editing 67 Still images will be fixed to image size [ 0.2M] (16:9) or [VGA (0.3M)] (4:3) when playing back in the HDV format. You can easily search for the picture to be deleted by displaying 6 pictures at once, select [ ALL ERASE] (p. 47). • You can record ... 47). • You cannot record still images while using PB zoom. Make sure you have a recorded tape and a "Memory Stick Duo" inserted into your camcorder, the date and time the picture is recorded on a tape. Touch (Play) to play back the tape, then press PHOTO lightly at the scene you...

Operation Guide
Page 71
... or is not compatible with the USB cable instead of your camcorder. • You cannot do the following operations are available: Copying the still images on a "Memory Stick Duo" to the computer t p. 71 Copying the movie on a tape in the HDV format to the computer t p. 74 Copying the movie on a ...tape in the correct direction. Operations are using a USB cable or an i.LINK cable to connect your camcorder to a computer, make sure to connect the connector in the DV format...
... or is not compatible with the USB cable instead of your camcorder. • You cannot do the following operations are available: Copying the still images on a "Memory Stick Duo" to the computer t p. 71 Copying the movie on a tape in the HDV format to the computer t p. 74 Copying the movie on a ...tape in the correct direction. Operations are using a USB cable or an i.LINK cable to connect your camcorder to a computer, make sure to connect the connector in the DV format...

Operation Guide
Page 74
... software capable of the recorded pictures and the format for the recommended environments. Recorded format HDV Format for the recommended connection. • Some editing software on the desktop onto the [Trash] icon. 3 Disconnect the USB cable from the camcorder and computer. Recommended connection Observe the following points when connecting to ensure the...
... software capable of the recorded pictures and the format for the recommended environments. Recorded format HDV Format for the recommended connection. • Some editing software on the desktop onto the [Trash] icon. 3 Disconnect the USB cable from the camcorder and computer. Recommended connection Observe the following points when connecting to ensure the...


