
Operation Guide
Page 2
... shock hazard, do not expose the unit to have a suitable outlet installed. Carefully observe all warnings, precautions and instructions on the bottom. HVR-HD1000U/HD1000N Serial No. This symbol is intended to alert the user to the operating instructions. Use Power Sources This set through openings as they .... Polarization This set . Model No. If the plug should be operated only from battery power, or other ). If you are not sure of the type of electric shock to your home, consult your Sony dealer regarding this can result in . Model No. This is intended to alert the...
... shock hazard, do not expose the unit to have a suitable outlet installed. Carefully observe all warnings, precautions and instructions on the bottom. HVR-HD1000U/HD1000N Serial No. This symbol is intended to alert the user to the operating instructions. Use Power Sources This set through openings as they .... Polarization This set . Model No. If the plug should be operated only from battery power, or other ). If you are not sure of the type of electric shock to your home, consult your Sony dealer regarding this can result in . Model No. This is intended to alert the...
Operation Guide
Page 4
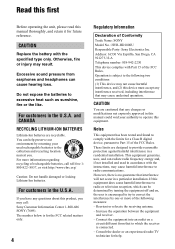
... relocate the receiving antenna. - CAUTION You are designed to provide reasonable protection against harmful interference in the U.S.A. and CANADA RECYCLING LITHIUM-ION BATTERIES Lithium-Ion batteries are recyclable. Read this first Before operating the unit, please read this equipment does cause harmful interference to radio or television reception, which ...If this manual thoroughly, and retain it for help preserve our environment by one or more information regarding recycling of Conformity Trade Name: SONY Model No.: HVR-HD1000U Responsible Party: Sony Electronics Inc.
... relocate the receiving antenna. - CAUTION You are designed to provide reasonable protection against harmful interference in the U.S.A. and CANADA RECYCLING LITHIUM-ION BATTERIES Lithium-Ion batteries are recyclable. Read this first Before operating the unit, please read this equipment does cause harmful interference to radio or television reception, which ...If this manual thoroughly, and retain it for help preserve our environment by one or more information regarding recycling of Conformity Trade Name: SONY Model No.: HVR-HD1000U Responsible Party: Sony Electronics Inc.
Operation Guide
Page 6
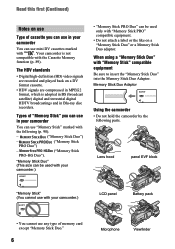
When using a "Memory Stick Duo" with your camcorder.) LCD panel Battery pack • You cannot use any type of memory card except "Memory Stick Duo." 6 Microphone Viewfinder The HDV standards • Digital high-definition (HD) video ... broadcastings and in MPEG2 format, which is not compatible with the Cassette Memory function (p. 89). "Memory Stick Duo" (This size can be used with your camcorder.) • "Memory Stick PRO Duo" can be used only with "Memory Stick PRO" compatible equipment. • Do not attach a label or the like on a "Memory...
When using a "Memory Stick Duo" with your camcorder.) LCD panel Battery pack • You cannot use any type of memory card except "Memory Stick Duo." 6 Microphone Viewfinder The HDV standards • Digital high-definition (HD) video ... broadcastings and in MPEG2 format, which is not compatible with the Cassette Memory function (p. 89). "Memory Stick Duo" (This size can be used with your camcorder.) • "Memory Stick PRO Duo" can be used only with "Memory Stick PRO" compatible equipment. • Do not attach a label or the like on a "Memory...
Operation Guide
Page 9
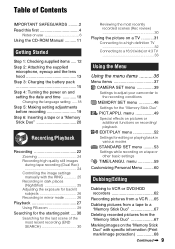
... 11 Getting Started Step 1: Checking supplied items ..... 12 Step 2: Attaching the supplied microphone, eyecup and the lens hood 13 Step 3: Charging the battery pack 15 Step 4: Turning the power on and setting the date and time 18 Changing the language setting ......18 Step 5: Making setting adjustments before ...:9 (wide) or 4:3 TV 33 Using the Menu Using the menu items .......... 36 Menu items 37 CAMERA SET menu 39 Settings to adjust your camcorder to a "Memory Stick Duo 67 Deleting recorded pictures from the "Memory Stick Duo 67 Marking images on the "Memory Stick Duo" with the RING...
... 11 Getting Started Step 1: Checking supplied items ..... 12 Step 2: Attaching the supplied microphone, eyecup and the lens hood 13 Step 3: Charging the battery pack 15 Step 4: Turning the power on and setting the date and time 18 Changing the language setting ......18 Step 5: Making setting adjustments before ...:9 (wide) or 4:3 TV 33 Using the Menu Using the menu items .......... 36 Menu items 37 CAMERA SET menu 39 Settings to adjust your camcorder to a "Memory Stick Duo 67 Deleting recorded pictures from the "Memory Stick Duo 67 Marking images on the "Memory Stick Duo" with the RING...
Operation Guide
Page 10
... 85 Self-diagnosis display/Warning indicators 85 Additional Information Using your camcorder abroad ...... 88 Maintenance and precautions ...... 89 Usable cassette tapes 89 About the "Memory Stick 90 About the "InfoLITHIUM" battery pack 92 About i.LINK 93 About x.v.Color 94 On using your camcorder 94 Specifications 98 Quick Reference Identifying parts and controls ..... 101...
... 85 Self-diagnosis display/Warning indicators 85 Additional Information Using your camcorder abroad ...... 88 Maintenance and precautions ...... 89 Usable cassette tapes 89 About the "Memory Stick 90 About the "InfoLITHIUM" battery pack 92 About i.LINK 93 About x.v.Color 94 On using your camcorder 94 Specifications 98 Quick Reference Identifying parts and controls ..... 101...

Operation Guide
Page 12
... cable (1) (p. 31, 62) Eye cup (1) CD-ROM "Manuals for Digital HD Video Camera Recorder"(1) Operating Guide (This manual) (1) To attach the lens cap to the camcorder again. Getting Started Step 1: Checking supplied items Make sure that item supplied. The number in the parentheses indicates the number of that you have following...
... cable (1) (p. 31, 62) Eye cup (1) CD-ROM "Manuals for Digital HD Video Camera Recorder"(1) Operating Guide (This manual) (1) To attach the lens cap to the camcorder again. Getting Started Step 1: Checking supplied items Make sure that item supplied. The number in the parentheses indicates the number of that you have following...

Operation Guide
Page 15
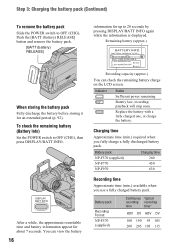
... to the DC IN jack of the arrow while pressing it until it to your camcorder. Be sure that the v mark on the DC plug is fully charged. Step 3: Charging the battery pack Getting Started 1 2 Battery pack 3 To the wall outlet (wall socket) DC plug 4 AC Adaptor Power ... a wall outlet (wall socket) as shown in the illustration. b Notes • You cannot attach any "InfoLITHIUM" battery pack other than the L series to your camcorder. 1 Attach the battery pack to your camcorder. 4 Connect the power cord (mains lead) to the AC Adaptor and the wall outlet (wall socket). Attach the...
... to the DC IN jack of the arrow while pressing it until it to your camcorder. Be sure that the v mark on the DC plug is fully charged. Step 3: Charging the battery pack Getting Started 1 2 Battery pack 3 To the wall outlet (wall socket) DC plug 4 AC Adaptor Power ... a wall outlet (wall socket) as shown in the illustration. b Notes • You cannot attach any "InfoLITHIUM" battery pack other than the L series to your camcorder. 1 Attach the battery pack to your camcorder. 4 Connect the power cord (mains lead) to the AC Adaptor and the wall outlet (wall socket). Attach the...
Operation Guide
Page 16
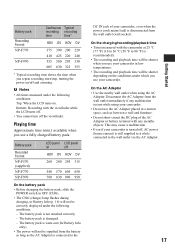
... by pressing DISPLAY/BATT INFO again while the information is displayed. Indicator Status Sufficient power remaining Battery low, recording/ playback will stop soon. Battery pack Recording Format NP-F570 (supplied) Continuous Typical recording recording time time* HDV DV HDV...the [BATT (battery) RELEASE] button and remove the battery pack. [BATT (battery) RELEASE] When storing the battery pack Fully discharge the battery before storing it for about 7 seconds. Replace the battery with a fully charged one, or charge the battery. To check the remaining battery (Battery Info) Set...
... by pressing DISPLAY/BATT INFO again while the information is displayed. Indicator Status Sufficient power remaining Battery low, recording/ playback will stop soon. Battery pack Recording Format NP-F570 (supplied) Continuous Typical recording recording time time* HDV DV HDV...the [BATT (battery) RELEASE] button and remove the battery pack. [BATT (battery) RELEASE] When storing the battery pack Fully discharge the battery before storing it for about 7 seconds. Replace the battery with a fully charged one, or charge the battery. To check the remaining battery (Battery Info) Set...
Operation Guide
Page 17
... - On the AC Adaptor • Use the nearby wall outlet when using your camcorder. • Do not use your camcorder, even when the power cord (mains lead) is disconnected from the wall outlet (wall socket). Battery pack Recorded Format NP-F570 (supplied) NP-F770 NP-F970 LCD panel LCD panel ... narrow space, such as the AC Adaptor is recommended). • The recording and playback time will be shorter when you use a fully charged battery pack. Bottom: Recording with the camcorder at 25 °C (77 °F) (10 to 30 °C (50 °F to the wall outlet via the AC Adaptor. 17 ...
... - On the AC Adaptor • Use the nearby wall outlet when using your camcorder. • Do not use your camcorder, even when the power cord (mains lead) is disconnected from the wall outlet (wall socket). Battery pack Recorded Format NP-F570 (supplied) NP-F770 NP-F970 LCD panel LCD panel ... narrow space, such as the AC Adaptor is recommended). • The recording and playback time will be shorter when you use a fully charged battery pack. Bottom: Recording with the camcorder at 25 °C (77 °F) (10 to 30 °C (50 °F to the wall outlet via the AC Adaptor. 17 ...
Operation Guide
Page 18
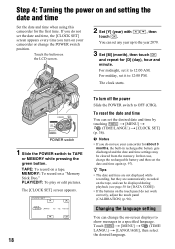
...MENU] t (TIME/ LANGU.) t [LANGUAGE], then select the desired language. CLOCK SET DATE 2007Y JAN M 1D 12: 00 AM OK 18 To turn on your camcorder for the first time. The clock starts. MEMORY: To record on a tape. To reset the date and time You can be cleared from the memory...time you do not work correctly, adjust the touch panel (CALIBRATION) (p. 96). TAPE: To record on a "Memory Stick Duo." In that case, charge the rechargeable battery and then set the desired date and time by touching t [MENU] t (TIME/LANGU.) t [CLOCK SET] (p. 36). z Tips • The date and ...
...MENU] t (TIME/ LANGU.) t [LANGUAGE], then select the desired language. CLOCK SET DATE 2007Y JAN M 1D 12: 00 AM OK 18 To turn on your camcorder for the first time. The clock starts. MEMORY: To record on a tape. To reset the date and time You can be cleared from the memory...time you do not work correctly, adjust the touch panel (CALIBRATION) (p. 96). TAPE: To record on a "Memory Stick Duo." In that case, charge the rechargeable battery and then set the desired date and time by touching t [MENU] t (TIME/LANGU.) t [CLOCK SET] (p. 36). z Tips • The date and ...

Operation Guide
Page 19
....) 1 To turn on the LCD screen, set to the best angle (2). z Tips • You can view pictures using the viewfinder to avoid wearing down the battery, or when the picture seen on or off the LCD screen Set the LCD ON/OFF switch to ON. To turn off . You can adjust... operate the touch panel. This is convenient during playback operations. • See [LCD/VF SET] - [LCD BRIGHT] (p. 55) to toggle the screen indicators (such as Battery Info) on the LCD screen is set the LCD ON/OFF switch to OFF. z Tips • If you can adjust the position of the shoulder...
....) 1 To turn on the LCD screen, set to the best angle (2). z Tips • You can view pictures using the viewfinder to avoid wearing down the battery, or when the picture seen on or off the LCD screen Set the LCD ON/OFF switch to ON. To turn off . You can adjust... operate the touch panel. This is convenient during playback operations. • See [LCD/VF SET] - [LCD BRIGHT] (p. 55) to toggle the screen indicators (such as Battery Info) on the LCD screen is set the LCD ON/OFF switch to OFF. z Tips • If you can adjust the position of the shoulder...

Operation Guide
Page 21
... "Memory Stick Duo" into the "Memory Stick Duo" slot in once. Do not shake or knock your camcorder is lit or flashing, your camcorder, turn the power off, eject the "Memory Stick Duo," or remove the battery pack. Getting Started 1 Open the jack cover. 2 Insert the "Memory Stick Duo" into the slot in...
... "Memory Stick Duo" into the "Memory Stick Duo" slot in once. Do not shake or knock your camcorder is lit or flashing, your camcorder, turn the power off, eject the "Memory Stick Duo," or remove the battery pack. Getting Started 1 Open the jack cover. 2 Insert the "Memory Stick Duo" into the slot in...

Operation Guide
Page 41
...such as a fluorescent lamp, sodium lamp or mercury lamp, horizontal bands may be set. • When [ONE PUSH] was selected, or taken your camcorder at a nearby white object for about 10 seconds for your convenience. MANUAL( ) Adjust the shutter speed using a tripod, etc. • When ...AUTO]. • If you select [ONE PUSH], keep framing white objects while is set with / . z Tips • If you have changed the battery pack while [AUTO] was selected, if keeps flashing after touching , set [WHITE BAL.], [SCENE SELECT] returns to MEMORY. and the setting value appear ...
...such as a fluorescent lamp, sodium lamp or mercury lamp, horizontal bands may be set. • When [ONE PUSH] was selected, or taken your camcorder at a nearby white object for about 10 seconds for your convenience. MANUAL( ) Adjust the shutter speed using a tripod, etc. • When ...AUTO]. • If you select [ONE PUSH], keep framing white objects while is set with / . z Tips • If you have changed the battery pack while [AUTO] was selected, if keeps flashing after touching , set [WHITE BAL.], [SCENE SELECT] returns to MEMORY. and the setting value appear ...

Operation Guide
Page 55
...brightness. Audio level meter LCD/VF SET The recorded picture will not be affected by this operation. b Notes • When you connect your camcorder to adjust the recording sound level during recording. The recording sound level adjustment bars appear on the LCD screen with 2 Touch . /. The recording... or standby. Touch / to outside power sources, [BRIGHT] is automatically selected for the setting. • When you select [BRIGHT], battery life is output at the default setting. b Notes • Use headphones to adjust the recording sound level automatically.
...brightness. Audio level meter LCD/VF SET The recorded picture will not be affected by this operation. b Notes • When you connect your camcorder to adjust the recording sound level during recording. The recording sound level adjustment bars appear on the LCD screen with 2 Touch . /. The recording... or standby. Touch / to outside power sources, [BRIGHT] is automatically selected for the setting. • When you select [BRIGHT], battery life is output at the default setting. b Notes • Use headphones to adjust the recording sound level automatically.

Operation Guide
Page 56
...viewfinder in black and white. x VIDEO OUT You can adjust the brightness of the viewfinder. COMPONENT (480i) - B 1080i/480i Select when connecting your camcorder to the DV format and output it from HDV format signals. AUDIO/VIDEO BRIGHT Brightens the viewfinder screen. On a 4:3...Be sure to outside power sources, [BRIGHT] is automatically selected for the following outputs. - b Notes • When you select [BRIGHT], battery life is slightly reduced during recording. STANDARD SET menu (Continued) x VF B.LIGHT You can set to [ON:SQUEEZE]/[ON: EDGE CROP], ...
...viewfinder in black and white. x VIDEO OUT You can adjust the brightness of the viewfinder. COMPONENT (480i) - B 1080i/480i Select when connecting your camcorder to the DV format and output it from HDV format signals. AUDIO/VIDEO BRIGHT Brightens the viewfinder screen. On a 4:3...Be sure to outside power sources, [BRIGHT] is automatically selected for the following outputs. - b Notes • When you select [BRIGHT], battery life is slightly reduced during recording. STANDARD SET menu (Continued) x VF B.LIGHT You can set to [ON:SQUEEZE]/[ON: EDGE CROP], ...

Operation Guide
Page 59
... the recording standby mode continues more time to reach the recording start point, but a smooth transition can be used on the LCD screen. • Your camcorder offers [ENG[SIMP]] (simplified English) for a moment (editing on your computer is to protect the tape and to prevent from the OFF (CHG) position), or... recording) You can slightly reduce the recording start point time when you start recording when you attempt to record right after you switch on the camcorder (set the POWER switch to TAPE from unnecessarily battery exhausting. This function is useful to the originally set time.
... the recording standby mode continues more time to reach the recording start point, but a smooth transition can be used on the LCD screen. • Your camcorder offers [ENG[SIMP]] (simplified English) for a moment (editing on your computer is to protect the tape and to prevent from the OFF (CHG) position), or... recording) You can slightly reduce the recording start point time when you start recording when you attempt to record right after you switch on the camcorder (set the POWER switch to TAPE from unnecessarily battery exhausting. This function is useful to the originally set time.

Operation Guide
Page 77
... socket) (p. 15). If the problem persists, disconnect the power source and contact your Sony dealer. If the problem persists, the battery may get warmer while you press the RESET button, all settings are reset, except Personal Menu items). The camcorder does not operate even when the power is completed (p. 15). Troubleshooting Troubleshooting If...
... socket) (p. 15). If the problem persists, disconnect the power source and contact your Sony dealer. If the problem persists, the battery may get warmer while you press the RESET button, all settings are reset, except Personal Menu items). The camcorder does not operate even when the power is completed (p. 15). Troubleshooting Troubleshooting If...

Operation Guide
Page 78
...not support Cassette Memory, so the indicator does not appear. You cannot operate functions using a cassette with battery operation) and therefore increases noise. The buttons on your camcorder (p. 47). The Cassette Memory indicator or title display does not appear while using a "Memory Stick Duo...The cassette cannot be ejected from the compartment. • Make sure the power source (battery pack or AC Adaptor) is connected correctly (p. 15). • Moisture condensation has occurred inside the camcorder (p. 95). The remaining tape indicator is not displayed. • Set [ REMAINING]...
...not support Cassette Memory, so the indicator does not appear. You cannot operate functions using a cassette with battery operation) and therefore increases noise. The buttons on your camcorder (p. 47). The Cassette Memory indicator or title display does not appear while using a "Memory Stick Duo...The cassette cannot be ejected from the compartment. • Make sure the power source (battery pack or AC Adaptor) is connected correctly (p. 15). • Moisture condensation has occurred inside the camcorder (p. 95). The remaining tape indicator is not displayed. • Set [ REMAINING]...

Operation Guide
Page 85
... warning)* • Eject the cassette, remove the power source, and then leave it and operate your camcorder again. • Change the cassette. Press RESET, and operate your Sony dealer or local authorized Sony service facility. Use an "InfoLITHIUM" battery pack (L series) (p. 92). • Connect the DC plug of the AC Adaptor to incompatible "Memory...
... warning)* • Eject the cassette, remove the power source, and then leave it and operate your camcorder again. • Change the cassette. Press RESET, and operate your Sony dealer or local authorized Sony service facility. Use an "InfoLITHIUM" battery pack (L series) (p. 92). • Connect the DC plug of the AC Adaptor to incompatible "Memory...
Operation Guide
Page 90
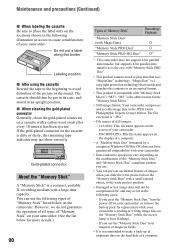
... and "Memory Stick Duo" compliant product you eject the "Memory Stick Duo," turn the power off on your camcorder, or remove the battery pack for , and may occur in the following types of your camcorder. If you use the "Memory Stick Duo" near magnets or magnetic fields. • It is ".JPG." &#...8226; File names of still images: - 101-0001: This file name appears on the hard disk of your camcorder. (...
... and "Memory Stick Duo" compliant product you eject the "Memory Stick Duo," turn the power off on your camcorder, or remove the battery pack for , and may occur in the following types of your camcorder. If you use the "Memory Stick Duo" near magnets or magnetic fields. • It is ".JPG." &#...8226; File names of still images: - 101-0001: This file name appears on the hard disk of your camcorder. (...


