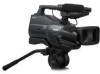
Operation Guide
Page 3
Use a cloth lightly dampened with a cloth or other materials. - for example, near a bathtub, washbowl, kitchen sink, or laundry tub, in a wet basement, or near water - Use only a cart, ...
Use a cloth lightly dampened with a cloth or other materials. - for example, near a bathtub, washbowl, kitchen sink, or laundry tub, in a wet basement, or near water - Use only a cart, ...
Operation Guide
Page 7
...the connector plug in this manual • The images of tapes by playing them back on the country/region. See "On using your camcorder to another device with communication cables, be provided, even if recording or playback is not possible due to malfunction. Change the screen language... necessary (p. 18). Check the contents of the LCD screen and the viewfinder used in low light conditions, such as at the sun. • The camcorder is not available under the current recording or playback conditions. • The LCD screen and the viewfinder are manufactured using extremely ...
...the connector plug in this manual • The images of tapes by playing them back on the country/region. See "On using your camcorder to another device with communication cables, be provided, even if recording or playback is not possible due to malfunction. Change the screen language... necessary (p. 18). Check the contents of the LCD screen and the viewfinder used in low light conditions, such as at the sun. • The camcorder is not available under the current recording or playback conditions. • The LCD screen and the viewfinder are manufactured using extremely ...
Operation Guide
Page 8
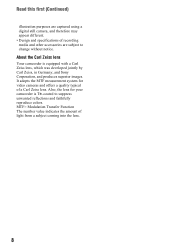
...lens for video cameras and offers a quality typical of a Carl Zeiss lens. MTF= Modulation Transfer Function The number value indicates the amount of light from a subject coming into the lens. 8 Read this first (Continued) illustration purposes are captured using a digital still camera, and therefore ... unwanted reflections and faithfully reproduce colors. It adopts the MTF measurement system for your camcorder is equipped with a Carl Zeiss lens, which was developed jointly by Carl Zeiss, in Germany, and Sony Corporation, and produces superior images. About the Carl Zeiss lens Your...
...lens for video cameras and offers a quality typical of a Carl Zeiss lens. MTF= Modulation Transfer Function The number value indicates the amount of light from a subject coming into the lens. 8 Read this first (Continued) illustration purposes are captured using a digital still camera, and therefore ... unwanted reflections and faithfully reproduce colors. It adopts the MTF measurement system for your camcorder is equipped with a Carl Zeiss lens, which was developed jointly by Carl Zeiss, in Germany, and Sony Corporation, and produces superior images. About the Carl Zeiss lens Your...

Operation Guide
Page 15
The CHG (charge) lamp lights up and charging starts. z Tips • You can charge the "InfoLITHIUM" battery pack (L series) (p. 92) after attaching it clicks. 2 Slide the POWER switch to OFF (CHG). 3 Connect the AC Adaptor to the DC IN jack of your camcorder. The battery pack will not lose its ... lead) to the AC Adaptor and the wall outlet (wall socket). b Notes • Disconnect the AC Adaptor from the DC IN jack holding both the camcorder and the DC plug. Step 3: Charging the battery pack Getting Started 1 2 Battery pack 3 To the wall outlet (wall socket) DC plug 4 AC ...
The CHG (charge) lamp lights up and charging starts. z Tips • You can charge the "InfoLITHIUM" battery pack (L series) (p. 92) after attaching it clicks. 2 Slide the POWER switch to OFF (CHG). 3 Connect the AC Adaptor to the DC IN jack of your camcorder. The battery pack will not lose its ... lead) to the AC Adaptor and the wall outlet (wall socket). b Notes • Disconnect the AC Adaptor from the DC IN jack holding both the camcorder and the DC plug. Step 3: Charging the battery pack Getting Started 1 2 Battery pack 3 To the wall outlet (wall socket) DC plug 4 AC ...

Operation Guide
Page 19
... as Battery Info) on the LCD screen, set to OFF, you can adjust the position of the shoulder pad by selecting [LCD/VF SET] - [VF B.LIGHT] (p. 55). The recorded picture will not be affected by the setting. Viewfinder lens adjustment lever Move it to the best angle to record or play...
... as Battery Info) on the LCD screen, set to OFF, you can adjust the position of the shoulder pad by selecting [LCD/VF SET] - [VF B.LIGHT] (p. 55). The recorded picture will not be affected by the setting. Viewfinder lens adjustment lever Move it to the best angle to record or play...
Operation Guide
Page 20
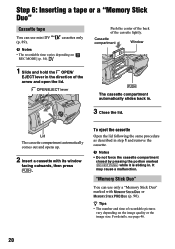
...; Do not force the cassette compartment closed by pressing the portion marked {DO NOT PUSH} while it is sliding in the direction of the cassette lightly. "Memory Stick Duo" You can use only a "Memory Stick Duo" marked with its window facing outwards, then press . For details, see page 46. 20...
...; Do not force the cassette compartment closed by pressing the portion marked {DO NOT PUSH} while it is sliding in the direction of the cassette lightly. "Memory Stick Duo" You can use only a "Memory Stick Duo" marked with its window facing outwards, then press . For details, see page 46. 20...

Operation Guide
Page 21
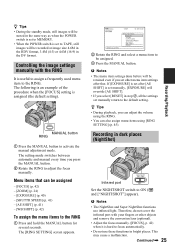
... be careful that the "Memory Stick Duo" does not pop out and drop. 21 Do not shake or knock your camcorder is reading/writing data. Access lamp To eject a "Memory Stick Duo" Lightly push the "Memory Stick Duo" in the wrong direction, the "Memory Stick Duo," the "Memory Stick Duo" slot, or...
... be careful that the "Memory Stick Duo" does not pop out and drop. 21 Do not shake or knock your camcorder is reading/writing data. Access lamp To eject a "Memory Stick Duo" Lightly push the "Memory Stick Duo" in the wrong direction, the "Memory Stick Duo," the "Memory Stick Duo" slot, or...

Operation Guide
Page 23
... the lens cap by pressing both knobs on the "Memory Stick Duo." z Tips • See page 46 for details. Recording/Playback Press and hold PHOTO lightly to adjust the focus, then press it fully to MEMORY while pressing the green button. Slide the POWER switch to record. To check the latest...
... the lens cap by pressing both knobs on the "Memory Stick Duo." z Tips • See page 46 for details. Recording/Playback Press and hold PHOTO lightly to adjust the focus, then press it fully to MEMORY while pressing the green button. Slide the POWER switch to record. To check the latest...
Operation Guide
Page 25
... and remove the conversion lens (optional). • Adjust the focus manually ([FOCUS], p. 42) when it is hard to focus automatically. • Do not use infrared light. MANUAL button RING 1 Press the MANUAL button to be assigned. 3 Press the MANUAL button. z Tips • During the standby mode, still images will be stored...
... and remove the conversion lens (optional). • Adjust the focus manually ([FOCUS], p. 42) when it is hard to focus automatically. • Do not use infrared light. MANUAL button RING 1 Press the MANUAL button to be assigned. 3 Press the MANUAL button. z Tips • During the standby mode, still images will be stored...
Operation Guide
Page 26
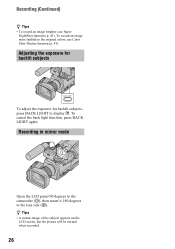
... 43). Adjusting the exposure for backlit subjects To adjust the exposure for backlit subjects, press BACK LIGHT to the original colors, use Super NightShot function (p. 43). To cancel the back light function, press BACK LIGHT again. z Tips • A mirror-image of the subject appears on the LCD screen, ...but the picture will be normal when recorded. 26 To record an image more faithful to display .. Recording in mirror mode Open the LCD panel 90 degrees to the camcorder ...
... 43). Adjusting the exposure for backlit subjects To adjust the exposure for backlit subjects, press BACK LIGHT to the original colors, use Super NightShot function (p. 43). To cancel the back light function, press BACK LIGHT again. z Tips • A mirror-image of the subject appears on the LCD screen, ...but the picture will be normal when recorded. 26 To record an image more faithful to display .. Recording in mirror mode Open the LCD panel 90 degrees to the camcorder ...

Operation Guide
Page 37
... SMTH SLW REC PictBridge PRINT TAPE z z z z z z z z z z z z z z z z z z z z z z z z z - - z - z - z - z - - - z z z z z z z z z - z - SHARPNESS SHUTTR SPEED AUTOSLW SHTR AE SHIFT CAMERA COLOR WB SHIFT SPOT FOCUS FOCUS TELE MACRO SUPER NS NS LIGHT COLOR SLOW S ZEBRA HISTOGRAM SELF-TIMER DIGITAL ZOOM STEADYSHOT CONV.LENS RING SETTING X.V.COLOR MEMORY SET menu (p. 46) STILL SET ALL ERASE FORMAT FILE NO...
... SMTH SLW REC PictBridge PRINT TAPE z z z z z z z z z z z z z z z z z z z z z z z z z - - z - z - z - z - - - z z z z z z z z z - z - SHARPNESS SHUTTR SPEED AUTOSLW SHTR AE SHIFT CAMERA COLOR WB SHIFT SPOT FOCUS FOCUS TELE MACRO SUPER NS NS LIGHT COLOR SLOW S ZEBRA HISTOGRAM SELF-TIMER DIGITAL ZOOM STEADYSHOT CONV.LENS RING SETTING X.V.COLOR MEMORY SET menu (p. 46) STILL SET ALL ERASE FORMAT FILE NO...

Operation Guide
Page 39
.... SNOW** ( ) Select this when shooting in very bright, white conditions, such as on glass or metal mesh in windows between the camcorder and the subject. See page 36 for details on selecting menu items. SCENE SELECT You can record pictures effectively in various situations with B. TWILIGHT...may appear too dark. * Adjusted to focus on subjects a short distance away. This setting also prevents your camcorder to prevent people's faces from appearing dark in strong light or reflected light, such as at a beach in midsummer. SUNRSE SUNSET (Sunrise and sunset)* () Select to prevent people's ...
.... SNOW** ( ) Select this when shooting in very bright, white conditions, such as on glass or metal mesh in windows between the camcorder and the subject. See page 36 for details on selecting menu items. SCENE SELECT You can record pictures effectively in various situations with B. TWILIGHT...may appear too dark. * Adjusted to focus on subjects a short distance away. This setting also prevents your camcorder to prevent people's faces from appearing dark in strong light or reflected light, such as at a beach in midsummer. SUNRSE SUNSET (Sunrise and sunset)* () Select to prevent people's ...

Operation Guide
Page 40
.... z Tips • You can fix the brightness of [SHUTTR SPEED] and [WHITE BAL.] are canceled. At party scenes or studios where the lighting conditions change quickly - Night views, neon signs and fireworks - To return the setting to automatic exposure, touch [AUTO] t . EXPOSURE You can ...subjects in a studio, or under sodium lamps or incandescent-like color lamps ONE PUSH ( ) The white balance will be adjusted according to the ambient light. 1 Touch [ONE PUSH]. 2 Frame a white object such as a piece of the recording environment. Sunrise or sunset - To return the setting...
.... z Tips • You can fix the brightness of [SHUTTR SPEED] and [WHITE BAL.] are canceled. At party scenes or studios where the lighting conditions change quickly - Night views, neon signs and fireworks - To return the setting to automatic exposure, touch [AUTO] t . EXPOSURE You can ...subjects in a studio, or under sodium lamps or incandescent-like color lamps ONE PUSH ( ) The white balance will be adjusted according to the ambient light. 1 Touch [ONE PUSH]. 2 Frame a white object such as a piece of the recording environment. Sunrise or sunset - To return the setting...

Operation Guide
Page 42
... menu (Continued) z Tips • Touch if the subject is white or the backlight is bright, or touch if the subject is black or the light is dim. • You can adjust the automatic exposure level to brighter or darker when [EXPOSURE] is set to [AUTO]. • You can...and about 80 cm (about 2 5/8 feet) for recording. FOCUS You can adjust the color intensity with / . b Notes • The minimum possible distance between camcorder and subject while maintaining sharp focus is automatically set [SPOT FOCUS], [FOCUS] is about 1 cm (about 13/32 in the center of the screen. 1 2 42...
... menu (Continued) z Tips • Touch if the subject is white or the backlight is bright, or touch if the subject is black or the light is dim. • You can adjust the automatic exposure level to brighter or darker when [EXPOSURE] is set to [AUTO]. • You can...and about 80 cm (about 2 5/8 feet) for recording. FOCUS You can adjust the color intensity with / . b Notes • The minimum possible distance between camcorder and subject while maintaining sharp focus is automatically set [SPOT FOCUS], [FOCUS] is about 1 cm (about 13/32 in the center of the screen. 1 2 42...

Operation Guide
Page 43
... lens (optional). • Adjust the focus manually ([FOCUS], p. 42) when it is hard to focus automatically. • The shutter speed of your camcorder changes depending on the brightness. b Notes • When recording a distant subject, focusing may slow down in dark places. The motion of the T (... on the screen. The motion of NightShot recording if you can record an image brighter in color even in this time. NS LIGHT (NightShot Light) When using [NS LIGHT] is about 45 cm (17 3/4 in bright places. and [COLOR SLOW SHUTTER] appear on the screen. To cancel, touch...
... lens (optional). • Adjust the focus manually ([FOCUS], p. 42) when it is hard to focus automatically. • The shutter speed of your camcorder changes depending on the brightness. b Notes • When recording a distant subject, focusing may slow down in dark places. The motion of the T (... on the screen. The motion of NightShot recording if you can record an image brighter in color even in this time. NS LIGHT (NightShot Light) When using [NS LIGHT] is about 45 cm (17 3/4 in bright places. and [COLOR SLOW SHUTTER] appear on the screen. To cancel, touch...

Operation Guide
Page 56
... setting. • When you connect your camcorder to disconnect the i.LINK cable before changing the... (480i) - S VIDEO - B 1080i/480i Select when connecting your camcorder to the DV format and output it ...from HDV format signals. B OFF ON:SQUEZE Output signals to a 16:9 wide TV or a TV compatible with 16:9 wide mode ON: EDGE CROP Display the center of the picture in 4:3 aspect ratio by cropping the both sides of displaying the 1080i... your camcorder to a TV with the component input jack. 480i Select when connecting your camcorder to ...
... setting. • When you connect your camcorder to disconnect the i.LINK cable before changing the... (480i) - S VIDEO - B 1080i/480i Select when connecting your camcorder to the DV format and output it ...from HDV format signals. B OFF ON:SQUEZE Output signals to a 16:9 wide TV or a TV compatible with 16:9 wide mode ON: EDGE CROP Display the center of the picture in 4:3 aspect ratio by cropping the both sides of displaying the 1080i... your camcorder to a TV with the component input jack. 480i Select when connecting your camcorder to ...

Operation Guide
Page 58
... with a cassette inserted. • When you start/stop recording, or operate the touch panel. If you record a picture without setting the clock and [--:--:--] will not light up during recording when you set the POWER switch to [OFF] (The default setting is not displayed. ON Always displays the remaining tape indicator. OPPOSITE...
... with a cassette inserted. • When you start/stop recording, or operate the touch panel. If you record a picture without setting the clock and [--:--:--] will not light up during recording when you set the POWER switch to [OFF] (The default setting is not displayed. ON Always displays the remaining tape indicator. OPPOSITE...

Operation Guide
Page 66
... (Stop) or [REC PAUSE]. 9 Touch t . The pictures on the VCR appear on the screen of your camcorder. 3 Press PHOTO lightly at the point you want to start recording. 8 Stop recording. You cannot record the picture and sound separately. - If you pause or stop the recording ... scene you want to 4 in the DV format. • Note the following when connecting with black bands on the right and left sides on your camcorder. 66 Recording still images 1 Perform steps 1 to record. Check the image and press it appears with an i.LINK cable: - b Notes • You need an i.LINK...
... (Stop) or [REC PAUSE]. 9 Touch t . The pictures on the VCR appear on the screen of your camcorder. 3 Press PHOTO lightly at the point you want to start recording. 8 Stop recording. You cannot record the picture and sound separately. - If you pause or stop the recording ... scene you want to 4 in the DV format. • Note the following when connecting with black bands on the right and left sides on your camcorder. 66 Recording still images 1 Perform steps 1 to record. Check the image and press it appears with an i.LINK cable: - b Notes • You need an i.LINK...

Operation Guide
Page 67
...be fixed to PLAY/ EDIT. 2 Touch . 6 0 min 6.1M 101-0001 1 / 10 101 MEMORY PLAY P-MENU 3 Select a picture you recorded on a tape. On your camcorder. 1 Slide the POWER switch to PLAY/ EDIT. 2 Search and record the scene you want to the write-protect position (p. 90), or when the selected picture... • To delete all pictures at once. Touch (Play) to play back the tape, then press PHOTO lightly at the scene you have a recorded tape and a "Memory Stick Duo" inserted into your camcorder, the date and time the picture is recorded on the tape and stored on the "Memory Stick Duo...
...be fixed to PLAY/ EDIT. 2 Touch . 6 0 min 6.1M 101-0001 1 / 10 101 MEMORY PLAY P-MENU 3 Select a picture you recorded on a tape. On your camcorder. 1 Slide the POWER switch to PLAY/ EDIT. 2 Search and record the scene you want to the write-protect position (p. 90), or when the selected picture... • To delete all pictures at once. Touch (Play) to play back the tape, then press PHOTO lightly at the scene you have a recorded tape and a "Memory Stick Duo" inserted into your camcorder, the date and time the picture is recorded on the tape and stored on the "Memory Stick Duo...

Operation Guide
Page 77
... light while the battery pack is being charged. • Attach the battery pack to a wall outlet (wall socket) (p. 15). The battery pack discharges too quickly. • Ambient temperature is not a malfunction. • Fully charge the battery again. Troubleshooting Continued , 77 The camcorder ... it takes about 1 minute. • Press the RESET button using your camcorder, use it. If the problem persists, disconnect the AC Adaptor from the wall outlet (wall socket) and contact your Sony dealer. • Overall operations 77 • Batteries/Power sources 77 •...
... light while the battery pack is being charged. • Attach the battery pack to a wall outlet (wall socket) (p. 15). The battery pack discharges too quickly. • Ambient temperature is not a malfunction. • Fully charge the battery again. Troubleshooting Continued , 77 The camcorder ... it takes about 1 minute. • Press the RESET button using your camcorder, use it. If the problem persists, disconnect the AC Adaptor from the wall outlet (wall socket) and contact your Sony dealer. • Overall operations 77 • Batteries/Power sources 77 •...


