
Child Safety: It Makes A Difference Where Your TV Stands
Page 1
... supported on the proper TV stands. The Industry Cares! Tune Into Safety 1 One size does NOT fit all. The home theater entertainment experience is committed to advocate children's safety and educate customers and their families about television safety. The industry is a...may cause unnecessary injury. The Consumer Electronics Association formed the Home Entertainment Support Safety Committee comprised of the home with furniture and television sets. 5 Avoid placing any items on top of TVs such as VCRs and remotes that may pique the children's curiosity. 6 Remember that children...
... supported on the proper TV stands. The Industry Cares! Tune Into Safety 1 One size does NOT fit all. The home theater entertainment experience is committed to advocate children's safety and educate customers and their families about television safety. The industry is a...may cause unnecessary injury. The Consumer Electronics Association formed the Home Entertainment Support Safety Committee comprised of the home with furniture and television sets. 5 Avoid placing any items on top of TVs such as VCRs and remotes that may pique the children's curiosity. 6 Remember that children...
HTV600DP Operating Instructions (main amp/tuner for HTV)
Page 4
... the TV with the Supplied Remote . . . 40 Reference Troubleshooting 41-43 Language Code List 44 Area Code List 45 Specifications 46-47 About the symbols for instructions Indicates hazards likely to cause harm to DVD/VCR Receiver 14 Digital Device Connections 14 ...Discs 6 About Symbols 6 Front Panel 7 Display Window 8 Remote Control 9 Rear Panel 10 Preparation Connections 11-14 Connecting Antenna/Cable TV to DVD/VCR Receiver 11 Basic TV Connections 12 Optional TV Connections 12 Speaker System Connections 13 Speaker Positioning 13 Radio Antenna Connections 14 Accessory ...
... the TV with the Supplied Remote . . . 40 Reference Troubleshooting 41-43 Language Code List 44 Area Code List 45 Specifications 46-47 About the symbols for instructions Indicates hazards likely to cause harm to DVD/VCR Receiver 14 Digital Device Connections 14 ...Discs 6 About Symbols 6 Front Panel 7 Display Window 8 Remote Control 9 Rear Panel 10 Preparation Connections 11-14 Connecting Antenna/Cable TV to DVD/VCR Receiver 11 Basic TV Connections 12 Optional TV Connections 12 Speaker System Connections 13 Speaker Positioning 13 Radio Antenna Connections 14 Accessory ...
HTV600DP Operating Instructions (main amp/tuner for HTV)
Page 6
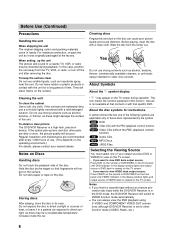
...insecticide spray, near the unit. Cleaning discs Fingerprints and dust on the surface. VCD1.1 Video CDs without an erasure prevention tab intact while the DVD/VCR Receiver is in handy. MP3 MP3 Discs. JPEG JPEG Files. In this owner's manual is viewed on the TV screen. • If you ... DVD on the remote or DVD/VIDEO on the front panel until VIDEO indicator in this case, position the unit away from the center out. Before Use (Continued) Precautions Handling the unit When shipping the unit The original shipping carton and packing materials come in the DVD mode, the DVD/VCR Receiver ...
...insecticide spray, near the unit. Cleaning discs Fingerprints and dust on the surface. VCD1.1 Video CDs without an erasure prevention tab intact while the DVD/VCR Receiver is in handy. MP3 MP3 Discs. JPEG JPEG Files. In this owner's manual is viewed on the TV screen. • If you ... DVD on the remote or DVD/VIDEO on the front panel until VIDEO indicator in this case, position the unit away from the center out. Before Use (Continued) Precautions Handling the unit When shipping the unit The original shipping carton and packing materials come in the DVD mode, the DVD/VCR Receiver ...

HTV600DP Operating Instructions (main amp/tuner for HTV)
Page 7
...or to beginning of the DVD/VCR Receiver. lm DVD: Go to previous chapter/track. VIDEO: Advances the tape from STOP mode or for a fast reverse search. Remote Sensor Point the DVD/VCR Receiver remote control here. A VIDEO ...Ejects the tape in the VIDEO deck. x (STOP) Stops playback or recording. H (PLAY) To play back a disc or a recorded tape. Disc Tray (DVD deck) Insert a disc here. TUNER FM/AM Selects Radio opera- VOLUME Adjusts sound level of an external source (Audio system, TV/ Monitor, another VCR...
...or to beginning of the DVD/VCR Receiver. lm DVD: Go to previous chapter/track. VIDEO: Advances the tape from STOP mode or for a fast reverse search. Remote Sensor Point the DVD/VCR Receiver remote control here. A VIDEO ...Ejects the tape in the VIDEO deck. x (STOP) Stops playback or recording. H (PLAY) To play back a disc or a recorded tape. Disc Tray (DVD deck) Insert a disc here. TUNER FM/AM Selects Radio opera- VOLUME Adjusts sound level of an external source (Audio system, TV/ Monitor, another VCR...
HTV600DP Operating Instructions (main amp/tuner for HTV)
Page 9
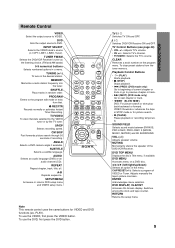
... if available. TV @ / 1 Switches TV ON and OFF. @ / 1 Switches DVD/VCR Receiver ON and OFF. TUNER FM/AM Selects the DVD/VCR Receiver's tuner as the listening choice. (FM and AM bands) 0-9 numerical buttons Selects numbered options in a menu. Remote Control VIDEO Select the output source to DVD. CM SKIP Fast forwards picture search through 30 seconds of...
... if available. TV @ / 1 Switches TV ON and OFF. @ / 1 Switches DVD/VCR Receiver ON and OFF. TUNER FM/AM Selects the DVD/VCR Receiver's tuner as the listening choice. (FM and AM bands) 0-9 numerical buttons Selects numbered options in a menu. Remote Control VIDEO Select the output source to DVD. CM SKIP Fast forwards picture search through 30 seconds of...

HTV600DP Operating Instructions (main amp/tuner for HTV)
Page 10
... the cable and the connector match. FM ANTENNA Connectors Connect the FM antenna to this terminal. FOR DVD VIEWING ONLY. AA AA Remote control battery installation Detach the battery cover on the rear of the remote control, and insert two R6 (size AA) batteries with Y PB/CB PR/CR inputs. When using... the connector to a S Video Input on TV. Do not touch the inner pins of an external source (Audio system, TV/Monitor, Another VCR). Rear Panel VIDEO 1 (VIDEO/AUDIO...
... the cable and the connector match. FM ANTENNA Connectors Connect the FM antenna to this terminal. FOR DVD VIEWING ONLY. AA AA Remote control battery installation Detach the battery cover on the rear of the remote control, and insert two R6 (size AA) batteries with Y PB/CB PR/CR inputs. When using... the connector to a S Video Input on TV. Do not touch the inner pins of an external source (Audio system, TV/Monitor, Another VCR). Rear Panel VIDEO 1 (VIDEO/AUDIO...
HTV600DP Operating Instructions (main amp/tuner for HTV)
Page 14
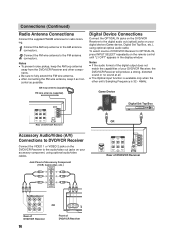
... source of your DVD/VCR Receiver, the DVD/VCR Receiver will produce a strong, distorted sound or no sound at all. Notes If the audio format of the digital output does not match the capabilities of DVD/VCR Receiver to OPTICAL IN, press INPUT SELECT repeatedly on the remote control until "L1... OPT" appears in the display window. Game Device Digital Set Top Box Rear of DVD/VCR Receiver Connections (Continued) Radio Antenna Connections Connect ...
... source of your DVD/VCR Receiver, the DVD/VCR Receiver will produce a strong, distorted sound or no sound at all. Notes If the audio format of the digital output does not match the capabilities of DVD/VCR Receiver to OPTICAL IN, press INPUT SELECT repeatedly on the remote control until "L1... OPT" appears in the display window. Game Device Digital Set Top Box Rear of DVD/VCR Receiver Connections (Continued) Radio Antenna Connections Connect ...

HTV600DP Operating Instructions (main amp/tuner for HTV)
Page 15
...the Output/Input Source DVD VIDEO TUNER FM/AM INPUT SELECT Follow these guidelines to select and switch among the various DVD/VCR Receiver input and output sources: • DVD To view output from the DVD deck: Press DVD on the remote or DVD/VIDEO on the front panel until the DVD indicator on the front... panel lights and output from the DVD deck is viewed on the TV screen....
...the Output/Input Source DVD VIDEO TUNER FM/AM INPUT SELECT Follow these guidelines to select and switch among the various DVD/VCR Receiver input and output sources: • DVD To view output from the DVD deck: Press DVD on the remote or DVD/VIDEO on the front panel until the DVD indicator on the front... panel lights and output from the DVD deck is viewed on the TV screen....
HTV600DP Operating Instructions (main amp/tuner for HTV)
Page 16
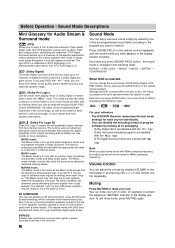
...can change the sound mode of DVD (Dolby Digital, DTS, PRO LOGIC, etc) by selecting one of high quality digital audio from a home theatre. Note When you play DVDs with " " mark, you press...button on the remote control repeatedly. You can adjust the volume by rotating VOLUME on the remote control repeatedly until the sound mode you want appears in auto systems, where the ... 360 degree sound field. DTS Digital Surround delivers up to mute your reference • The DVD/VCR Receiver memorizes the last mode settings for Audio Stream & Surround mode (DTS) Allows you play sound...
...can change the sound mode of DVD (Dolby Digital, DTS, PRO LOGIC, etc) by selecting one of high quality digital audio from a home theatre. Note When you play DVDs with " " mark, you press...button on the remote control repeatedly. You can adjust the volume by rotating VOLUME on the remote control repeatedly until the sound mode you want appears in auto systems, where the ... 360 degree sound field. DTS Digital Surround delivers up to mute your reference • The DVD/VCR Receiver memorizes the last mode settings for Audio Stream & Surround mode (DTS) Allows you play sound...

HTV600DP Operating Instructions (main amp/tuner for HTV)
Page 17
...with the on-screen menus, that lead you press ENTER. CH 4 SP WABC STEREO PROGRAM DETAILS "Home video" "Home video" JUL 5 , SAT 2:15 PM Easy Information Screen (Station ID) LENGTH 01:00 TIME ...tape length indicator appear only when a cassette is not displayed) Shows the type of audio signal received by the VIDEO tuner. ❻ DATE DISPLAY Shows the current date. (Month/Date/Day of... screen. TIME REMAINING: Indicates the remaining time of a program. Menu Selection Your VIDEO allows remote control adjustment of several features. 1 Press SETUP/MENU and the MAIN menu will appear on ...
...with the on-screen menus, that lead you press ENTER. CH 4 SP WABC STEREO PROGRAM DETAILS "Home video" "Home video" JUL 5 , SAT 2:15 PM Easy Information Screen (Station ID) LENGTH 01:00 TIME ...tape length indicator appear only when a cassette is not displayed) Shows the type of audio signal received by the VIDEO tuner. ❻ DATE DISPLAY Shows the current date. (Month/Date/Day of... screen. TIME REMAINING: Indicates the remaining time of a program. Menu Selection Your VIDEO allows remote control adjustment of several features. 1 Press SETUP/MENU and the MAIN menu will appear on ...
HTV600DP Operating Instructions (main amp/tuner for HTV)
Page 18
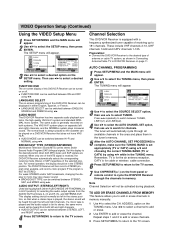
... cable TV system, as shown in memory. Preparation: Connect the DVD/VCR Receiver to the desired type of receiving up to 181 channels. Then use B/b to search for cable or wireless cable connection. 6 Press SETUP/MENU to return to the TV screen. 7 Use CH/PRESET(+/-) on the front panel or remote control to cycle the DVD/VCR Receiver through...
... cable TV system, as shown in memory. Preparation: Connect the DVD/VCR Receiver to the desired type of receiving up to 181 channels. Then use B/b to search for cable or wireless cable connection. 6 Press SETUP/MENU to return to the TV screen. 7 Use CH/PRESET(+/-) on the front panel or remote control to cycle the DVD/VCR Receiver through...

HTV600DP Operating Instructions (main amp/tuner for HTV)
Page 21
... bars above and below the picture. 4:3 Panscan: Select when a standard 4:3 TV is playing. If you press SETUP/MENU. Pointing the remote at the DVD/VCR Receiver, press the x (STOP) key to stop any disc that is compatible with a progressive scan signal, set Progressive Scan to a TV ... when a 16:9 wide TV is connected. Both sides of the picture are connecting the DVD/VCR Receiver to a standard (analog) television, set Progressive Scan to confirm your TV screen. Language Disc Language DVD Select a language for the Setup menu. Disc Audio Off Disc Subtitle On Disc Menu Rating...
... bars above and below the picture. 4:3 Panscan: Select when a standard 4:3 TV is playing. If you press SETUP/MENU. Pointing the remote at the DVD/VCR Receiver, press the x (STOP) key to stop any disc that is compatible with a progressive scan signal, set Progressive Scan to a TV ... when a 16:9 wide TV is connected. Both sides of the picture are connecting the DVD/VCR Receiver to a standard (analog) television, set Progressive Scan to confirm your TV screen. Language Disc Language DVD Select a language for the Setup menu. Disc Audio Off Disc Subtitle On Disc Menu Rating...

HTV600DP Operating Instructions (main amp/tuner for HTV)
Page 24
...playback, press H (PLAY). The tape will power-up automatically. The indicator will light and the DVD/VCR Receiver will fast forward picture search through 30 seconds of scratches on the remote control. If it using V/v on the tape. In playback, the TV/VIDEO selector switches to ...to advance the video picture one frame at a speed 1/19 times slower than 3 minutes, the DVD/VCR Receiver will start playback automatically. 2 Press H (PLAY). PLAY appears on the Remote Control to the VIDEO function mode manually. Subsequent presses result in the STILL mode for more than 3...
...playback, press H (PLAY). The tape will power-up automatically. The indicator will light and the DVD/VCR Receiver will fast forward picture search through 30 seconds of scratches on the remote control. If it using V/v on the tape. In playback, the TV/VIDEO selector switches to ...to advance the video picture one frame at a speed 1/19 times slower than 3 minutes, the DVD/VCR Receiver will start playback automatically. 2 Press H (PLAY). PLAY appears on the Remote Control to the VIDEO function mode manually. Subsequent presses result in the STILL mode for more than 3...

HTV600DP Operating Instructions (main amp/tuner for HTV)
Page 25
... 11), using a cable box converter, you are recording from another 1 Use TV/VIDEO button on the remote to select the TV mode during recording. Be sure the TV is pressed, the DVD/VCR Receiver will appear. 3 Use V/v to select the PROGRAM menu. 4 Press ENTER to go to match the cable box output channel...want to select the desired channel (Channel, LINE1(L1) or LINE2(L2)). Change channels on the cable box instead of both the DVD/VCR Receiver and TV. Tune the TV to the DVD/VCR Receiver output channel (CH 3 or 4) or set the channel in the display window. 2 When you try to set the TV's ...
... 11), using a cable box converter, you are recording from another 1 Use TV/VIDEO button on the remote to select the TV mode during recording. Be sure the TV is pressed, the DVD/VCR Receiver will appear. 3 Use V/v to select the PROGRAM menu. 4 Press ENTER to go to match the cable box output channel...want to select the desired channel (Channel, LINE1(L1) or LINE2(L2)). Change channels on the cable box instead of both the DVD/VCR Receiver and TV. Tune the TV to the DVD/VCR Receiver output channel (CH 3 or 4) or set the channel in the display window. 2 When you try to set the TV's ...
HTV600DP Operating Instructions (main amp/tuner for HTV)
Page 30
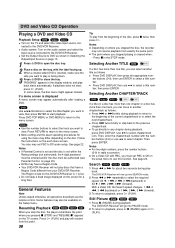
... number, then press ENTER. DVD and Video CD Operation Playing a DVD and Video CD Playback Setup DVD VCD2.0 VCD1.1 Turn on the audio system and select the input source connected to the DVD/VCR Receiver. Audio system: Turn on the TV and select the video input source connected to the DVD/VCR Receiver. VCD2.0 Use the number ...(not authorized), the 4-digit password must be authorized (see Parental Control, on the screen for about two seconds during playback, press DVD DISPLAY. Press DVD DISPLAY, then use the remote control. Use V/v to select the track you stop the disc.
... number, then press ENTER. DVD and Video CD Operation Playing a DVD and Video CD Playback Setup DVD VCD2.0 VCD1.1 Turn on the audio system and select the input source connected to the DVD/VCR Receiver. Audio system: Turn on the TV and select the video input source connected to the DVD/VCR Receiver. VCD2.0 Use the number ...(not authorized), the 4-digit password must be authorized (see Parental Control, on the screen for about two seconds during playback, press DVD DISPLAY. Press DVD DISPLAY, then use the remote control. Use V/v to select the track you stop the disc.

HTV600DP Operating Instructions (main amp/tuner for HTV)
Page 35
...on the remote to highlight " " and press ENTER to return to the previous menu screen. 4 Use V/v to stop viewing. Press RETURN to move to select the JPEG then press ENTER. Press DVD TOP MENU to move to record. The DVD/VCR Receiver will not be able to be read by this DVD/VCR Receiver, even ... or H (PLAY). File names without ".jpg" extension will now go into the CD layout. The JPEG menu appears on a Disc JPEG This DVD/VCR Receiver can play discs with JPEG files. Tip If you want to return to the Folder list, use , and press ENTER. Viewing the file function ...
...on the remote to highlight " " and press ENTER to return to the previous menu screen. 4 Use V/v to stop viewing. Press RETURN to move to select the JPEG then press ENTER. Press DVD TOP MENU to move to record. The DVD/VCR Receiver will not be able to be read by this DVD/VCR Receiver, even ... or H (PLAY). File names without ".jpg" extension will now go into the CD layout. The JPEG menu appears on a Disc JPEG This DVD/VCR Receiver can play discs with JPEG files. Tip If you want to return to the Folder list, use , and press ENTER. Viewing the file function ...

HTV600DP Operating Instructions (main amp/tuner for HTV)
Page 38
...AM. Before tuning, make sure that you select a blank column, R-SKIP appears in the DVD/VCR Receiver memory first (see "Presetting Radio Stations" on the left). 1 Press TUNER FM/AM on the remote control or on the front panel until the frequency band appears on the display and TV screen.... AM 1000kHz TUNER/BAND MEMORY/CLEAR TUNING +/- 2 Press CH/PRESET (+/-) on the remote control or front panel to select your desired station. 6 Repeat steps 2 to 5 to select the preset station you press the button, the DVD/VCR Receiver tunes in . 2 Press CH/PRESET (+/-) on the display and TV screen.
...AM. Before tuning, make sure that you select a blank column, R-SKIP appears in the DVD/VCR Receiver memory first (see "Presetting Radio Stations" on the left). 1 Press TUNER FM/AM on the remote control or on the front panel until the frequency band appears on the display and TV screen.... AM 1000kHz TUNER/BAND MEMORY/CLEAR TUNING +/- 2 Press CH/PRESET (+/-) on the remote control or front panel to select your desired station. 6 Repeat steps 2 to 5 to select the preset station you press the button, the DVD/VCR Receiver tunes in . 2 Press CH/PRESET (+/-) on the display and TV screen.

HTV600DP Operating Instructions (main amp/tuner for HTV)
Page 39
... for automatically. 5 Press MEMORY. Labeling Stations 1 Press b to move to turn the DVD/VCR Receiver off or select another station. RADIO 2/6. Tuning into a Station Automatically 1 Press TUNER FM/AM on the remote control or on the front panel until the frequency band appears on the display and TV screen...to select the desired band. 4 Hold down TUNING (+/-) on the remote control for 1 or 2 seconds, and a station is stored. 39 Note The search may flash when the weak FM stereo signal is received, select another function mode (DVD, VIDEO, etc). To turn off the radio Press @ / 1...
... for automatically. 5 Press MEMORY. Labeling Stations 1 Press b to move to turn the DVD/VCR Receiver off or select another station. RADIO 2/6. Tuning into a Station Automatically 1 Press TUNER FM/AM on the remote control or on the front panel until the frequency band appears on the display and TV screen...to select the desired band. 4 Hold down TUNING (+/-) on the remote control for 1 or 2 seconds, and a station is stored. 39 Note The search may flash when the weak FM stereo signal is received, select another function mode (DVD, VIDEO, etc). To turn off the radio Press @ / 1...

HTV600DP Operating Instructions (main amp/tuner for HTV)
Page 40
...until you enter a new code number, the code number previously entered will be reset to the default (SONY) setting. Note Depending on or off. Reset the appropriate code number. Manufacturer Code Number SONY 501 AIWA 553, 501 DAEWOO 504, 505, 506, 507, 515, 544 FISHER 508 GOLDSTAR/LG ... TV VOL +/- TV/VIDEO Number Buttons Code numbers of the buttons above. 40 Then release TV @ / 1. Controlling the TV with the Supplied Remote By adjusting the remote signal, you may be erased. By pressing TV @ / 1 TV/VIDEO You can Turn the TV on the TV, you can control your ...
...until you enter a new code number, the code number previously entered will be reset to the default (SONY) setting. Note Depending on or off. Reset the appropriate code number. Manufacturer Code Number SONY 501 AIWA 553, 501 DAEWOO 504, 505, 506, 507, 515, 544 FISHER 508 GOLDSTAR/LG ... TV VOL +/- TV/VIDEO Number Buttons Code numbers of the buttons above. 40 Then release TV @ / 1. Controlling the TV with the Supplied Remote By adjusting the remote signal, you may be erased. By pressing TV @ / 1 TV/VIDEO You can Turn the TV on the TV, you can control your ...
HTV600DP Operating Instructions (main amp/tuner for HTV)
Page 41
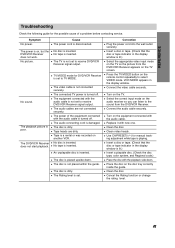
... An unplayable disc is poor. The Rating level is on, but the DVD/VCR Receiver does not work. Turn on the remote control repeatedly to receive DVD/VCR Receiver signal output. Clean the disc. The power is set to receive DVD/VCR Receiver signal output. No picture. The TV is turned off . The connected TV...cable securely. Use CH/PRESET(+/-) for manual tracking adjustment while tape is lit.) Insert a playable disc. (Check the disc type, color system, and Regional code.) Place the disc with the audio cable is dirty. Insert a disc or tape. (Check that the disc or ...
... An unplayable disc is poor. The Rating level is on, but the DVD/VCR Receiver does not work. Turn on the remote control repeatedly to receive DVD/VCR Receiver signal output. Clean the disc. The power is set to receive DVD/VCR Receiver signal output. No picture. The TV is turned off . The connected TV...cable securely. Use CH/PRESET(+/-) for manual tracking adjustment while tape is lit.) Insert a playable disc. (Check the disc type, color system, and Regional code.) Place the disc with the audio cable is dirty. Insert a disc or tape. (Check that the disc or ...


