
Limited Warranty (US Only)
Page 1
... repair or replace the Product, at its original packaging or packaging affording an equal degree of purchase, if this Product (including any authorized Sony service facility. This warranty does not cover customer instruction, installation, set up adjustments or signal reception problems. This warranty does not cover cosmetic damage or damage due to acts of God, accident, misuse, abuse, negligence, commercial use...
... repair or replace the Product, at its original packaging or packaging affording an equal degree of purchase, if this Product (including any authorized Sony service facility. This warranty does not cover customer instruction, installation, set up adjustments or signal reception problems. This warranty does not cover cosmetic damage or damage due to acts of God, accident, misuse, abuse, negligence, commercial use...

Operating Instructions
Page 4
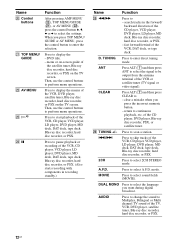
... Dolby Digital and DTS Surround sound (AUTO FORMAT DIRECT)....... 47 Selecting a pre-programmed sound field .... 49 Using only the front speakers and sub woofer (2CH STEREO 51 Resetting sound fields to the initial settings 52 Tuner Operations Listening to FM/AM radio 52 Presetting radio stations 54 Other Operations Switching the audio input mode (INPUT MODE 56 Watching component images from other inputs (COMPONENT VIDEO ASSIGN) ...... 57 Watching HDMI images from other inputs (HDMI ASSIGN 58 Naming inputs 59 Changing the display 59 Using the Sleep Timer 60 Recording using the receiver...
... Dolby Digital and DTS Surround sound (AUTO FORMAT DIRECT)....... 47 Selecting a pre-programmed sound field .... 49 Using only the front speakers and sub woofer (2CH STEREO 51 Resetting sound fields to the initial settings 52 Tuner Operations Listening to FM/AM radio 52 Presetting radio stations 54 Other Operations Switching the audio input mode (INPUT MODE 56 Watching component images from other inputs (COMPONENT VIDEO ASSIGN) ...... 57 Watching HDMI images from other inputs (HDMI ASSIGN 58 Naming inputs 59 Changing the display 59 Using the Sleep Timer 60 Recording using the receiver...

Operating Instructions
Page 6
G MASTER VOLUME Turn to store a station or enter the selection when selecting the settings (page 28). L A.F.D. mode (page 47). P MEMORY/ENTER Press to adjust the volume level of all speakers at the same time (page 33, 34, 36, 37). H MUTING Press to the supplied ECM-AC2 optimizer microphone for the Auto Calibration function (page 30). jacks R AUTO CAL MIC jack Connects to mute the sound (page 34). M 2CH Press to select the tuning mode (page 53...
G MASTER VOLUME Turn to store a station or enter the selection when selecting the settings (page 28). L A.F.D. mode (page 47). P MEMORY/ENTER Press to adjust the volume level of all speakers at the same time (page 33, 34, 36, 37). H MUTING Press to the supplied ECM-AC2 optimizer microphone for the Auto Calibration function (page 30). jacks R AUTO CAL MIC jack Connects to mute the sound (page 34). M 2CH Press to select the tuning mode (page 53...

Operating Instructions
Page 7
... Logic processing to 2 channel signals in order to tune in radio stations (page 52), etc. Lights up when using the receiver to output the center and surround channel signals. Note When playing a DTS format disc, be sure that you have made digital connections and that INPUT MODE is output from the SUB WOOFER jack. Lights up when Dolby Digital signals are input. Flashes when you have preset. For details on the display Getting Started 123 4 5 6 7 SW LFE SP A ;DIGITAL ;PRO LOGIC II DTS...
... Logic processing to 2 channel signals in order to tune in radio stations (page 52), etc. Lights up when using the receiver to output the center and surround channel signals. Note When playing a DTS format disc, be sure that you have made digital connections and that INPUT MODE is output from the SUB WOOFER jack. Lights up when Dolby Digital signals are input. Flashes when you have preset. For details on the display Getting Started 123 4 5 6 7 SW LFE SP A ;DIGITAL ;PRO LOGIC II DTS...

Operating Instructions
Page 9
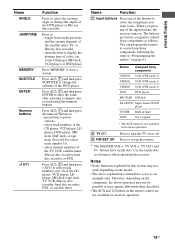
...AUDIO CENTER OUT R R AUDIO IN AUDIO IN AUDIO OUT AUDIO IN DVD VIDEO 2 VIDEO 1 R SUB FRONT SURROUND WOOFER SUB MULTI CH IN WOOFER CENTER + - The COAXIAL jack provides a better COAXIAL IN quality of a VCR or a DVD player (page 21, 22, 23, 25, 26). Connects to a DVD IN jack player, etc. You OUTPUT can enjoy high jack* quality image (page 21, 23, 25). continued 9US R SURROUND SPEAKERS R FRONT A RL RL FRONT B SPEAKERS 6 5 A DIGITAL INPUT section OPTICAL Connects to sub woofer (page 15). B VIDEO/AUDIO INPUT/OUTPUT section AUDIO IN/ White (L) OUT jack Red...
...AUDIO CENTER OUT R R AUDIO IN AUDIO IN AUDIO OUT AUDIO IN DVD VIDEO 2 VIDEO 1 R SUB FRONT SURROUND WOOFER SUB MULTI CH IN WOOFER CENTER + - The COAXIAL jack provides a better COAXIAL IN quality of a VCR or a DVD player (page 21, 22, 23, 25, 26). Connects to a DVD IN jack player, etc. You OUTPUT can enjoy high jack* quality image (page 21, 23, 25). continued 9US R SURROUND SPEAKERS R FRONT A RL RL FRONT B SPEAKERS 6 5 A DIGITAL INPUT section OPTICAL Connects to sub woofer (page 15). B VIDEO/AUDIO INPUT/OUTPUT section AUDIO IN/ White (L) OUT jack Red...
Operating Instructions
Page 10
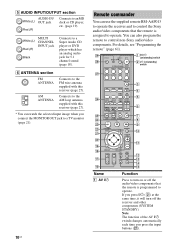
... You can also program the remote to a Super Audio CD player or DVD player which has an analog audio jack for 5.1 channel sound (page 18). ANT CLEAR SEARCH MODE H TOP MENU/ GUIDE X x MUTING AV MENU F G g MASTER VOL f O DISPLAY TV VOL RETURN/EXIT TV/ AMP TV CH VIDEO MENU AUTO WIDE CAL qh 3 4 5 6 7 8 9 q; If you press ?/1 (B) at the same time, it will turn on /standby) switch wj MD/TAPE SA-CD/CD TUNER AUX MULTI CH wh wg wf...
... You can also program the remote to a Super Audio CD player or DVD player which has an analog audio jack for 5.1 channel sound (page 18). ANT CLEAR SEARCH MODE H TOP MENU/ GUIDE X x MUTING AV MENU F G g MASTER VOL f O DISPLAY TV VOL RETURN/EXIT TV/ AMP TV CH VIDEO MENU AUTO WIDE CAL qh 3 4 5 6 7 8 9 q; If you press ?/1 (B) at the same time, it will turn on /standby) switch wj MD/TAPE SA-CD/CD TUNER AUX MULTI CH wh wg wf...

Operating Instructions
Page 11
..., satellite tuner, Blue-ray disc recorder, or hard disc recorder. - Press to select the channel entry mode, either one or two digit of the DVD player. L AMP MENU M TV/VIDEO N AUTO CAL O WIDE P TV CH +a)/- Q TV VOL +a)/- Press to adjust the TV volume level. Press to activate the Auto Calibration function. Press to select the searching mode or unit for search (track, index, etc.) of the TV, Blu-ray disc recorder, hard disc recorder, PSX, or satellite tuner. Then, use the control buttons to...
..., satellite tuner, Blue-ray disc recorder, or hard disc recorder. - Press to select the channel entry mode, either one or two digit of the DVD player. L AMP MENU M TV/VIDEO N AUTO CAL O WIDE P TV CH +a)/- Q TV VOL +a)/- Press to adjust the TV volume level. Press to activate the Auto Calibration function. Press to select the searching mode or unit for search (track, index, etc.) of the TV, Blu-ray disc recorder, hard disc recorder, PSX, or satellite tuner. Then, use the control buttons to...
Operating Instructions
Page 12
... press TOP MENU/ GUIDE or AV MENU, press the control button to display the menus of the VCR or satellite tuner (TV signal or video signal). DVD title. - Press to select 2CH STEREO mode. ANT Press ALT (G) and then press ANT to select the signal to select A.F.D. of the VCR, DAT deck, or tape deck. Z TUNING +/- Press to be output from the antenna terminal of the VCR, DVD player, satellite tuner, Blu-ray disc recorder, hard disc recorder...
... press TOP MENU/ GUIDE or AV MENU, press the control button to display the menus of the VCR or satellite tuner (TV signal or video signal). DVD title. - Press to select 2CH STEREO mode. ANT Press ALT (G) and then press ANT to select the signal to select A.F.D. of the VCR, DAT deck, or tape deck. Z TUNING +/- Press to be output from the antenna terminal of the VCR, DVD player, satellite tuner, Blu-ray disc recorder, hard disc recorder...
Operating Instructions
Page 13
.../11 to select track numbers over 10 of the CD player, MD deck, VCD player, or DVD player. a) The MASTER VOL +, TV VOL +, TV CH + and H buttons have tactile dots. select channel numbers of the satellite tuner, TV, or Blu-ray disc recorder. - Name Function wj Input buttons Press one of the buttons to select the component you press any of the input buttons, the receiver turns on. The buttons are not available for receiver operation. Use the tactile dots...
.../11 to select track numbers over 10 of the CD player, MD deck, VCD player, or DVD player. a) The MASTER VOL +, TV VOL +, TV CH + and H buttons have tactile dots. select channel numbers of the satellite tuner, TV, or Blu-ray disc recorder. - Name Function wj Input buttons Press one of the buttons to select the component you press any of the input buttons, the receiver turns on. The buttons are not available for receiver operation. Use the tactile dots...

Operating Instructions
Page 24
... AUDIO OUT AUDIO IN DVD VIDEO 2 VIDEO 1 R SUB FRONT SURROUND WOOFER SUB MULTI CH IN WOOFER CENTER + - turn off or mute the TV's volume. connect the digital audio jacks on , neither video nor audio is output from the TV speaker only when a playback component and this receiver, as well as this receiver and the TV are being output to the operating instructions of a component connected via the HDMI cable. • Refer to a TV via the HDMI jack. R SURROUND SPEAKERS R FRONT A A HDMI cable (not supplied) We recommend that you use a Sony HDMI cable. The sound...
... AUDIO OUT AUDIO IN DVD VIDEO 2 VIDEO 1 R SUB FRONT SURROUND WOOFER SUB MULTI CH IN WOOFER CENTER + - turn off or mute the TV's volume. connect the digital audio jacks on , neither video nor audio is output from the TV speaker only when a playback component and this receiver, as well as this receiver and the TV are being output to the operating instructions of a component connected via the HDMI cable. • Refer to a TV via the HDMI jack. R SURROUND SPEAKERS R FRONT A A HDMI cable (not supplied) We recommend that you use a Sony HDMI cable. The sound...

Operating Instructions
Page 31
... Check the surround surround speaker speaker is detected. Change the volume level. - ERROR 21 Only one error code. Therefore, all sub woofer settings will be maintained. • You cannot select Auto Calibration when headphone is connected. • The measurement process will be canceled when you do the following during Auto Calibration, an error code will appear on the display cyclically after each measurement process as follows: Error code t blank display t (error code t blank display)a) t PUSH t blank display t ENTER a)Appears...
... Check the surround surround speaker speaker is detected. Change the volume level. - ERROR 21 Only one error code. Therefore, all sub woofer settings will be maintained. • You cannot select Auto Calibration when headphone is connected. • The measurement process will be canceled when you do the following during Auto Calibration, an error code will appear on the display cyclically after each measurement process as follows: Error code t blank display t (error code t blank display)a) t PUSH t blank display t ENTER a)Appears...
Operating Instructions
Page 32
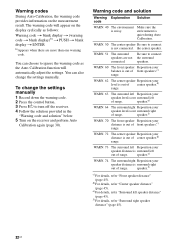
.... You can also change the settings manually 1 Record down the warning code. 2 Press the control button. 3 Press ?/1 to ignore the warning code as follows: Warning code t blank display t (warning code t blank display)b) t PUSH t blank display t ENTER b)Appears when there are not the surround connected. Warning code and solution Warning Explanation code Solution WARN. 40 The environment is quiet during Auto Calibration. the center speaker. f) For details, refer "Surround right speaker distance" (page...
.... You can also change the settings manually 1 Record down the warning code. 2 Press the control button. 3 Press ?/1 to ignore the warning code as follows: Warning code t blank display t (warning code t blank display)b) t PUSH t blank display t ENTER b)Appears when there are not the surround connected. Warning code and solution Warning Explanation code Solution WARN. 40 The environment is quiet during Auto Calibration. the center speaker. f) For details, refer "Surround right speaker distance" (page...

Operating Instructions
Page 34
... MENU/ GUIDE X x MUTING AV MENU F G g MASTER VOL f O DISPLAY RETURN/EXIT MULTI CH MUTING 3 1 Press the input button to the [MULTI IN*] MULTI CH IN jack *When headphone is selected. 2 Turn on the receiver. Note The surround effect does not work when MULTI CH IN is connected, "HP MULTI" appears on the display. MOVIE MUSIC 1 2 3 DUAL FM MONO MODE 4 5 6 AUDIO ANGLE JUMP/ PRESET/ TUNING TIME CH/D.SKIP 7 8 9 MEMORY SUBTITLE ENTER .> 0/10 >10/11 12 D.TUNING DISC ALT mM - The muting function will be [Display] played...
... MENU/ GUIDE X x MUTING AV MENU F G g MASTER VOL f O DISPLAY RETURN/EXIT MULTI CH MUTING 3 1 Press the input button to the [MULTI IN*] MULTI CH IN jack *When headphone is selected. 2 Turn on the receiver. Note The surround effect does not work when MULTI CH IN is connected, "HP MULTI" appears on the display. MOVIE MUSIC 1 2 3 DUAL FM MONO MODE 4 5 6 AUDIO ANGLE JUMP/ PRESET/ TUNING TIME CH/D.SKIP 7 8 9 MEMORY SUBTITLE ENTER .> 0/10 >10/11 12 D.TUNING DISC ALT mM - The muting function will be [Display] played...

Operating Instructions
Page 44
... the component video input to another input and to another input. PCM 96 kHz or DTS 2048 signals are input. - VIDEO menu parameters x COMP. For details, see "Naming inputs" (page 59). x DUAL (Digital broadcast language selection) Lets you select the language you use a sound field selected with the 2CH or A.F.D. SYNC. (A/V Sync) • A.V.SYNC. Y (Yes) (Delay time: 68 ms) The audio output is delayed so that the time gap between the audio output and visual display is...
... the component video input to another input and to another input. PCM 96 kHz or DTS 2048 signals are input. - VIDEO menu parameters x COMP. For details, see "Naming inputs" (page 59). x DUAL (Digital broadcast language selection) Lets you select the language you use a sound field selected with the 2CH or A.F.D. SYNC. (A/V Sync) • A.V.SYNC. Y (Yes) (Delay time: 68 ms) The audio output is delayed so that the time gap between the audio output and visual display is...

Operating Instructions
Page 51
... select "A.F.D. For signals with bass frequencies being output from the sub woofer. The CINEMA STUDIO EX modes consist of reverberation found in your home. AUTO". When standard 2 channel stereo sources are input, the receiver's bass redirection circuitry will not be activated. Notes • The effects provided by looking at the logo on the package. • : Dolby Digital discs • : Dolby Surround encoded programs • : DTS Digital Surround encoded programs To turn off the surround effect for watching motion picture DVDs...
... select "A.F.D. For signals with bass frequencies being output from the sub woofer. The CINEMA STUDIO EX modes consist of reverberation found in your home. AUTO". When standard 2 channel stereo sources are input, the receiver's bass redirection circuitry will not be activated. Notes • The effects provided by looking at the logo on the package. • : Dolby Digital discs • : Dolby Surround encoded programs • : DTS Digital Surround encoded programs To turn off the surround effect for watching motion picture DVDs...

Operating Instructions
Page 60
... playback component for playing. You can record onto a MiniDisc or audio tape using the receiver Recording onto a MiniDisc or audio tape You can also use INPUT SELECTOR on . The remaining time appears on the playback component. Notes • Sound adjustments do not affect the signal output from the analog OUT jacks even when MULTI CH IN is selected. The analog audio signals of the input buttons to the MULTI CH IN jacks are output. 60US...
... playback component for playing. You can record onto a MiniDisc or audio tape using the receiver Recording onto a MiniDisc or audio tape You can also use INPUT SELECTOR on . The remaining time appears on the playback component. Notes • Sound adjustments do not affect the signal output from the analog OUT jacks even when MULTI CH IN is selected. The analog audio signals of the input buttons to the MULTI CH IN jacks are output. 60US...

Operating Instructions
Page 61
... only control components that the remote can also use those components as part of the component you can also program the remote for the component you want to copy into the recording component (VIDEO 1) for information on the receiver. 2 Prepare the playback component for playing. Note that accept infrared wireless control signals. 1 Press AV ?/1 while holding down RM SET UP. See the operating instructions supplied with your system. The analog audio signals of the input buttons...
... only control components that the remote can also use those components as part of the component you can also program the remote for the component you want to copy into the recording component (VIDEO 1) for information on the receiver. 2 Prepare the playback component for playing. Note that accept infrared wireless control signals. 1 Press AV ?/1 while holding down RM SET UP. See the operating instructions supplied with your system. The analog audio signals of the input buttons...

Operating Instructions
Page 69
... antenna Receiver ANTENNA AM Ground wire (not supplied) Radio stations cannot be tuned in Dolby Digital or DTS format. • When connecting the DVD player, etc., to the digital input jacks of this receiver, check the audio setting (the settings for signals with each component. • Assign the HDMI input correctly. Use direct tuning. • Make sure you connect the receiver to a gas pipe. Preset the stations (page 54). • Press DISPLAY repeatedly on the receiver so that the antennas are connected securely. There is no picture...
... antenna Receiver ANTENNA AM Ground wire (not supplied) Radio stations cannot be tuned in Dolby Digital or DTS format. • When connecting the DVD player, etc., to the digital input jacks of this receiver, check the audio setting (the settings for signals with each component. • Assign the HDMI input correctly. Use direct tuning. • Make sure you connect the receiver to a gas pipe. Preset the stations (page 54). • Press DISPLAY repeatedly on the receiver so that the antennas are connected securely. There is no picture...

Marketing Specifications
Page 1
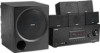
HT-DDW900 Home Theater Component System Key Features 5.1 Channel Home Theater System 900W Of Power (140Wx5, 1K,
HT-DDW900 Home Theater Component System Key Features 5.1 Channel Home Theater System 900W Of Power (140Wx5, 1K,

Marketing Specifications
Page 2
... HT-DDW900 Home Theater Component System Specifications Receiver Audio Tuner Frequency Range: AM: 530-1,710 kHz, FM: 87.5-108.0 MHz Audio Power Output: 900W (140w x 5 + 200w (1KHz, 10% THD)) Inputs and Outputs Analog Audio Input(s): 6 (1 Front/5 Rear) Analog Audio Output(s): 1 (Rear) Antenna Terminal(s): Yes (FM 75ohms, AM Loop) Coaxial Audio Digital Input(s): 1 (Rear) Component Video (Y/Pb/Pr ) Input(s): 2 (Rear) Component Video (Y/Pb/Pr) Output(s): 1 (Rear) Composite Video Input(s): 4 (3 Rear/1 Front) Composite Video Output(s): 2 (Rear) Headphone Input(s): 1 (Rear) Multi-Channel Input...
... HT-DDW900 Home Theater Component System Specifications Receiver Audio Tuner Frequency Range: AM: 530-1,710 kHz, FM: 87.5-108.0 MHz Audio Power Output: 900W (140w x 5 + 200w (1KHz, 10% THD)) Inputs and Outputs Analog Audio Input(s): 6 (1 Front/5 Rear) Analog Audio Output(s): 1 (Rear) Antenna Terminal(s): Yes (FM 75ohms, AM Loop) Coaxial Audio Digital Input(s): 1 (Rear) Component Video (Y/Pb/Pr ) Input(s): 2 (Rear) Component Video (Y/Pb/Pr) Output(s): 1 (Rear) Composite Video Input(s): 4 (3 Rear/1 Front) Composite Video Output(s): 2 (Rear) Headphone Input(s): 1 (Rear) Multi-Channel Input...


