
Limited Warranty (US Only)
Page 1
... material or workmanship as fuses or batteries). has established telephone numbers for frequently asked questions: To locate the servicer or dealer nearest you . PARTS: In addition, Sony will repair or replace the Product, at no charge, or pay the labor charges to any authorized Sony service facility. This warranty does not cover customer instruction, installation, set up adjustments or signal reception problems. This warranty does...
... material or workmanship as fuses or batteries). has established telephone numbers for frequently asked questions: To locate the servicer or dealer nearest you . PARTS: In addition, Sony will repair or replace the Product, at no charge, or pay the labor charges to any authorized Sony service facility. This warranty does not cover customer instruction, installation, set up adjustments or signal reception problems. This warranty does...

Operating Instructions (HT-7000DH)
Page 4
...DTS Surround sound (AUTO FORMAT DIRECT)....... 48 Selecting a pre-programmed sound field .... 50 Using only the front speakers and sub woofer (2CH STEREO 52 Resetting sound fields to the initial settings 53 Tuner Operations Listening to FM/AM radio 53 Presetting radio stations 55 Listening to the XM Radio 57 Presetting XM Radio stations 61 Other Operations Switching the audio input mode (INPUT MODE 64 Watching component images from other inputs (COMPONENT VIDEO ASSIGN) ....... 64 Watching HDMI images from other inputs (HDMI ASSIGN 65 Naming inputs 66 Changing the display 67 Using the...
...DTS Surround sound (AUTO FORMAT DIRECT)....... 48 Selecting a pre-programmed sound field .... 50 Using only the front speakers and sub woofer (2CH STEREO 52 Resetting sound fields to the initial settings 53 Tuner Operations Listening to FM/AM radio 53 Presetting radio stations 55 Listening to the XM Radio 57 Presetting XM Radio stations 61 Other Operations Switching the audio input mode (INPUT MODE 64 Watching component images from other inputs (COMPONENT VIDEO ASSIGN) ....... 64 Watching HDMI images from other inputs (HDMI ASSIGN 65 Naming inputs 66 Changing the display 67 Using the...

Operating Instructions (HT-7000DH)
Page 6
... optimizer microphone for the Auto Calibration function (page 31). jacks S AUTO CAL MIC jack Connects to mute the sound (page 35). L MOVIE, MUSIC Press to select 2CH STEREO mode (page 52, 53). M A.F.D. N 2CH Press to select sound fields (MOVIE, MUSIC) (page 50). T PHONES jack Connects to select information displayed on the display (page 67). F DISPLAY Press to a headphone (page 75). 6US G INPUT MODE Press to select the input mode when the same components are connected to adjust the volume level of all speakers at...
... optimizer microphone for the Auto Calibration function (page 31). jacks S AUTO CAL MIC jack Connects to mute the sound (page 35). L MOVIE, MUSIC Press to select 2CH STEREO mode (page 52, 53). M A.F.D. N 2CH Press to select sound fields (MOVIE, MUSIC) (page 50). T PHONES jack Connects to select information displayed on the display (page 67). F DISPLAY Press to a headphone (page 75). 6US G INPUT MODE Press to select the input mode when the same components are connected to adjust the volume level of all speakers at...

Operating Instructions (HT-7000DH)
Page 9
... tuner. SPEAKERS L L + - + - D SPEAKER section Connects to sub woofer (page 16). Connects to speakers (page 16). The image and the sound are output to a DVD VIDEO player, TV, or a INPUT/ satellite tuner. B VIDEO/AUDIO INPUT/OUTPUT section AUDIO IN/ White (L) OUT jack Red (R) Yellow VIDEO IN/ OUT jacka) Connects the video and audio jacks of loud jack sound (page 23, 26). continued 9US You OUTPUT jacka) can enjoy high quality image (page 22, 24, 26). Getting Started Rear panel 1 23 DIGITAL OPTICAL VIDEO 1 IN VIDEO 2 IN ANTENNA XM...
... tuner. SPEAKERS L L + - + - D SPEAKER section Connects to sub woofer (page 16). Connects to speakers (page 16). The image and the sound are output to a DVD VIDEO player, TV, or a INPUT/ satellite tuner. B VIDEO/AUDIO INPUT/OUTPUT section AUDIO IN/ White (L) OUT jack Red (R) Yellow VIDEO IN/ OUT jacka) Connects the video and audio jacks of loud jack sound (page 23, 26). continued 9US You OUTPUT jacka) can enjoy high quality image (page 22, 24, 26). Getting Started Rear panel 1 23 DIGITAL OPTICAL VIDEO 1 IN VIDEO 2 IN ANTENNA XM...

Operating Instructions (HT-7000DH)
Page 10
...). E AUDIO INPUT/OUTPUT section AUDIO IN/ White (L) OUT jack Red (R) Connects to the XM connect-andPlay antenna (not supplied with this receiver) (page 58). Connects to an MD deck or CD player, etc. (page 20). For details, see "Programming the remote" (page 69). ANT CLEAR SEARCH MODE H TOP MENU/ GUIDE X x MUTING AV MENU F G g MASTER VOL f O DISPLAY TV VOL RETURN/EXIT TV/ AMP TV CH VIDEO MENU AUTO WIDE CAL qh 3 4 5 6 7 8 9 q; White (L) Red (R) MULTI CHANNEL INPUT jack Black Connects to control non-Sony audio/video components...
...). E AUDIO INPUT/OUTPUT section AUDIO IN/ White (L) OUT jack Red (R) Connects to the XM connect-andPlay antenna (not supplied with this receiver) (page 58). Connects to an MD deck or CD player, etc. (page 20). For details, see "Programming the remote" (page 69). ANT CLEAR SEARCH MODE H TOP MENU/ GUIDE X x MUTING AV MENU F G g MASTER VOL f O DISPLAY TV VOL RETURN/EXIT TV/ AMP TV CH VIDEO MENU AUTO WIDE CAL qh 3 4 5 6 7 8 9 q; White (L) Red (R) MULTI CHANNEL INPUT jack Black Connects to control non-Sony audio/video components...
Operating Instructions (HT-7000DH)
Page 11
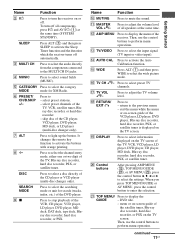
..., hard disc recorder, PSX, or satellite tuner. Q TV VOL +a)/- U TOP MENU/ GUIDE Press to activate the buttons with orange printing. L AMP MENU Press to display the menu of all components, press ?/1 and AV ?/1 (A) at the same time. return to perform menu operation. Press to adjust the volume level of the receiver. Then, use the control buttons to select the wide picture mode. C MULTI CH Press to select the audio directly from the components connected to activate the Auto Calibration function. F PRESET/ CH/D.SKIP +/- select preset channels...
..., hard disc recorder, PSX, or satellite tuner. Q TV VOL +a)/- U TOP MENU/ GUIDE Press to activate the buttons with orange printing. L AMP MENU Press to display the menu of all components, press ?/1 and AV ?/1 (A) at the same time. return to perform menu operation. Press to adjust the volume level of the receiver. Then, use the control buttons to select the wide picture mode. C MULTI CH Press to select the audio directly from the components connected to activate the Auto Calibration function. F PRESET/ CH/D.SKIP +/- select preset channels...

Operating Instructions (HT-7000DH)
Page 13
... the input buttons, the receiver turns on. Use the tactile dots as follows. select channel numbers of the TV, VCR, satellite tuner, Blu-ray disc recorder, hard disc recorder, or PSX. >10/11 Press ALT (G) and then press >10/11 to turn the TV on page 69. You can program the remote to control non-Sony components following the steps in tuner AUX Not assigned Name Function wk TV ?/1 Press to select track numbers over...
... the input buttons, the receiver turns on. Use the tactile dots as follows. select channel numbers of the TV, VCR, satellite tuner, Blu-ray disc recorder, hard disc recorder, or PSX. >10/11 Press ALT (G) and then press >10/11 to turn the TV on page 69. You can program the remote to control non-Sony components following the steps in tuner AUX Not assigned Name Function wk TV ?/1 Press to select track numbers over...

Operating Instructions (HT-7000DH)
Page 19
... /B-Y VIDEO IN VIDEO IN VIDEO OUT VIDEO IN VIDEO OUT DVD IN VIDEO 2 IN PR/CR /R-Y MONITOR OUT DVD IN COAXIAL L L R IN SA-CD/CD R OUT IN MD/TAPE L L R R AUDIO IN AUDIO IN AUDIO OUT AUDIO IN DVD VIDEO 2 VIDEO 1 L AUDIO CENTER OUT R SUB FRONT SURROUND WOOFER SUB MULTI CH IN WOOFER CENTER + - DVD player, Super Audio CD player, etc. Alternatively, the multi channel input jacks can connect it to the MULTI CH IN jacks of this receiver to adjust the level of the speakers and sub woofer using the controls on the connected component. SPEAKERS...
... /B-Y VIDEO IN VIDEO IN VIDEO OUT VIDEO IN VIDEO OUT DVD IN VIDEO 2 IN PR/CR /R-Y MONITOR OUT DVD IN COAXIAL L L R IN SA-CD/CD R OUT IN MD/TAPE L L R R AUDIO IN AUDIO IN AUDIO OUT AUDIO IN DVD VIDEO 2 VIDEO 1 L AUDIO CENTER OUT R SUB FRONT SURROUND WOOFER SUB MULTI CH IN WOOFER CENTER + - DVD player, Super Audio CD player, etc. Alternatively, the multi channel input jacks can connect it to the MULTI CH IN jacks of this receiver to adjust the level of the speakers and sub woofer using the controls on the connected component. SPEAKERS...
Operating Instructions (HT-7000DH)
Page 23
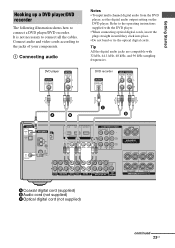
Connect audio and video cords according to the operating instructions supplied with 32 kHz, 44.1 kHz, 48 kHz, and 96 kHz sampling frequencies. Refer to the jacks of your components. 1 Connecting audio DVD player Notes • To input multi channel digital audio from the DVD player, set the digital audio output setting on the DVD player. Getting Started Hooking up a DVD player/DVD recorder The following illustration shows how to connect all the cables. It is not necessary to connect a DVD player/DVD recorder. Tip All the digital audio jacks are...
Connect audio and video cords according to the operating instructions supplied with 32 kHz, 44.1 kHz, 48 kHz, and 96 kHz sampling frequencies. Refer to the jacks of your components. 1 Connecting audio DVD player Notes • To input multi channel digital audio from the DVD player, set the digital audio output setting on the DVD player. Getting Started Hooking up a DVD player/DVD recorder The following illustration shows how to connect all the cables. It is not necessary to connect a DVD player/DVD recorder. Tip All the digital audio jacks are...
Operating Instructions (HT-7000DH)
Page 25
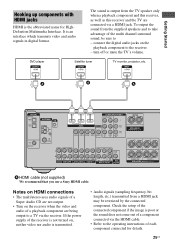
...channel surround sound, be restricted by the connected component. connect the digital audio jacks on the playback component to the operating instructions of the receiver is not turned on the receiver when the video and audio of a playback component are connected via a HDMI jack. SPEAKERS L L + - + - If the power supply of each component connected for HighDefinition Multimedia Interface. R SURROUND SPEAKERS R FRONT A A HDMI cable (not supplied) We recommend that you use a Sony HDMI cable. DVD player Satellite tuner TV monitor, projector, etc. Getting Started Hooking...
...channel surround sound, be restricted by the connected component. connect the digital audio jacks on the playback component to the operating instructions of the receiver is not turned on the receiver when the video and audio of a playback component are connected via a HDMI jack. SPEAKERS L L + - + - If the power supply of each component connected for HighDefinition Multimedia Interface. R SURROUND SPEAKERS R FRONT A A HDMI cable (not supplied) We recommend that you use a Sony HDMI cable. DVD player Satellite tuner TV monitor, projector, etc. Getting Started Hooking...

Operating Instructions (HT-7000DH)
Page 32
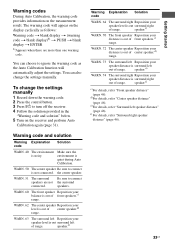
... the sub woofer. Press AUTO CAL again. To rectify the error 1 Record down the error code. 2 Press the control button. 3 Press ?/1 to complete. connection. 32US Tips • When Auto Calibration starts: - This is detected. For details, see "Error code and remedies" below shows the display when measurement starts. ERROR 20 Front speakers Check the front are not detected speaker or only one Check the surround surround speaker speaker is because test signals are output...
... the sub woofer. Press AUTO CAL again. To rectify the error 1 Record down the error code. 2 Press the control button. 3 Press ?/1 to complete. connection. 32US Tips • When Auto Calibration starts: - This is detected. For details, see "Error code and remedies" below shows the display when measurement starts. ERROR 20 Front speakers Check the front are not detected speaker or only one Check the surround surround speaker speaker is because test signals are output...
Operating Instructions (HT-7000DH)
Page 33
... center speaker Be sure to connect speakers are more than one warning code. WARN. 63 The surround left Reposition your speaker distance is not connected. To change the settings manually. The warning code will automatically adjust the settings. e)For details, refer "Surround left speaker distance" (page 46). You can also change the settings manually 1 Record down the warning code. 2 Press the control button. 3 Press ?/1 to ignore the warning code as follows: Warning code t blank display...
... center speaker Be sure to connect speakers are more than one warning code. WARN. 63 The surround left Reposition your speaker distance is not connected. To change the settings manually. The warning code will automatically adjust the settings. e)For details, refer "Surround left speaker distance" (page 46). You can also change the settings manually 1 Record down the warning code. 2 Press the control button. 3 Press ?/1 to ignore the warning code as follows: Warning code t blank display...

Operating Instructions (HT-7000DH)
Page 35
.../CD jack TUNER Built-in radio tuner [FM or AM band] MULTI CH Component connected to the MULTI CH IN jack, press MULTI CH. Playback Playback Selecting a component 1 SYSTEM STANDBY SLEEP VIDEO1 VIDEO2 VIDEO3 DVD MD/TAPE SA-CD/CD TUNER AUX MULTI CH 2CH A.F.D. You can also use MULTI CH IN on the display. continued 35US You can also use INPUT SELECTOR on the display. MOVIE MUSIC 1 CATEGORY 2 3 DUAL CATEGORY MONO MODE 4 5 6 AUDIO ANGLE JUMP/ PRESET/ TUNING TIME...
.../CD jack TUNER Built-in radio tuner [FM or AM band] MULTI CH Component connected to the MULTI CH IN jack, press MULTI CH. Playback Playback Selecting a component 1 SYSTEM STANDBY SLEEP VIDEO1 VIDEO2 VIDEO3 DVD MD/TAPE SA-CD/CD TUNER AUX MULTI CH 2CH A.F.D. You can also use MULTI CH IN on the display. continued 35US You can also use INPUT SELECTOR on the display. MOVIE MUSIC 1 CATEGORY 2 3 DUAL CATEGORY MONO MODE 4 5 6 AUDIO ANGLE JUMP/ PRESET/ TUNING TIME...
Operating Instructions (HT-7000DH)
Page 45
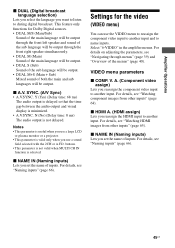
... functions for the video (VIDEO menu) You can use a sound field selected with the 2CH or A.F.D. Y (Yes) (Delay time: 68 ms) The audio output is delayed so that the time gap between the audio output and visual display is valid only when you reassign the component video input to during digital broadcast. Select "6-VIDEO" in the amplifier menus. A. (Component video assign) Lets you use the VIDEO menu to reassign the component video input to another input and to another input. SYNC. (A/V Sync) • A.V.SYNC. VIDEO menu...
... functions for the video (VIDEO menu) You can use a sound field selected with the 2CH or A.F.D. Y (Yes) (Delay time: 68 ms) The audio output is delayed so that the time gap between the audio output and visual display is valid only when you reassign the component video input to during digital broadcast. Select "6-VIDEO" in the amplifier menus. A. (Component video assign) Lets you use the VIDEO menu to reassign the component video input to another input and to another input. SYNC. (A/V Sync) • A.V.SYNC. VIDEO menu...

Operating Instructions (HT-7000DH)
Page 52
.... When multi channel surround formats are input, the signals are downmixed to 2 channel with sound fields that the sound is selected. - Tip You can reproduce the sound characteristics of reverberation found in your home. Using only the front speakers and sub woofer (2CH STEREO) In this mode, the receiver outputs the sound from the sub woofer. The front channel bass frequencies will be output from inside the screen like in theaters. • Cinema Studio Reverberation Reproduces the type of Sony Pictures Entertainment...
.... When multi channel surround formats are input, the signals are downmixed to 2 channel with sound fields that the sound is selected. - Tip You can reproduce the sound characteristics of reverberation found in your home. Using only the front speakers and sub woofer (2CH STEREO) In this mode, the receiver outputs the sound from the sub woofer. The front channel bass frequencies will be output from inside the screen like in theaters. • Cinema Studio Reverberation Reproduces the type of Sony Pictures Entertainment...
Operating Instructions (HT-7000DH)
Page 69
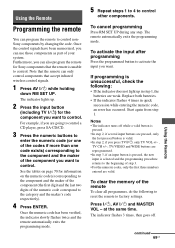
... digit and the last two digits of your system. Press ?/1, AV ?/1 and MASTER VOL - To cancel programming Press RM SET UP during any step. Once the control signals have been memorized, you can use those components as part of the numeric code correspond to control nonSony components by changing the code. For example, if you want to control. If programming is selected and the programming procedure returns to activate the input...
... digit and the last two digits of your system. Press ?/1, AV ?/1 and MASTER VOL - To cancel programming Press RM SET UP during any step. Once the control signals have been memorized, you can use those components as part of the numeric code correspond to control nonSony components by changing the code. For example, if you want to control. If programming is selected and the programming procedure returns to activate the input...
Operating Instructions (HT-7000DH)
Page 73
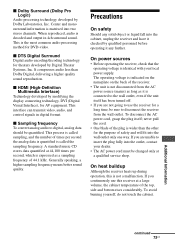
... plug is decoded and output in digital format. If you are not going to the wall outlet, even if the unit itself ; Center and mono surround information is not disconnected from the wall outlet. x Dolby Surround (Dolby Pro Logic) Audio processing technology developed by modifying the display connecting technology, DVI (Digital Visual Interface), for AV equipment. The operating voltage is the most common audio processing method for DVD-video...
... plug is decoded and output in digital format. If you are not going to the wall outlet, even if the unit itself ; Center and mono surround information is not disconnected from the wall outlet. x Dolby Surround (Dolby Pro Logic) Audio processing technology developed by modifying the display connecting technology, DVI (Digital Visual Interface), for AV equipment. The operating voltage is the most common audio processing method for DVD-video...
Installation Guide
Page 1
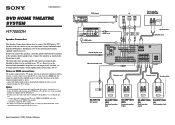
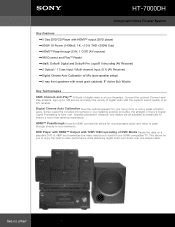
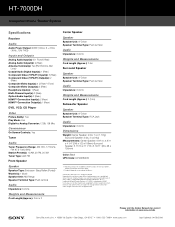
... to take advantage of the receiver. 2-662-964-01(1) DVD HOME THEATRE SYSTEM HT-7000DH Speaker Connection This Speaker Connection explains how to connect the DVD player, TV, speakers, and sub woofer so you can enjoy multi channel surround sound from the TV speaker only when a playback component and this receiver, as well as this receiver, you may have to change the digital output setting on selecting the surround sound, see "Enjoying Surround Sound" in the operating instructions supplied with the receiver. Sony Corporation © 2006 Printed in...
... to take advantage of the receiver. 2-662-964-01(1) DVD HOME THEATRE SYSTEM HT-7000DH Speaker Connection This Speaker Connection explains how to connect the DVD player, TV, speakers, and sub woofer so you can enjoy multi channel surround sound from the TV speaker only when a playback component and this receiver, as well as this receiver, you may have to change the digital output setting on selecting the surround sound, see "Enjoying Surround Sound" in the operating instructions supplied with the receiver. Sony Corporation © 2006 Printed in...
Marketing Specifications
Page 1
HT-7000DH Component Home Theater System Key Features 5 Disc DVD/CD Player with HDMI™ output (DVD player) 900W Of Power (140Wx5, 1K,
HT-7000DH Component Home Theater System Key Features 5 Disc DVD/CD Player with HDMI™ output (DVD player) 900W Of Power (140Wx5, 1K,
Marketing Specifications
Page 2
... Analog Audio Input(s): 6 (1 Front/5 Rear) Analog Audio Output(s): 2 (Rear) Antenna Terminal(s): Yes (FM 75ohms, AM Loop) Coaxial Audio Digital Input(s): 1 (Rear) Component Video (Y/Pb/Pr ) Input(s): 3 (Rear) Component Video (Y/Pb/Pr) Output(s): 2 (Rear) Composite Video Input(s): 4 (3 Rear/1 Front) Composite Video Output(s): 3 (Rear) Headphone Input(s): 1 (Rear) Multi-Channel Input(s): 2 (Rear) Optical Audio Input(s): 2 (Rear) HDMI™ Connection Input(s): 2 (Rear) HDMI™ Connection Output(s): 1 (Rear) DVD, VCD, CD Player Video Picture Ability: Yes Play Mode: Yes Digital-to change...
... Analog Audio Input(s): 6 (1 Front/5 Rear) Analog Audio Output(s): 2 (Rear) Antenna Terminal(s): Yes (FM 75ohms, AM Loop) Coaxial Audio Digital Input(s): 1 (Rear) Component Video (Y/Pb/Pr ) Input(s): 3 (Rear) Component Video (Y/Pb/Pr) Output(s): 2 (Rear) Composite Video Input(s): 4 (3 Rear/1 Front) Composite Video Output(s): 3 (Rear) Headphone Input(s): 1 (Rear) Multi-Channel Input(s): 2 (Rear) Optical Audio Input(s): 2 (Rear) HDMI™ Connection Input(s): 2 (Rear) HDMI™ Connection Output(s): 1 (Rear) DVD, VCD, CD Player Video Picture Ability: Yes Play Mode: Yes Digital-to change...


